Tabla de contenido
Publicidad
Enlaces rápidos
Top Mount No Frost Refrigerators
Réfrigérateur á Congélateur Anti Givre
Refrigeradores con Congelador Superior
sin Escarcha
User Manual
U
Model # Series PRTS, RRTG, RRTW, HTA, HRTS
Guide de l'Utilisateur
Modéle # Series PRTS, RRTG, RRTW, HTA, HRTS
Manual del Usuario
Para Modelo de # Series PRTS, RRTG, RRTW, HTA, HRTS
(Les caractéristiques et la taille Peuvent Varier par le Modèle)
(Las características y el tamaño Pueden Variar por el Modelo)
(Features and Size May Vary per Model)
Quality • Innovation • Style
Publicidad
Tabla de contenido

Manuales relacionados para Haier PRTS Serie


Resumen de contenidos para Haier PRTS Serie
- Página 1 Top Mount No Frost Refrigerators Réfrigérateur á Congélateur Anti Givre Refrigeradores con Congelador Superior sin Escarcha (Features and Size May Vary per Model) (Les caractéristiques et la taille Peuvent Varier par le Modèle) (Las características y el tamaño Pueden Variar por el Modelo) User Manual Model # Series PRTS, RRTG, RRTW, HTA, HRTS Guide de l’Utilisateur...
- Página 2 English...
-
Página 3: Safety Precautions
English S S A A F F E E T T Y Y P P R R E E C C A A U U T T I I O O N N S S Read all of the instructions before using this appliance. When using this appliance, always exercise basic safety precautions, including the following: 1) Use this appliance only for its intended purpose as described in this use... - Página 4 . . Thank you for using our Haier product.
-
Página 5: Tabla De Contenido
English Table Of Contents PAGE Safety Precautions ................1 Parts And Features ................4 Installing Your Refrigerator............5 Unpacking Your Refrigerator ..............5 Adjusting Your Refrigerator ..............5 Proper Air Circulation ................5 Electrical Requirements ................6 Door Handle Installation ..............7 Door Alignment ..................8 Reversing the Door Swing ..............8 Reversing the Door Handles ..............11 Installing Front Grill ................11 Refrigerator Features And Use ............12... -
Página 6: Parts And Features
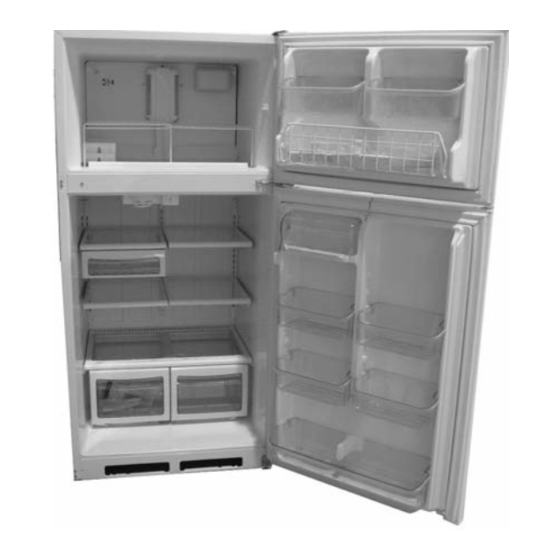
English Parts And Features Freezer Light 10. Deluxe Crisper Drawers Ice Trays (2) 11. Freezer Door Bins Freezer Shelf (size of shelves vary 12. Tilt-Out Wire Basket (some per model models only) Temperature Control 13. Dairy Compartment Interior Refrigerator Light 14. -
Página 7: Installing Your Refrigerator
English Installing Your Refrigerator Unpacking Your Refrigerator 1. Remove all packaging material. This includes the corrugated base and all adhesive tape holding the refrigerator accessories inside and outside. 2. Inspect and remove any remains of packing, tape or printed materials before powering on the refrigerator. Adjusting Your Refrigerator Leveling Your Refrigerator: •... -
Página 8: Electrical Requirements
English Electrical Requirement • Make sure there is a suitable power outlet (115 volts, 15 amps outlet) with proper grounding to power the refrigerator. • Avoid the use of three plug adapters or cutting off the third grounding pin order to accommodate a two plug outlet. This is a dangerous practice since it provides no effective grounding for the refrigerator and may result in shock hazard. -
Página 9: Door Handle Installation
English... -
Página 10: Door Alignment
English... - Página 11 English...
- Página 12 English 1. As shown in fig.5, dismantle the bottom hinge and bottom hinge pad and secure them to the left side. It is also necessary to move the bottom hinge axle from the right side of the hinge to the left side.
-
Página 13: Reversing The Door Handles
English... -
Página 14: Refrigerator Features And Use
English Refrigerator Features And Use encapsulated (see fig. #8) -
Página 15: Utility Drawer And Cover
English (see fig. #8) fig. #8 (see fig. #9) fig. #9 (see fig. #10) -
Página 16: Crisper And Crisper Cover
English (see fig. #10) fig. #10 (see fig. #11) fig. #11... - Página 17 English (see fig. #12) fig. #12 (see fig. #12) (see fig. #13)
-
Página 18: Refrigerator Door Shelves
English • LOW setting allows moist air to exit the crisper for optimum storage of fruits and/or vegetables, which have skins. • HIGH setting retains moist air in the crisper for optimum storage of fresh, leafy vegetables. High High/Low fig. #13 fig. -
Página 19: Light Bulb Replacement
English (see fig. #15) fig. #15 Light Bulb Replacement fig. #16 Refrigerator 1. Unplug power to the refrigerator. 2. Remove the highest shelf. 3. Allow light bulb to cool before removing. 4. Remove the bulb by turning it counter clockwise. 5. -
Página 20: Food Storage Information
English... - Página 21 English Plastic containers with air tight lids Heavy duty aluminum foil Plastic wrap made from plastic film wrap Self-sealing plastic bags • Do not refreeze defrosted/thawed foods. • It is recommended that the freezing date be marked on the packaging.
-
Página 22: Normal Operating Sounds
English... -
Página 23: Proper Refrigerator Care And Cleaning
English Proper Refrigerator Care and Cleaning... -
Página 24: Power Interruptions
English “General cleaning” section pg. 21. -
Página 25: Troubleshooting
English TroubleShooting in “defrost” mode and must complete this cycle before compressor starts to operate. - Página 26 English • Check front to back slope is approx. 1/4”.
-
Página 27: Warranty Information
English... - Página 28 Francais...
- Página 29 Francais 12) Ne pas utiliser les outils électriques de pouvoir pour les installations de poignée, plutôt utiliser des tournevis réguliers.
- Página 30 Francais...
- Página 31 Francais Table des Matiéres PAGE Mesures de sécurité ................1 Pièces et Caractéristiques de I’Appareil ..........5 Installation du Réfrigérateur..............6 Désemballage du Réfrigérateur ..............6 Réglages du Réfrigérateur ................6 Circulation d’Air Adéquate ................6 Caractéristiques Electriques ................7 Installation de la Poignée de Porte ..............8 Inverser I’Ouverture de la Porte ..............9 Inverser les Poignées de Porte ..............12 Le Gril installant de Devant ..............12...
-
Página 32: Pièces Et Caractéristiques De L'appareil
Francais Pièces et Caractéristiques de l’appareil 1. Ampoule de Congélateur. 11. Huche du congélateur de la 2. Plateau de glace. porte 3. Étagères du congélateur (Le type 12. Inclinaisons pour panier (sur et la quantité varient en fonction certains du modèle du Bac á glace) du modèle). - Página 33 Francais...
- Página 34 Francais...
- Página 35 Francais...
- Página 36 Francais...
- Página 37 Francais...
- Página 38 Francais 1. Comme montré dans la figue 5, démontez la charnière de fond et le bloc de charnière de fond et protégez-les au côté gauche. Il est aussi nécessaire de déplacer l'axe de charnière de fond du côté juste de la charnière au côté gauche. NOTEZ : si la porte appropriée est trop serrée entre le fond et les charnières de cen tre après le fait de les déplacer au côté...
- Página 39 Francais...
- Página 40 Francais encapsulé. Le modèle en votre possession comporte soit...
- Página 41 Francais (consulter le schéma nº8) schéma 8...
- Página 42 Francais (consulter le schéma nº9) schéma 9 schéma 9 (consulter le schéma nº10)
- Página 43 Francais (consulter le schéma nº10) schéma 10 (consulter le schéma nº11) schéma 11...
- Página 44 Francais (consulter le schéma nº12) schéma 12 (consulter le schéma nº12)
- Página 45 Francais (consulter le schéma nº13) schéma 13 (consulter le schéma nº14) schéma 14 (consulter le schéma nº14) 3. Abaisser chaque côté de l’étagere de la porte avec précaution, ce qu’elle se trouve bien en place á l’intérieur des supports de la porte du réfrigérateur.
- Página 46 Francais (consulter le schéma nº15) schéma 15 Pour Changer les Ampoules du Réfrigérateur 1. Débranchez votre réfrigérateur ou déconnectez. Schéma 16 2. Retirer I’ensemble des articles stockés sur I’étageré. 3. Laisser I’ampoule refroidir avant de la refirer. 4. Retirer I’ampoule en la dévissant dans le sens inverse des aiguilles d’une montre.
- Página 47 Francais...
- Página 48 Francais...
- Página 49 Francais...
- Página 50 Francais...
- Página 51 Francais...
- Página 52 Francais...
- Página 53 Francais •Fron de contrôle pour soutenir la pente est approximativement 1/4".
- Página 54 Francais...
- Página 55 Español...
- Página 56 Español 12) No utiliza herramientas eléctricas eléctricas para instalaciones de asidero, en lugar el uso desatornilladores regulares.
- Página 57 Español...
- Página 58 Español Indice PÁGINA Instrucciones Precautions ..............1 Indice ......................4 Partes y Funciones ................5 Instalación su refrigerador ..............6 Desempaquetado de su refrigerador ............6 Ajustamiento de su Refrigerador ..............6 Circulación Adecuada del Aire..............6 Requerimientos Eléctricos................7 Instalación de la Manija de la Puerta ............8 Alineación de la Puerta ................9 Cómo Invertir la Oscilación de la Puerta ............9 Cómo Invertir las Manijas de la Puerta............12...
-
Página 59: Partes Y Funciones
Español Partes Y Funciones 1. Luz del freezer 11. Compartimiento del fresar de 2. Cubiteras la puerta. 3. Estante del fresar (el tipo y la 12. Repisa para canasto de alam- cantidad varían con el modelo). bre (No en todas los modelos). 4. - Página 60 Español...
- Página 61 Español...
- Página 62 Español...
- Página 63 Español...
- Página 64 Español...
- Página 65 Español 1. Como mostrado en el higo 5, desmonte el gozne de fondo y la almo hadilla de gozne de fondo y asegúrelos al lado izquierdo. Es también necesario mover el árbol de gozne de fondo de la derecha del gozne al lado izquierdo.
- Página 66 Español...
- Página 67 Español encapsulé. Su modelo puede incluir entrepaños de ancho (vea la figura #8)
- Página 68 Español (vea la figura #8) fig. #8 (vea la figura #9) fig. #9 (vea la figura #10)
- Página 69 Español (vea la figura #10) fig. #10 (vea la figura #11) fig. #11...
- Página 70 Español (vea la figura #12) fig. #12 (vea la figura #12) (vea la figura #13)
-
Página 71: Entrepaños En La Puerta Del Refrigerador
Español Entrepaños en la Puerta del Refrigerador Almacenamiento de galones en la puerta: (ver la figura #14) Su refrigerador puede estar equipado con entrepaños de almacenamiento de galón en la puerta. Esta función le permitira almacenar con- tenedores tamaño galón. Para quitar los entrepaños de la puerta del refrigerador: (ver figura #14) 1. -
Página 72: Reemplazo De La Bombilla De Luz
Español (vea la figura #15) fig. #15 Reemplazo de la bombilla de luz El Refrigerador 1. Desconectar la refrigeradora. fig. #16 2. Quitar el estante más alto. 3. Deje que la bombilla enfríe antes de removerlo. 4. Quitar la bombilla girándolo hacia la derecha. 5. - Página 73 Español...
- Página 74 Español...
- Página 75 Español...
- Página 76 Español...
- Página 77 Español...
- Página 78 Español...
- Página 79 Español • La espalda de fron de cheque para inclinar es aproximadamente 1/4".
- Página 80 Español...
- Página 81 Printed in US Imprimé en US Issued: October-07 0060513454 Impreso en US...