Tabla de contenido

Publicidad

Idiomas disponibles

Idiomas disponibles

Enlaces rápidos

HOYER Handel GmbH
Tasköprüstraße 3
22761 Hamburg
GERMANY
Estado de las informaciones · Versione delle informazioni
Status of information · Stand der Informationen:
09/2021
ID: SSMS 1350 B2_21_V1.3
IAN 373122_2104
CAFETERA EXPRESO COMPACTA SSMS 1350 B2
MACCHINA PER CAFFÈ ESPRESSO SLIM
SSMS 1350 B2
ES
CAFETERA EXPRESO
COMPACTA
Instrucciones de servicio
GB
SLIM ESPRESSO MACHINE
Operating instructions
IAN 373122_2104
ES
IT
IT
MACCHINA PER CAFFÈ
ESPRESSO SLIM
Manuale di istruzioni per l'uso
DE
AT
CH
ESPRESSOMASCHINE SLIM
Bedienungsanleitung
ES
IT

Publicidad

Tabla de contenido
loading

Resumen de contenidos para Silvercrest SSMS 1350 B2

  • Página 1 CAFETERA EXPRESO COMPACTA SSMS 1350 B2 MACCHINA PER CAFFÈ ESPRESSO SLIM SSMS 1350 B2 HOYER Handel GmbH CAFETERA EXPRESO MACCHINA PER CAFFÈ Tasköprüstraße 3 COMPACTA ESPRESSO SLIM 22761 Hamburg Instrucciones de servicio Manuale di istruzioni per l'uso GERMANY Estado de las informaciones · Versione delle informazioni...
  • Página 2 Español..................2 Italiano .................. 32 English ................... 62 Deutsch .................. 90...
  • Página 3 Vista general / Panoramica / Overview / Übersicht...
  • Página 4: Tabla De Contenido

    Indice 1. Vista general ..................3 2. Uso adecuado.................4 3. Indicaciones de seguridad...............4 4. Volumen de suministro ..............8 5. Desembalaje e instalación ..............8 6. Indicaciones de los anillos LED ............8 7. Preparar un expreso: los pasos más importantes......10 8. Preparación..................10 Llenado del depósito de agua ............10 Insertar/sustituir el filtro ..............
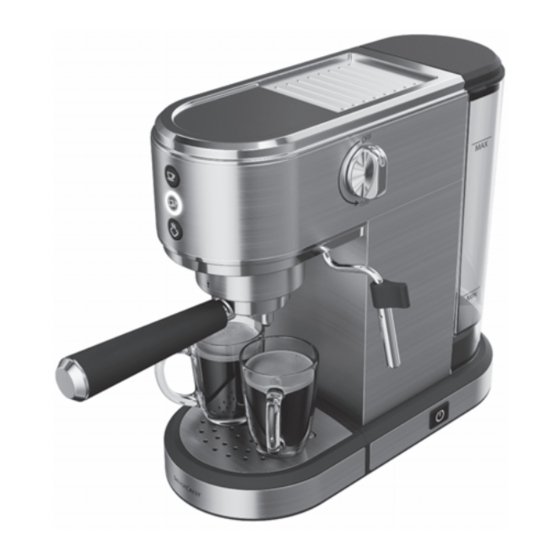
  • Página 5: Vista General

    Vista general Filtro para doble expreso Filtro para expreso sencillo Placa calefactora para tazas OFF / Interruptor giratorio para el suministro de vapor y agua caliente Tapa (del depósito de agua) Depósito de agua (cantidad de llenado: 250 ml - MAX 1.000 ml) Cable de conexión con enchufe Interruptor de encendido/apagado Prensador...
  • Página 6: Símbolos En El Aparato

    ¡Muchas gracias por su Uso adecuado confianza! La cafetera expreso Slim está diseñada ex- clusivamente para las siguientes finalidades Le felicitamos por la compra de su nueva ca- de uso: fetera expreso Slim. para preparar café expreso a partir de café...
  • Página 7: Instrucciones Para Un Funcionamiento Seguro

    Instrucciones para un funcionamiento seguro  Este aparato puede ser utilizado por niños mayores de 8 años y por personas con las capacidades físicas, sensoriales o mentales disminuidas o que carezcan de la experiencia y/o los conocimien- tos necesarios, bajo supervisión o habiendo recibido las instruccio- nes oportunas para el uso seguro del aparato y siendo conscientes del peligro de un uso incorrecto.
  • Página 8: Si El Cable De Conexión Del Aparato Presenta Desperfectos, Deberá

     Si el cable de conexión del aparato presenta desperfectos, deberá ser sustituido únicamente por el fabricante, el servicio postventa u otras personas igualmente cualificadas, para evitar peligros.  Tenga en cuenta el capítulo dedicado a la limpieza (véase "Limpie- za"...
  • Página 9: Advertencia Sobre Daños

     Durante el uso del aparato, vigile que ¡PELIGRO de irritación en no se presione ni se aplaste el cable de los ojos! conexión.  Al manipular el producto descalcifica-  Para extraer el enchufe de la toma de dor incluido en el suministro, tenga en corriente, tire siempre de la clavija, cuenta la información suministrada, nunca del cable.
  • Página 10: Volumen De Suministro

    Volumen de 4. Limpie todas las piezas antes del primer uso (véase "Limpieza" en la suministro página 22). 1 cafetera expreso 5. Coloque el aparato sobre una superfi- 1 portafiltros 16 cie seca, lisa y antideslizante. Se reco- 1 filtro para expreso sencillo 2 mienda una superficie de trabajo lisa a 1 filtro para doble expreso 1 la que puedan adherirse los soportes...
  • Página 11 Indicaciones de los anillos LED Significado  17  18  19 Se prepara un expreso sencillo. parpadea — — Interruptor giratorio 4 abierto: suministro de agua caliente — parpadea — Se prepara un doble expreso. El aparato se precalienta para el suministro de —...
  • Página 12: Preparar Un Expreso: Los Pasos Más Importantes

    Preparar un 2. Abra la tapa 5 del depósito de agua 6. expreso: los pasos más importantes Antes de que llegue a conocer con exactitud cada uno de los pasos en los siguientes ca- pítulos, con todos los consejos y trucos, aquí obtendrá...
  • Página 13: Rellenar Con Agua

    Insertar/sustituir el filtro 6. El depósito de agua debe quedar co- rrectamente encajado por debajo. En Su cafetera expreso cuenta con dos filtros caso necesario, presiónelo un poco ha- distintos: cia abajo. Impresión en la parte inferior: 1-cup 2-cup Filtro para expre- Filtro para doble so sencillo 2 expreso 1...
  • Página 14: Conexión, Encendido Y Apagado

    3. Inserte el enchufe 7 en una toma de co- rriente. NOTA: dado que el filtro 1 tan solo presen- 4. Pulse el interruptor de encendido/ ta un punto de relieve 21, también puede  8. apagado insertarse recto en el portafiltros 16. - Todos los anillos LED 17, 18, 19 se iluminan una vez consecutivamente.
  • Página 15: Precalentar Las Tazas

    Precalentar el filtro y la Requisito: el aparato está listo para el servi- cio. Los anillos LED 17, 18 se iluminan de cabeza de grupo forma duradera. (descarga de agua) 1. Llene el depósito de agua 6 con agua Justo antes de cada preparación, enjuague el del grifo fresca.
  • Página 16: Dosificar Y Prensar El Café Expreso En Polvo

    Dosificar y prensar superficie de trabajo y distribuir el ca- fé, p. ej., con una cucharilla sin pre- el café expreso en sión. polvo NOTAS: • Al comprar café expreso en polvo, pro- cure que el grado de molienda sea adecuado para las cafeteras con porta- 3.
  • Página 17: Preparar Un Expreso

    10. Preparar un 4. Coloque la taza precalentada bajo la salida del portafiltros 16. expreso  17. 5. Pulse la tecla  17 parpadea. - El anillo LED ¡PELIGRO de lesiones por es-  18 se apaga. - El anillo LED caldaduras! - El expreso fluye lentamente hasta la ...
  • Página 18: Consejos Para Un Expreso Perfecto

    11. Consejos para un 3. Gire el mango del portafiltros 16 hacia la derecha hasta . El portafiltros expreso perfecto debe quedar bien ajustado. Preparar un expreso perfecto no es algo que se consiga siempre a la primera. Por ese motivo, experimente un poco tranquilamen- te hasta que el resultado quede a su gusto.
  • Página 19: Suministrar Agua Caliente

    • Una extracción excesiva se recono- Puede girar la boquilla de vapor 10 hacia ce cuando el expreso gotea lentamente uno y otro lado. hasta la taza y tiene un sabor amargo. Remedio: - Utilice menos café expreso en polvo. - No ejerza tanta presión al prensar. •...
  • Página 20: Hacer Espuma De Leche

    13. Hacer espuma de hacen que la espuma de leche se des- haga. Un punto de referencia: con una leche jarrita metálica se alcanza la tempera- tura adecuada cuando las paredes late- ¡PELIGRO de lesiones por es- rales de la jarrita estén demasiado caldaduras! calientes como para sujetarla en la ma- ...
  • Página 21: Ajustes

    7. Cuando el volumen de la leche haya aumentado visiblemente (aprox. un NOTA: este proceso de enfriamiento dura 50 %), sumerja la boquilla de va- varios minutos. Si desea preparar rápida- por 10 un poco más profundamente. El mente un nuevo expreso, puede acelerar el remolino debe mantenerse.
  • Página 22: Dureza Del Agua

    14.2 Dureza del agua Requisito: se ha accedido al menú. Los 3 anillos LED 17, 18, 19 parpadean con- Como cualquier aparato que usa agua ca- secutivamente por duplicado alternándose. liente, esta cafetera expreso también se  18. 1. Pulse la tecla debe descalcificar regularmente. La cal se Los anillos LED 17, 18, 19 indican breve- deposita en el interior del aparato y en los mente el rango de dureza actual:...
  • Página 23: Temperatura Del Expreso

    14.3 Temperatura del 2. Cuando los anillos LED se iluminan con- secutivamente alternándose, pulse la te- expreso cla para el rango de temperatura Es posible modificar la temperatura del deseado: agua durante la extracción del expreso Rango de inter- para adaptarla a distintas variedades de baja caliente temperatura:...
  • Página 24: Expreso Sencillo

    Expreso sencillo El aparato volverá a estar de inmediato listo para el servicio para preparar un expreso. Requisito: el aparato está listo para el servi- Los anillos LED 17, 18 se iluminan de nue- cio. Los anillos LED 17, 18 se iluminan de vo de forma duradera. forma duradera.
  • Página 25: Después De Hacer Espuma De Leche

    Después de hacer espuma de ¡PELIGRO de lesiones por es- caldaduras! leche  Numerosos elementos y accesorios de la cafetera expreso se calientan mucho de- NOTA: procure siempre que el orificio de la bido al funcionamiento. Deje que se en- boquilla de vapor 10 permanezca limpio.
  • Página 26: Boquilla De Vapor

    Boquilla de vapor 2. Eleve la bandeja de goteo 12 tirando de ella hacia arriba. Debería desmontar la boquilla de vapor 10 una vez al día para limpiarla a fondo. 1. Deje que la boquilla de vapor 10 se enfríe. 2. Retire el pitorro de la boquilla de va- por 10.
  • Página 27: Filtros Y Portafiltros

    Filtros y portafiltros NOTAS: 1. Incluso aunque utilice siempre el mismo • Para que el requerimiento para realizar filtro 1/2, debe extraerlo al menos una la descalcificación aparezca en el mo- vez a la semana del portafiltros 16. mento adecuado, puede adaptar el 2.
  • Página 28: Proceso De Descalcificación

    Proceso de descalcificación LED 17, 18 se iluminan de forma durade- Requisito si aparece el requerimiento para la descalcificación: todos los anillos Proceso de enjuague LED 17, 18, 19 se iluminan de forma dura- 1. Extraiga el depósito de agua 6 y escu- dera. rra, dado el caso, la solución descalci- Requisito si no aparece el requerimiento ficadora sobrante.
  • Página 29: Conservación Y Transporte

    17. Conservación y Embalaje transporte Cuando quiera eliminar el embalaje, siga las correspondientes normas de protección medioambiental vigentes en su país. ¡PELIGRO para los niños! 19. Solicitar accesorios  Guarde el aparato fuera del alcance de los niños. En nuestro sitio web servicio encontrará in- ¡ADVERTENCIA sobre daños mate- formación sobre los accesorios que puede riales!
  • Página 30: Solución De Problemas

    20. Solución de problemas Si en algún momento el aparato no funciona como es debido, consulte en primer lugar la siguiente lista de comprobación. Es posible que se trate de un problema sin importancia que usted mismo puede solucionar. ¡PELIGRO de descarga eléctrica! ...
  • Página 31: Datos Técnicos

    21. Datos técnicos Símbolos empleados Geprüfte Sicherheit (seguridad Modelo: SSMS 1350 B2 verificada): los aparatos deben 220 – 240 V ~ 50/60 Hz Tensión de la satisfacer las normas técnicas re- red: conocidas con carácter general y...
  • Página 32: Garantía De Hoyer Handel Gmbh

    22. Garantía de Cobertura de la garantía El aparato ha sido fabricado conforme a unas HOYER Handel GmbH directivas de calidad estrictas y ha sido com- Estimado cliente, probado y controlado antes de su entrega. Este aparato tiene un plazo de garantía de La garantía cubre los defectos del material o 3 años desde la fecha de compra.
  • Página 33: Servicio Técnico

    • Si aparece algún fallo en el funciona- miento o algún otro defecto, póngase Distribuidor en contacto por teléfono o por co- Tenga en cuenta que esta dirección no es rreo electrónico con el servicio técni- la dirección del servicio técnico. Pón- co que figura más abajo.
  • Página 34 Indice 1. Panoramica .................33 2. Uso conforme ................34 3. Istruzioni per la sicurezza ............34 4. Materiale in dotazione ..............37 5. Disimballaggio e posizionamento ..........38 6. Indicazioni degli anelli LED ............38 7. Preparazione di un caffè: i passi più importanti ......39 8.
  • Página 35: Panoramica

    Panoramica Filtro per caffè doppio Filtro per caffè normale Piastra riscaldante per tazze OFF / Interruttore girevole per il prelievo di vapore e acqua calda Coperchio (della caldaia) Caldaia (capienza 250 ml - MAX 1.000 ml) Cavo di collegamento con spina Interruttore on/off Pressino Lancia vapore...
  • Página 36: Uso Conforme

    Vi ringraziamo della Uso conforme vostra fiducia! La macchina per caffè espresso Slim è desti- nata esclusivamente ai seguenti scopi: Congratulazioni per l'acquisto della vostra preparazione di caffè mediante caffè nuova macchina per caffè espresso Slim. macinato, prelievo di acqua calda o vapore dalla Per un impiego sicuro dell'apparecchio e lancia vapore.
  • Página 37 Istruzioni per un impiego sicuro  Questo apparecchio può essere utilizzato da bambini di età supe- riore a 8 anni e da persone con facoltà fisiche, sensoriali o mentali ridotte o prive di esperienza e/o conoscenze, a condizione che vengano sorvegliati o istruiti circa l'utilizzo sicuro dell'apparecchio e che abbiano compreso i rischi derivanti da tale utilizzo.
  • Página 38: Pericolo Di Scossa Elettrica

     Attenersi al capitolo sulla pulizia (vedere “Pulizia” a pagina 52).  Assicurarsi di non riversare liquido sopra il connettore dell'appa- recchio.  Considerare che dopo l'uso la superficie dell'elemento riscaldante presenta ancora calore residuo. Le seguenti superfici possono esse- re ancora calde dopo l'uso: filtro e portafiltro, gruppo erogatore, lancia vapore e piastra riscaldante.
  • Página 39: Materiale In Dotazione

     Staccare la spina dalla presa di corren- AVVERTENZA: rischio di danni materiali! - se si verifica un guasto  L'apparecchio è dotato di ventose di si- - se non si utilizza la macchina per caf- licone. Dato che i mobili sono rivestiti fè...
  • Página 40: Disimballaggio E Posizionamento

    Disimballaggio e 5. Collocare l'apparecchio su una superfi- cie d'appoggio asciutta, piana e non posizionamento scivolosa. Si consiglia una superficie di 1. Togliere tutto il materiale di imballag- lavoro liscia su cui le ventose possano gio. fissarsi. 2. Verificare che tutti i pezzi siano presenti e integri.
  • Página 41: Preparazione Di Un Caffè: I Passi Più Importanti

    Indicazioni degli anelli LED Significato  17  18  19 Interruttore girevole 4 aperto: prelievo di vapo- — — lampeggia — — lampeggia durante il processo di decalcificazione Tutti gli anelli LED lampeggiano alternati- Compare il menu per le impostazioni. vamente due volte di seguito. Portare l'interruttore girevole 4 completamente su OFF.
  • Página 42: Preparazione

    Preparazione 5. Reinserire la caldaia 6 nella macchina. Nel farlo assicurarsi che i due ganci della caldaia s'inseriscano nel supporto Riempimento della del fianco dell'apparecchio. caldaia AVVERTENZA: rischio di danni mate- riali!  Non versare in nessun caso liquidi di- versi da acqua potabile fredda nella caldaia 6! NOTA: nella rientranza sotto la caldaia 6 si raccoglie un poco d'acqua.
  • Página 43: Inserimento/Sostituzione Del Filtro

    Per aggiungere acqua, la caldaia 6 può re- 2. Inserire il filtro 1/2 obliquamente nel stare nell'apparecchio. portafiltro 16, in modo che la tac- ca 20 e la tacca 22 siano sovrappo- 1. Aprire il coperchio 5 della caldaia 6. ste. Premere il filtro verso il basso e 2.
  • Página 44: Lavaggio Dell'apparecchio

     8 Lavaggio 1. Accertarsi che l'interruttore on/off sia disinserito. dell'apparecchio 2. Portare l'interruttore girevole 4 comple- Se l'apparecchio è rimasto inutilizzato, ad tamente su OFF. es. durante la notte, o se si mette in funzione l'apparecchio per la prima volta, si consi- glia di sciacquarlo per riempire le conduttu- re di acqua pulita.
  • Página 45: Preriscaldamento Delle Tazze

    Preriscaldamento delle tazze Quando l'apparecchio è pronto per l'uso, la piastra riscaldante 3 viene riscaldata. • Collocare le tazze sulla piastra riscal- dante 3 per riscaldarle. In alternativa si possono usare per il risciac- quo le tazze che si desidera preriscaldare. 2. Collocare una tazza sotto il portafil- In questo modo si possono preriscaldare in tro 16.
  • Página 46: Misurazione E Pressatura Del Caffè Macinato

    Misurazione e 3. A questo punto disporre il pressino 9 perpendicolarmente sul caffè macinato. pressatura del caffè Premere uniformemente sul caffè maci- macinato nato fino a raggiungere all'incirca il se- gno MAX del filtro 1/2. NOTE: • Quando si compra il caffè macinato, assicurarsi che il grado di macinazione sia adatto alle macchine con portafiltro.
  • Página 47: Preparazione Di Un Caffè

     17. 10. Preparazione di un 5. Premere il tasto  17 lampeggia. caffè - L'anello LED  18 si spegne. - L'anello LED - Il caffè scorre lentamente nella tazza PERICOLO di lesioni da scotta- e si arresta automaticamente. ture! 6. Se si desidera interrompere l'operazio- ...
  • Página 48: Suggerimenti Per Un Caffè Perfetto

    11. Suggerimenti per 3. Girare l'impugnatura del portafiltro 16 verso destra fino a . Il portafiltro un caffè perfetto deve essere collocato saldamente. Non sempre si riesce a preparare un caffè perfetto. Per questo è meglio sperimentare un poco con tranquillità finché il risultato non soddisfa il proprio gusto.
  • Página 49: Prelievo Di Acqua Calda

    Rimedio: È possibile ruotare la lancia vapore 10 - Utilizzare una minore quantità di caf- avanti e indietro. fè macinato. - Non esercitare tanta pressione duran- te la pressatura. • Per sviluppare il gusto ottimale sono ne- cessarie temperature dell'acqua diverse a seconda del tipo di caffè.
  • Página 50: Creazione Di Schiuma Di Latte

    13. Creazione di corretta si raggiunge quando le pareti del bricchetto sono troppo calde per so- schiuma di latte stenere il bricchetto con la mano. • Dopo aver terminato la creazione della PERICOLO di lesioni da scotta- schiuma di latte, non attendere troppo. ture! Altrimenti una parte della schiuma di ...
  • Página 51: Impostazioni

    8. Quando la schiuma di latte ha la consi- 2. Quando gli anelli LED 17, 18 lampeg- stenza desiderata, portare l'interruttore giano di nuovo ritmicamente, riportare girevole 4 su OFF. l'interruttore girevole 4 su OFF. Gli anelli LED 17, 18 sono accesi in modo fisso. L'apparecchio è pronto per la prepa- NOTA: in totale il tempo massimo per la razione del caffè.
  • Página 52: Temperatura Del Caffè

    momento, tutti gli anelli LED 17, 18, 19 re- 2. Quando gli anelli LED si accendono al- stano accesi. A quel punto non sarà più pos- ternativamente uno dopo l'altro, preme- sibile usare l'apparecchio. Per prima cosa re il tasto dell'intervallo di durezza bisognerà...
  • Página 53: Modifica Del Volume Di Caffè

     17. 14.4 Modifica del volume di 1. Premere il tasto Gli anelli LED 17, 18, 19 indicano breve- caffè mente l'intervallo di temperatura attuale: Intervallo di NOTA: il volume del caffè erogato è deter- bassa media alta temperatura: minato anche dalla quantità e dalla compat- tazione del caffè...
  • Página 54: Ripristino Delle Impostazioni Di Fabbrica

    15. Pulizia Caffè doppio Presupposto: l'apparecchio è pronto per l'uso. Gli anelli LED 17, 18 sono accesi in modo fisso. PERICOLO di scossa elettrica! 1. Preparare filtro 1, portafiltro 16 e caffè  Non immergere la macchina per caffè macinato per un caffè doppio e fissare espresso e il cavo di collegamento con il portafiltro sotto il gruppo erogato- spina 7 in acqua o altri liquidi.
  • Página 55: Giornalmente

    Dopo ogni caffè 1. Togliere la griglia di sgocciolamen- to 13. 1. Togliere il portafiltro 16 dal gruppo 2. Estrarre la vaschetta 12 verso l'alto. erogatore 14. 2. Battere sul filtro 1/2 per liberarlo dal fondo di caffè e smaltire quest'ultimo tra i rifiuti organici. Eventuali residui possono essere eliminati con un cuc- chiaino.
  • Página 56: Lancia Vapore

    Lancia vapore Filtri e portafiltro La lancia vapore 10 andrebbe smontata 1. Anche se si usa sempre lo stesso fil- una volta al giorno per pulirla a fondo. tro 1/2, è preferibile toglierlo dal por- 1. Fare raffreddare la lancia vapore 10. tafiltro 16 almeno una volta alla 2.
  • Página 57 1. Riempire la caldaia 6. 2. Versare tutto il contenuto del flacone di NOTE: decalcificante (circa 125 ml) nella cal- • Affinché la richiesta di eliminare il cal- daia 6 dell'acqua. care giunga al momento corretto, si 3. Riempire la caldaia 6 fino al segno può...
  • Página 58: Conservazione E Trasporto

    17. Conservazione e Lavaggio 1. Estrarre la caldaia 6 e scuotere via trasporto l'eventuale soluzione anticalcare resi- dua. 2. Sciacquare più volte la caldaia 6 con PERICOLO per i bambini! acqua limpida.  Conservare l'apparecchio lontano dal- 3. Riempire la caldaia 6 di acqua di rubi- la portata dei bambini.
  • Página 59: Smaltimento

    18. Smaltimento 19. Ordinazione degli accessori Questo prodotto è soggetto alla Direttiva europea 2012/19/UE. Sul nostro sito web si possono ottenere infor- Il simbolo del bidone della mazioni sugli accessori che è possibile ordi- spazzatura su ruote barrato si- nare. gnifica che all'interno dell'Unione Europea il prodot- Ordinazione online...
  • Página 60: Risoluzione Dei Problemi

    20. Risoluzione dei problemi Qualora l'apparecchio non funzioni correttamente, scorrere l'elenco di controllo seguente, poiché potrebbe trattarsi solo di un piccolo problema che l'utente è in grado di risolvere au- tonomamente. PERICOLO di scossa elettrica!  Non tentare in nessun caso di riparare l'apparecchio da soli. Guasto Possibili cause / rimedi •...
  • Página 61: Dati Tecnici

    21. Dati tecnici Simboli utilizzati Geprüfte Sicherheit (sicurezza Modello: SSMS 1350 B2 verificata): gli apparecchi devo- 220 – 240 V ~ 50/60 Hz Tensione di re- no soddisfare le regole tecniche riconosciute e sono conformi alla...
  • Página 62: Garanzia Della Hoyer Handel Gmbh

    22.Garanzia della Entità della garanzia L'apparecchio è stato prodotto con cura ba- HOYER Handel GmbH sandosi su severe direttive di qualità ed è stato controllato scrupolosamente prima del- Gentile cliente, la consegna. questo apparecchio è dotato di una garan- La garanzia si applica agli errori di materia- zia di 3 anni a decorrere dalla data d'acqui- le o produzione.
  • Página 63 • Qualora si presentassero errori di fun- zionamento o altri difetti, si rivolga in- Centri assistenza nanzitutto ai centri assistenza indicati di seguito, telefonicamente o tramite Assistenza Italia e-mail. Tel.: 02 36003201 • Il prodotto registrato come difettoso po- E-Mail: hoyer@lidl.it trà...
  • Página 64 Contents 1. Overview ..................63 2. Intended purpose ................64 3. Safety information ................. 64 4. Items supplied ................67 5. Unpacking and setting up .............. 67 6. LED ring displays ................68 7. Preparing an espresso - the most important steps ......69 8.
  • Página 65: Overview

    Overview Filter for double espresso Filter for single espresso Hot plate for cups OFF / Dial for steam and hot water production Lid (of the water tank) Water tank (filling volume: 250 ml - MAX 1,000 ml) Power cable with mains plug On/off switch Tamper Steam nozzle...
  • Página 66: Intended Purpose

    Thank you for placing Intended purpose your trust in our The slim espresso machine is intended exclu- products! sively for the following uses: for preparing espresso from ground es- We congratulate you on your new slim es- presso powder, presso machine. for drawing hot water or steam from the steam nozzle.
  • Página 67: Instructions For Safe Operation

    Instructions for safe operation  This device can be used by children from the age of 8 and people with restricted physical, sensory or intellectual abilities or a lack of experience or knowledge if they are supervised or have been in- structed in how to use this device safely and if they have under- stood the resulting dangers.
  • Página 68  Please take note of the chapter on cleaning (see “Cleaning” on page 80).  Make sure that no liquid overflows onto the device plug connec- tion.  Please note that the surface of the heating element still has residual heat after use.
  • Página 69: Items Supplied

     Place the device on a stable, level sur- DANGER! Risk of injury face. through scalding!  During operation, (hot) water and  Do not touch the hot parts of the device. steam, espresso and espresso powder  During the preparation of espresso, hot can accumulate on the base.
  • Página 70: Led Ring Displays

    LED ring displays The 3 LED rings 17/18/19 on the buttons at the front of the device indicate different op- erating modes or programming steps. The following table shows the respective meaning. Please note that the LED rings can display 3 different states: - permanently lit - regularly flashing - rhythmic flashing (flash 3 times - pause - flash 3 times - etc.)
  • Página 71: Preparing An Espresso - The Most Important Steps

    Preparing an 2. Open the lid 5 of the water tank 6. espresso - the most important steps Before you get to know the individual prepa- ration steps and all the tips and tricks in the following chapters, here is an overview of the steps you need for every good espresso: 1.
  • Página 72: Inserting/Replacing The Filter

    Inserting/replacing the 6. The water tank must sit correctly at the bottom. Press it down a little if neces- filter sary. Your espresso machine comes with two fil- ters: Print on the underside: 1-cup 2-cup Filter for single es- Filter for double 7.
  • Página 73: Connecting And Switching On/Off

     8. 4. Press the on/off switch - All LED rings 17, 18, 19 light up NOTE: as the filter 1 has only one nub 21, one after the other. it can also be inserted straight into the por- - The LED rings 17, 18 flash regularly. tafilter 16. The device heats up.
  • Página 74: Rinsing The Device

    Rinsing the device Preheating the filter and brewing head If you have not used the device overnight, (flushing) for example, or if you are using it for the first time, we recommend that you flush the de- Rinse the filter 1/2 and the brewing head 14 vice once to fill the pipes with fresh water.
  • Página 75: Measure And Tamp The Espresso Powder

    Measure and tamp 3. Now place the tamper 9 straight down onto the espresso powder. Press evenly the espresso on the espresso powder until it reaches powder approximately the MAX marking in the filter 1/2. NOTES: • When buying espresso powder, make sure that the degree of grinding is suita- ble for portafilter machines.
  • Página 76: Preparing An Espresso

     17. 10. Preparing an 5. Press the button  17 flashes. espresso - The LED ring  18 goes out. - The LED ring - The espresso flows slowly into the cup DANGER! Risk of injury and stops automatically. through scalding! 6. If you want to cancel the process, press ...
  • Página 77: Tips For The Perfect Espresso

    11. Tips for the perfect 3. Turn the handle of the portafilter 16 to the right as far as . The portafilter espresso must be tight. Preparing the perfect espresso is not always easy right away. So feel free to experiment a little until the result suits your taste.
  • Página 78: Extracting Hot Water

    the optimum flavour. For dark roasting 2. Turn the dial 4 in the direction of the the temperature should be lower and symbol for light roasting higher.  17 flashes. - The LED ring • Clean your espresso machine regularly.  18 goes out. - The LED ring Coffee residues or clogged pores alter - Hot water flows from the steam noz-...
  • Página 79 You can froth milk with the steam nozzle 10. Tips: This requires a bit of practice. - Immerse the steam nozzle 10 just be- low the surface so that air is intro- Tips: duced into the milk ("drawing • Try milk from different producers. phase").
  • Página 80: Settings

    14.2 Water hardness NOTE: this cooling process takes a few min- Like any hot water appliance, this espresso utes. If you want to quickly prepare another machine must be descaled regularly. Lime espresso, you can speed up the cooling pro- deposits form inside the device and on small cess by drawing hot water from the device: openings (e.g.
  • Página 81: Espresso Temperature

    2. When the LED rings light up one after 2. When the LED rings light up one after the other, press the button for the de- the other, press the button for the de- sired hardness range: sired hardness range: Hardness Temperature soft...
  • Página 82: Double Espresso

     17. The 3. Press and hold the button 1. Place a container under the steam noz- espresso preparation begins. zle 10.  18 flashes 4. When the LED ring 2. Turn the dial 4 in the direction of the quickly and the desired quantity has symbol been reached, let go of the button - Water flows out of the steam noz-...
  • Página 83 • If the accessories that come into contact 1. Remove the drip grid 13. with water, espresso or milk have resi- 2. Lift the drip tray 12 upwards and out. dues of detergent, the taste of the es- presso will be negatively affected. Therefore, rinse these parts thoroughly with clean water if cleaning with deter- gent is necessary.
  • Página 84: Steam Nozzle

    Steam nozzle Water tank You should disassemble the steam noz- 1. You should clean the inside of the water zle 10 once a day and clean it thoroughly. tank 6 with a little mild detergent ap- 1. Let the steam nozzle 10 cool down. prox.
  • Página 85 Preparing the descaling solution 9. When about 450 ml of descaling solu- tion have passed through, turn the di- al 4 to OFF. DANGER! Risk of eye irrita- - The descaling solution is pumped tion! through the brewing head 14 with  When handling the supplied descaling pauses.
  • Página 86: Storage And Transport

    17. Storage and Packaging transport When disposing of the packaging, make sure you comply with the environmental reg- ulations applicable in your country. DANGER for children! 19. Ordering  Keep the device out of the reach of chil- dren. accessories WARNING! Risk of material dam- On our website you will find information on age!
  • Página 87: Trouble-Shooting

    20. Trouble-shooting If your device fails to function as required, please try this checklist first. Perhaps there is only a minor problem, and you can solve it yourself. DANGER! Risk of electric shock!  Do not attempt to repair the device yourself under any circumstances. Fault Possible causes / Action •...
  • Página 88: Technical Specifications

    21. Technical Symbols used specifications Geprüfte Sicherheit (certified safety): devices must comply with Model: SSMS 1350 B2 the generally acknowledged Mains voltage: 220 – 240 V ~ 50/60 Hz rules of technology and the Ger- Protection man Product Safety Act (Produkt- class: sicherheitsgesetz - ProdSG).
  • Página 89: Warranty Of The Hoyer Handel Gmbh

    22.Warranty of the The warranty applies to material or factory defects. HOYER Handel GmbH Excluded from the warranty are Dear Customer, wear parts subject to normal wear your device is provided with a 3 year war- and damages to fragile parts, e.g. ranty starting with the purchase date.
  • Página 90: Service Centre

    At www.lidl-service.com you can download this and many other manuals, product vide- os and installation software. This QR code takes you directly to the Lidl Ser- vice website (www.lidl-service.com), where you can enter the article number (IAN) 373122_2104 to open your user instruc- tions.
  • Página 92 Inhalt 1. Übersicht ..................91 2. Bestimmungsgemäßer Gebrauch ............ 92 3. Sicherheitshinweise ............... 93 4. Lieferumfang ................. 96 5. Auspacken und aufstellen .............. 96 6. Anzeigen der LED-Ringe ..............97 7. Espresso zubereiten - die wichtigsten Schritte ......... 98 8. Vorbereitung ................. 98 Wassertank füllen ................
  • Página 93: Übersicht

    Übersicht Sieb für doppelten Espresso Sieb für einfachen Espresso Wärmeplatte für Tassen OFF / Drehschalter für Dampf- und Heißwasserbezug Deckel (des Wassertanks) Wassertank (Füllmenge: 250 ml - MAX 1.000 ml) Anschlussleitung mit Netzstecker Ein-/Ausschalter Tamper Dampfdüse Schwimmer (Anzeige: Abtropfschale leeren) Abtropfschale Abtropfgitter Brühkopf Bedienelemente (Frontseite) Siebträger...
  • Página 94: Vorhersehbarer Missbrauch

    Herzlichen Dank für Ihr Bestimmungsgemä- Vertrauen! ßer Gebrauch Die Espressomaschine Slim ist ausschließlich Wir gratulieren Ihnen zu Ihrer neuen zu folgenden Verwendungszwecken vorge- Espressomaschine Slim. sehen: zum Zubereiten von Espresso aus ge- Für einen sicheren Umgang mit dem Gerät mahlenem Espressopulver, und um den ganzen Leistungsumfang ken- zur Entnahme von heißem Wasser oder nenzulernen:...
  • Página 95: Sicherheitshinweise

    Sicherheitshinweise WARNUNG! Mittleres Risiko: Missachtung der Warnung kann Verletzungen oder Warnhinweise schwere Sachschäden verursachen. Falls erforderlich, werden folgende Warn- VORSICHT: Geringes Risiko: Missachtung hinweise in dieser Bedienungsanleitung ver- der Warnung kann leichte Verletzungen wendet: oder Sachschäden verursachen. GEFAHR! Hohes Risiko: Missach- HINWEIS: Sachverhalte und Besonderhei- tung der Warnung kann Schaden ten, die im Umgang mit dem Gerät beachtet...
  • Página 96  Berühren Sie nicht die heißen Geräteteile, wie z. B. Sieb und Siebträger, Brühkopf, Dampfdüse und Wärmeplatte. Fas- sen Sie die Dampfdüse und den Siebträger nur an den Griffen an.  Fassen Sie nicht in den heißen Dampf,... … der während der Dampfentnahme (z. B. beim Milch- schäumen) entsteht.
  • Página 97  Ziehen Sie den Netzstecker aus der GEFAHR von Stromschlag Steckdose: durch Feuchtigkeit! - wenn eine Störung auftritt  Schützen Sie das Gerät vor Feuchtig- - wenn Sie die Espressomaschine nicht keit, Tropf- oder Spritzwasser: Es be- benutzen steht die Gefahr eines elektrischen - bevor Sie die Espressomaschine reini- Schlages.
  • Página 98: Lieferumfang

    Auspacken und WARNUNG vor Sachschäden!  Das Gerät ist mit Silikon-Saugfüßen aus- aufstellen gestattet. Da Möbel mit einer Vielfalt 1. Entfernen Sie sämtliches Verpackungs- von Lacken und Kunststoffen beschichtet material. sind und mit unterschiedlichen Pflege- 2. Überprüfen Sie, ob alle Teile vorhanden mitteln behandelt werden, kann nicht und unbeschädigt sind.
  • Página 99: Anzeigen Der Led-Ringe

    Anzeigen der LED-Ringe Die 3 LED-Ringe 17/18/19 an den Tasten vorne am Gerät zeigen verschiedene Betriebs- zustände oder Programmierschritte an. Der folgenden Tabelle können Sie die jeweilige Be- deutung entnehmen. Beachten Sie, dass die LED-Ringe in 3 Varianten anzeigen können: - dauerhaft leuchten - gleichmäßig blinken - rhythmisch blinken (3x blinken - Pause - 3x blinken - usw.) Anzeigen der LED-Ringe...
  • Página 100: Espresso Zubereiten - Die Wichtigsten Schritte

    Espresso zubereiten 2. Öffnen Sie den Deckel 5 des Wasser- tanks 6. - die wichtigsten Schritte Bevor Sie in den folgenden Kapiteln die ein- zelnen Zubereitungsschritte mit allen Tipps und Tricks genau kennenlernen, erhalten Sie hier einen Überblick über die Schritte, die Sie für jeden guten Espresso benötigen: 1.
  • Página 101: Sieb Einsetzen/Tauschen

    Sieb einsetzen/ 6. Der Wassertank muss unten richtig auf- sitzen. Drücken Sie ihn ggf. ein biss- tauschen chen herunter. Zu Ihrer Espressomaschine gehören zwei Siebe: Aufdruck auf der Unterseite: 1-cup 2-cup Sieb für einfachen Sieb für doppelten 7. Schließen Sie den Deckel 5 des Was- Espresso 2 Espresso 1 sertanks 6.
  • Página 102: Anschließen Und Ein-/Ausschalten

     8 hat zwei Positio- 2. Setzen Sie das Sieb 1/2 schräg in den Der Ein-/Ausschalter  Siebträger 16, sodass die Kerbe 20 nen: und die Kerbe 22 übereinander liegen. - leicht eingedrückt = eingeschaltet Drücken Sie das Sieb herunter und dre- - leicht nach außen stehend = ausge- hen Sie es ein Stück im Siebträger, so- schaltet dass es nicht herausfallen kann.
  • Página 103: Gerät Durchspülen

    Tassen vorwärmen • Die Espressomaschine schaltet sich au- tomatisch aus, wenn 30 Minuten lang Wenn das Gerät betriebsbereit ist, wird die keine Taste gedrückt wurde. Wärmeplatte 3 aufgeheizt. • Stellen Sie die Tassen auf die Wärme- platte 3, um sie vorzuwärmen. Gerät durchspülen Alternativ können Sie die Tasse, die Sie vor- Wenn Sie das Gerät z. B.
  • Página 104: Espressopulver Abmessen Und Tampen

     18. 3. Drücken Sie die Taste 1. Geben Sie so viel Espressopulver in das Sieb 1/2, dass dies leicht gehäuft gefüllt  18 blinkt. - Der LED-Ring ist.  17 erlischt. - Der LED-Ring - Heißes Wasser fließt durch den Sieb- träger 16 in die Tasse. 4.
  • Página 105: Espresso Zubereiten

    • Um Risse zu vermeiden: Nach dem 3. Drehen Sie den Griff des Siebträ-   . Der Sieb- Tampen niemals gegen den Siebträ- gers 16 nach rechts bis ger 16 klopfen! träger muss fest sitzen. 4. Heben Sie den Tamper 9 vorsichtig ab. 5.
  • Página 106: Doppelten Espresso Extrahieren

    10.2 Doppelten Espresso 8. Drehen Sie den Griff des Siebträ-   gers 16 nach links bis und neh- extrahieren men diesen nach unten ab. Voraussetzung: Das Gerät ist betriebsbereit. 9. Klopfen Sie das Espressopulver aus Die LED-Ringe 17, 18 leuchten dauerhaft. dem Sieb 1 und entsorgen es im Bio- 1.
  • Página 107: Heißwasser Beziehen

    Abhilfe: Über die Dampfdüse 10 können Sie heißes - Überprüfen Sie, ob das Espressopul- Wasser (ca. 80 °C) beziehen, zum Beispiel ver fein genug gemahlen ist. für Americano oder um Tassen vorzuwär- - Verwenden Sie mehr Espressopulver. men. - Achten Sie auf gleichmäßiges Verdich- Sie können die Dampfdüse 10 hin und her ten des Espressopulvers ohne Risse.
  • Página 108: Milch Schäumen

    13. Milch schäumen des Kännchens zu heiß sind, um es in der Hand zu halten. • Wenn die Milch fertig geschäumt ist, GEFAHR von Verletzungen warten Sie nicht zu lange. Ein Teil des durch Verbrühen! Milchschaums zerfällt sonst wieder.  Beim Arbeiten mit der Dampfdüse 10 Voraussetzung: Das Gerät ist betriebsbereit.
  • Página 109: Einstellungen

    8. Wenn der Milchschaum die gewünsch- te Konsistenz hat, stellen Sie den Dreh- HINWEIS: Dieser Abkühlvorgang dauert schalter 4 auf OFF. einige Minuten. Wenn Sie schneller wieder einen Espresso zubereiten möchten, können HINWEIS: Insgesamt beträgt die maximale Sie den Abkühlprozess durch eine Heißwas- Zeit für die Dampfproduktion 120 Sekun- serentnahme beschleunigen: den.
  • Página 110: Wasserhärte

    14.2 Wasserhärte Voraussetzung: Das Menü ist aufgerufen. Die 3 LED-Ringe 17, 18, 19 blinken nach- Wie jedes Heißwassergerät muss auch die- einander im Wechsel jeweils doppelt. se Espressomaschine regelmäßig entkalkt  18. 1. Drücken Sie die Taste werden. Kalk setzt sich im Inneren des Gerä- Die LED-Ringe 17, 18, 19 zeigen einmal tes und an kleinen Öffnungen (z. B.
  • Página 111: Espresso-Temperatur

     17 3-mal blinkt, ist 14.3 Espresso-Temperatur Wenn der LED-Ring die neue Einstellung gespeichert. Die Temperatur des Wassers beim Extrahie- ren des Espressos kann verändert werden, 14.4 Espresso-Volumen um sie an verschiedene Kaffeesorten und Ih- anpassen ren Geschmack anzupassen. Bei dunkler Röstung sollte die Temperatur eher niedriger sein, bei heller Röstung eher höher.
  • Página 112: Doppelter Espresso

    14.5 Auf Werkseinstellun- Das Gerät ist sofort wieder betriebsbereit für die Espressozubereitung. Die LED-Rin- gen zurücksetzen ge 17, 18 leuchten wieder dauerhaft. Mit dieser Funktion können Sie alle Einstel- Doppelter Espresso lungen auf die Werkseinstellungen zurück- Voraussetzung: Das Gerät ist betriebsbereit. setzen. Die LED-Ringe 17, 18 leuchten dauerhaft.
  • Página 113: Reinigen

    15. Reinigen Nach jedem Espresso 1. Nehmen Sie den Siebträger 16 vom Brühkopf 14 ab. 2. Klopfen Sie das Espressopulver aus GEFAHR durch Stromschlag! dem Sieb 1/2 und entsorgen es im Bio-  Die Espressomaschine und die An- müll. Reste können Sie ggf. mit einem schlussleitung mit Netzstecker 7 dürfen Teelöffel entfernen.
  • Página 114 Dampfdüse 2. Heben Sie die Abtropfschale 12 nach oben heraus. Die Dampfdüse 10 sollten Sie einmal täg- lich zum gründlichen Reinigen auseinander- nehmen. 1. Lassen Sie die Dampfdüse 10 abküh- len. 2. Ziehen Sie die Tülle von der Dampfdü- se 10 ab. 3. Leeren und reinigen Sie diese Zubehör- teile von Hand mit mildem Spülmittel.
  • Página 115: Entkalken

    Siebe und Siebträger HINWEISE: 1. Auch wenn Sie immer das gleiche • Damit die Aufforderung zum Entkalken Sieb 1/2 verwenden, sollten Sie dieses zum richtigen Zeitpunkt kommt, können mindestens einmal wöchentlich aus Sie die Wasserhärte-Einstellung an Ihr dem Siebträger 16 herausnehmen. Leitungswasser anpassen (siehe “Was- 2.
  • Página 116: Aufbewahren Und Transportieren

     19 ca. 5 Se- 3. Füllen Sie den Wassertank 6 bis zur 5. Halten Sie die Taste Markierung MAX mit frischem, kalten kunden lang gedrückt, bis die 3 LED- Leitungswasser auf. Ringe 17, 18, 19 nacheinander im 4. Setzen Sie den Wassertank 6 ein. Wechsel doppelt blinken. 5.
  • Página 117: Entsorgen

    18. Entsorgen 19. Zubehörteile bestellen Dieses Produkt unterliegt der europäischen Richtlinie Auf unserer Webseite erhalten Sie die Infor- 2012/19/EU. Das Symbol mation, welche Zubehörteile nachbestellt der durchgestrichenen Ab- werden können. falltonne auf Rädern bedeu- tet, dass das Produkt in der Bestellung online Europäischen Union einer getrennten Müll- sammlung zugeführt werden muss.
  • Página 118: Problemlösung

    20. Problemlösung Sollte Ihr Gerät einmal nicht wie gewünscht funktionieren, gehen Sie bitte erst diese Checkliste durch. Vielleicht ist es nur ein kleines Problem, das Sie selbst beheben können. GEFAHR durch Stromschlag!  Versuchen Sie auf keinen Fall, das Gerät selbstständig zu reparieren. Fehler Mögliche Ursachen / Maßnahmen •...
  • Página 119: Technische Daten

    Sie die Funktion sofort erneut verwenden. 21. Technische Daten Verwendete Symbole Geprüfte Sicherheit: Geräte müs- Modell: SSMS 1350 B2 sen den allgemein anerkannten Netzspannung: 220 – 240 V ~ 50/60 Hz Regeln der Technik genügen und Schutzklasse: gehen mit dem Produktsicher- heitsgesetz (ProdSG) konform.
  • Página 120: Garantie Der Hoyer Handel Gmbh

    22. Garantie der Garantieumfang Das Gerät wurde nach strengen Qualitäts- HOYER Handel GmbH richtlinien sorgfältig produziert und vor Aus- Sehr geehrte Kundin, sehr geehrter Kunde, lieferung gewissenhaft geprüft. Sie erhalten auf dieses Gerät 3 Jahre Ga- Die Garantieleistung gilt für Material- oder rantie ab Kaufdatum.
  • Página 121: Service-Center

    • Sollten Funktionsfehler oder sonstige Män- gel auftreten, kontaktieren Sie zunächst Service-Center das nachfolgend benannte Service-Center telefonisch oder per E-Mail. Service Deutschland • Ein als defekt erfasstes Produkt können Tel.: 0800 5435 111 Sie dann unter Beifügung des Kaufbe- (kostenfrei) legs (Kassenbon) und der Angabe, wor- E-Mail: hoyer@lidl.de in der Mangel besteht und wann er...

Tabla de contenido