Tabla de contenido

Publicidad

Idiomas disponibles
  • ES

Idiomas disponibles

Enlaces rápidos

INSTRUCTION MANUAL
Megapixel Camera
THIS INSTALLATION SHOULD BE MADE BY A QUALIFIED
SERVICE PERSON AND SHOULD CONFORM TO ALL LOCAL
CODES.
Please read this instruction manual carefully in order to ensure correct installation. In addition,
be sure to read carefully the electronic manual contained in the supplied CD-ROM to ensure
correct operation of the camera.
MEMO: This manual covers three models. Any difference among the three models is indicated when
necessary.
Installing Camera
Installing Camera
1/4"-20 UNC
Lens cap
1
Transportation screw and treaded holes
for mounting (Top and Bottom)
When using a camera mount base (sold
separately) etc., use an attachment screw
shorter than 10 mm / 0.4 in.
1
VCC-HD4000P
VCC-HD4000
VCC-HDN4000PC
Contents
Information To User . . . . . . . . . . . . . . . . . . . . . . . . . 1
Parts Names and Functions. . . . . . . . . . . . . . . . . . . 3
What You Can Do . . . . . . . . . . . . . . . . . . . . . . . . . . . 5
Network Settings Procedure . . . . . . . . . . . . . . . . . . 7
Connections . . . . . . . . . . . . . . . . . . . . . . . . . . . . . . . 8
Viewing Live Video . . . . . . . . . . . . . . . . . . . . . . . . . 13
Menu Screen List . . . . . . . . . . . . . . . . . . . . . . . . . . 14
Formatting the Recording Media. . . . . . . . . . . . . . 16
Setting a Password . . . . . . . . . . . . . . . . . . . . . . . . . 17
Using the Supplied CD-ROM . . . . . . . . . . . . . . . . . 18
Main specifications. . . . . . . . . . . . . . . . . . . . . . . . . 29
Recording times and target sizes (Insert at the end
of this manual)
Install the camera in a correct location so
that the intended object can be monitored
properly.
You should also adjust on the monitor
side.
• If you want to use a commercially available
platform for the camera, select an
appropriate type, taking into consideration
the gross weight of the camera and
platform, and secure it on a firm place.
• Images may blur under extremely bright
lighting; adjust the lighting angle to get
clear images.

Publicidad

Tabla de contenido
loading

Resumen de contenidos para Sanyo VCC-HD4000P

  • Página 1: Tabla De Contenido

    INSTRUCTION MANUAL Megapixel Camera VCC-HD4000P THIS INSTALLATION SHOULD BE MADE BY A QUALIFIED SERVICE PERSON AND SHOULD CONFORM TO ALL LOCAL VCC-HD4000 CODES. VCC-HDN4000PC Please read this instruction manual carefully in order to ensure correct installation. In addition, be sure to read carefully the electronic manual contained in the supplied CD-ROM to ensure correct operation of the camera.
  • Página 2: Information To User

    ■ Do not open or modify immediately and disconnect the power cord, and Do not open the cabinet, as it may be dangerous then consult your dealer or an Authorized Sanyo and cause damage to the unit. For repairs, Service Center.
  • Página 3 For EU Users For Russian Users This product certified by official Please note: certification company which is Your SANYO product is designed and authorized by Russian Federation. manufactured with high quality materials and components which can ДЛЯ ПОЛЬЗОВАТЕЛЕЙ be recycled and reused.
  • Página 4: Parts Names And Functions

    Parts Names and Functions ■Power/Error indicator • Power ON : Lit (Startup time: 30 sec) • Power OFF : Off • Error (failure) : Blinks MEMO: To enable the power indicator, via the network, set [POWER LED (FRONT)] to "ON" on the OPTION SETTINGS screen. ■Side Face SD card SD card slot...
  • Página 5 ■Rear Face & For connections, see pages 11 and 12. ALARM IN 1 ALARM POWER IN 2 ALARM OUT lamp ALARM IN 1 ALARM ALARM OUT IN 2 POWER A B C D E ZOOM FOCUS AC24V EX-HDD ZOOM FOCUS Control terminals SD OUT connector (BNC type) When connecting the cable, press and hold...
  • Página 6: What You Can Do

    What You Can Do Network Monitoring System Recording and Playing back Live Video By connecting the camera to your PC via LAN cable, you can operate various b Recording functions required for monitoring from • Media (an SD card or external hard disk) your PC’s Web browser (Internet can be installed on the camera to enable Explorer) via the network.
  • Página 7 Alarm Functions b Detection b Notification • The camera has a built-in motion sensor. • When an alarm is detected, you can receive the image data as e-mail The face detection function works in attachment. conjunction with the motion sensor to detect presence of human.
  • Página 8: Network Settings Procedure

    Network Settings Procedure ■Checking the Operating Environment • PC : IBM PC/AT and compatibles • OS : Windows XP Professional/Windows Vista • CPU : Core2Duo E6700 2.66 GHz or higher • Memory : Windows XP : 1GB or more Windows Vista : 2GB or more •...
  • Página 9: Connections

    Connections Connection when Using PoE (Power over Ethernet) Power Supply This camera provides simultaneous delivery of video in the JPEG and H.264 formats and also bi-directional video between the camera and PC. ● Do not use the power supply of the camera. ●...
  • Página 10: Internet Connection

    Connections Connection when Not Using PoE (Power over Ethernet) Power Supply Internet LAN connection connection (&P10) Switching hub Router or ADSL modem ✱1 ✱1 Direct connection LAN cable LAN cable (straight type) (straight type) LAN cable (crossover type) Power Supply (AC24V/DC12V) ✱1 HDMI...
  • Página 11 About the “A Internet connection” Port forwarding for the video port (HTTP/UDP) must be enabled on the broadband router. For details on how to set port forwarding, please refer to your router's Instruction manual. b Port 1: JPEG/H.264 HTTP Port number (default): 80 (TCP) Port number (default): 80 (TCP) IP address (default): 192.168.0.2 •...
  • Página 12 Connections Do not connect the power cord until all other connections have been completed. Camera Control Unit Connection for Zoom/Focus (Options:VAC-70) +6V/12V (FAR) (FOCUS) -6V/12V (NEAR) BNC type ✱1 ALARM IN 1 ALARM +6V/12V (WIDE) ALARM OUT IN 2 POWER ✱2 (ZOOM) -6V/12V (TELE)
  • Página 13: Power Supply Connection

    Monitor Connection Thicker than RG-6U (5C-2V): 500 m / 547 yds. max. Using different cables from those specified here may attenuate the (Non-PoE power supply) video and/or sync signals and Power Supply Connection interfere with correct transmission. To prevent a fire hazard use any UL listed wire rated VW-1.
  • Página 14: Viewing Live Video

    Viewing Live Video When the camera is turned on, live video is displayed on the monitor. The following information also appears. The display position can be selected from 12 positions on the TV OUT SETTINGS screen via the network. Camera title Recording/downloading status •...
  • Página 15: Menu Screen List

    Menu Screen List The settings below can be configured on the menu of the camera unit. • Configure other settings on the Web-version menu screen. &P15 Network Settings DHCP IP ADDRESS SUBNETMASK GATEWAY NETWORK SPEED NO LIMIT PORT 00080 MENU DEFAULT [MENU]_(MAIN MENU) Recording Media Settings...
  • Página 16: Setting Up The Network Information Of The Camera

    Setting up the network information of the camera <Default Settings> • DHCP : OFF • Network Speed (bandwidth limitation) : NO LIMIT • IP Address : 192.168.0.2 • Port Number : 80 • Subnet Mask : 255.255.255.0 • Gateway : 192.168.0.1 If you wish to use the default settings, the settings below are not necessary.
  • Página 17: Formatting The Recording Media

    Formatting the Recording Media An SD card or external hard disk can be installed on the camera to record live video. Format the media before use. ● Installing an SD Card or External Hard Disk in the Camera & Please refer to your media’s Instruction manual. <Media recording area setting>...
  • Página 18: Setting A Password

    Setting a Password A password can be set to restrict access to the camera menu screen. ■ Setting the Password ■ Changing the Password [PASSWORD LOCK] [PASSWORD CHANGE] Select [PASSWORD] in the main menu Select [PASSWORD] in the main menu with the jl buttons and press the SET with the jl buttons and press the SET button.
  • Página 19: Using The Supplied Cd-Rom

    & Page 19 of this manual. ● VA-SW3050Lite This is monitoring software for use with Sanyo’s cameras. This software allows monitoring of live video from multiple cameras (up to 128 cameras). & "VA-SW3050LITE" folder: Instruction Manual (PDF) ● H.264 Plug-in This is software for playing back high-quality video.
  • Página 20: Downloading And Playing Back Recorded Video - Using "Dlviewer_Hdcdownloader" Software

    Execute "Setup.exe" in "DLViewer_HDCDownloader" folder. The installer will start. Follow the on-screen instructions to install the software. Installation folder: C:\Program Files\SANYO\HDC Utilites When installation is finished, check the Internet options. • Click [Tools] → [Internet Options] in Internet Explorer. 1 [Security] tab → [Custom level] •...
  • Página 21 HDC Downloader Operation Flow The HDC Downloader screen appears. Download video data recorded on an Connect the SD card or external hard SD card or external hard disk to your disk to your PC and copy the required & & image/video data from it.
  • Página 22 Downloading and Playing back Recorded Video DLViewer Operation Flow The DLViewer screen appears. Select the language. Click Select the type of image/video to play back (JPEG or H.264) and specify the folder. [Example] Operation panel &P27...
  • Página 23 Downloading Recorded Video (HDC Downloader) Download video data recorded on an SD card or external hard disk to your PC. Proxy If you will use a proxy server, select this checkbox and enter the server address (or URL) and port number. Password Enter the password of the download user set in the camera.
  • Página 24 Downloading and Playing back Recorded Video ■ Download by Time/Date ■ Download by Alarm Event ✱1 The [Alarm list] does not contain any alarm when you switch to the [Alarm Search] screen. The start point [Top] and end point [End] Specify the date of the alarm event that are automatically displayed.
  • Página 25 Click [Download]. Click [Play]. The size of the download data is calculated "DLViewer" automatically starts and the and a confirmation dialog box appears. video data is displayed. MEMO: Click [...] button and specify the folder that you wish to play back when you downloaded multiple video data.
  • Página 26 Downloading and Playing back Recorded Video (Explanation of the alarm list) No.: Result: Alarm number • Pass: Download succeeded Pre Alarm: • Fail: Download failed Start date and time of Pre Alarm recording. • No display: Post Alarm: Download not yet executed Start date and time of Post Alarm recording.
  • Página 27 Connect the SD card or external hard disk to your PC and copy the required image/video data from it. Select the display language. Click [Time/Date Search]. [Alarm Search] cannot be used. Click the "Copy from SD/HDD" radio button. Click the [...] button and specify the drive and folder of the SD card or hard disk.
  • Página 28 Downloading and Playing back Recorded Video Playing back Downloaded Video Data (DLViewer) ■ Using the operation panel Slide bar Speed bar (default setting: 3) Slide the knob to move the playback point. Slide the knob to change the playback speed. •...
  • Página 29 ■ Saving and Printing Images ■ Date and Time Display Settings Saving an Image Setting the Date Format Select [View] → [Date Display Format] Click on the toolbar. on the menu bar. Specify the folder, filename, and file type, and click [Save]. Image data is saved as a still image.
  • Página 30: Main Specifications

    Main specifications Television system VCC-HD4000P/VCC-HDN4000PC: PAL color standards VCC-HD4000: NTSC color standards Lens Image pickup device 1/2.5” CMOS sensor Effective pixels 2,320 (H) × 1,728 (V), approx. 4.00 million pixels Recording pixels 2,288 (H) × 1,712 (V), approx. 3.92 million pixels Lens Focal length: f = 6.3 - 63.0 mm (Optical 10×)
  • Página 31 The camera is a precision instrument. Handle it carefully and always follow the safety precautions. If the camera requires service, never try to repair it yourself or open the casing. For servicing, maintenance, or repairs, consult your dealer or an Authorized Sanyo Service Center. b Notes on data storage •...
  • Página 32 • For information on the other products or services provided by third parties which are introduced in the CD-ROM, please contact each supplier or manufacturer. Software, this manual and the electronic manual are copyrighted by SANYO Electric Co., Ltd. No materials contained in these manuals may be reproduced in any format without the prior permission of the copyright holder.
  • Página 33: Installation De La Caméra

    MANUEL D’INSTRUCTIONS Caméra à mégapixels CETTE INSTALLATION DOIT ETRE EFFECTUEE PAR UNE VCC-HD4000P PERSONNE QUALIFIEE DU SERVICE TECHNIQUE ET DOIT ETRE CONFORME A TOUS LES CODES LOCAUX. VCC-HD4000 Veuillez lire ce manuel d’instructions très attentivement afin d’effectuer une installation correcte. Veuillez également lire très attentivement le manuel électronique contenu dans le CD-ROM afin de faire fonctionner la caméra correctement.
  • Página 34: Informations Pour L'utilisateur

    à courts-circuits ou des dommages. Faites attention pour votre revendeur ou à un Centre de service Sanyo autorisé. protéger l’appareil de la pluie, de l’eau de mer, etc. Si de l’eau ou autre liquide entre dans l’appareil, éteignez ■...
  • Página 35 Pour Utilisateurs de l’UE Svp note: SANYO FISHER Sales (Europe) GmbH Stahlgruberring 4, D-81829 München, Germany Votre produit Sanyo est conçu et fabriqué avec des matèriels et des composants de SANYO Electric Co., Ltd. qualité supérieure qui peuvent être 1-1, Sanyo-cho, Daito City, Osaka 574-8534, Japan recyclés et réutilisés.
  • Página 36: Dénomination Et Fonctions Des Pièces

    Dénomination et fonctions des pièces ■Indicateur d’alimentation/d’erreur • Alimentation sur MARCHE : Allumé (heure de début : 30 s) • Alimentation sur ARRÊT : Éteint • Erreur (défaillance) : Clignotant N.B. : Pour activer l’indicateur d’alimentation via le réseau, réglez [LED D’ALIMENTATION (AVANT)] sur «...
  • Página 37: Face Arrière

    ■Face arrière & Pour les branchements, reportez-vous aux pages 11 et 12. ALARM IN 1 ALARM Voyant IN 2 ALARM OUT POWER ALARM IN 1 ALARM IN 2 ALARM OUT POWER A B C D E ZOOM FOCUS AC24V EX-HDD ZOOM FOCUS Bornes de contrôle...
  • Página 38: Ce Que Vous Pouvez Faire

    Ce que vous pouvez faire Système de surveillance en réseau Enregistrement et lecture de la vidéo en direct En reliant la caméra à votre PC avec un câble LAN, vous pouvez utiliser diverses b Enregistrement fonctions pour une surveillance via le •...
  • Página 39: Fonctions D'alarme

    Fonctions d’alarme b Détection b Notification • La caméra est équipée d’un capteur de • Quand une alarme est détectée, vous mouvement intégré. pouvez recevoir les données d’image jointes à un e-mail. La fonction de détection du visage fonctionne conjointement avec le détecteur de mouvement pour détecter la présence d’une personne.
  • Página 40: Procédure Pour Les Réglages De Réseau

    Procédure pour les réglages de réseau ■Vérification de l’environnement de fonctionnement • PC : IBM PC/AT ou compatible • Système d’exploitation: Windows XP Professional/Windows Vista • Unité centrale : Core2Duo E6700 2,66 GHz ou supérieure • Mémoire : Windows XP : 1 Go ou plus Windows Vista : 2 Go ou plus •...
  • Página 41: Branchements

    Branchements Branchement avec la fonction PoE (Power over Ethernet) alimentation électrique Cette caméra fournit simultanément une vidéo en formats JPEG et H.264 et une vidéo bidirectionnelle entre la caméra et le PC. ● N'utilisez pas l'alimentation électrique de la caméra. ●...
  • Página 42: Connexion Internet

    Branchements Branchement sans la fonction PoE (Power over Ethernet) alimentation électrique Connexion Connexion LAN Internet (&P10) Concentrateur de commutation Routeur ou modem ADSL ✱1 ✱1 Connexion directe Câble LAN Câble LAN (droit) (droit) Câble LAN (croisé) Alimentation électrique ✱1 (24 V CA/12 V CC) HDMI SD OUT Moniteur HD...
  • Página 43 A propos de la « A Connexion Internet » La transmission par port pour le port vidéo (HTTP/UDP) doit être activée sur le routeur à large bande. Pour obtenir les détails concernant le réglage de la transmission par port, veuillez vous reporter à le manuel d’instructions de votre routeur.
  • Página 44 Branchements Ne branchez pas le cordon d’alimentation tant que les autres branchements n’ont pas ete effectues. Télécommande pour caméra Branchement pour l’entrée mise (Options: VAC-70) au point et Zoom +6V/12V (LOIN) (FOCUS) -6V/12V (PRES) Type BNC ✱1 +6V/12V ALARM IN 1 ALARM (GRAND-ANGLE) ALARM OUT IN 2...
  • Página 45: Connexion De L'alimentation

    Branchement du moniteur Plus épais que RG-6U (5C-2V) : 500 m / 547 yds. max. L'utilisation de câbles autres que ceux spécifiés peut atténuer les (Alimentation non PoE) signaux video et/ou sync et réduire la Connexion de l’alimentation qualité de la transmission. Pour éviter tout risque d’incendie utilisez un fil répertorié...
  • Página 46: Visionnage De La Vidéo En Direct

    Visionnage de la vidéo en direct Quand la caméra est sous tension, la vidéo en direct s’affiche sur le moniteur. Les informations suivantes s’affichent également. La position d’affichage peut être sélectionnée parmi 12 positions sur l’écran RÉGLAGES DE SORTIE DE TV via le réseau. Titre de la caméra État de l’enregistrement/du téléchargement •...
  • Página 47: Liste Des Écrans De Menu

    Liste des écrans de menu Les réglages indiqués ci-après peuvent être configurés sur le menu de la caméra. • Configurez d’autres réglages sur l’écran de menu version Web. &P15 Réglages de réseau DHCP IP ADDRESS SUBNETMASK GATEWAY NETWORK SPEED NO LIMIT PORT 00080 MENU...
  • Página 48: Configuration Des Informations De Réseau De La Caméra

    Configuration des informations de réseau de la caméra <Réglages par défaut> • DHCP : OFF • Vitesse de réseau (limitation de largeur de bande) : NO LIMIT • Adresse IP : 192.168.0.2 • Numéro de port : 80 • Masque de sous-réseau: 255.255.255.0 •...
  • Página 49: Formatage Du Support D'enregistrement

    Formatage du support d’enregistrement Une carte SD ou un disque dur externe peuvent être installés dans la caméra pour enregistrer une vidéo en direct. Formatez le support avant l’utilisation. ● Installation d’une carte SD ou d’un disque dur externe dans la caméra &...
  • Página 50: Définition D'un Mot De Passe

    Définition d’un mot de passe Un mot de passe peut être défini pour limiter l’accès à l’écran de menu de la caméra. ■ Définition du mot de passe ■ Changement du mot de passe [PASSWORD LOCK] [PASSWORD CHANGE] Sélectionnez [PASSWORD] dans le Sélectionnez [PASSWORD] dans le menu principal au moyen des boutons menu principal au moyen des boutons...
  • Página 51: Utilisation Du Cd-Rom Fourni

    & Page 19 du présent manuel. ● VA-SW3050Lite Il s’agit d’un logiciel de surveillance utilisé avec les caméras de Sanyo. Ce logiciel permet de surveiller une vidéo en direct à partir de plusieurs caméras (jusqu’à 128 caméras).
  • Página 52: Téléchargement Et Lecture De La Vidéo Enregistrée - Utilisation Du Logiciel « Dlviewer_Hdcdownloader

    DLViewer_HDCDownloader ». L’assistant d’installation démarre. Suivez les instructions à l’écran pour installer le logiciel. Dossier d’installation : C:\Program Files\SANYO\HDC Utilites Une fois l’installation effectuée, vérifiez les options Internet. • Cliquez sur [Outils] → [Options Internet] dans Internet Explorer. 1 L’onglet [Sécurité] → [Niveau personnalisé]...
  • Página 53 Flux de fonctionnement du HDC Downloader L’écran HDC Downloader s’affiche. Téléchargez sur votre PC les données Reliez la carte SD ou le disque dur vidéo enregistrées sur une carte SD externe à votre PC et copiez, à partir ou sur un disque dur externe. &P22 de celle-ci/celui-ci, les données image/vidéo requises.
  • Página 54 Téléchargement et lecture de la vidéo enregistrée Flux de fonctionnement du DLViewer L’écran DLViewer s’affiche. Sélectionnez la langue. Cliquez Sélectionnez le type d’image/vidéo à lire (JPEG ou H.264) et spécifiez le dossier. [Exemple] Panneau de commande &P27...
  • Página 55: Téléchargement De La Vidéo Enregistrée (Hdc Downloader)

    Téléchargement de la vidéo enregistrée (HDC Downloader) Téléchargez sur votre PC les données vidéo enregistrées sur une carte SD ou sur un disque dur externe. Proxy Si vous utilisez un serveur mandataire (proxy), cochez cette case et entrez l’adresse du serveur (ou URL) et le numéro de port.
  • Página 56 Téléchargement et lecture de la vidéo enregistrée ■ Télécharger par date/heure ■ Télécharger par événement ✱1 d’alarme La liste des alarmes ([Liste des alarmes]) ne contient aucune alarme lorsque vous ouvrez Le point de début [Haut] et le point de fin l’écran de recherche par alarme ([Recherche [Fin] s’affichent automatiquement.
  • Página 57 Cliquez sur [Telechargement]. Cliquez sur [Lecture]. La taille des données téléchargées est « DLViewer » démarre automatiquement et calculée et une boîte de dialogue de les données vidéo sont affichées. confirmation s’affiche. N.B. : Cliquez sur le bouton [...] et sélectionnez le dossier que vous souhaitez lire une fois les données vidéo multiples téléchargées.
  • Página 58 Téléchargement et lecture de la vidéo enregistrée (Explication de la liste des alarmes) N°: Résultat : Numéro de l’alarme • Pass : téléchargement exécuté avec succès Pré alarme : • Fail : téléchargement échoué Date et heure de début de l’enregistrement par pré-alarme.
  • Página 59 Reliez la carte SD ou le disque dur externe à votre PC et copiez, à partir de celle-ci/celui-ci, les données image/vidéo requises. Sélectionnez la langue d’affichage. Cliquez sur [Recherche Heure/Jour]. [Recherche d’alarme] ne peut pas être Cliquez sur la case d’option « De copie utilisé.
  • Página 60: Utilisation Du Panneau De Commande

    Téléchargement et lecture de la vidéo enregistrée Lecture des données vidéo téléchargées (DLViewer) ■ Utilisation du panneau de commande Glissière Barre de vitesse (réglage par défaut : 3) Faites glisser le coulisseau pour déplacer le Faites glisser le coulisseau pour changer la point de lecture.
  • Página 61 ■ Sauvegarde et impression des ■ Réglages de l’affichage de la date images et de l’heure Sauvegarde d'une image Réglage du format de la date Cliquez sur dans la barre d’outils. Sélectionnez [Vue] → [Format aff. date] dans la barre de menus. Spécifiez le dossier, le nom de fichier et le type de fichier, et cliquez sur [Enregistrer].
  • Página 62: Spécifications Principales

    Spécifications principales Système de télévision VCC-HD4000P: Normes couleur PAL VCC-HD4000: Normes couleur NTSC Objectif Analyseur d’images Capteur CMOS 1/2,5” Pixels effectifs 2320 (H) × 1728 (V) env. 4,00 millions de pixels Pixels d’enregistrement 2288 (H) × 1712 (V) env. 3,92 millions de pixels Objectif Distance focale : f = 6,3 - 63,0 mm (Optique 10×)
  • Página 63: Service Apres Vente

    • Télécommande pour caméra : VAC-70 • Boîtier disque dur externe spécifié SANYO : VA-HDC4000 Pour plus d’informations sur les disques durs recommandés, consultez le site web SANYO : • Carte SD (de 2 Go à 32 Go) Pour plus d’informations sur les cartes SD recommandées, consultez le site web SANYO :...
  • Página 64 • Pour obtenir des informations sur les autres produits ou services fournis par des tiers et présentés dans le CD-ROM, veuillez contacter chaque fournisseur ou fabricant. Le logiciel, le présent manuel et le manuel électronique appartiennent à SANYO Electric Co., Ltd. Aucun des matériels contenus dans ces manuels ne peut être reproduit, dans quelque format que ce soit, sans l’autorisation préalable du détenteur du copyright.
  • Página 65: Cámara De Megapíxeles

    MANUAL DE INSTRUCCIONES Cámara de megapíxeles LA INSTALACIÓN TIENE QUE SER REALIZADA POR UNA VCC-HD4000P PERSONA DE SERVICIO Y TIENE QUE ESTAR DE ACUERDO CON LOS CÓDIGOS LOCALES. VCC-HD4000 Leer atentamente este manual de instrucciones para garantizar que se realiza una instalación correcta.
  • Página 66: Información Para El Usuario

    Sanyo. Si el agua u otros líquidos entran en la unidad, desconecte la alimentación inmediatamente y ■...
  • Página 67: Para Usuarios De La Ue

    SANYO FISHER Sales (Europe) GmbH Stahlgruberring 4, D-81829 München, Germany SANYO Electric Co., Ltd. 1-1, Sanyo-cho, Daito City, Osaka 574-8534, Japan ■ Protéjala de la humedad y el polvo ■ Limpieza Para no dañarla, no la instale donde este sujeta a •...
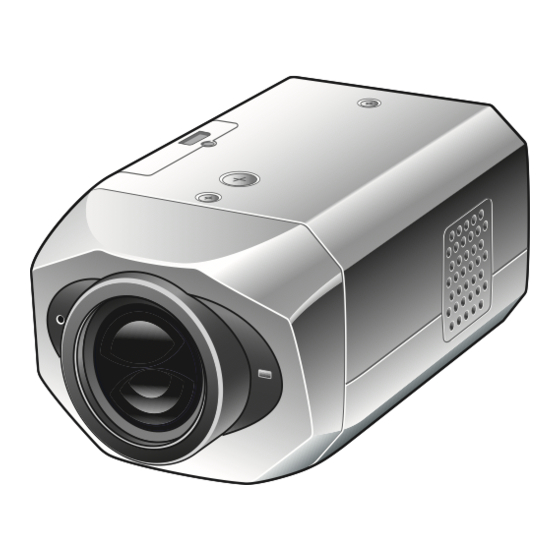
  • Página 68: Nombres Y Funciones De La Piezas

    Nombres y funciones de la piezas ■Indicador de alimentación/fallo • Alimentación ON : Encendido (Tiempo de inicio: 30 s) • Alimentación OFF : Apagado • Error (fallo) : Parpadea NOTA: Para habilitar el indicador de alimentación, a través de la red, ajustar [LED DE ALIMENTACION (DELANTERO)] en "ON"...
  • Página 69: Cara Trasera

    ■Cara trasera & Para las conexiones, ver las páginas 11 y 12. ALARM IN 1 ALARM Indicador IN 2 ALARM OUT POWER ALARM IN 1 ALARM IN 2 ALARM OUT POWER A B C D E ZOOM FOCUS AC24V EX-HDD ZOOM FOCUS Terminales de control...
  • Página 70: Posibilidades De Uso

    Posibilidades de uso Sistema de monitorización de red Grabación y reproducción de vídeo en vivo Conectando la cámara al PC a través de un cable LAN, es posible realizar varias b Grabación de las funciones requeridas para la • Los medios (una tarjeta SD o un disco monitorización desde el programa de duro externo) puede instalarse en la navegación del PC (Internet Explorer) a...
  • Página 71: Detección

    Funciones de alarma b Detección b Aviso • La cámara está provista de un sensor de • Cuando se detecta una alarma, es posible movimiento incorporado. recibir los datos de imágenes como adjunto al mensaje de correo electrónico. La función de detección de caras funciona conjuntamente con el sensor de movimiento para detectar la presencia de humanos.
  • Página 72: Procedimiento Para Los Ajustes De Red

    Procedimiento para los ajustes de red ■Verificación del entorno operativo • PC : IBM PC/AT o compatible • Sistema operativo : Windows XP Professional/Windows Vista • CPU : Core2Duo E6700 2.66 GHz o superior • Memoria : Windows XP : 1 GB o más Windows Vista : 2 GB o más •...
  • Página 73: Conexiones

    Conexiones Conexión cuando se usa la fuente de alimentación PoE (Power over Ethernet) Esta cámara proporciona un suministro simultáneo de vídeo en los formatos JPEG y H.264 y también vídeo bidireccional entre la cámara y el PC. ● No usar la fuente de alimentación de la cámara. ●...
  • Página 74: Conexión A Internet

    Conexiones Conexión cuando no se usa la fuente de alimentación PoE (Power over Ethernet) Conexión a Conexión a la Internet (&P10) Conmutador Enrutador o módem ADSL ✱1 ✱1 Conexión directa Cable LAN Cable LAN (recto) (recto) Cable LAN (cruzado) Alimentación (CA 24 V/CC 12 V) ✱1 HDMI...
  • Página 75 Acerca de "A Conexión a Internet" El redireccionamiento de puerto del puerto de vídeo (HTTP/UDP) debe estar habilitado en el enrutador de banda ancha. Para mayores detalles acerca de cómo configurar el redireccionamiento de puertos, consultar el manual de instrucciones del enrutador. b Puerto 1: JPEG/H.264 HTTP Número de puerto (ajuste por defecto): 80 (TCP) Número de puerto (ajuste por defecto): 80 (TCP)
  • Página 76: Conexión Para Entrada De Enfoque/Zoom

    Conexiones No conectar el cable de alimentación hasta que no se haya terminado con todas las conexiones. Unidad de control de la cámara Conexión para entrada de (Opciones: VAC-70) enfoque/zoom +6V/12V (LEJOS) (FOCUS) -6V/12V (CERCA) Tipo BNC ✱1 +6V/12V (GRAN ALARM IN 1 ALARM ANGULO) ALARM OUT...
  • Página 77: Conexión Del Monitor

    Conexión del monitor Más grueso que el RG-6U (5C-2V): 500 m / 547 yardas máx. El uso de cables que no son los que aquí se especifican podría atenuar (Fuente de alimentación no PoE) las señales de vídeo y/o de sincronización e interferir con la Conexión de alimentación transmisión correcta.
  • Página 78: Visualización De Vídeo En Vivo

    Visualización de vídeo en vivo Cuando la cámara se activa, se visualizan vídeo en vivo en el monitor. Aparece también la siguiente información. La posición de visualización puede seleccionarse entre 12 posiciones en la pantalla AJUSTES DE SALIDA A TV a través de la red. Título de la cámara Estado de grabación/descarga •...
  • Página 79: Lista De Pantallas De Menú

    Lista de pantallas de menú Los ajustes siguientes pueden configurarse en el menú de la unidad de la cámara. • Configurar otros ajustes en la pantalla del menú de la versión para web. &P15 Ajustes de red DHCP IP ADDRESS SUBNETMASK GATEWAY NETWORK SPEED...
  • Página 80: Configuración De Los Datos De Red De La Cámara

    Configuración de los datos de red de la cámara. <Ajustes por defecto> • DHCP : OFF • Velocidad de red (límite de anchura de banda) : NO LIMIT • Dirección IP : 192.168.0.2 • Número de puerto : 80 • Máscara de subred : 255.255.255.0 •...
  • Página 81: Formateo De Los Medios De Grabación

    Formateo de los medios de grabación Puede instalarse una tarjeta SD o un disco duro externo en la cámara para grabar vídeo en vivo. Formatear los medios antes del uso. ● Instalación de una tarjeta SD o de un disco duro externo en la cámara &...
  • Página 82: Ajuste De Una Contraseña

    Ajuste de una contraseña Puede ajustarse una contraseña para restringir el acceso a la pantalla del menú de la cámara. ■ Ajuste de la contraseña ■ Cambio de la contraseña [PASSWORD LOCK] [PASSWORD CHANGE] Seleccionar [PASSWORD] en el menú Seleccionar [PASSWORD] en el menú principal mediante los botones jl y principal mediante los botones jl y pulsar el botón SET.
  • Página 83: Uso Del Cd-Rom Suministrado

    & Página 19 de este manual. ● VA-SW3050Lite Este es un software de monitorización que se usa con las cámaras de Sanyo. Este software permite la monitorización de vídeo en vivo desde varias cámaras (hasta 128 cámaras).
  • Página 84: Descarga Y Reproducción De Vídeo Grabadas - Uso Del Software "Dlviewer_Hdcdownloader

    El instalador inicia. Seguir las instrucciones que se proporcionan en la pantalla para instalar el software. Carpeta de instalación: C:\Program Files\SANYO\HDC Utilites Al terminar la instalación, verificar las opciones de Internet. • Hacer clic en [Herramientas] → [Opciones Internet] en Internet Explorer.
  • Página 85: Flujo De Funcionamiento Del Hdc Downloader

    Flujo de funcionamiento del HDC Downloader Aparece la pantalla del HDC Downloader. Descargar los datos de vídeo Conectar la tarjeta SD o el disco duro grabados en una tarjeta SD o en un externo al PC y copiar los datos de disco duro en el PC.
  • Página 86: Descarga Y Reproducción De Vídeo Grabadas

    Descarga y reproducción de vídeo grabadas Flujo de funcionamiento del DLViewer Aparece la pantalla del DLViewer. Seleccionar el idioma. Clic Seleccionar el tipo de imágenes/vídeo que hay que reproducir (JPEG o H.264) y especificar la carpeta. [Ejemplo] Panel de operación &P27...
  • Página 87: Descarga De Vídeo Grabadas (Hdc Downloader)

    Descarga de vídeo grabadas (HDC Downloader) Descargar los datos de vídeo grabados en una tarjeta SD o en un disco duro en el PC. Proxy Si se usa un servidor proxy, seleccionar esta casilla de verificación y escribir la dirección del servidor (o URL) y el número de puerto.
  • Página 88: Descarga Por Fecha/Hora

    Descarga y reproducción de vídeo grabadas ✱1 ■ Descarga por Fecha/Hora ■ Descarga por evento de alarma La [Lista de alarmas] no contiene ninguna alarma cuando se cambia a la pantalla [Busqueda de alarma]. Se visualizan automáticamente el punto inicial [Superior] y el punto final [Fin]. Especificar la fecha de la alarma que se está...
  • Página 89 Hacer clic en [Descargar]. Hacer clic en [Reproducir]. Se calcula el tamaño de los datos de "DLViewer" inicia automáticamente y se descarga y aparece un cuadro de diálogo visualizan los datos de vídeo. de confirmación. NOTA: Hacer clic en el botón [...] y especificar la carpeta que se desea reproducir cuando se descargan datos de vídeo múltiples.
  • Página 90 Descarga y reproducción de vídeo grabadas (Explicación de la lista de alarmas) Núm.: Resultados: Número de alarma • Pass: Descarga correcta Pre Alarma: • Fail: Descarga incorrecta Fecha y ora iniciales de la grabación de • Ninguna visualización: prealarma. la descarga no se ha efectuado aún Post alarma: Anterior/Siguiente button: Fecha y ora iniciales de la grabación de...
  • Página 91 Conectar la tarjeta SD o el disco duro externo al PC y copiar los datos de imágenes/vídeo necesarios del mismo. Seleccionar el idioma de visualización. Hacer clic en [Busqueda de Hora/Fecha]. [Busqueda de alarma] no puede usarse. Hacer clic en el botón de radio "Extraer de SD/HDD".
  • Página 92: Reproducción De Datos De Vídeo Descargados (Dlviewer)

    Descarga y reproducción de vídeo grabadas Reproducción de datos de vídeo descargados (DLViewer) ■ Uso del panel de operación Barra deslizante Barra de velocidad (ajuste por defecto: 3) Desplazar el punto de deslizamiento para mover Desplazar el punto de deslizamiento para el punto de reproducción.
  • Página 93 ■ Guardar e imprimir imágenes ■ Ajustes de visualización de la fecha y de la hora Guardar imágenes Ajuste del formato de la fecha Hacer clic en en la barra de herramientas. Seleccionar [Vista] → [Formato vis. fecha] en la barra del menú. Especificar la carpeta, nombre de archivo y tipo de archivo y hacer clic en [Guardar].
  • Página 94: Especificaciones Principales

    Especificaciones principales Sistema de televisión VCC-HD4000P: Estándares de color PAL VCC-HD4000: Estándares de color NTSC Lente Dispositivo de recogida 1/2,5” sensor CMOS de imágenes Píxeles efectivos 2320 (H) × 1728 (V), unos 4,00 millones de píxeles Píxeles de grabación 2288 (H) × 1712 (V), unos 3,92 millones de píxeles Lente Distancia focal: f = 6,3 - 63,0 mm (Óptico 10×)
  • Página 95: Asistencia

    • Unidad de control de la cámara: VAC-70 • Carcasa del disco duro externo específico SANYO: VA-HDC4000 Para mayor información sobre los discos duros recomendados, consultar el sitio web SANYO: • Tarjeta SD (de 2 GB a 32 GB) Para mayor información sobre las tarjetas SD recomendadas, consultar el sitio web SANYO:...
  • Página 96 • Para información acerca de otros productos o servicios suministrados por terceras partes que se han incluido en el CD-ROM, contactar con el proveedor o fabricante correspondiente. El software, este manual y el manual electrónico son propiedad intelectual de SANYO Electric Co., Ltd.
  • Página 97: Installieren Der Kamera

    BEDIENUNGSANLEITUNG Megapixel-Kamera DIESE INSTALLATION IST QUALIFIZIERTEM VCC-HD4000P SERVICE-PERSONAL VORBEHALTEN UND MUSS MIT ALLEN LOKALEN GESETZESVORSCHRIFTEN KONFORM SEIN. Lesen Sie bitte diese Bedienungsanleitung sorgfältig durch, um die einwandfreie Installation sicherzustellen. Lesen Sie außerdem auch die auf der CD-ROM enthaltene elektronische Anleitung, um die korrekte Bedienung der Kamera zu gewährleisten.
  • Página 98: Informationen Für Den Benutzer

    Sonnenlichteinfall, weil dadurch Deformationen, wenden Sie sich an Ihren Händler oder an ein Verfärbungen und andere Beschädigungen autorisiertes Sanyo-Kundendienstzentrum. verursacht werden können. ■ Das Gerät darf nicht geöffnet und es dürfen Seien Sie vorsichtig, wenn Sie das Gerät an einer Decke, in einer Küche oder in einem Kesselraum...
  • Página 99 Dieses Symbol und das entsprechende Recycling-System gelten nur für EU-Länder und finden in den anderen Ländern der Welt keine Anwendung. SANYO FISHER Sales (Europe) GmbH Stahlgruberring 4, D-81829 München, Germany SANYO Electric Co., Ltd. 1-1, Sanyo-cho, Daito City, Osaka 574-8534, Japan...
  • Página 100: Bezeichnung Und Funktionen Der Teile

    Bezeichnung und Funktionen der Teile ■Einschalt-/Fehler-Anzeige • Eingeschaltet : Leuchtet (Einschaltzeit: 30 Sek.) • Ausgeschaltet : Leuchtet nicht • Fehler (Ausfall) : Blinkt HINWEIS: Um die Netzanzeige über das Netzwerk zu aktivieren, stellen Sie [EINSCHALT-LED (VORDERSEITE)] im Bildschirm OPTIONS-EINSTELLUNGEN auf „EIN“. ■Seite SD-Karte Steckplatz für SD-Karte...
  • Página 101 ■Rückseite & Anschlüsse: siehe Seite 11 und 12. ALARM IN 1 ALARM Netzanzeige IN 2 ALARM OUT (POWER) ALARM IN 1 ALARM ALARM OUT IN 2 POWER A B C D E ZOOM FOCUS AC24V EX-HDD ZOOM FOCUS Steuerungsanschlüsse SD OUT-Anschlussklemme (BNC-Stecker) Drücken Sie zum Anschließen des Kabels den vorstehenden Teil der betreffenden...
  • Página 102: Was Sie Tun Können

    Was Sie tun können Netzwerk-Überwachungssystem Aufnahme und Wiedergabe von Videoaufnahmen Wenn Sie die Kamera über ein LAN-Kabel an Ihren PC anschließen, b Aufnahme stehen Ihnen verschiedene Funktionen • Sie können Aufnahmemedien (eine SD-Karte für die Überwachung vom Web-Browser oder eine externe Festplatte) für die Kamera Ihres PCs (Internet Explorer) über das installieren, um die Aufnahme der Netzwerk zur Verfügung.
  • Página 103 Alarmfunktionen b Erfassung b Benachrichtigung • Die Kamera verfügt über einen eingebauten • Sie können einstellen, dass Sie bei der Erfassung Bewegungssensor. eines Alarms eine E-Mail mit angehängten Die Kombination von Gesichtsabtastung und Bilddaten erhalten. Bewegungssensor dient der Erfassung von Personen.
  • Página 104: Vorgehensweise Für Die Netzwerkeinstellungen

    Vorgehensweise für die Netzwerkeinstellungen ■Überprüfen der Betriebsumgebung • PC : IBM PC/AT oder kompatible Modelle • Betriebssystem : Windows XP Professional/Windows Vista • CPU : Core2Duo E6700 2,66 GHz oder höher • Arbeitsspeicher : Windows XP : Mindestens 1 GB Windows Vista : Mindestens 2 GB •...
  • Página 105: Anschlüsse

    Anschlüsse Anschlussschema für die Stromversorgung mit PoE (Power over Ethernet) Diese Kamera ermöglicht gleichzeitig die Bildwiedergabe in den Formaten JPEG und H.264 und zudem die bidirektionale Bildübertragung zwischen Kamera und PC. ● Nicht den Netzanschluss der Kamera verwenden. ● Das PoE-Hub bzw. den PoE-Netzadapter nicht an die Stromversorgung anschließen, bevor die Installation der Kamera abgeschlossen wurde.
  • Página 106 Anschlüsse Anschlussschema ohne PoE-Stromversorgung (Power over Ethernet) Internet LAN-Anschluss (&Seite 10) Umschalt-Hub Router oder ADSL ✱1 ✱1 Direkter Anschluss LAN-Netzwerkkabel LAN-Netzwerkkabel (Patchkabel) (Patchkabel) LAN-Netzwerkkabel (Crossover-Kabel) Stromversorgung (AC24V/DC12V) ✱1 HDMI SD OUT HD-Monitor ✱1: LAN-Netzwerkkabel: CAT5 oder höher, Patchkabel, max. 100 m Kamerasteuergerät Monitor...
  • Página 107 Informationen zur „A Internet-Verbindung“ Die Port-Weiterleitung für den Video-Port (HTTP/UDP) muss am Breitband-Router aktiviert werden. Für Einzelheiten über die Vorgehensweise zur Einstellung der Port-Weiterleitung, schlagen Sie bitte in der Bedienungsanleitung des Routers nach. b Port 1: JPEG/H.264 HTTP Anschlussnummer (Voreinstellung): 80 (TCP) Anschlussnummer (Voreinstellung): 80 (TCP) IP-Adresse (Voreinstellung): 192.168.0.2 •...
  • Página 108 Anschlüsse Das Netzkabel nicht anschließen, bevor nicht alle anderen Anschlüsse ausgeführt wurden. Kamerasteuergerät Anschluss für Zoom-/Scharfeinstellungswerte (Optionen: VAC-70) +6V/12V (FERN) (FOCUS) -6V/12V (NAHE) BNC Typ ✱1 +6V/12V ALARM IN 1 ALARM (WEITWINKEL) ALARM OUT IN 2 POWER ✱2 (ZOOM) -6V/12V (TELE) ZOOM FOCUS AC24V...
  • Página 109 Durchmesser von mindestens RG-6U (5C-2V): Monitoranschluss 500 m max. Die Verwendung von nicht mit den Spezifikationen konformen Kabeln kann (ohne PoE) die Video- und/oder Synchronisationssignalen schwächen und Netzanschluss die korrekte Übertragung beeinträchtigen. Verwenden Sie zur Vermeidung von Brandgefahr ein UL-Kabel nach VW-1. AC 24V Prüfen Sie, ob die +/- Polarität richtig ist.
  • Página 110: Anzeigen Von Live-Videobildern

    Anzeigen von Live-Videobildern Wenn die Kamera eingeschaltet ist, werden Live-Videobilder auf dem Monitor angezeigt. Darüber hinaus werden die folgenden Informationen eingeblendet. Für die Anzeigeposition stehen über das Netzwerk 12 Positionen auf dem Bildschirm TV OUT-EINSTELLUNGEN zur Auswahl. Kamerabezeichnung Aufnahme-/Download-Status • Stellen Sie sie im Bildschirm NETZWERK EINST.
  • Página 111: Liste Der Menübildschirme

    Liste der Menübildschirme Die nachstehenden Einstellungen können über das Menü der Kameraeinheit konfiguriert werden. • Konfigurieren Sie die weiteren Einstellungen über das Menü der Web-Version. & Netzwerkeinstellungen Seite 15 DHCP IP ADDRESS SUBNETMASK GATEWAY NETWORK SPEED NO LIMIT PORT 00080 MENU DEFAULT [MENU]_(MAIN MENU)
  • Página 112: Einstellen Der Netzwerkdaten Der Kamera

    Einstellen der Netzwerkdaten der Kamera <Voreinstellungen> • DHCP : OFF • Netzgeschwindigkeit (Bandbreitenbegrenzung) : NO LIMIT • IP-Adresse : 192.168.0.2 • Anschlussnummer : 80 • Subnetzmaske : 255.255.255.0 • Gateway : 192.168.0.1 Wenn Sie die Voreinstellungen verwenden, sind die nachstehenden Einstellungen nicht erforderlich. Gehen Sie wie in Schritt 2 beschrieben Wählen Sie mit der jl-Taste die Option [NETWORK SET] und drücken Sie die...
  • Página 113: Formatieren Der Aufnahmemedien

    Formatieren der Aufnahmemedien Für die Aufnahme von Live-Videobildern können Sie auch eine SD-Karte oder eine externe Festplatte für die Kamera installieren. Formatieren Sie die Medien vor dem Gebrauch. ● Installieren einer SD-Karte oder einer externen Festplatte für die Kamera & Weitere Informationen hierzu finden Sie in der Bedienungsanleitung Ihres Mediums.
  • Página 114: Einstellen Eines Kennworts

    Einstellen eines Kennworts Sie können ein Kennwort einstellen, um den Zugriff auf den Menübildschirm der Kamera zu beschränken. ■ Einstellen des Kennworts ■ Ändern des Kennworts [PASSWORD LOCK] [PASSWORD CHANGE] Wählen Sie mit der jl-Taste die Option Wählen Sie mit der jl-Taste die Option [PASSWORD] und drücken Sie die [PASSWORD] und drücken Sie die SET-Taste.
  • Página 115: Verwenden Der Mitgelieferten Cd-Rom

    Dies ist ein Programm zum Herunterladen und Wiedergeben von mit der Kamera aufgenommenen Videodaten (JPEG/H.264). & Siehe Seite 19 dieses Handbuchs. ● VA-SW3050Lite Dies ist ein Überwachungsprogramm zur Verwendung mit Kameras von Sanyo. Dieses Programm ermöglicht die Überwachung der Live-Videobilder von mehreren (bis zu 128) Kameras. & „VA-SW3050LITE“ Verzeichnis: Bedienungsanleitung (PDF) ●...
  • Página 116: Herunterladen Und Wiedergeben Von Videoaufnahmen - Bei Gebrauch Der „Dlviewer_Hdcdownloader" Software

    Ordner „DLViewer_HDCDownloader“. Das Installationsprogramm startet nun. Befolgen Sie die Bildschirmanweisungen, um die Software zu installieren. Installationsverzeichnis: C:\Program Files\SANYO\HDC Utilites Überprüfen Sie nach abgeschlossener Installation die Internetoptionen. • Klicken Sie im Internet Explorer auf [Extras] → [Internetoptionen]. 1 Registerkarte [Sicherheit] → [Stufe anpassen...]...
  • Página 117 HDC Downloader - Vorgehensweise Der Bildschirm HDC Downloader wird angezeigt. Laden Sie die auf einer SD-Karte oder Schließen Sie die SD-Karte oder die externe Festplatte an Ihren PC an und kopieren Sie Festkarte aufgenommenen Videodaten & die gewünschten Bild-/Videodaten von auf Ihren PC herunter.
  • Página 118 Herunterladen und Wiedergeben von Videoaufnahmen DLViewer - Vorgehensweise Der Bildschirm DLViewer wird angezeigt. Wählen Sie die gewünschte Sprache. Klicken Wählen Sie die Art der Bilder/Videos, die wiedergegeben werden sollen (JPEG oder H.264), und geben Sie das Verzeichnis an. [Beispiel] Bedienfeld &...
  • Página 119 Herunterladen von Videoaufnahmen (HDC Downloader) Laden Sie die auf einer SD-Karte oder Festkarte aufgenommenen Videodaten auf Ihren PC herunter. Proxy Wenn Sie einen Proxy-Server verwenden, aktivieren Sie dieses Kontrollkästchen und geben Sie die Server-Adresse (oder URL) und die Anschlussnummer ein. Kennwort Geben Sie das in der Kamera eingestellte Kennwort für den „download“-Benutzer ein.
  • Página 120 Herunterladen und Wiedergeben von Videoaufnahmen ■ Herunterladen nach Zeit/Datum ■ Herunterladen nach ✱1 Alarmereignis Unter [Alarmliste] wird kein Alarm angezeigt, wenn Sie den Bildschirm [Alarmsuchlauf] Der Ausgangspunkt [Oben] und der öffnen. Endpunkt [Ende] werden automatisch Geben Sie in [Datum] das Datum des angezeigt.
  • Página 121 Klicken Sie auf [Download]. Klicken Sie auf [Wiedergabe]. Die Größe der Download-Daten wird Der „DLViewer“ startet automatisch und berechnet und ein Dialogfeld zur zeigt die Videodaten an. Bestätigung wird angezeigt. HINWEIS: Klicken Sie die Schaltfläche [...] an und geben Sie den Ordner für die Wiedergabe beim Herunterladen von mehreren Videodaten an.
  • Página 122 Herunterladen und Wiedergeben von Videoaufnahmen (Erläuterung der Alarmliste) Zahl: Ergebnis: Alarmnummer • Pass: Die Daten wurden erfolgreich heruntergeladen. Vor Alarm: • Fail: Der Download-Vorgang ist Startdatum und Uhrzeit für die fehlgeschlagen. Voralarmaufnahme. • Keine Anzeige: Post-Alarm: Der Download-Vorgang wurde noch nicht Startdatum und Uhrzeit für die ausgeführt.
  • Página 123 Schließen Sie die SD-Karte oder die externe Festplatte an Ihren PC an und kopieren Sie die gewünschten Bild-/Videodaten von diesem Medium. Wählen Sie die gewünschte Klicken Sie auf [Zeit/Datumssuchlauf]. Anzeigesprache. Die Option [Alarmsuchlauf] steht nicht zur Verfügung. Klicken Sie auf das Optionsfeld „Kopieren von SD/HDD“.
  • Página 124: Verwendung Des Bedienfelds

    Herunterladen und Wiedergeben von Videoaufnahmen Wiedergabe von heruntergeladenen Videodaten (DLViewer) ■ Verwendung des Bedienfelds Schieberegler Geschwindigkeitsschieberegler (Voreinstellung: 3) Sie können den Wiedergabepunkt verschieben, indem Sie den Schieberegler an die gewünschte Mit diesem Schieberegler können Sie die Stelle ziehen. Wiedergabegeschwindigkeit ändern. •...
  • Página 125 ■ Speichern und Drucken von Bildern ■ Einstellungen für die Datums- und Uhrzeitanzeige Speichern eines Bildes Einstellen des Datumsformats Klicken Sie in der Symbolleiste auf Wählen Sie in der Menüleiste [Ansicht] → [Form. Datumsanz.]. Geben Sie das Verzeichnis, den Dateinamen und den Dateityp an und klicken Sie auf [Speichern].
  • Página 126: Wichtigste Technische Daten

    Wichtigste technische Daten Fernsehsystem PAL Farbstandards Objektiv Bildaufnahmesensor 1/2,5” CMOS Sensor Effektive Bildpunkte 2320 (H) × 1728 (V), ca. 4,00Millionen Pixel Aufnahmepixel 2288 (H) × 1712 (V), ca. 3,92Millionen Pixel Objektiv Brennweite: f = 6,3 - 63,0 mm (10-facher optischer Zoom) F-Nummer: F1,8 - 2,5 Elektronischer Zoom: max.
  • Página 127 • Kamerasteuergerät: VAC-70 • Von SANYO zugelassenes externes Festplattengehäuse: VA-HDC4000 Weitere Informationen über die empfohlenen Festplatten finden Sie auf der Website von SANYO: • SD-Karte (2 GB bis 32 GB) Weitere Informationen über die empfohlenen SD-Karten finden Sie auf der Website von SANYO:...
  • Página 128 CD-ROM angegebene Dritte bereitgestellt werden, an den jeweiligen Lieferanten oder Hersteller. Die Software, diese Anleitung und die elektronische Anleitung unterliegen dem Urheberrecht der Sanyo Electric Co., Ltd. Sämtliche in diesen Anleitungen enthaltenen Materialien dürfen ohne vorherige Genehmigung durch den Inhaber des Urheberrechts in keiner Weise reproduziert werden.
  • Página 129 说明手册 摄像头 本摄像头的安装应由合格的维修人员来执行,且应遵守所有的地方 VCC-HD4000P 法规。 VCC-HDN4000PC 为了保证正确的安装,请仔细阅读本说明手册。另外,请务必仔细阅读 CD-ROM 光盘中包含的电子手 册,以保证对摄像头的正确操作。 目录 用户须知 ........1 各部分名称和功能...
  • Página 130: 用户须知

    用户须知 注意事项 ■ 发生故障时 ■ 避免高温 如果本机出现冒烟、 异常气味现象, 或看上去功 切勿设置在取暖炉或其他热源, 如聚光灯等的附 能不正常, 则不要使用本机。 立即关闭电源并脱 近;也不要设置在易受到直射阳光照射的地方, 开电源线, 然后与销售店或三洋认可的维修中心 否则可能会引起变形、 褪色或其他损伤。 商谈。 当设置在天花板、 厨房或锅炉房附近时, 温度可 能会升得很高, 请予注意。 ■ 切勿拆开或改装 ■ 清洁 切勿打开壳体, 否则可能会导致危险和引起本机 损坏。 如要进行修理, 请与销售店或三洋认可的 • 用软布擦拭能去掉壳体上的脏物。 要除去污 维修中心商谈。 垢, 可用软布沾上洗涤剂溶液并拧干后擦拭, 然后再用干的软布擦干。...
  • Página 131 VCC-HDN4000PC 使用 此标志适用于在中国国内销售的电子信息产品,标志中央的数字 表示环保使用期限的年数。 因此,标志中央的数字并不是该产品的保修期。 有关有毒有害物质的含有状况 T: 含有 有毒有害物质或元素 环 保 零部件名称 多溴 多溴 使用期限 铅 汞 镉 六价铬 联苯 二苯醚 (Pb) (Hg) (Cd) (Cr6+) (PBB) (PBDE) 壳体 (金属) 壳体 (树脂) 主 光学镜头 体 印刷线路板· 安装零部件 结构零部件 附 其他 (电缆等) 件...
  • Página 132: 各部分名称和功能

    各部分名称和功能 ■电源/错误指示器 • 通电 : 发亮(启动时间:30秒) • 断电 : 关 • 错误(故障) : 闪烁 备注: 如要启用电源指示器,请通过网络在OPTION SETTINGS屏幕上将[POWER LED (FRONT)]设置为 “ON” 。 ■侧面 SD卡 SD卡插槽 侧盖 在配置设置之后,请关上封盖。请务必使 用随附的螺钉固定封盖。 操作按钮 MENU RESET MENU按钮 RESET按钮 显示主菜单。 使用笔或其它尖利物体进行按键操作。 • 重新启动摄像头。 jl按钮 • 复位设置。 向上/向下移动光标。 如要将所有设置恢复为默认值...
  • Página 133 ■后面 & 欲了解如何进行连接,请参见第11页和第12页。 ALARM IN 1 ALARM POWER IN 2 ALARM OUT 指示灯 ALARM IN 1 ALARM IN 2 ALARM OUT POWER A B C D E ZOOM FOCUS AC24V EX-HDD ZOOM FOCUS 控制端子 SD OUT 端子(BNC连接器) 在连接电缆时,请按住端子的突出端,将电缆插 输出SD(标准清晰度)视频。 入端子,然后松开突出端。 24 VAC/12 VDC 端子...
  • Página 134: 可进行的操作

    可进行的操作 网络监控系统 录制和播放实况视频 通过使用LAN电缆将摄像头连接至计算机, b 录像 可以运行通过网络从计算机的Web浏览器 • 可以在摄像头上安装媒体 (SD 卡或外置硬 (Internet Explorer)进行监控所需的各种功 盘 ),以便在检测到报警时能够录制实况 能。 视频。 录制了静像和视频。 • 可使用定时器和 / 或日程表功能对录像进 行编程。 • 可选软件可用于在计算机上录制 (JPEG)实况视频。 b 下载和播放 安全措施 • 随附的软件 "DLViewer_HDCDownloader" 可用于将通过摄像头录制的实况视频下载 b 在出现访问尝试时,需要根据用户ID和密 到计算机上,以进行播放。 码进行身份验证。 • 通过将 SD 卡或外置硬盘直接安装到计算 b 可限制能访问摄像头的计算机数量。...
  • Página 135 报警功能 b 检测 b 通知 • 摄像头具有一个内置的运动传感器。 • 在检测到报警时,可以将图像数据作为电子 邮件附件进行接收。 人脸检测功能可与运动传感器结合使用,以 检测人的存在。 未检测到 已检测到 • 当您位于离监视器较远的位置时,蜂鸣器或 指示灯可用来通知您已检测到报警。 • 可以设置两种类型的报警输入,例如开门和 关门。 • 当检测到报警条件时,将会放大屏幕上的物 体。 隐私掩蔽 剪辑功能 隐私掩蔽可隐藏被监控图像的某个部分,因 您可以剪辑实况视频的一部分进行集中监 此可用来保护隐私。 (最多5个掩蔽位置) 控,并将其显示在监视器上。...
  • Página 136: 网络设置步骤

    网络设置步骤 ■检查操作环境 • 个人电脑 : IBM PC/AT 或兼容机 • 操作系统 : Windows XP Professional/Windows Vista : Core2Duo E6700 2.66 GHz 或以上 • CPU • 内存 : 1 GB 或更多 : Windows XP Windows Vista : 2 GB 或更多 • 网络接口 : 100Base-TX/1000Base-T (RJ-45 连接器)...
  • Página 137 连接 使用 PoE (以太网供电)电源连接时 该摄像头可同时传送 JPEG 和 H.264 格式的视频,另外它还提供了摄像头和电脑之间的双向视频。 ● 请勿使用摄像头的电源。 ● 在完成摄像头安装之前,请勿向 PoE 集线器或 PoE 电源适配器供电。 使用LAN屏蔽电缆通过交换集线器将摄像头连接至LAN。 您可以使用支持 PoE 的多路交换集线器,延长传输距离。 有关可延长之距离的详细信息,请参见规格等资料中的网络集线器性能。 个人电脑 支持 PoE 的多路 交换集线器 ✱1 ✱1 ✱1: LAN电缆:5类或以上,直线型,最长100 m HDMI SD OUT HD监视器 摄像头控制器 监视器 使用LAN屏蔽电缆通过电源适配器和交换集线器将摄像头连接至 LAN。 交换集线器...
  • Página 138 连接 未使用 PoE (以太网供电)电源连接时 个人电脑 Internet 连接 LAN 连接 (&第10页) 交换集线器 路由器或 ADSL 调制解调器 ✱1 ✱1 直接连接 LAN 电缆 LAN 电缆 (直线型) (直线型) LAN 电缆 (交叉型) 电源 (AC24V/DC12V) ✱1 HDMI SD OUT HD监视器 ✱1: LAN电缆:5类或以上,直线型,最长100 m 摄像头控制器 监视器...
  • Página 139 关于 “A Internet 连接” 必须在宽带路由器上对视频端口(HTTP/UDP)启用端口映射功能。 欲了解如何设置端口映射功能的详细信息,请参阅路由器的说明书。 b 端口1:JPEG/H.264 HTTP 端口号(默认):80(TCP) 端口号(默认):80(TCP) • 设置为与 LAN 相同的值 IP地址(默认):192.168.0.2 至LAN端口 至WAN端口 路由器 b 端口2:H.264 UDP Unicast(单播) 端口号(默认):3939 (UDP) 端口号(默认):3939 (UDP) • 设置为与 LAN 相同的值 IP地址(默认):192.168.0.2 至LAN端口 至WAN端口 路由器 如要通过 Internet 查看 H.264 视频,请为 UDP 设置端口映射功能,以使用 UDP 协议进行通信。不过, 根据网络环境,有可能无法实现此目的。请咨询网络管理员。...
  • Página 140 连接 在其它连接尚未完成之前,请勿连接电源线。 摄像头控制器 聚焦/变焦输入连接设备 (选项: VAC-70) +6V/12V (远距) (FOCUS) -6V/12V (近距) BNC类型 ✱1 +6V/12V ALARM IN 1 ALARM ALARM OUT IN 2 (最大广角) POWER ✱2 (ZOOM) -6V/12V (最大远摄) ZOOM FOCUS AC24V EX-HDD 报警信号输入 b 含报警输入1 (选定 “1") (IN1) 报警信号输入 (COM) b 含报警输入2 (选定...
  • Página 141 监视器连接 比RG-6U (5C-2V)粗,最长 500 m 如果使用与这些指定类型不同的电 缆,视频和/或同步信号将会被削弱和 (非PoE电源) 受到干扰而无法正常传输。 电源线的连接 为避免引起火灾,请使用UL列出的任何 符合VW-1的导线。 AC 24V 检查确定 +/- 极性正确。 LAN 连接 – – 个人电脑 DC 12V ✱2 比 18 AWG 粗 个人电脑 个人电脑 交换集线器 LAN屏蔽电缆 & “使用 PoE (以太网供电)电源连接时” (第8页). & “未使用 PoE (以太网供电)电源连接时” (第9页).
  • Página 142: 查看实况视频

    查看实况视频 在打开摄像头时,实况视频会显示在监视器上。 另外,还会出现以下信息。可通过网络在 TV OUT SETTINGS 屏幕上从 12 个位置中选择显示位置。 摄像头名称 录像/下载状态 • 通过网络在 NETWORK SETTING 屏幕上进 行设置。 变焦放大倍率 Network Camera Network Camera Network Camera x1.0 x1.0 x1.0 REC ALM1 REC ALM1 REC ALM1 ✱ 插在本手册的末尾 报警状态 变焦和聚焦 可以使用侧盖下的按钮对实况视频的变焦和聚焦进行调节。 聚焦 变焦 光学变焦:最大10x 电子变焦:最大160x MENU...
  • Página 143: 菜单屏幕列表

    菜单屏幕列表 可以在摄像头装置的菜单上配置以下设置。 • 在 Web 版菜单屏幕上配置其它设置。 &第15页 网络设置 DHCP IP ADDRESS SUBNETMASK GATEWAY NETWORK SPEED NO LIMIT PORT 00080 MENU DEFAULT [MENU]_(MAIN MENU) &第16页 录像媒体设置 CAPACITY FORMAT 主菜单 NETWORK SET NETWORK SET NETWORK SET EX-HDD : 500GB SD/HDD SET SD/HDD SET SD/HDD SET PASSWORD PASSWORD...
  • Página 144: 设置摄像头的网络信息

    设置摄像头的网络信息 <默认设置> • DHCP : OFF • 网关 : 192.168.0.1 • 网速(带宽限制) : NO LIMIT • IP地址 : 192.168.0.2 • 子网掩码 : 255.255.255.0 • 端口号 : 80 如要使用默认设置,则无需进行以下设置。 使用jl按钮选择[NETWORK SET],然后 使用jl按钮选择[NETWORK SPEED], 按下SET按钮。 然后按下SET按钮。 出现在所选的 “NO LIMIT”旁边,表 • 示可以更改设置。 DHCP IP ADDRESS SUBNETMASK DHCP...
  • Página 145: 格式化录像媒体

    格式化录像媒体 可以在摄像头上安装 SD 卡或外置硬盘,以录制实况视频。 在使用之前需格式化媒体。 ● 在摄像头中安装 SD 卡或外置硬盘 & 请参阅媒体的说明手册。 < 媒体录像区域设置 > 在摄像头菜单屏幕上格式化媒体之后,正常录像区域和报警录像区域的大小将按照 “80 : 20”的比例自 动分配。 如要指定不同的大小比例,请通过网络在 [RECORD] → [SD MEMORY CARD/EX HDD SETTINGS] 中格 式化媒体。 使用jl按钮在主菜单上选择[SD/HDD 使用jl按钮选择要格式化的媒体,然后按 下SET按钮。 SET],然后按下SET按钮。 出现在所选的 “OFF”旁边,表示可 • 以进行初始化。 CAPACITY FORMAT 使用jl按钮选择 “ON” ,然后按下SET EX-HDD : 500GB 按钮。...
  • Página 146: 设置密码

    设置密码 可以设置密码,以限制对于摄像头菜单屏幕的访问。 ■ 设置密码 [PASSWORD LOCK] ■ 更改密码 [PASSWORD CHANGE] 使用jl按钮在主菜单中选择 使用jl按钮在主菜单中选择 [PASSWORD],然后按下SET按钮。 [PASSWORD],然后按下SET按钮。 PASSWORD LOCK PASSWORD LOCK PASSWORD CHANGE PASSWORD CHANGE 使用jl按钮选择[PASSWORD LOCK], 使用jl按钮选择[PASSWORD 然后按下SET按钮。 CHANGE],然后按下SET按钮。 PASSWORD PASSWORD NOW PASSWORD **** **** 使用dc按钮移动输入位置,并使用jl按 输入当前密码,然后按下SET按钮。 钮选择值。在完成后,按下SET按钮。 • 如果是第一次设置密码,请输入 “1234” 。 PASSWORD NEW PASSWORD PASSWORD...
  • Página 147: 使用随附的Cd-Rom光盘

    使用随附的CD-ROM光盘 ■ 软件 随附的 CD-ROM 光盘包含下面所示的应用程序软件。 可以安装这些应用程序,以扩展通过摄像头录制的数据的使用范围。 ● DLViewer_HDCDownloader 这是一种用于下载和播放通过摄像头录制的视频数据(JPEG/H.264)的软件。 & 本手册的第19页。 ● VA-SW3050Lite 这是一种结合Sanyo摄像头使用的监控软件。 该软件允许从多个摄像头(多达128个摄像头)监控实况视频。 & “VA-SW3050LITE”文件夹:说明手册(PDF) ● H.264 Plug-in 这是一种用于播放高质量视频的软件。 如要通过网络在屏幕上查看H.264实况视频,则该软件是必需的。 备注: 可购买另售的 VA-SW3050 Server/Client,以便在计算机上录制 (JPEG)和播放实况视频。 ■ 电子手册 通过使用随附的 CD-ROM 光盘中包含的电子手册,您可以获得从基本操作到高级设置和功能以及故障 排除等方面的广泛信息。 ● 查看电子手册的要求 浏览器:Internet Explorer 6.0或以上 • 请确认已启用了 JavaScript 和 Cookie。...
  • Página 148: 使用 "Dlviewer_Hdcdownloader"软件

    时安装。 请按照屏幕上的说明安装该插件。 将随附的CD-ROM光盘插入计算机的 CD-ROM驱动器。 在 “DLViewer_HDCDownloader”文件夹 中运行 “Setup.exe” 。 安装程序将会启动。请按照屏幕上的说明安 装该软件。 安装文件夹: C:\Program Files\SANYO\HDC Utilites 在安装完成后,检查Internet选项。 • 在Internet Explorer中单击[Tools] →[Internet Options]。 1 [Security]选项→[Custom level] • 请确认 “Run ActiveX controls and plug-ins”设置为 “Enable” 。 2 [Advanced]选项 • 请确认未选中[Security] → [Check for...
  • Página 149 HDC Downloader操作流程 出现HDC Downloader屏幕。 将SD卡或外置硬盘上录制的视频数据下 将SD卡或外置硬盘连接至计算机,并从 & 载至计算机。 第22页 该装置复制所需的图像/视频数据。 & 第26页 单击 “Download from Camera”并 单击 “Copy from SD/HDD”并指定 输入网络信息。 SD卡或硬盘的驱动器和文件夹。 • 密码:download 选择要下载的图像/视频的类型(JPEG 或H.264)。 选择要下载的图像/视频的类型(JPEG 或H.264)。 单击 按钮。 选择搜索方法。 指定包含要下载的数据的文件夹以及下载数据的目标文件夹。 单击 按钮。...
  • Página 150 下载和播放录制的视频 DLViewer操作流程 出现DLViewer屏幕。 选择语言。 单击 选择要播放的图像/视频的类型(JPEG或H.264)并指定文件夹。 [示例] 操作面板 &第27页...
  • Página 151 下载录制的视频(HDC Downloader) 将SD卡或外置硬盘上录制的视频数据下载至计算机。 Proxy 如要使用代理服务器,请选中该复选框并输 入服务器地址(或URL)和端口号。 Password 输入在摄像头中设置的下载用户密码。 • 如果是第一次输入密码,请输入 “download” 。 连接状态显示 显示与摄像头连接的状态。 选择要下载的图像/视频的类型(JPEG或 H.264)。 如要同时下载JPEG和H.264,请一起选择这 选择显示语言。 两种类型。 单击 “Download from Camera”单选按 选择搜索方法。 钮。 如要查看搜索方法的详细说明,请参见下 文。 配置连接到摄像头所需的网络设置。 • 时间/日期搜索: 打开Time/Date Search屏幕。 IP address or URL & 执行 “按时间/日期下载”一节中说 输入摄像头的IP地址(或URL)。 明的步骤。...
  • Página 152 下载和播放录制的视频 ✱1 ■ 按时间/日期下载 ■ 按报警事件 下载 当切换到[Alarm Search]屏幕时, [Alarm list]不包 含任何报警。 开始点[Top]和结束点[End]将自动显示。 指定在[Date]中搜索的报警事件的日期并单 击[Search]。 设置[Start time]和[End time]。 报警事件将出现在[Alarm list]中。 单击[...]按钮并指定在计算机上保存视频数 在[Alarm list]中单击要下载的报警事件。 据的文件夹。 可以选择多个报警事件。 如要在未安装DLViewer的计算机上播放视 单击[...]按钮并指定在计算机上保存视频数 频数据,请选中[with DLViewer]复选框。 据的文件夹。 DLViewer播放软件将与所需的文件一起复制 如要在未安装DLViewer的计算机上播放视 到目标文件夹。 频数据,请选中[with DLViewer]复选框。 & & 转到步骤4。 ( 第24页) DLViewer播放软件将与所需的文件一起复制...
  • Página 153 单击[Download]。 单击[Play]。 将计算下载数据的大小,并出现确认对话 “DLViewer”将自动启动,并显示视频数 框。 据。 备注: 在下载多份视频数据之后,单击[...]按钮并 指定要播放的文件夹。 [示例] & 参见 “播放下载的视频数据 (DLViewer)”一节。 (第27页) 单击[Yes]。 下载开始。 当下载完成时,将出现 “Finished.” 。 在目标文件夹中将自动创建下面的文件夹。 (文件夹说明) JPEG AL 20080922 1030 001 图像格式(JPEG/H264) 搜索方法 • TD(时间/日期搜索) • AL(报警搜索) 年-月-日(示例:2008年9月22日) 小时-分钟(示例:10:30) 文件号 备注: 如要取消下载,请单击[Cancel]按钮。 下载 取消;不过,在单击[Cancel]按钮之前下载 的所有数据都已保存。...
  • Página 154 下载和播放录制的视频 ( 报警列表说明 ) No.: Result: 报警编号 • Pass: 下载成功 • Fail: 下载失败 Pre Alarm: 报警前录像的开始日期和时间。 • 无显示: 下载尚未执行 Post Alarm: 报警后录像的开始日期和时间。 Previous/Next按钮: 当报警事件的数量超过1000时,可单击此按钮 Duration: 显示隐藏的报警。 录像的大约持续时间(单位:分钟) 最长错误时间:约为2分钟 Size (KB): 所录制数据的大小 Type: 报警类型 • Alarm 1/2: 在报警输入端子1/2上检测到的数据。 • Motion: 运动传感器检测到的数据。 •...
  • Página 155 将SD卡或外置硬盘连接至计算机,并从该装置复制所需的图像/视频数 据。 选择显示语言。 单击[Time/Date Search]。 不能使用[Alarm Search]。 单击 “Copy from SD/HDD”单选按钮。 单击[...]按钮并指定SD卡或硬盘的驱动器和 文件夹。 选择要下载的图像/视频的类型(JPEG或 H.264)。 如要同时下载JPEG和H.264,请一起选择这 两种类型。 备注: 从SD卡或硬盘复制图像/视频数据时,不能 使用[Alarm Search](在报警列表中指定一个 图像)。 & 执行 “按时间/日期下载”一节中说明 的步骤。 (第23页)
  • Página 156 下载和播放录制的视频 播放下载的视频数据 (DLViewer) ■ 使用操作面板 滑动条 速度条(默认设置:3) 滑动滑块,以移动播放点。 滑动滑块,以改变播放速度。 • H.264: 5 步 备注: • JPEG: 10 步 文件的开始点和结束点的日期和时间会出现在滑 动条的两端。 日期和时间显示 显示正在播放的视频数据的日期和时间。 播放按钮 可更改年/月/日格式。 : 在视频暂停时以帧为单位向后移动。 & 参见 “设置日期格式"一节。 : 暂停播放并显示静像。 (第28页) : 在视频暂停时以帧为单位向前移动。 时间/日期搜索 : 向后播放。 : 向前播放。 备注: 如要在某个点进行放大或缩小操作,请将鼠标指...
  • Página 157 ■ 保存和打印图像 ■ 日期和时间显示设置 保存图像 设置日期格式 在菜单栏上选择[View] → [Date Display 在工具栏上单击 。 Format]。 指定文件夹、文件名和文件类型,然后单击 [Save]。 图像数据保存为静像。 文件类型: 可以选择位图或JPEG。 打印图像 选择显示格式和分隔符,然后单击[OK]。 在工具栏上单击 。 设置时间显示位置 在菜单栏上选择[View] → [Time Display 检查打印条件并单击[OK]。 Position],然后单击预定的显示位置。 b 在打印的图像上显示标题 在菜单栏上单击[File] → [Title Input]。 • 最多可以存储10个设置的标题。可从下拉 菜单中选择存储的标题。 在[Title Input]屏幕中输入一个标题并单击 [OK]。...
  • Página 158: 主要规格

    主要规格 电视系统 PAL彩色标准 镜头 摄影元件 1/2.5” CMOS 传感器 有效像素 2320 (水平) x 1728 (垂直)、大约400万像素 录像像素 2288 (水平) x 1712 (垂直)、大约392万像素 镜头 焦距:f = 6.3 - 63.0 mm (光学 10×) 焦距比数:F1.8 - 2.5 电子变焦:最大x16(当与光学变焦合并使用时最大可达x160) 摄像头 视频尺寸 (H.264) (16:9) HD 1920x1080p、 HD 1280x720p、 960x540p、 640x360p、 320x180p (4:3) 1080x864p、...
  • Página 159 • 建议将重要数据复制到单独的媒体。 • 在下列情况下,录制的数据可能会丢失 ( 遭到破坏 )。对于因数据丢失所致的损害或利益损失,我公司 不承担任何责任。 - 媒体(SD卡或外置硬盘)未正确使用。 - 媒体未正确安装到设备上。 - 媒体受到电击或机械撞击。 - 在存取记忆卡时移除此卡或关闭电源。 - 媒体已达到使用寿命末期。 b 选项 • 录像 / 播放软件:VA-SW3050 Server/Client • 摄像头控制器:VAC-70 • SANYO 指定的外部硬盘盒:VA-HDC4000 欲获取有关建议的硬盘的更多信息,请访问SANYO网站: • SD 卡 (2 GB 至 32 GB) 欲获取有关建议的SD卡的更多信息,请访问SANYO网站: www.sanyosecurity.com/...
  • Página 160 主要规格 CD-ROM 光盘中包含的软件之许可 • 请仔细阅读安装软件过程中出现在屏幕上的许可协议中包含的条款。如果您同意了其中的所有条款, 可以根据许可协议使用软件。 • 有关 CD-ROM 光盘中引入的、由第三方提供的其它产品或服务之信息,请与各供应商或制造商联系。 软件、本手册和电子手册的版权归 SANYO Electric Co., Ltd. 所有。 事先若未经版权所有者的许可,不得以任何格式复制这些手册中包含的任何材料。 • 除了个人使用,版权法禁止在没有得到版权所有者明确许可的情况下使用记录的受版权保护的图 像。 Microsoft、 Windows、 ActiveX和Internet Explorer是Microsoft Corporation在美国和其他国家 (地区)的注 册商标或商标。 ® ® 本手册中使用的 “Windows”的官方名称为Microsoft Windows Operating System。请注意,本手册中 ® ® ® ® “Windows”一词指的是 “Microsoft XP Operating System”和...
  • Página 161 Recording times and target sizes <CONTENTS> b Recording time by resolution VCC-HD4000P/VCC-HDN4000PC Hard disk recording time ........P1 SD memory card recording time ......P3 VCC-HD4000 Hard disk recording time ........P5 SD memory card recording time ......P7 b Target size by resolution......P9...
  • Página 162 ■ Recording time by resolution ■ Durée d'enregistrement par résolution ■ Aufnahmezeit nach Auflösung ■ Tiempo de grabación por resolución ■ 根据分辨率设置的录像时间 VCC-HD4000P/VCC-HDN4000PC 1 Hard disk recording time 1 Durée d'enregistrement du disque dur 1 Festplatte Aufnahmezeit 1 Tiempo de grabación de disco duro 1 硬盘录像时间...
  • Página 163 Picture quality 80GB Recording rate SUPER FINE FINE ENHANCED NORMAL BASIC Resolution (ips) 16.0 19.0 23.4 30.4 43.2 40.1 47.5 58.5 75.9 108.1 2288 × 1712 80.1 95.1 116.9 151.8 216.2 200.3 237.7 292.3 379.4 540.6 400.5 475.3 584.5 758.8 1081.2 16.0 18.8...
  • Página 164 VCC-HD4000P 2SD memory card recording time 2Durée d'enregistrement de la carte mémoire SD 2SD-Speicherkarte Aufnahmezeit 2Tiempo de grabación de la tarjeta de memoria SD 2SD 记忆卡录像时间 Picture quality Recording rate SUPER FINE FINE ENHANCED NORMAL BASIC Resolution (ips) 1920 × 1080p 12.5...
  • Página 165 Picture quality Recording rate SUPER FINE FINE ENHANCED NORMAL BASIC Resolution (ips) 2288 × 1712 11.8 10.4 12.7 16.5 23.6 1600 × 1200 10.2 12.4 15.7 21.4 17.4 20.5 24.8 31.4 42.8 1280 × 960 11.8 11.8 13.2 15.1 19.6 29.4 23.6 26.5...
  • Página 166 VCC-HD4000 1 Hard disk recording time 1 Durée d'enregistrement du disque dur 1 Festplatte Aufnahmezeit 1 Tiempo de grabación de disco duro 1 硬盘录像时间 Picture quality 80GB SUPER FINE FINE ENHANCED NORMAL BASIC Recording rate Resolution (ips) 14.4 16.5 19.2 23.0 28.8 1920 ×...
  • Página 167 Picture quality 80GB SUPER FINE FINE ENHANCED NORMAL BASIC Recording rate Resolution (ips) 13.4 15.8 19.5 25.3 36.0 40.1 47.5 58.5 75.9 108.1 2288 × 1712 80.1 95.1 116.9 151.8 216.2 200.3 237.7 292.3 379.4 540.6 400.5 475.3 584.5 758.8 1081.2 16.0 18.8...
  • Página 168 VCC-HD4000 2SD memory card recording time 2Durée d'enregistrement de la carte mémoire SD 2SD-Speicherkarte Aufnahmezeit 2Tiempo de grabación de la tarjeta de memoria SD 2SD 记忆卡录像时间 Picture quality SUPER FINE FINE ENHANCED NORMAL BASIC Recording rate Resolution (ips) 1920 × 1080p 1280 ×...
  • Página 169 Picture quality SUPER FINE FINE ENHANCED NORMAL BASIC Recording rate Resolution (ips) 2288 × 1712 11.8 10.4 12.7 16.5 23.6 1600 × 1200 10.2 12.4 15.7 21.4 17.4 20.5 24.8 31.4 42.8 1280 × 960 11.8 11.8 13.2 15.1 19.6 29.4 23.6 26.5...
  • Página 170 ■ Target size by resolution ■ Taille cible par résolution ■ Zielgröße nach Auflösung ■ Tamaño del objetivo por resolución ■ 根据分辨率设置的目标物体大小 VCC-HD4000P/VCC-HD4000/VCC-HDN4000PC Picture quality SUPER FINE FINE ENHANCED NORMAL BASIC Recording rate Resolution (ips) 25 (30) 8000 7000 6000...
  • Página 171: Display Information

    Display Information ● Error message E01: HDD ERROR E02: SD CARD ERROR E03: TEMPERATURE ERROR ● Warning message W01: FAN WARNING W02: POWER RECOVER/POWER LOSS W03: USB CURRENT WARNING W04: NORMAL RECORDING AREA FULL W05: ALARM RECORDING AREA FULL W10: HDD TEMPERATURE W11: NO MEDIA ●...
  • Página 172 Dimensions 161 (6.3) 159 (6.2) 95 (3.7) Unit: mm (inch) Accessories (VCC-HD4000) *1 VCC-HD4000P : English/Français/Deutsch/中文简体 VCC-HD4000 : English/Français/Español VCC-HDN4000PC : 中文简体 1AC6P1P3313-- SANYO Electric Co., Ltd. L5CL2/XE, US, C (0808KP-HS)

Este manual también es adecuado para:

Vcc-hd4000Vcc-hdn4000pc

Tabla de contenido