Tabla de contenido
Publicidad
Idiomas disponibles
Idiomas disponibles
Enlaces rápidos
BEURER GmbH • Söflinger Str. 218 • 89077 Ulm (Germany)
Tel.: +49 (0) 731 / 39 89-144 • Fax: +49 (0) 731 / 39 89-255
www.beurer.com • Mail: kd@beurer.de
BM 85
D Blutdruckmessgerät
Gebrauchsanweisung .........................................2 – 18
G Blood pressure monitor
Instructions for use ...........................................19 – 35
F Tensiomètre
Mode d'emploi ..................................................36 – 52
E Tensiómetro
Instrucciones de uso ....................................... 53 – 69
I Misuratore di pressione
Istruzioni per l'uso ............................................70 – 86
T Tansiyon ölçme cihazı
Kullanım Kılavuzu ............................................87 – 102
r Прибор для измерения артериального давления
Инструкция по применению ......................103 – 122
Q Ciśnieniomierz
Instrukcja obsługi .........................................123 – 139
Electromagnetic Compatibility Information
....... 140 – 143
Publicidad
Tabla de contenido

Manuales relacionados para Beurer medical BM 85


Resumen de contenidos para Beurer medical BM 85
- Página 1 BM 85 D Blutdruckmessgerät Gebrauchsanweisung .........2 – 18 G Blood pressure monitor Instructions for use ...........19 – 35 F Tensiomètre Mode d’emploi ..........36 – 52 E Tensiómetro Instrucciones de uso ........53 – 69 I Misuratore di pressione Istruzioni per l’uso ..........70 – 86 T Tansiyon ölçme cihazı...
-
Página 2: Wichtige Hinweise
Ihr Beurer-Team zung auf und machen Sie diese auch anderen Benutzern 1. Kennenlernen zugänglich. Überprüfen Sie das Beurer BM 85 Blutdruckmessgerät auf 2. Wichtige Hinweise äußere Unversehrtheit der Verpackung und auf die Vollstän- Zeichenerklärung digkeit des Inhalts. Vor dem Gebrauch ist sicherzustellen, dass das Gerät und Zubehör keine sichtbaren Schäden aufweisen... - Página 3 Gebrauchsanweisung beachten Hinweise zur Anwendung • Um eine Vergleichbarkeit der Werte zu gewährleisten, mes- sen Sie Ihren Blutdruck immer zu gleichen Tageszeiten. Anwendungsteil Typ BF • Ruhen Sie sich vor jeder Messung ca. 5 Minuten aus! • Wenn Sie mehrere Messungen an einer Person durchführen möchten, warten Sie zwischen den einzelnen Messungen Gleichstrom jeweils 5 Minuten.
- Página 4 • Beachten Sie, dass es während des Aufpumpens zu einer • Das Gerät ist nur für den in dieser Gebrauchsanweisung Funktionsbeeinträchtigung des betroffenen Gliedmaßes beschriebenen Zweck vorgesehen. Der Hersteller haftet kommen kann. nicht für Schäden, die durch unsachgemäßen oder falschen •...
- Página 5 3. Gerätebeschreibung Hinweise zu Reparatur und Entsorgung • Sie dürfen das Gerät nicht selbst reparieren oder justieren. Eine einwandfreie Funktion ist in diesem Fall nicht mehr ge- währleistet. • Reparaturen dürfen nur vom Kundenservice oder autori- sierten Händlern durchgeführt werden. •...
-
Página 6: Usb-Schnittstelle
Anzeigen auf dem Display: USB–Schnittstelle Sie können mit dem Blutdruckmessgerät zusätzlich Ihre ge- messenen Werte auf den PC übertragen. Hierzu benötigen Sie ein handelsübliches USB Kabel (im Liefer umfang enthalten) sowie die PC-Software „HealthManager“. Die Software können Sie kostenlos im Downloadbereich unter Service auf www.beurer.com herunterladen. -
Página 7: Messung Vorbereiten
4. Messung vorbereiten Im Display blinkt das Stundenformat. Laden Sie das Blutdruckmessgerät vor Ihrer ersten Messung • Wählen Sie mit den Speichertasten M1/ vollständig auf: M2 Ihr gewünschtes Stundenformat und • über PC: bestätigen Sie mit der START/STOPP- Stecken Sie das USB Kabel in die USB-Schnittstelle am Taste Gerät und verbinden Sie es direkt mit dem PC. -
Página 8: Blutdruck Messen
Manschette anlegen Im Display blinkt das Bluetooth Symbol. ® Legen Sie die Manschette am entblöß- • Wählen Sie mit den Speichertasten M1/M2, ob die ten linken Oberarm an. Die Durch- automatische Bluetooth Datenübertragung aktiviert ® blutung des Arms darf nicht durch zu (Bluetooth Symbol blinkt) oder deaktiviert (Bluetooth ®... -
Página 9: Blutdruckmessung Durchführen
werte unterschiedlich sein. Führen Sie die Messung immer am • Um das Messergebnis nicht zu verfälschen, ist es wichtig, selben Arm durch. sich während der Messung ruhig zu verhalten und nicht zu sprechen. Falls sich die Werte zwischen den beiden Armen sehr deutlich unterscheiden, sollten Sie mit Ihrem Arzt absprechen, welchen Blutdruckmessung durchführen Arm Sie für die Messung verwenden. -
Página 10: Ergebnisse Beurteilen
Wenn Sie vergessen das Blutdruckmessgerät auszu- • erscheint wenn die Messung nicht ord- schalten, schaltet es sich nach ca. 3 Minuten automa- nungsgemäß durchgeführt werden konnte tisch aus. Auch in diesem Fall wird der Wert im ausge- (siehe Kapitel 10 Fehlermeldung/Fehlerbe- wählten oder zuletzt verwendeten Benutzerspeicher hebung). - Página 11 darauf, dass Sie sich 5 Minuten ausruhen und während der Bereich der Systole Diastole Maßnahme Messung nicht sprechen oder bewegen. Sollte das Symbol Blutdruckwerte (in mmHg) (in mmHg) oft erscheinen, wenden Sie sich bitte an Ihren Arzt. Stufe 3: einen Arzt aufsu- Selbstdiagnose und -behandlung aufgrund der Messergeb- starke ≥...
- Página 12 In diesem Fall kann unter anderem eine nervale innere Un- GRÜN: Hämodynamische Stabilität vorhanden ruhe ursächlich sein, welche durch kurzfristige Ruhephasen Die Messergebnisse des systolischen und diastolischen Drucks nicht beseitigt werden kann. Weiter können auch bestehen- sind unter hinreichender Kreislaufruhe erhoben und reflektieren de Herzrhythmus-Störungen eine stabile Blutdruckmessung mit guter Sicherheit den Ruheblutdruck.
-
Página 13: Messwerte Abrufen Und Löschen
7. Messwerte abrufen und löschen Wenn Sie den Benutzerspeicher 1 ausgewählt haben ist die Speichertaste M1 zu betätigen. Die Ergebnisse jeder erfolgreichen Messung werden Wenn Sie den Benutzerspeicher 2 ausgewählt haben zusammen mit Datum und Uhrzeit abgespeichert. Bei ist die Speichertaste M2 zu benutzen. mehr als 60 Messdaten wird jeweils die älteste Messung Im Display blinkt A. -
Página 14: Übertragung Der Messwerte
Während einer Messung kann keine Datenübertragung • Wenn Sie die jeweilige Speichertaste (M1 gestartet werden. oder M2) erneut drücken, wird im Display die letzte Einzelmessung angezeigt (hier im Auf dem Display wird PC angezeigt. Starten Sie die Beispiel Messung 03). Datenübertragung in der PC-Software „HealthMana ger“. -
Página 15: Gerät Reinigen Und Aufbewahren
Sie die Datenübertragung in der Beurer „HealthManager“ App. Schritt 2: Beurer „HealthManager“ App 9. Gerät reinigen und aufbewahren Fügen Sie in der Beurer HealthManager App unter „Einstellungen / Meine Geräte“ das BM 85 • Reinigen Sie Gerät und Manschette vorsichtig nur mit einem hinzu. leicht angefeuchteten Tuch. -
Página 16: Technische Angaben
Sie sich nicht bewegen oder reden. Akku-Laufzeit Für ca. 50 Messungen, je nach Höhe 11. Technische Angaben des Blutdrucks bzw. Aufpumpdruck Modell-Nr. BM 85 Zubehör Manschette, Manschettenhalter, Geb- Messmethode Oszillometrisch, nicht invasive Blut- rauchsanweisung, USB Netzteil, USB-... - Página 17 12. Netzteil EN1060-1 (nicht invasive Blutdruckmessgeräte Teil 1: Allge- meine Anforderungen), EN1060-3 (nicht invasive Blutdruck- Modell Nr. FW 7575M/EU/6/06 messgeräte Teil 3: Ergänzende Anforderungen für elektro- Eingang 100 – 240 V, 50 – 60 Hz mechanische Blutdruckmesssysteme) und IEC80601-2-30 Ausgang 6 V DC, 600 mA, nur in Verbindung mit Beurer (Medizinische elektrische Geräte Teil 2 –...
- Página 18 Beurer GmbH, Söflinger Straße 218, 89077 Ulm, Germany geltend zu machen. Der Kunde hat im Garantiefall das Recht Das BM 85 ist mit einerm Lithium Ionen Akku (3.7V / 400 mAh) zur Reparatur der Ware bei unseren eigenen oder bei von uns ausgestattet.
-
Página 19: Getting To Know Your Instrument
1. Getting to know your instrument 2. Important notes Check that the packaging of the Beurer BM 85 blood pressure Signs and symbols monitor has not been tampered with and make sure that all the required contents are present. - Página 20 • If you want to perform several measurements on the same Application part, type BF person, wait five minutes between each measurement. • Do not take a measurement within 30 minutes of eating, drinking, smoking or exercising. Direct current • Repeat the measurement if you are unsure of the measured Disposal in accordance with EC Directive value.
- Página 21 • Avoid any mechanical restriction, compression or bending of – Protect the device from impacts, humidity, dirt, marked the cuff line. temperature fluctuations and direct sunlight. • Do not allow sustained pressure in the cuff or frequent meas- – Do not drop the device. urements.
-
Página 22: Unit Description
3. Unit description • Batteries must not be disposed of with household waste. Please dispose of batteries at the collection points intended for this purpose. • Remove the battery before disposing of the device. Undo the four, round rubber covers on the rear of the device to remove the battery. - Página 23 Information on the display: USB interface The blood pressure monitor also allows you to transfer your measured values to the PC. To do this you require a commercially available USB cable (included in delivery) and the Beurer “Health Manager” PC software. The software can be downloaded free of charge from the download area under Service at www.beurer.com.
-
Página 24: Preparing For The Measurement
4. Preparing for the measurement The hour format now flashes on the display. Completely charge up the blood pressure monitor before ta- • Select the desired hour format using the king your first measurement: M1/M2 memory buttons and confirm with •... -
Página 25: Measuring Blood Pressure
Attaching the cuff The Bluetooth symbol flashes on the display. ® Place the cuff on to the bare left upper • Use the M1/M2 memory buttons to choose whether arm. The circulation of the arm must automatic Bluetooth data transfer is activated (Blue- ®... - Página 26 If the values between the two arms are significantly different, Performing the blood pressure measurement please consult your doctor to determine which arm should be As described above, attach the cuff and adopt the po- used for the measurement. sture in which you want to perform the measurement. Important: The unit may only be operated with the original •...
-
Página 27: Evaluating Results
If you forget to turn off the blood pressure monitor, it will • appears if the measurement could not switch off automatically after approximately 3 minutes. In be performed properly (see section 10 this case too, the value is stored in the selected or most “Error messages/troubleshooting”). - Página 28 during the measurement. If the symbol appears frequent- Blood pressure Systole Diastole Action ly, please consult your doctor. value category (in mmHg) (in mmHg) Self-diagnosis and treatment based on the measurements can Grade 2: seek medical at- be dangerous. Always follow your GP’s instructions. moderate hyper- 160 –...
- Página 29 However, if there is an indication that the circulatory system In an overwhelming number of cases, the HSD diagnosis will is not sufficiently at rest (haemodynamic instability), the give a very good guide as to whether the circulatory system symbol lights up red. is rested when taking the measurement.
-
Página 30: Displaying And Deleting Measurements
7. Displaying and deleting measurements A flashes on the display. The average value of all saved measured The results of every successful measurement are stored values in this user memory is displayed. together with the date and time. The oldest measurement is overwritten in the event of more than 60 measure- ments. -
Página 31: Transferring Measurements
8. Transferring measurements • When the relevant memory button (M1 or M2) is pressed again, the last individual Transfers using the USB interface measurement is displayed (in this example, Connect the blood pressure monitor to your PC using the USB measurement 03). -
Página 32: Cleaning And Storing The Unit
9. Cleaning and storing the unit In the Beurer “HealthManager” app, add the • Clean the unit and cuff carefully using a slightly damp cloth BM 85 under “Settings/My devices”. only. • Do not use any cleaning agents or solvents. -
Página 33: Technical Specifications
For approx. 50 measurements, depen- ding on levels of blood pressure and 11. Technical specifications pump pressure Model no. BM 85 Accessories Cuff, cuff holder, instructions for use, Measurement me- Oscillometric, non-invasive blood pres- USB mains part, USB cable, storage... -
Página 34: Mains Part
12. Mains part momanometers, Part 1: General requirements), EN 1060-3 (non-invasive sphygmomanometers, Part 3: Supplementary Model No. FW 7575M/EU/6/06 requirements for electro-mechanical blood pressure measur- Input 100 – 240 V, 50 – 60 Hz ing systems) and IEC 80601-2-30 (Medical electrical equip- Output 6 V DC, 600 mA, in conjunction with Beurer ment –... - Página 35 13. Battery The BM 85 is equipped with a lithium ion battery (3.7V/400 mAh). If the symbol flashes, you must charge the battery for a minimum of two hours using the enclosed cable. Rechar- ge the battery to between 50 and 75 % of its capacity at least twice a year to achieve a maximum battery service life.
-
Página 36: Conseils Importants
2. Conseils importants 1. Présentation Symboles utilisés Vérifiez que l’emballage du tensiomètre BM 85 de Beurer est intact et que tous les éléments sont inclus. Avant l’utilisation, Les symboles suivants sont utilisés sur le mode d’emploi, sur assurez-vous que l’appareil et les accessoires ne présentent l’emballage et sur la plaque signalétique de l’appareil et des... - Página 37 • Avant toute mesure, reposez-vous pendant env. 5 minutes ! Appareil de type BF • Lorsque vous devez effectuer plusieurs mesures sur une personne, patientez à chaque fois 5 minutes entre chaque mesure. Courant continu • Évitez de manger, boire, fumer ou de pratiquer des activités Élimination conformément à...
- Página 38 • Il ne faut pas bloquer la circulation sanguine plus longtemps Consignes de rangement et d’entretien que nécessaire au cours de la prise de tension. Si l’appareil • Le tensiomètre est constitué de composants électroniques et ne fonctionne pas bien, retirez la manchette du bras. de précision.
-
Página 39: Description De L'appareil
3. Description de l’appareil • Seuls le service client ou les opérateurs autorisés peuvent procéder à une réparation. • N’ouvrez pas l’appareil, sauf lors de l’élimination. Dans ce cas, il convient de retirer la batterie intégrée. Le non-respect de cette consigne annulerait la garantie. •... - Página 40 Données affichées à l’écran : Interface USB Avec le tensiomètre, vous pouvez également transférer les valeurs mesurées sur votre PC. Pour ce faire, il vous faut un câble USB classique (fourni) ainsi que le logiciel « HealthManager ». Ce logiciel peut être téléchargé gratuitement dans la rubrique Téléchargement à...
-
Página 41: Préparation De La Mesure
4. Préparation de la mesure Maintenez la touche MARCHE/ARRÊT enfoncée pen- dant 5 secondes. Avant la première utilisation, chargez complètement le tensi- omètre, Le format de l’heure clignote à l’écran. • via PC : • À l’aide des touches mémoire M1/M2, Insérez le câble USB dans l’interface USB sur l’appareil et sélectionnez le format d’heure que vous connectez-le directement à... -
Página 42: Mesurer La Tension
• Branchez ensuite la fiche de l’adaptateur secteur à la prise. L’heure clignote à l’écran. • Après chaque utilisation du tensiomètre, débranchez d’abord • À l’aide des touches mémoire M1/M2, l’adaptateur secteur de la prise, puis déconnectez-le du ten- sélectionnez l’heure en cours et confirmez siomètre. - Página 43 Insérez maintenant le tuyau de la Adopter une position adéquate manchette dans la prise de raccord de la manchette. Si vous effectuez la mesure sur le bras droit, le tuyau se trouve à l’intérieur de votre coude. Assurez-vous que votre bras n’est pas posé...
-
Página 44: Évaluer Les Résultats
Suite à l’autotest, au cours duquel tous les segments Lorsque le transfert de données via Bluetooth® est s’affichent rapidement, la mesure commence. La man- activé, après confirmation de la mémoire utilisateur, les chette se gonfle automatiquement. La mesure se fait lors données sont transférées. - Página 45 Cela peut indiquer une arythmie. L’arythmie est une maladie dans deux plages OMS différentes (par ex. systole en plage qui se caractérise par une anomalie du rythme cardiaque, en « normale haute » et diastole en plage « normale »), la gra- raison de perturbations du système bioélectrique.
- Página 46 aucun signe de manque de repos circulatoire, le symbole instables, annotez vos valeurs de mesure de tension artérielle (stabilité hémodynamique) s’affiche en vert et le résultat de la concernant le fait que les mesures n’ont pas pu être réalisées mesure peut être enregistré comme nouvelle valeur de tension avec un repos circulatoire suffisant.
-
Página 47: Récupérer Et Supprimer Les Valeurs De Mesure
7. Récupérer et supprimer les valeurs de Si vous avez sélectionné la mémoire utilisateur 1, mesure vous devez actionner la touche mémoire M1. Si vous avez sélectionné la mémoire utilisateur 2, Le résultat de chaque mesure réussie est enregistré avec vous devez actionner la touche mémoire M2. -
Página 48: Transfert Des Valeurs Mesurées
8. Transfert des valeurs mesurées • Si vous appuyez de nouveau sur la touche mémoire (M1 ou M2), la dernière mesure Transfert via interface USB s’affiche à l’écran (ici par exemple la Raccordez votre tensiomètre à votre PC à l’aide du câble USB. mesure 03). -
Página 49: Nettoyage Et Conservation De L'appareil
Étape 2 : Application Beurer 9. Nettoyage et conservation de l’appareil « HealthManager » Ajoutez le BM 85 dans l’application Beurer • Nettoyez soigneusement l’appareil et la manchette, unique- « HealthManager » à la section « Réglages/Mes ment à l’aide d’un chiffon légèrement humide. -
Página 50: Caractéristiques Techniques
Autonomie de la Pour env. 50 mesures, selon le niveau de la tension artérielle ou la pression de batterie N° du modèle BM 85 gonflage Mode de mesure Mesure de la tension artérielle au bras, Accessoires Manchette, support de manchette, mo- oscillométrique et non invasive... -
Página 51: Adaptateur Secteur
12. Adaptateur secteur EN1060-3 (tensiomètres non invasifs, partie 3 : exigences complémentaires sur les tensiomètres électromécaniques) N° du mo- FW 7575M/EU/6/06 et EC80601-2-30 (appareils électromédicaux, partie 2 – 30 : dèle exigences particulières pour la sécurité et les performances Entrée 100 –... - Página 52 13. Batterie Le BM 85 est équipé d’une batterie lithium-ion (3,7 V / 400 mAh). Lorsque le symbole clignote, la batterie doit être rechargée avec le câble fourni pendant env. 2 heures. Rechargez la batterie au moins 2 fois par an à 50 - 75 % pour atteindre une durée de vie maximale de la batterie.
-
Página 53: Introducción
1. Introducción y asegúrese de que estén disponibles para otros usuarios. Compruebe que el embalaje del tensiómetro Beurer BM 85 esté intacto y que su contenido esté completo. Antes de utili- 2. Indicaciones importantes zar el aparato deberá asegurarse de que ni este ni los acce- Símbolos... - Página 54 Tenga en cuenta las instrucciones de uso Indicaciones de utilización • Para garantizar que los valores sean comparables, tómese la tensión siempre a la misma hora del día. Pieza de aplicación tipo BF • Repose unos 5 minutos antes de cada medición. •...
- Página 55 • Tenga en cuenta que durante el inflado puede sufrir cierta • Este aparato está diseñado única y exclusivamente para el limitación funcional en la extremidad en cuestión. fin descrito en estas instrucciones de uso. Por lo tanto, el • La medición de la presión sanguínea no debe interrumpir la fabricante declinará...
-
Página 56: Descripción Del Aparato
3. Descripción del aparato Indicaciones acerca de reparaciones y eliminación de residuos • No repare ni ajuste el aparato usted mismo. Si lo hace, no se garantiza un funcionamiento correcto. • Las reparaciones solo deben dejarse en manos del servicio al cliente o de distribuidores autorizados. - Página 57 Indicaciones en la pantalla: Interfaz USB El tensiómetro le permite además transferir los valores medi- dos al PC. Para ello necesita un cable USB convencional (incluido), así como el software para PC “HealthManager”. El software puede descargarse gratuitamente del área de des- cargas de la rúbrica Service en www.beurer.com.
-
Página 58: Preparar La Medición
4. Preparar la medición Mantenga pulsada la tecla de INICIO/PARADA durante 5 segundos. Cargue el tensiómetro completamente antes de realizar la primera medición: El formato de hora parpadea en la pantalla. • con el PC • Seleccione con las teclas de memoriza- Enchufe el cable USB en la interfaz USB del aparato y coné- ción M1/M2 el formato de hora deseado y ctelo directamente al PC. -
Página 59: Medición De La Presión Sanguínea
• Conecte la fuente de alimentación con el cable USB. La El indicador de la hora parpadea en la fuente de alimentación se puede conectar únicamente a la pantalla. tensión de red indicada en la placa indicadora de tipo. • Seleccione la hora actual con las teclas de •... - Página 60 Ajuste el extremo libre del brazalete Adopción de una postura correcta alrededor del brazo sin que quede demasiado tenso y cierre el velcro. El brazalete debe quedar lo suficiente- mente ajustado como para que quepan dos dedos debajo del mismo. Introduzca el tubo flexible del brazalete •...
- Página 61 Medición de la presión sanguínea • aparece cuando la medición no se ha podido realizar correctamente (véase el Póngase el brazalete como se ha descrito anteriormente capítulo 10 Aviso de errores/Solución de y colóquese en la postura en la que desea realizar la problemas).
-
Página 62: Evaluación De Los Resultados
minutos y que durante la medición no puede hablar ni mover- Si olvida desconectar el tensiómetro, se desconectará se. Si el símbolo aparece con frecuencia, consulte a su de forma automática después de aproximadamente 3 médico. minutos. También en este caso se memoriza el valor en Realizar un autodiagnóstico e iniciar un tratamiento por su el registro de usuario seleccionado o en el último registro cuenta puede ser peligroso. - Página 63 en la tensión sanguínea (estabilidad hemodinámica), es decir, Rango de los Sístole Diástole Medida tanto la presión sanguínea sistólica como la diastólica apare- valores de la (en mmHg) (en mmHg) cen alteradas en este caso. Este aparato determina de forma tensión arterial automática, durante la medición de la presión sanguínea, si Nivel 3:...
-
Página 64: Consultar Y Borrar Los Valores Medidos
y tranquilo, permanezca allí en calma, cierre los ojos, intente erróneos. Los resultados de las mediciones de la presión san- relajarse y respire con tranquilidad y de forma equilibrada y guínea en los cuales se determinó la existencia de calma en la pausada. - Página 65 Si ha seleccionado el registro de usuario 1, deberá • Si vuelve a pulsar la tecla de memorización pulsar la tecla de memorización M1. correspondiente (M1 o M2) se mostrará en Si ha seleccionado el registro de usuario 2, deberá la pantalla la última medición individual (en utilizar la tecla de memorización M2.
-
Página 66: Transmisión De Los Valores De Medición
Paso 2: Aplicación “HealthManager” de Beurer En la pantalla se muestra PC. Inicie la transferencia Añada el dispositivo BM 85 en la opción “Ein- de datos en el software para PC “HealthManager”. stellungen/Meine Geräte” (Ajustes/Mis dispo- Durante la transferencia de datos se visualiza una sitivos) de la aplicación “HealthManager”... -
Página 67: Limpieza Y Almacenamiento Del Aparato
• No use limpiadores ni disolventes. Nº de modelo BM 85 • No se puede sumergir el aparato en ningún caso, ya que Método de medición Oscilométrico, medición no invasiva de puede penetrar líquido en él y dañarlo. - Página 68 cliente en la dirección indicada en este documento o leer el Diámetro de bra- 22 a 36 cm final de las instrucciones de uso. zalete • Este aparato cumple la directiva europea en lo referente a Condiciones de + 10 °C a + 40 °C, ≤ 90 % humedad rela- productos sanitarios 93/42/CE, las leyes relativas a produc- funcionamiento ad- tiva (sin condensación)
- Página 69 12. Enchufe 13. Batería El tensiómetro BM 85 está equipado con una batería de iones N.º de mo- FW 7575M/EU/6/06 de litio (3,7V/400 mAh). Si parpadea el símbolo , la batería delo deberá cargarse con el cable suministrado durante aproxima- Entrada 100 –...
-
Página 70: Indicazioni Importanti
1. Introduzione Controllare l'integrità esterna della confezione e del contenu- 2. Indicazioni importanti to del misuratore di pressione Beurer BM 85. Prima dell'uso Spiegazione dei simboli assicurarsi che l'apparecchio e gli accessori non presentino nessun danno palese e che il materiale di imballaggio sia stato I seguenti simboli sono utilizzati nelle istruzioni per l'uso, rimosso. - Página 71 • Per effettuare più misurazioni su una stessa persona, atten- Parte applicativa tipo BF dere 5 minuti tra una misurazione e l'altra. • Evitare di mangiare, bere, fumare o praticare attività fisica almeno nei 30 minuti precedenti alla misurazione. Corrente continua •...
- Página 72 • Evitare di schiacciare, comprimere o piegare meccanicamen- dell'apparecchio dipendono da un utilizzo attento e scrupo- te il tubo del manicotto. loso: • Evitare di mantenere una pressione costante nel manicotto – Non esporre l'apparecchio a urti, umidità, sporcizia, forti e di effettuare misurazioni troppo frequenti che causereb- sbalzi di temperatura e direttamente alla luce solare.
-
Página 73: Descrizione Dell'apparecchio
3. Descrizione dell'apparecchio Indicazioni per la riparazione e lo smaltimento • L‘apparecchio non deve essere riparato o tarato personal- mente. In questo caso non è più garantito il funzionamento corretto. • Le riparazioni possono essere effettuate solo dal Servizio clienti o da rivenditori autorizzati. •... - Página 74 Indicatori sul display: Interfaccia USB Con il misuratore di pressione è anche possibile trasferire i valori misurati sul PC. A tale scopo è necessario disporre di un cavo USB disponibile in commercio (fornito in dotazione) e del software per PC "HealthManager"...
-
Página 75: Preparazione Della Misurazione
4. Preparazione della misurazione Sul display lampeggia il formato ora. Prima della prima misurazione, caricare completamente il mi- • Con i pulsanti per la memorizzazione M1/ suratore di pressione: M2 selezionare il formato dell'ora deside- • Tramite PC: rato e confermare con il pulsante START/ Inserire il cavo USB nell'interfaccia USB dell'apparecchio e STOP collegarlo direttamente al PC. -
Página 76: Misurazione Della Pressione
• Dopo avere utilizzato il misuratore di pressione, staccare l'ali- Sul display lampeggia l'ora. mentatore prima dalla presa e poi dal misuratore di pressio- • Con i pulsanti per la memorizzazione M1/ M2 selezionare l'ora corrente e confermare con il pulsante START/STOP 5. - Página 77 Inserire l'attacco del tubo del manicotto Postura corretta nel relativo ingresso sull'apparecchio. Se si esegue la misurazione sul braccio destro, il tubo si trova all'interno del gomito. Prestare attenzione a non appog- giare il braccio sul tubo. • Prima di ogni misurazione rilassarsi per ca. 5 minuti. In caso La pressione può...
- Página 78 Esecuzione della misurazione della pressione • viene visualizzato se la misurazio- ne non è stata effettuata correttamente Applicare il manicotto e sistemarsi nella posizione in cui (vedere il capitolo 10 Messaggi di errore/ si desidera eseguire la misurazione. Soluzioni). Ripetere la misurazione. •...
-
Página 79: Interpretazione Dell'esito
né muoversi durante la misurazione. Rivolgersi al proprio medi- Se si dimentica di spegnere il misuratore di pressione, co nel caso l'icona compaia frequentemente. questo si spegne automaticamente dopo circa 3 minuti. Diagnosi e terapie definite autonomamente in base agli esiti Anche in questo caso il valore viene memorizzato nella delle misurazioni possono rivelarsi pericolose. - Página 80 Intervallo dei va- Sistole Diastole Misura da adot- VERDE: stabilità emodinamica presente lori di pressione (in mmHg) (in mmHg) tare Le misurazioni della pressione sistolica e diastolica vengono Livello 3: Rivolgersi a un effettuate con una circolazione rilassata e riflettono con buon ≥...
-
Página 81: Ricerca E Cancellazione Dei Valori Misurati
pause di rilassamento. Si può anche trattare di disturbi del • Dopo la visualizzazione a schermo intero, selezionare ritmo cardiaco che impediscono una misurazione stabile della entro 3 secondi con il pulsante per la memorizzazione pressione. M1 o M2 la memoria utente desiderata ( La mancanza di pressione a riposo può... - Página 82 • Premendo nuovamente il pulsante per la Sul display lampeggia l'indicazione A. memorizzazione corrispondente (M1 o Viene visualizzato il valore medio di tutti i M2), il display visualizza l'ultima misura- valori misurati della memoria utente selezi- zione singola (nell'esempio la misurazione onata.
-
Página 83: Trasmissione Dei Valori Di Misurazione
Fase 2: App "HealthManager" di Beurer Sul display viene visualizzato PC. Avviare la Aggiungere il BM 85 nell'app HealthManager di trasmissione dei dati nel software per PC "Health- Beurer in "Impostazioni/Miei dispositivi". Manager". Durante la trasmissione dei dati sul display viene visualizzata un'animazione. -
Página 84: Pulizia E Cura
11. Dati tecnici • Non utilizzare detergenti o solventi. • L'apparecchio non deve per nessun motivo essere immerso Codice BM 85 nell'acqua, in quanto potrebbe infiltrarsi dell'umidità e dan- Metodo di misura- Oscillometrico, misurazione non invasi- neggiarlo. - Página 85 norme europee EN1060-1 (Sfigmomanometri non invasivi Dimensioni manicotto Da 22 a 36 cm Parte 1: Requisiti generali), EN1060-3 (Sfigmomanometri Condizioni di funzio- +10 °C - +40 °C, ≤ 90 % umidità relativa non invasivi Parte 3: Requisiti integrativi per sistemi elet- namento ammesse (senza condensa) tromeccanici per la misurazione della pressione arteriosa)
-
Página 86: Batteria Ricaricabile
12. Alimentatore 13. Batteria ricaricabile Il BM 85 è dotato di una batteria ricaricabile agli ioni di litio Codice FW 7575M/EU/6/06 (3,7 V/400 mAh). Quando l'icona lampeggia, è necessario Ingresso 100 - 240 V, 50 - 60 Hz caricare la batteria ricaricabile con il cavo fornito in dotazione... -
Página 87: Ürün Özellikleri
Beurer Ekibiniz diğer kullanıcıların kılavuza erişebilmesini sağlayın. 1. Ürün özellikleri 2. Önemli yönergeler Beurer BM 85 tansiyon ölçme cihazının ambalajının dıştan İşaretlerin açıklaması hasar görmemiş ve içeriğin eksiksiz olduğundan emin olun. Cihazı kullanmadan önce, cihazda ve aksesuarlarında gözle Cihazın ve aksesuarların kullanım kılavuzunda, ambalajında ve görülür hasarlar olmadığından ve tüm ambalaj malzeme-... - Página 88 • Bir kişide birden fazla ölçüm yapmak istiyorsanız, ölçümler Uygulama parçası tip BF arasında 5 dakika bekleyin. • Ölçüme en az 30 dakika kala yememeli, içmemeli, sigara kullanmamalı veya fiziksel egzersiz yapmamalısınız. Doğru akım • Ölçülen değerler ile ilgili şüpheniz varsa, ölçümü tekrarlayın. Elektrikli ve elektronik eski cihazlarla ilgili AB •...
- Página 89 • Manşette sürekli basınç olmasını önleyin ve sık ölçümlerden – Cihazı güçlü elektromanyetik alanların yakınında kullanma- kaçının. Kan akışının bunun sonucunda kısıtlanması halinde yın ve radyo sistemlerinden veya cep telefonlarından uzak yaralanmalar meydana gelebilir. tutun. • Manşeti, atardamarları veya toplardamarları tıbbi tedavi gö- –...
-
Página 90: Cihaz Açıklaması
3. Cihaz açıklaması Onarım ve elden çıkarma ile ilgili bilgiler • Cihazı kendiniz onarmayın veya ayarlamayın. Aksi halde ciha- zın kusursuz çalışması garanti edilemez. • Onarım işlemleri yalnızca müşteri servisi veya yetkili satıcılar tarafından yapılabilir. • Cihazı, bertaraf edilmesi haricinde açmayın. Bu durumda takılı... - Página 91 Ekrandaki göstergeler: USB bağlantı noktası Ayrıca, tansiyon ölçme cihazınızla ölçtüğünüz değerleri bilgisa- yara aktarabilirsiniz. Bunun için piyasada sunulan bir USB kablosu (teslimat kapsamındadır) ve bilgisayar yazılımı "HealthManager" gereklidir. Bu yazılımı ücretsiz olarak www.beurer.com adresinde Servis altındaki indirme bölümünden indirebilirsiniz. Beurer bilgisayar yazılımı "HealthManager" için sistem gereksinimleri 1.
-
Página 92: Ölçüme Hazırlık
4. Ölçüme hazırlık Ekranda saat biçimi yanıp söner. İlk ölçümden önce tansiyon ölçme cihazını tamamen şarj edin: • Hafıza düğmeleri M1/M2 ile istediğiniz • Bilgisayar üzerinden: saat biçimini seçin ve BAŞLAT/DURDUR USB kablosunu cihazdaki USB bağlantı noktasına takın ve düğmesi ile onaylayın. -
Página 93: Tansiyon Ölçme
Manşeti takma Ekranda sembolü yanıp söner. ® Manşeti çıplak sol üst kola takın. Kolun • Hafıza düğmeleri M1/M2 ile otomatik Bluetooth veri ® kan dolaşımı dar giysiler veya benzeri aktarımının etkinleştirilip (Bluetooth sembolü yanıp ® nedeniyle engellenmemelidir. söner) etkinleştirilmeyeceğini (Bluetooth sembolü... - Página 94 Dikkat: Cihaz sadece orijinal manşetle kullanılabilir. Manşet Tansiyon ölçümünü gerçekleştirme sadece 22 ile 36 cm arası kol çevresi için uygundur. Manşeti yukarıda açıklandığı gibi takın ve ölçümü Sipariş numarası 163.387 ile 35 ile 44 cm arası üst kol çevrele- gerçekleştirmek istediğiniz duruşa geçin. ri için daha büyük bir manşeti yetkili bir satıcıdan veya servis •...
-
Página 95: Sonuçları Değerlendirme
• Ölçüm doğru şekilde gerçekleştirilemedi- Tansiyon ölçme cihazını kapatmayı unutursanız, cihaz ğinde görüntülenir (bkz. Bölüm 10 Hata yaklaşık 3 dakika sonra otomatik olarak kapanır. Bu du- iletisi/Arıza giderme). Ölçümü tekrarlayın. rumda da değer, seçilen veya en son kullanılan kullanıcı hafızasına kaydedilir ve bu veriler, Bluetooth veri ®... - Página 96 Ölçüm sonuçlarına göre kendi kendinize teşhis koymanız ve Tansiyon Sistol Diyastol Önlem kendi kendinizi tedavi etmeniz tehlikeli olabilir. Mutlaka dok- değerlerinin (mmHg (mmHg torunuzun talimatlarını yerine getirin. aralığı olarak) olarak) Seviye 2: WHO sınıflandırması: Bir doktora orta şiddette 160 – 179 100 – 109 Ölçüm sonuçları, Dünya Sağlık Örgütü'nün (WHO) standartları/ başvurun hipertansiyon...
- Página 97 Sükunet tansiyonunun eksikliğinin çeşitli nedenleri olabilir: YEŞİL: Hemodinamik stabilite mevcut örneğin bedensel yorgunluk, ruhsal gerginlik, dikkat dağınıklığı, Sistolik ve diyastolik basıncın ölçüm sonuçları, yeterli kan tansiyon ölçümü sırasında konuşmak ve kalp ritmi bozukluğu dolaşımı sükuneti altında elde edilir ve güvenilir bir şekilde sü- gibi.
-
Página 98: Ölçüm Değerlerini Çağırma Ve Silme
7. Ölçüm değerlerini çağırma ve silme Ekranda A sembolü yanıp söner. Bu kullanıcı hafızasında kayıtlı olan tüm öl- Başarılı her ölçümün sonuçları, tarih ve saat ile birlikte çüm değerlerinin ortalaması gösterilir. kaydedilir. 60'tan fazla ölçüm verisi kaydedildiğinde en eski ölçümün üzerine yazılır. •... -
Página 99: Ölçüm Değerlerinin Aktarılması
8. Ölçüm değerlerinin aktarılması • İlgili hafıza düğmesine (M1 veya M2) yeniden basarsanız ekranda son münferit USB bağlantı noktası üzerinden aktarım ölçüm gösterilir (Buradaki örnekte 03 ölçü- Tansiyon ölçme cihazınızı USB kablosuyla bilgisayarınıza mü). bağlayın. • İlgili hafıza düğmesine (M1 veya M2) tekrar basarsanız Ölçüm sırasında veri aktarımı... -
Página 100: Cihaz Temizliği Ve Muhafazası
Adım 2: Beurer „HealthManager“ App 9. Cihaz temizliği ve muhafazası Beurer HealthManager App'te „Ayarlar / Cihazlarım“ altından BM 85'i ekleyin. • Cihazı ve manşeti dikkatli bir şekilde, sadece hafif nemlendi- rilmiş bir bezle temizleyin. • Temizlik maddeleri veya çözücü maddeler kullanmayın. -
Página 101: Teknik Veriler
Yakl. 50 ölçüm için, tansiyonun konuşmamaya dikkat edin. çalışma süresi yüksekliğine veya şişirme basıncına 11. Teknik veriler göre Model no. BM 85 Aksesuarlar Manşet, bileklik, kullanım kılavuzu, USB elektrik adaptörü, USB kablosu, sakla- Ölçüm yöntemi Üst koldan, osilometrik, invazif olmayan ma çantası... -
Página 102: Elektrik Adaptörü
13. Şarj edilebilir pil niz. BM 85, Lityum iyon şarj edilebilir pile (3,7 V / 400 mAh) sahiptir. • Bu ürünün Avrupa R&TTE Yönetmeliği 1999/5/EC’ye uygun sembolü yanıp sönüyorsa şarj edilebilir pil birlikte verilen olduğunu garanti ederiz. -
Página 103: Для Ознакомления
измерению Вашего артериального давления в состоянии Проверьте комплектность поставки прибора для покоя. Подробнее об этом — в главе 6. измерения артериального давления Beurer BM 85 Сохраняйте данную инструкцию по применению для и убедитесь в том, что на упаковке нет внешних... - Página 104 Осторожно! Серийный номер Символ CE подтверждает соответствие основным требованиям директивы о Указание медицинских изделиях 93/42/EWG. Отмечает важную информацию Указания к применению Соблюдайте инструкцию по применению • Для сравнительного анализа данных всегда измеряйте свое артериальное давление только в определенные Рабочая часть типа BF часы.
- Página 105 щих преэклампсией. Перед использованием прибора для • Не используйте манжету у женщин, перенесших ампута- измерения артериального давления во время беремен- цию груди. ности рекомендуется проконсультироваться с врачом. • Во избежание дальнейших повреждений не накладывай- • Заболевания системы кровообращения могут привести те...
- Página 106 – Не используйте прибор вблизи сильных электромагнит- • Не выбрасывайте использованные аккумуляторы в быто- ных полей, держите его на значительном расстоянии от вой мусор. Утилизируйте использованные аккумуляторы радиоустановок или мобильных телефонов. в предусмотренных для этого пунктах сбора. – Используйте только входящие в комплект или ориги- •...
-
Página 107: Описание Прибора
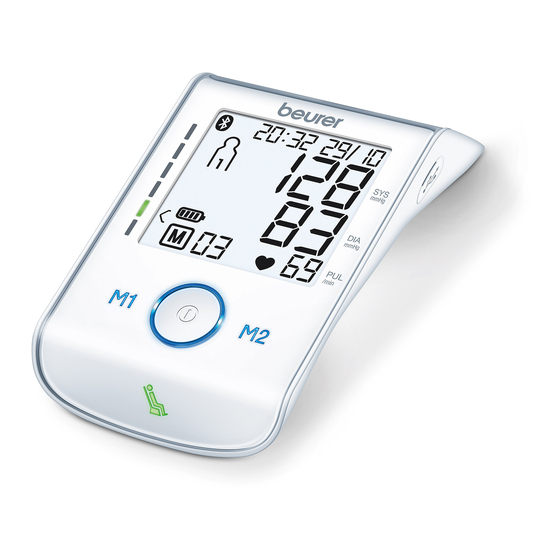
3. Описание прибора Индикация на дисплее: 1. Время/дата 2. Систолическое давление 3. Диастолическое давление 4. Измеренное значение пульса 5. Символ «Пульс» 1. Манжета 6. Выпуск воздуха (стрелка) 2. Шланг манжеты 7. Номер ячейки памяти/индикация содержимого памяти: 3. Штекер манжеты среднее значение ( ), утром ( ), вечером... -
Página 108: Подготовка К Измерению
4. Подготовка к измерению Интерфейс USB С помощью прибора для измерения артериального Перед первым измерением давления полностью зарядите давления Вы можете перенести измеренные значения на прибор: компьютер. • от ПК: Для этого Вам потребуется обычный USB-кабель (входит в Подсоедините USB-кабель к интерфейсу USB на приборе комплект... - Página 109 Удерживая нажатой кнопку сохранения M1 или M2, На дисплее замигают часы. можно быстрее настроить значения. • С помощью кнопок сохранения M1/M2 Удерживайте кнопку ВКЛ./ВЫКЛ. нажатой в течение выберите количество часов и подтвер- 5 секунд. дите выбор нажатием кнопки ВКЛ./ ВЫКЛ. На...
-
Página 110: Измерение Артериального Давления
• Подключите другой конец USB-кабеля к блоку питания. Плотно, но не слишком туго оберните Блок питания должен подключаться только к сетевому свободный конец манжеты вокруг напряжению, указанному на табличке на оборотной сто- руки и застегните с помощью роне устройства. застежки-липучки. Манжета должна •... - Página 111 Правильное положение тела Измерение артериального давления Наложите манжету, как описано выше, и займите удобное для измерения положение. • Для запуска прибора для измерения артериального давления нажмите кнопку ВКЛ./ВЫКЛ. На короткое время на дисплее отобра- • Не занимайтесь активной деятельностью в течение 5 ми- зятся...
-
Página 112: Оценка Результатов
Если Вы забудете выключить прибор, он выключится • Символ появляется, если измере- автоматически примерно через 3 минуты. В этом ние было произведено ненадлежащим случае измеренное значение также сохранится образом (см. главу 10 «Сообщение об в выбранной или последней использованной ошибке/устранение неисправностей»). пользовательской... - Página 113 недостатком сна. Аритмия может быть выявлена только в систолическое давление — высокое в допустимых результате обследования у врача. пределах, а диастолическое — нормальное), то Если после первого измерения на дисплее отображается графическое деление ВОЗ на приборе всегда будет символ , повторите измерение. Обратите внимание отображать...
- Página 114 Показания индикатора состояния покоя (диагностика показатель артериального давления влияет на назначение гемодинамической стабильности) медикаментозного лечения пациента. Самая распространенная ошибка при измерении КРАСНЫЙ: отсутствие гемодинамической давления состоит в том, что давление в момент стабильности измерения не является артериальным давлением покоя Очень вероятно, что измерение систолического и (гемодинамическая...
-
Página 115: Просмотр И Удаление Результатов Измерения
или нарушения сердечного ритма во время измерения • После появления полноэкранного изображения в давления. течение 3 секунд нажатием кнопки сохранения M1 В большинстве случаев применения диагностика или M2 выберите нужную пользовательскую память гемодинамической стабильности очень хорошо свидетельствует о том, измерялось ли артериальное –... - Página 116 • При повторном нажатии соответствую- На дисплее замигает A. щей кнопки сохранения (M1 или M2) на Отобразится среднее значение всех дисплее отобразится результат послед- сохраненных в данной пользовательской него измерения (в качестве примера памяти результатов измерений. используется измерение 03). На дисплее замигает AM. •...
-
Página 117: Передача Измеренных Значений
8. Передача измеренных значений Для этого Вам понадобится приложение Beurer HealthMa- nager. Оно доступно для загрузки в Appstore. Передача через интерфейс USB Чтобы перенести данные, выполните следующие действия. С помощью USB-кабеля подключите Ваш прибор для Если в меню настроек активирована функция Bluetooth ®... -
Página 118: Очистка И Хранение Прибора
данных в приложении Beurer HealthManager. Шаг 2: Приложение Beurer 9. Очистка и хранение прибора HealthManager • Производите очистку прибора для измерения артери- Добавьте BM 85 в разделе «Настройки/Мои ального давления с осторожностью. Используйте только устройства» приложения Beurer HealthMa- слегка влажную салфетку. nager. - Página 119 разговаривайте во время измерения. Допустимые От -20 °C до + 55 °C, при 11. Технические данные условия хранения относительной влажности воздуха ≤ № модели BM 85 90 %, давление окружающей среды 800 –1050 гПа Метод измерения Осциллометрическое, неинвазивное Электропитание 5 В пост. тока...
- Página 120 • Точность данного прибора для измерения артериального Классификация Внутреннее питание, IPX0, без давления была тщательно проверена, прибор был раз- AP или APG, продолжительное работан с расчетом на длительный срок эксплуатации. использование, рабочая часть типа При использовании прибора в медицинских учреждениях необходимо...
-
Página 121: Блок Питания
12. Блок питания 13. Аккумулятор Прибор BM 85 оснащен литий-ионным аккумулятором № модели FW 7575M/EU/6/06 (3,7 В/400 мА·ч). Если символ начинает мигать, Вход 100 – 240 В, 50 – 60 Гц аккумулятор необходимо заряжать при помощи Выход 6 В пост. тока, 600 мА, только в... - Página 122 Товар подлежит декларированию: Срок эксплуатации изделия: минимум 5 лет Фирма-изготовитель: Бойрер Гмбх, Софлингер штрассе 218, 89077-УЛМ, Германия Фирма-импортер: OOO БОЙРЕР, 109451 г. Москва, ул. Перерва 62, корп. 2, офис 3 Сервисный центр: 109451 г. Москва, ул. Перерва 62, корп. 2, Тел(факс) 495–658 54 90 bts-service@ctdz.ru Дата...
-
Página 123: Informacje O Urządzeniu
Zespół Beurer innych użytkowników. 1. Informacje o urządzeniu 2. Ważne wskazówki Ciśnieniomierz Beurer BM 85 należy sprawdzić pod kątem Objaśnienie symboli zewnętrznych uszkodzeń opakowania oraz kompletności zawartości. Przed użyciem należy upewnić się, że urządzenie W instrukcji obsługi, na opakowaniu i tabliczce znamionowej i akcesoria nie wykazują... - Página 124 • Jeśli chcesz wykonać kilka pomiarów u jednej osoby, zacho- Część aplikacyjna typ BF waj 5-minutowe przerwy między pomiarami. • Na co najmniej 30 minut przed wykonaniem pomiaru nie należy jeść, pić, palić ani podejmować wysiłku fizycznego. Prąd stały • Powtórz pomiar, jeśli zmierzona wartość budzi wątpliwości. Utylizacja zgodnie z dyrektywą...
- Página 125 • Unikać utrzymywania ciśnienia w mankiecie oraz częstych – Chronić urządzenie przed upadkiem. pomiarów. Wynikające z tego zaburzenie przepływu krwi – Nie należy używać ciśnieniomierza w pobliżu silnych pól może spowodować uszczerbek na zdrowiu. elektromagnetycznych, a także urządzeń radiowych i tele- •...
-
Página 126: Opis Urządzenia
3. Opis urządzenia Wskazówki dotyczące naprawy i utylizacji • Nie naprawiać ani nie regulować samodzielnie urządzenia. W przeciwnym razie nie można zagwarantować prawidłowego działania. • Naprawy mogą być wykonywane tylko przez serwis produ- centa lub autoryzowanego dystrybutora. • Nie otwierać urządzenia za wyjątkiem utylizacji. W tym celu należy wyjąć... - Página 127 Informacje na wyświetlaczu: Złącze USB Ciśnieniomierz umożliwia dodatkowo przesyłanie zmierzonych wartości do komputera. W tym celu konieczne jest posiadanie standardowego prze- wodu USB (dostarczany w komplecie z urządzeniem) oraz oprogramowania komputerowego „HealthManager”. Oprogramowanie można pobrać bezpłatnie w sekcji pobierania (zakładka „Serwis”) na stronie www.beurer.com. Program „HealthManager”...
-
Página 128: Przygotowanie Do Pomiaru
4. Przygotowanie do pomiaru Przytrzymać przycisk START/STOP wciśnięty przez 5 sekund. Przed wykonaniem pierwszego pomiaru ciśnieniomierz należy całkowicie naładować: Na wyświetlaczu zacznie migać wskazanie • za pomocą komputera: formatu godziny. Podłączyć kabel USB do złącza USB w urządzeniu i połą- •... -
Página 129: Pomiar Ciśnienia Tętniczego
• Podłączyć zasilacz za pomocą kabla USB. Zasilacz może Na wyświetlaczu zacznie migać wskazanie być podłączany tylko do napięcia zgodnego z podanym na godziny. tabliczce znamionowej. • Za pomocą przycisków pamięci M1/M2 • Następnie podłączyć wtyczkę sieciową zasilacza do gniazda ustawić... - Página 130 Owiń mankiet wokół ramienia tak, aby Prawidłowa pozycja ciała dobrze do niego przylegał, lecz nie był zaciśnięty zbyt mocno. Następnie zapnij mankiet za pomocą zapięcia na rzep. Mankiet zapiąć w taki sposób, aby można było wsunąć pod niego dwa palce. Podłącz wężyk mankietu do gniazdka •...
-
Página 131: Interpretacja Wyników
Po zakończeniu automatycznego testu, podczas którego Jeśli transmisja danych poprzez Bluetooth® jest aktyw- wyświetlane są wszystkie segmenty wyświetlacza, rozpo- na, po potwierdzeniu pamięci użytkownika dane zostaną czyna się pomiar. Mankiet zostanie automatycznie na- przesłane. Ciśnieniomierz wskazuje symbol Bluetooth ® pompowany. Pomiar odbywa się w trakcie pompowania. podczas transmisji danych. - Página 132 układzie bioelektrycznym sterującym biciem serca. Objawami wysokie”, a ciśnienie rozkurczowe w zakresie „Normalne”), tej choroby są przedwczesne uderzenia serca lub ich brak, a wyświetlany jest zawsze wyższy zakres — w opisywanym także zbyt wolne lub zbyt szybkie tętno. Przyczyny to m.in. przykładzie będzie to ciśnienie „Normalne wysokie”.
- Página 133 przypadku zafałszowane jest zarówno ciśnienie skurczowe, Odczekaj spokojnie przynajmniej 5 minut i powtórz pomiar. jak i rozkurczowe. Urządzenie podczas pomiaru ciśnienia krwi Udaj się w spokojne i wygodne miejsce, pozostań tam w ciszy, określa automatycznie, czy krwiobieg znajduje się w spoczyn- zamknij oczy, spróbuj się...
-
Página 134: Odczyt I Usuwanie Wyników Pomiaru
których został stwierdzony spoczynek układu krwionośnego, W przypadku wybrania pamięci użytkownika 1 należy są szczególnie wiarygodne. nacisnąć przycisk pamięci M1. W przypadku wybrania pamięci użytkownika 2 należy 7. Odczyt i usuwanie wyników pomiaru nacisnąć przycisk pamięci M2. Wyniki każdego udanego pomiaru są zapisywane łącznie Na wyświetlaczu będzie migać... -
Página 135: Przenoszenie Danych Pomiarowych
Podczas pomiaru nie można rozpocząć transmisji danych. • Jeśli ponownie naciśniesz odpowiedni przycisk pamięci (M1 lub M2), na wy- Na wyświetlaczu pojawi się wskazanie PC. świetlaczu pojawi się ostatni pojedynczy Rozpocznij przesyłanie danych za pomocą pomiar (w przykładzie pomiar 03). oprogramowania „HealthManager”. -
Página 136: Czyszczenie I Przechowywanie Urządzenia
Aplikacja firmy Beurer „HealthManager” musi być aktywna Krok 1: BM 85 w celu wykonania transmisji. Aktywuj funkcję Bluetooth w swoim ® urządzeniu (patrz rozdział 4 — Przygotowanie W celu zapewnienia sprawnego przenoszenia danych zdejmij do pomiaru, Bluetooth ® etui ze smartfonu. Rozpocznij transmisję danych w aplikacji „HealthManager”... -
Página 137: Dane Techniczne
3,7 V/400 mAh Czas pracy akumu- Ok. 50 pomiarów, w zależności od 11. Dane techniczne latora wysokości ciśnienia tętniczego lub Nr modelu BM 85 ciśnienia pompowania Metoda pomiaru Oscylometryczny, nieinwazyjny pomiar Akcesoria Mankiet, uchwyt mankietu, instrukc- ciśnienia na ramieniu ja obsługi, zasilacz USB, kabel USB,... - Página 138 12. Zasilacz • Urządzenie spełnia wymogi dyrektywy 93/42/WE dotyczącej wyrobów medycznych, ustawy o wyrobach medycznych Nr modelu FW 7575M/EU/6/06 oraz norm EN1060-1 (Nieinwazyjne sfigmomanometry — Wejście 100 – 240 V, 50–60 Hz Część 1: Wymagania ogólne), EN1060-3 (Nieinwazyjne sfig- Wyjście 6 V —...
- Página 139 13. Akumulator Urządzenie BM 85 jest wyposażone w akumulator litowo- jonowy (3,7 V/400 mAh). Jeśli miga symbol , akumulator należy ładować za pomocą dołączonego do zestawu kabla przez ok. 2 godziny. Akumulator należy ładować co najmniej 2 razy w roku do poziomu naładowania 50%–75%, aby zapewnić...
-
Página 140: Electromagnetic Compatibility Information
RF emissions CISPR 11 Group 1 The BM 85 uses RF energy only for its internal function. Therefore, its RF emissions are very low and are not likely to cause any interference in nearby electronic equipment. RF emissions CISPR 11... - Página 141 (>95 % dip in U Mains power quality should be that of a typical com- for 0.5 cycle for 0.5 cycle mercial or hospital environment. If the user of the BM 85 Voltage dips, short inter- 40 % U (60 % dip in U...
- Página 142 fixed RF transmitters, an electromagnetic site survey should be considered. If the measured field strength in the location in which the BM 85 is used exceeds the applicable RF compliance level above, the BM 85 should be observed to verify normal operation. If abnormal performance is observed, additional measures may be necessary, such as re-orienting or relocating the BM 85.
- Página 143 Recommended separation distances between portable and mobile RF communications equipment and the BM 85 The BM 85 is intended for use in an electromagnetic environment in which radiated RF disturbances are controlled. The customer or the user of the BM 85 can help prevent electromagnetic interference by maintaining a minimum distance between portable and mobile RF communications equipment (transmitters) and the BM 85 as recommended below, according to the maximum output power of the communications equipment.