GE GXSS20H Manual Del Propietario E Instrucciones De Instalación
Sistema suavizante de agua
Ocultar thumbs
Ver también para GXSS20H:
Tabla de contenido
Idiomas disponibles
Idiomas disponibles
Enlaces rápidos
. . . . . . . . . . . . .2
Step-by-step instructions . . . . . . . .6-12
Operating Instructions
Breaking a salt bridge . . . . . . . . . . . . .14
venturi assembly . . . . . . . . . . . . . . . . . .14
Features . . . . . . . . . . . . . . . . . . . . . . . . . .15
Service . . . . . . . . . . . . . . . . . . . . .13, 16-18
Water softener system . . . . . . . . .16-18
. . . . . . . . . . . . .19
Consumer Support
Consumer Support . . . . . . . .Back Cover
Parts list/catalog . . . . . . . . . . . . . . .23-26
Warranty . . . . . . . . . . . . . . . . . . . . . . . . .27
System tested and certified by NSF International against NSF/ANSI Standard 44 for the
chemical reduction claims specified on the performance data sheet.
Sistema probado y certificado por NSF International contra norma 44 de NSF/ANSI para las
afirmaciones de reducción de los productos químicos especificadas en la hoja de datos de
funcionamiento.
System Tested and Certified by the Water Quality Association against CSA B483.1.
Sistema probado y certificado por Water Quality Association en cumplimiento con CSA B483.1.
Write the model and serial
numbers here:
Model # ________________
Serial # ________________
To find these numbers, look
on the rim under the salt
hole cover.
ge.com
Water Softening
. . . .3-12
Sistema Suavizante
. . . . . .20-22
7283853
215C1173P023
System
Owner's Manual &
Installation Instructions
Model GXSS20H
de Agua
Manual del Propietario e
Instrucciones de Instalación
Modelo GXSS20H
La sección en español empieza en la página 29
49-50178-1 10-08 JR
Capítulos
Tabla de contenido
Solución de problemas

Manuales relacionados para GE GXSS20H


Resumen de contenidos para GE GXSS20H
- Página 28 Notes.
- Página 29 Información de seguridad ..30 Instrucciones de instalación ....31–40 Instrucciones paso por paso ..34–40 Instrucciones de operación Cómo limpiar la ensambladura de la boquilla y el Venturi .
-
Página 30: Información De Seguridad
En estas condiciones, es posible que quiera distorsión u otros daños a las partes no metálicas. considerar la compra de un sistema de filtración del punto de admisión para casas GE con un filtro ■ Conecte a tierra de manera apropiada según los reductor de cloro. -
Página 31: Instrucciones De Instalación
Sistema Suavizante de Agua de instalación Modelo GXSS20H ¿Preguntas? Llame 800.GE.CARES (800.432.2737) o Visite nuestra página en la red en: ge.com ADVERTENCIA: Lea este manual en su totalidad. No seguir todas las pautas y normas podría causar lesiones personales o daños a la propiedad. - Página 32 • Si una manguera adicional es necesaria para el drenaje de la válvula y el tanque de sal, usted la puede solicitar en Accesorios GE llamando al 800.626.2002, no. de parte WS07X10004. • Si necesita una válvula rígida de drenaje para cumplir con los códigos de plomería, podrá...
- Página 33 Instrucciones de instalación PLANIFIQUE LA INSTALACIÓN ADVERTENCIA: Use solamente fundente DEL DESCALCIFICADOR y soldadura sin plomo para evitar envenenamiento de plomo. Lo primero que debe decidir es cómo instalar las tuberías que entran y salen del descalcificador. Fíjese en la tubería de agua Consulte la Ilustración de instalación normal.
-
Página 34: Instrucciones Paso Por Paso
Instrucciones de instalación ANTES DE COMENZAR MUEVA LA ENSAMBLADURA DEL DESCALCIFICADOR HACIA SU POSICIÓN • Suspenda el suministro de gas o de energía eléctrica que alimenta el calentador de agua, en la posibilidad de que DE INSTALACIÓN el calentador pueda drenarse mientras usted drena las Antes de deslizar el descalcificador a su lugar, cerciórese de tuberías. - Página 35 Cerciórese de cumplir con los códigos locales. abajo como se muestra. IMPORTANTE: Si necesita más manguera de drenaje, ordénela llamando al Departamento de Partes de GE al 800.626.2002, no. de parte WS07X10004. El descalcificador Gire la válvula de agua no funciona si el agua no escapa por esta de bypass boca manguera durante las regeneraciones.
- Página 36 Instrucciones de instalación CONECTE Y HAGA FUNCIONAR LA INSTALE LOS ACCESORIOS DE MANGUERA DE DRENAJE DE LA VÁLVULA SOBREFLUJO DEL TANQUE DE SALMUERA Y LA MANGUERA (CONT.) • Elevar la manguera de drenaje podría causar una • Inserte una arandela de goma en el agujero de 3/4″ presión negativa que podría reducir la toma del contenido (1,91 cm) de diámetro en el lado del tanque de salmuera de sal durante las regeneraciones.
- Página 37 Instrucciones de instalación INSTALE LA ABRAZADERA DE TIERRA PURGUE LAS TUBERÍAS, SAQUE EL AIRE DEL DESCALCIFICADOR Y PRUEBE SU PELIGRO No adherir apropiadamente la INSTALACIÓN EN BÚSQUEDA DE FUGAS abrazadera de tierra podría resultar en una descarga DE AGUA (CONT.) eléctrica.
- Página 38 AJUSTE EL NIVEL DE DUREZA DEL AGUA correcto de la siguiente forma siguiente: FT20 para 1. Oprima el botón SELECT (seleccionar) GXSS20H. Si se le pasa el código correcto, use el botón hasta que HARDNESS (dureza) se DOWN . Luego, oprima el botón SELECT (seleccionar) visualice.
- Página 39 Instrucciones de instalación AJUSTE EL NIVEL DE DUREZA DEL AGUA AJUSTE LA HORA (DE INICIO) DE RECARGA (CONT.) 3. Cuando la pantalla muestre el nivel de dureza del agua 1. Presione el botón SELECT deseado (en granos por galón), oprima SELECT (seleccionar) hasta que la flecha (seleccionar) para aceptar.
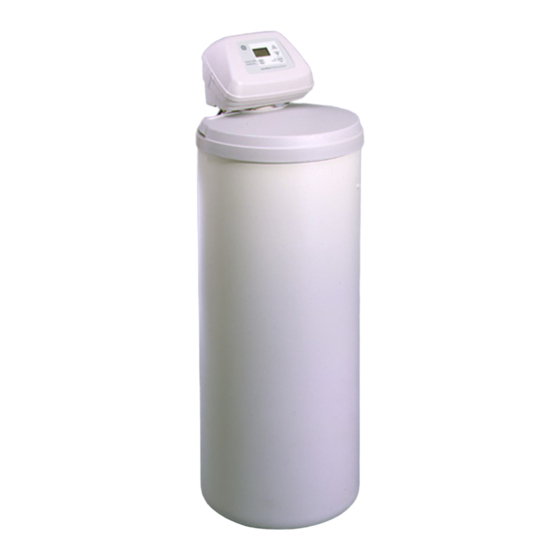
- Página 40 TOUCH o HOLD del plato para comenzar una recarga inmediata. El cloro es llevado a través del descalcificador de agua. Este proceso dura aproximadamente 2 horas. Especificaciones/Dimensiones 11–1/2″ GXSS20H (29,2 cm) 3–3/8″ Capacidad calificada* 7800 granos con 1,8 lbs. de sal (8,6 cm) 16800 granos con 5,8 lbs.
-
Página 41: Servicio
Sobre el sistema de descalcificación de agua. ge.com Servicio Después de un período de tiempo, la capa de Cuando el sistema descalcificador de agua está resina se obstruye o se satura con los minerales proporcionando agua descalcificada, a esto se le duros y debe limpiarse. -
Página 42: Cómo Romper Un Puente De Sal
Sobre el sistema de descalcificación de agua. Cómo romper un puente de sal Empuje el instrumento hacia el interior del A veces, una capa dura de sal o puente de sal depósito de sal para se forma en el área de almacenamiento de la sal. romper el puente Esto generalmente se debe a la humedad alta o 1″–2″... -
Página 43: De La Boquilla Y El Venturi
Cómo limpiar la ensambladura de la boquilla y el Venturi Es necesario que la boquilla y el Venturi estén limpios para que el sistema de descalcificación Tapa de agua funcione apropiadamente. Esta pequeña unidad ejecuta la succión para mover la salmuera del área de almacenamiento de sal... -
Página 44: Funciones
Si ve un código de error nuevamente a la hora actual del día, consulte la sección de Consejos de resolución de problemas o llame al Centro de respuestas de GE (GE Answer Center) al 800.626.2000 para obtener servicio de mantenimiento. - Página 45 Sobre el sistema de descalcificación de agua. ge.com Servicio: Funciones y servicio del tiempo de demanda electrónico CÓDIGO DE ERROR VISUALIZADO ERR 01 ERR 02 ERR 03 ERR 04 ERR 05 POSIBLE DEFECTO • El motor no •Interruptor •Motor no •Interruptor...
-
Página 46: De Agua
POSICIÓN del interruptor de operación. correctamente, el código del modelo debe ser FT20 por (no incluido Si la letra aparece significa que el modelo GXSS20H. en este manual) interruptor está cerrado; si los guiones Para reajustar el código, presione el botón de UP (hacia aparecen, significa que el interruptor está... - Página 47 Servicio: Inspección manual del avance de la recarga ■ La revisión verifica la operación adecuada Que el empaque de la boquilla o el Venturi del motor de válvula, rellenado del tanque de no estén defectuosos. salmuera, succión de salmuera, tasas de flujo de ■...
-
Página 48: Cuidado Y Limpieza
(llamada agua rojo ladrillo). Para extraer el hierro de esta agua se requiere un filtro u otro equipo. GE recomienda que se usen las marcas de sal Diamond Crystal Red•Out con aditivo Iron ®... -
Página 49: Consejos Para La Solución De Averías
Verifique la dureza del suministro de agua—llamando a su compañía de agua local, haciendo pruebas al agua o llamando al Centro de Respuestas de GE. • Puente de sal—la sal se solidifica por encima del nivel del agua de forma tal que la salmuera no está... - Página 50 Antes de llamar para solicitar servicio… Problema Posible causa Qué hacer A veces el agua Usar agua caliente mientras el • Evite usar agua caliente mientras el descalcificador de agua está está dura descalcificador de agua está en en el proceso de recarga porque el calentador de agua se el proceso de regeneración rellenará...
- Página 51 Problema Posible causa Qué hacer Nivel alto/excesivo La válvula de drenaje de la manguera está • Cualquier restricción en la manguera de drenaje podría evitar la de agua en el tanque doblada y eso la está obstruyendo, o está...
- Página 52 Notas.
- Página 53 Notas. ge.com...
-
Página 54: Lista De Partes/Catálogo
Lista de partes. - Página 55 ge.com...
- Página 56 Catálogo de partes. CATÁLOGO DE PARTES DE GENERAL ELECTRIC NO. REFER. NO. DE PARTE DESCRIPCIÓN DE LA PARTE (02) 0003 WS35X10001 KIT DEL SELLO DE ARO TÓRICO 0004 WS34X10005 ETIQUETA 0005 WS07X10004 MANGUERA DE DRENAJE, 20 PIES 1 0007 WS14X10002 DISTRIBUIDOR (SUP.) 0008 WS14X10001...
- Página 57 CATÁLOGO DE PARTES DE GENERAL ELECTRIC NO. REFER. NO. DE PARTE DESCRIPCIÓN DE LA PARTE (02) 0101 WS02X10012 TORNILLO, Nº 4 – 24 X 1-1/8″ 0102 WS02X10013 ESPACIADOR 0103 WS21X10003 INTERRUPTOR 0104 WS03X10009 CLAVIJA DE EXPANSIÓN 0105 WS02X10014 TORNILLO, Nº 10 – 14 X 2″...
-
Página 58: Garantía
Estados Unidos. Si el producto está situado en un área que no dispone de servicio por parte de un proveedor de servicio autorizado de GE, podría tener que hacerse cargo de los costes de envío o bien podría solicitársele que lleve el producto a un centro de servicio de GE autorizado para realizar la reparación. -
Página 59: Soporte Al Consumidor
Solicite una reparación ge.com El servicio de expertos GE está a tan sólo un paso de su puerta. Llame al 800.GE.CARES (800.432.2737) durante horas normales de oficina para solicitar su reparación. Real Life Design Studio (Estudio de diseño para la vida real) ge.com...