INNO TR149 Instrucciones De Instalación
Tabla de contenido
Idiomas disponibles
Idiomas disponibles
Enlaces rápidos
Before using the Mounting hooks, carefully read the installation instructions as well as the installation
instructions for basic carrier systems, and follow all usage instructions. After reading the installation
instructions, keep it in a safe place along with the installation instructions for basic carrier systems. If you
are to give the mounting hooks to a third person, provide the installation instructions to ensure safe
installation and usage. If you have any questions regarding the installation instructions, contact our
customer service listed below.
Install hooks correctly at specified positions according to the installation instructions herein and the installation instructions for the
applicable carrier system. Installation positions of hooks depend on the vehicle type. If hooks are not installed at specified
positions, the carrier may fall and cause accidents. If the installation instructions appropriate for your vehicle type are not
available, contact our customer service listed below.
Select hooks matching your vehicle by referring to the Fit Guide available at stores or on our website : www.innoracks.com.
If inappropriate hooks are used, the carrier / attachment may fall and cause accidents.
Before driving the vehicle, rock the stays and bars in all directions to ensure that there is no looseness. Retighten any loose
knobs or bolts.
Do not use these hooks for attachments of non-specified types.
The carrier may fall and cause accidents.
Observe the specified loading conditions.
Failure to observe the loading condition may cause the carrier to break or loosen and fall, resulting in accidents.
For INNO dedicated ski & snowboard carriers, read the carrier installation instructions to determine proper
mounting locations.
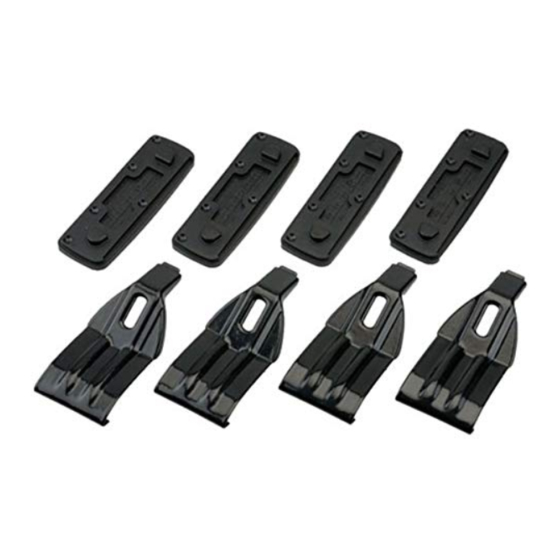
The TR Mounting hooks include the parts listed below. Verify that all of these parts are
included in the carrier system you have purchased. In the event any of these parts are
missing, contact our customer service listed below.
1
5
NOTE
The specifications or external appearance of this product or any of the genuine
spare parts may be changed for improvement without prior notification.
If you have any comments, questions or suggestions, contact our customer service listed below.
Car Mate USA shall not be held liable for any accidents or incidental losses arising from improper installations or usage.
Furthermore, Car Mate USA shall not be held liable for any accidents or incidental losses arising from installation or usage after
the customer has made any modifications to the system's original configuration or specifications.
If you can not find your vehicle on the following page(s), contact us for more information.
Car Mate USA, Inc.
383 Van Ness Ave., Suite 1603,
Torrance, CA 90501 U.S.A.
support@innoracks.com
www.innoracks.com
Installation Instructions
WARNING
2
3
7
6
Contact Information
TR Fit Hooks
4
11mm
23mm
8
14539491A-
TR149
No.
Part
①
Cushion base 514
②
Base bracket
③
Spacer [11mm]
④
Bolt [M6x23mm]
⑤
Protection sheet
⑥
Hex Wrench [B=4]
⑦
Base Cover
⑧
Installation Instructions
4182809TR1491
EN
Qty
4
4
4
4
8
1
4
1
09 / 2014
-EN
-A
Tabla de contenido

Manuales relacionados para INNO TR149


Resumen de contenidos para INNO TR149
-
Página 9: Información De Contacto
No respetar las condiciones de carga puede provocar que el portacargas se rompa o se afloje y caiga, lo que causaría un accidente. Para los portacargas exclusivos para esquís y tablas de snowboard de INNO lea los manuales de instrucciones del portacargas para determinar las ubicaciones de montaje correctas. -
Página 10: Procedimiento De Instalación Para Modelos De Vehículos Individuales
TR149 Procedimiento de instalación para modelos de vehículos individuales Condiciones de carga Fabricante Modelo Tipo Año Capacidad máxima de carga Bicicleta libras CX-7 2007 - 2012 MAZDA ( Carga + Perchas de la base + Dispositivo de CX-9 2007 - montaje ) Preparaciones del vehículo... -
Página 11: Fijación De Las Abrazaderas De Base
Fijación de las abrazaderas de 4N・m base Llave hexagonal Conéctelas a la tuerca del vehículo Perno (largo) como se muestra en la figura. 23mm [M6x23] Sujételas con el perno largo [M6x23] Abrazaderas de base (incluido) con una llave hexagonal (incluida) hasta que los pernos estén Separador bien ajustados y los dispositivos se Base del... -
Página 12: Instalación Del Sistema De Portacargas
Instalación del sistema de portacargas Coloque la unidad de la base en la base 4N・m del amortiguador / abrazadera de la Clé base que se han instalado. Luego, hexagonale con la llave hexagonal (incluida), Boulon [M6X15] sujétela ajustando de forma alternada 15mm 15mm los pernos derecho e izquierdo (cortos)