Klein Tools ET40 - Manual del Comprobador Electrónico de Voltaje AC/DC
- 1 DESCRIPCIÓN DE LAS PIEZAS
- 2 ESPECIFICACIONES GENERALES
- 3 ESPECIFICACIONES ELÉCTRICAS
- 4 INSTRUCCIONES DE FUNCIONAMIENTO
- 5 INSTRUCCIONES DE FUNCIONAMIENTO
- 6 REEMPLAZO DE LA BATERÍA
- 7 LIMPIEZA
- 8 ALMACENAMIENTO
- 9 SERVICIO AL CLIENTE
- 10 Símbolos en el comprobador
- 11 Referencias
- 12 Descargar el manual
- 13 En otros idiomas
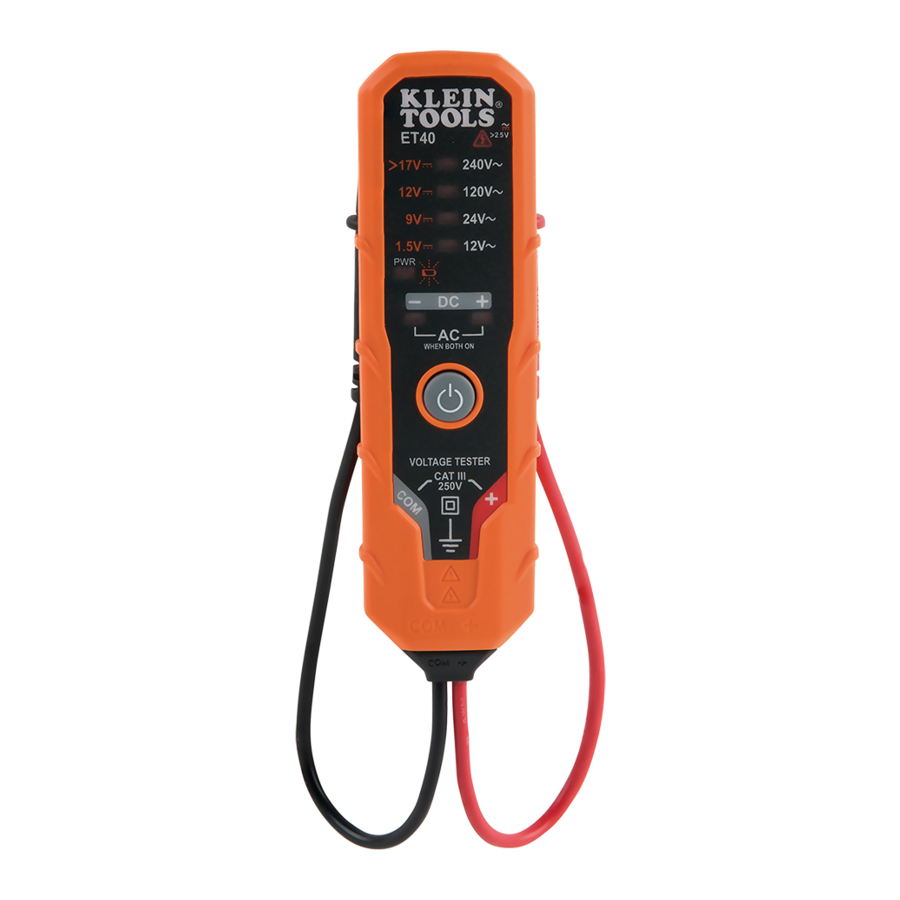
DESCRIPCIÓN DE LAS PIEZAS

- Power On/Off Button (Botón de Encendido/Apagado)
- Power On / Low Battery Indicator (Indicador de Encendido / Batería Baja)
- Voltage Level Indicators (Indicadores de Nivel de Voltaje)
- DC Polarity Indicators (AC when both illuminated) (Indicadores de Polaridad DC (AC cuando ambos están iluminados))
- Hazardous Voltage Indicator (Indicador de Voltaje Peligroso)
- Test Leads (Cables de Prueba)
- Battery Compartment Door (Tapa del Compartimento de la Batería)
- Battery Compartment Screw (Tornillo del Compartimento de la Batería)
- Pocket Clip (Clip de Bolsillo)
- Test Lead Holders (Sujetadores de Cables de Prueba)
 NOTA: No hay piezas reparables por el usuario dentro del comprobador.
ESPECIFICACIONES GENERALES
- Operating Altitude: (Altitud de Funcionamiento:) Hasta 6562 pies (2000 m)
- Relative Humidity: (Humedad Relativa:) <85% sin condensación
- Operating Temperature: (Temperatura de Funcionamiento:) 5° a 113°F (‑15° a 45°C)
- Storage Temperature: (Temperatura de Almacenamiento:) ‑4° a 140°F (‑20° a 60°C)
- Batteries: (Baterías:) 2x AAA 1.5V Alcalinas
- Dimensions: (Dimensiones:) 5.24" x 1.52" x 1.11" (133 x 39 x 28 mm)
- Weight: (Peso:) 3.1 oz. (90 g) incluyendo las baterías
- Calibration: (Calibración:) Precisa durante un año
- Standards: (Normas:)
EN61326‑1:2013, EN61326‑2:2013, EN61010‑1:2010, EN61010‑2‑030:2010, EN61010‑031:2015
![]()
Conforms to UL STD. 61010‑1, 61010‑2‑030 and 61010‑031.
Certified to CSA STD. C22.2 NO. 61010‑1, 61010‑2‑030 and 61010‑031. - Pollution degree: (Grado de contaminación:) 2
- Drop Protection: (Protección contra caídas:) 9.8 ft. (3 m)
- Ingress Protection: (Protección contra ingreso:) IP41
- Safety Rating: (Clasificación de seguridad:)
CAT III 250V, Class 2, double insulation (Clase 2, doble aislamiento)
CAT III: Measurement category III is applicable to test and measuring circuits connected to the distribution part of the building's low‑voltage MAINS installation. (CAT III: La categoría de medición III es aplicable a los circuitos de prueba y medición conectados a la parte de distribución de la instalación de RED de baja tensión del edificio).
- Safety Rating: (Clasificación de seguridad:)
- Electromagnetic Environment: (Entorno electromagnético:) This equipment meets requirements for use in basic and controlled electromagnetic environments like residential properties, business premises, and light‑industrial locations. (Este equipo cumple con los requisitos para su uso en entornos electromagnéticos básicos y controlados, como propiedades residenciales, locales comerciales y ubicaciones industriales ligeras).

Specifications subject to change. (Especificaciones sujetas a cambios).
ESPECIFICACIONES ELÉCTRICAS
- Voltage Level Indicators: (Indicadores de Nivel de Voltaje:)
- AC: 12V, 24V, 120V, 240V
- DC: 1.5V, 9V, 12V, >17V
- DC Polarity Indicators: (Indicadores de Polaridad DC:) DC Positive (DC Positivo), DC Negative (DC Negativo), both illuminated indicates AC (ambos iluminados indican AC)
- Hazardous Voltage Indicator: (Indicador de Voltaje Peligroso:)
- Continuously on when voltage >25V AC or >25V DC (Continuamente encendido cuando el voltaje es >25V AC o >25V DC)
- Blinking at ~2Hz when voltage >240V AC or >60V DC (Parpadeando a ~2Hz cuando el voltaje es >240V AC o >60V DC)
- AC Frequency: (Frecuencia AC:) 50Hz / 60Hz
- Input Protection: (Protección de Entrada:) 250V AC/DC
- Maximum Measurable Voltage: (Voltaje Máximo Medible:)
240V AC (240V AC Indicator) or 24V DC (>17V DC Indicator) (Indicador de 240V AC) o 24V DC (Indicador de >17V DC) - Accuracy: (Precisión:) Voltage level indicators typically illuminate fully at approx. 70% to 100% of indicated voltage, except for 12V DC (84% to 100%) and >17V DC (94% to 100% of 17V) (Los indicadores de nivel de voltaje normalmente se iluminan por completo a aproximadamente el 70% al 100% del voltaje indicado, excepto para 12V DC (84% al 100%) y >17V DC (94% al 100% de 17V))
- Auto Power-OFF: (Apagado Automático:) After 2 minutes of inactivity (Después de 2 minutos de inactividad)
Specifications subject to change. (Especificaciones sujetas a cambios).

To ensure safe operation and service of the tester, follow these instructions. Failure to observe these warnings can result in severe injury or death. (Para garantizar el funcionamiento y el servicio seguros del comprobador, siga estas instrucciones. No observar estas advertencias puede provocar lesiones graves o la muerte).
- Before each use verify tester operation by measuring a known voltage. (Antes de cada uso, verifique el funcionamiento del comprobador midiendo un voltaje conocido).
- Never use the tester on a circuit with voltages that exceed the category based rating of this tester. (Nunca use el comprobador en un circuito con voltajes que excedan la clasificación basada en la categoría de este comprobador).
- Do not use the tester during electrical storms or in wet weather. (No use el comprobador durante tormentas eléctricas o en clima húmedo).
- Do not use the tester or test leads if they appear to be damaged. (No use el comprobador o los cables de prueba si parecen estar dañados).
- Keep fingers behind the finger guards and away from the metal probe contacts when making measurements. (Mantenga los dedos detrás de los protectores de los dedos y lejos de los contactos de la sonda de metal al realizar mediciones).
- Use caution when working with voltages above 25V AC RMS or 60V DC. Such voltages pose a shock hazard. (Tenga precaución al trabajar con voltajes superiores a 25V AC RMS o 60V DC. Dichos voltajes representan un peligro de descarga eléctrica).
- Always adhere to local and national safety codes. Use personal protective equipment to prevent shock and arc blast injury where hazardous live conductors are exposed. (Siempre cumpla con los códigos de seguridad locales y nacionales. Utilice equipo de protección personal para evitar descargas eléctricas y lesiones por arco eléctrico donde estén expuestos conductores activos peligrosos).
- Tester is IP41 dust & water resistant. Following any contact with water, thoroughly dry tester prior to subsequent use. (El comprobador es resistente al polvo y al agua IP41. Después de cualquier contacto con el agua, seque completamente el comprobador antes de su uso posterior).

- DO NOT attempt to repair this tester. It contains no serviceable parts. (NO intente reparar este comprobador. No contiene piezas reparables).
- DO NOT expose tester to extremes in temperature or high humidity. (NO exponga el comprobador a temperaturas extremas o alta humedad).
INSTRUCCIONES DE FUNCIONAMIENTO
PRUEBAS EN UBICACIONES DE MEDICIÓN CAT III
Ensure the test lead shield is pressed firmly in place. Failure to use the CATIII shield increases arc‑flash risk. (Asegúrese de que el protector del cable de prueba esté firmemente presionado en su lugar. No usar el protector CATIII aumenta el riesgo de arco eléctrico).

PRUEBAS EN UBICACIONES DE MEDICIÓN CAT II
CAT III shields may be removed for CAT II locations. This will allow testing on recessed conductors such as standard wall outlets. Take care not to lose the shields. (Los protectores CAT III se pueden quitar para ubicaciones CAT II. Esto permitirá realizar pruebas en conductores empotrados, como tomas de corriente de pared estándar. Tenga cuidado de no perder los protectores).

INSTRUCCIONES DE FUNCIONAMIENTO
Press and hold the On/Off button  for approx. 1 second to turn the tester on or off. When on, the Power/Low Battery indicator
  will be continuously illuminated. The tester will automatically power‑OFF following 2 minutes of inactivity to conserve battery life. (Mantenga presionado el botón de Encendido/Apagado durante aproximadamente 1 segundo para encender o apagar el comprobador. Cuando esté encendido, el indicador de Encendido/Batería Baja estará continuamente iluminado. El comprobador se apagará automáticamente después de 2 minutos de inactividad para conservar la duración de la batería).
Apply test leads  to the system under test to measure voltage. The Voltage Level Indicators
  will illuminate indicating the voltage present. When DC voltage is detected, the "+" or "–" polarity indicator
  will illuminate, revealing the polarity. When AC voltage is detected, both polarity indicators will illuminate. (Aplique los cables de prueba al sistema bajo prueba para medir el voltaje. Los indicadores de nivel de voltaje se iluminarán indicando el voltaje presente. Cuando se detecta voltaje DC, el indicador de polaridad "+" o "-" se iluminará, revelando la polaridad. Cuando se detecta voltaje AC, ambos indicadores de polaridad se iluminarán).
DO NOT attempt to measure AC voltages in excess of 240V AC, or DC voltages in excess of 25V DC under any circumstances. The hazardous voltage indicator will illuminate in the presence of voltage exceeding 25V AC or DC, with characteristics as detailed in the table below. (NO intente medir voltajes AC superiores a 240V AC, o voltajes DC superiores a 25V DC bajo ninguna circunstancia. El indicador de voltaje peligroso se iluminará en presencia de voltaje que exceda los 25V AC o DC, con características como se detalla en la tabla a continuación).
| HAZARDOUS VOLTAGE INDICATOR STATUS (ESTADO DEL INDICADOR DE VOLTAJE PELIGROSO) | AC VOLTAGE (VOLTAJE AC) | DC VOLTAGE (VOLTAJE DC) |
| Solid on (Encendido fijo) | >25V AC | >25V DC |
| Blinking at approx. 2Hz (Parpadeando a aprox. 2Hz) | >240V AC | >60V DC |
REEMPLAZO DE LA BATERÍA
When the Power‑ON / Low Battery indicator  blinks, the batteries must be replaced. (Cuando el indicador de Encendido/Batería Baja parpadee, las baterías deben ser reemplazadas).
- Remove screw
![]() from battery compartment door
from battery compartment door ![]() . (Retire el tornillo de la tapa del compartimento de la batería).
. (Retire el tornillo de la tapa del compartimento de la batería). - Remove and recycle spent batteries. (Retire y recicle las baterías gastadas).
- Install two new AAA batteries. Note proper polarity. (Instale dos baterías AAA nuevas. Observe la polaridad correcta).
- Replace battery door and fasten securely with screw. (Vuelva a colocar la tapa de la batería y asegúrela con el tornillo).
 from battery compartment door
  . (Retire el tornillo de la tapa del compartimento de la batería).
 To avoid risk of electric shock, disconnect leads from any voltage source before removing battery door. (Para evitar el riesgo de descarga eléctrica, desconecte los cables de cualquier fuente de voltaje antes de quitar la tapa de la batería).
To avoid risk of electric shock, do not operate tester while battery door is removed. (Para evitar el riesgo de descarga eléctrica, no opere el comprobador mientras la tapa de la batería esté quitada).
LIMPIEZA
Ensure tester is turned off and wipe with a clean, dry lint‑free cloth. (Asegúrese de que el comprobador esté apagado y límpielo con un paño limpio, seco y sin pelusa).
Do not use abrasive cleaners or solvents. (No use limpiadores abrasivos ni solventes).
ALMACENAMIENTO
Remove the batteries when not in use for a prolonged period of time. Do not expose to high temperatures or humidity. After a period of storage in extreme conditions exceeding the limits mentioned in the General Specifications section, allow the tester to return to normal operating conditions before using. (Retire las baterías cuando no esté en uso durante un período prolongado de tiempo. No exponga a altas temperaturas o humedad. Después de un período de almacenamiento en condiciones extremas que excedan los límites mencionados en la sección de Especificaciones generales, permita que el comprobador vuelva a las condiciones normales de funcionamiento antes de usarlo).
SERVICIO AL CLIENTE
KLEIN TOOLS, INC.
450 Bond Street, Lincolnshire, IL 60069 1‑800‑553‑4676
customerservice@kleintools.com
www.kleintools.com
Símbolos en el comprobador

Riesgo de descarga eléctrica
Riesgo de peligro.

Es importante que los usuarios de este comprobador lean, comprendan y sigan todas las advertencias, precauciones, información de seguridad e instrucciones de este manual antes de operar o dar servicio a este comprobador. No seguir las instrucciones podría resultar en la muerte o lesiones graves.
 | Leer las instrucciones |
 | Doble aislamiento |
 | Voltaje AC |
 | Voltaje DC |
 | Entrada de cable negativo |
 | Entrada de cable positivo |

Referencias
Descargar el manual
Aquí puede descargar la versión PDF completa del manual. Puede contener instrucciones de seguridad adicionales, información de garantía, reglas de la FCC, etc.
Descargar Klein Tools ET40 - Manual del Comprobador Electrónico de Voltaje AC/DC


