Descargar Imprimir esta página

Publicidad

Idiomas disponibles

Idiomas disponibles

Enlaces rápidos

In some European factories the letter "W" of the part code mentioned herein will be automatically
W11670365A.indd 1
W11670365A.indd 1
22-Jun-2023 16:56:43 EDT | RELEASED
Countertop Oven
Horno para mostrador
replaced by the number "4000" (e.g. "W12345678" becomes "400012345678")
Four grille-pain
KCO128
6/21/2023 11:07:06 AM

Publicidad

loading

Resumen de contenidos para KitchenAid KCO128

  • Página 1 Countertop Oven Four grille-pain Horno para mostrador KCO128 In some European factories the letter "W" of the part code mentioned herein will be automatically W11670365A.indd 1 W11670365A.indd 1 6/21/2023 11:07:06 AM 6/21/2023 11:07:06 AM 22-Jun-2023 16:56:43 EDT | RELEASED replaced by the number "4000" (e.g. "W12345678" becomes "400012345678")
  • Página 2 PARTS AND FEATURES Toughened Glass Window Mode Knob: Cooking Mode Selector Removable Crumb Tray Preheating Icon Cool Down Surface for Removable Toast Icon Oven Rack Bagel Icon Enamel-coated Pan Shade Icon Chrome-plated Steel Oven Rack Fresh Icon Door Handle Frozen Icon Air Fry Basket Minutes Icon Pizza Stone...
  • Página 3 Authorized Service Facility for examination, repair, or electrical or mechanical adjustment. 6. The use of accessories/attachments not recommended or sold by KitchenAid may cause fire, electrical shock, or injury to persons. 7. Do not let cord hang over edge of table or counter, or touch hot surfaces.
  • Página 4 14. Extreme caution should be exercised when using containers constructed of materials other than metal or glass. 15. Do not store any materials, other than KitchenAid recommended accessories, in this Countertop Oven when not in use. 16. Do not place any of the following materials in the Countertop Oven: paper, cardboard, plastic, or anything similar.
  • Página 5 GETTING STARTED Before first use, clean all parts and accessories (see “Care and Cleaning” section). Place the Countertop Oven on a dry and flat level surface. Remove all packaging materials and labels, if present. Open the door and align the rack with the grooves for desired positions Make sure all sides are positioned with at (see”Countertop Oven Rack Position”...
  • Página 6 GETTING STARTED TIME RECOMMENDATION - AIR FRY FUNCTION TEMPERATURE FOOD PORTION TIME °F(°C) Chicken Nuggets 425°F (218°C) 1 Layer 8-10 minutes Chicken Tenders 425°F (218°C) 1 Layer 13-15 minutes Chicken Wings 425°F (218°C) 1 Layer 18-20 minutes Fish Fillets 450°F (232°C) 1 Layer 12-14 minutes Fish Sticks 450°F (232°C) 1 Layer 10-12 minutes French Fries...
  • Página 7 COOKING FUNCTIONS RECOMMEND COOKING PRESET TEMP. TEMPERATURE PRESET RACK PREHEAT FUNCTION °F (°C) RANGE °F (°C) TIME POSITION 80–180°F Dehydrate Upper/Lower 150°F (66°C) 6 hours (27–82°C) 80–100°F Proof Lower 90°F (32°C) 30 minutes (27–38°C) 150–450°F Air Fry Lower Auto 400°F (205 °C) 17 minutes (66–232°C) 150–450°F Bake...
  • Página 8 COUNTERTOP OVEN RACK POSITION Bottom rack position for Air Fry, Bake, Dehydrate, Keep Warm, Pizza, Proof, Reheat Top rack position for Broil, Dehydrate USING THE DEHYDRATE FUNCTION Dehydrate option is to remove moisture content from veggies or fruits to dry and preserve them.
  • Página 9 USING THE DEHYDRATE FUNCTION IMPORTANT: Always use oven mitts when removing pans or racks. When the time has elapsed, the end signal will sound and the Air Fryer will shut off automatically. USING THE PROOF FUNCTION The Proof function maintains a warm environment useful for rising yeast.
  • Página 10 USING THE PIZZA (FROZEN/FRESH) FUNCTION The Pizza Function distributes power to the top and bottom heating elements to maintain the desired Oven temperature to cook homemade or Frozen Pizza. The preset temperatures are 400°F (204°C) for Frozen and Set the Mode knob to Pizza. 450°F (232°C) for Fresh pizza.
  • Página 11 USING THE TOAST OR BAGEL FUNCTION In Toast mode, your oven distributes power to the top and bottom heating elements to maintain the desired oven temperature. In Bagel mode, the oven distributes power between the top and bottom heating elements to nicely brown the top of cut bagels while gently warming the outside.
  • Página 12 USING THE AIR FRY FUNCTION Open the door and place the food on the When the time has elapsed, the end signal center of the rack. Close the door. will sound and the Countertop Oven will Press Start to start the cycle. shut off automatically.
  • Página 13 USING THE BROIL FUNCTION Only the top cooking elements heat when the Broil function is selected. Use the included broil pan directly on the oven rack for even browning and easy cleanup. The broil pan may also be used for the Bake and Warm settings.
  • Página 14 USING THE REHEAT FUNCTION Open the door and place the food on the When the time has elapsed, the end signal center of the rack. Close the door. will sound and the Countertop Oven will Press Start to start the cycle. shut off automatically.
  • Página 15 USING THE KEEP WARM FUNCTION Open the door and place the food on the When the time has elapsed, the end signal center of the rack. Close the door. will sound and the Countertop Oven will Press Start to start the cycle. shut off automatically.
  • Página 16 TROUBLESHOOTING GUIDE WARNING Electrical Shock Hazard Plug into a grounded 3 prong outlet. Do not remove ground prong. Do not use an adapter. Do not use an extension cord. Failure to follow these instructions can result in death, fire, or electrical shock.
  • Página 17 The replacement parts and repair labor costs to correct defects in materials and workmanship that existed at the time this product. was purchased. Service be provided by an Authorized KitchenAid Service Center. A. Commercial, non-residential, or multiple family use or use KitchenAid Will inconsistent with product instructions and manuals.
  • Página 18 P.O. Box 218, St. Joseph, MI 49085-0218 For service information in Mexico: Call toll-free 01-800-0022-767. /™ ©2023 KitchenAid. All rights reserved. Used under license in Canada. ® In some European factories the letter "W" of the part code mentioned herein will be automatically W11670365A.indd 18...
  • Página 19 PIÈCES ET CARACTÉRISTIQUES Hublot en verre trempé Bouton Mode : Sélecteur du mode de cuisson Ramasse-miettes amovible Icône Préchauffage Surface de refroidissement pour grille amovible du four Icône de pain grillé Plateau émaillé Icône de bagel Grille en acier chromé du four Icône Degré...
  • Página 20 Retourner l’appareil au centre de service agréé le plus proche pour examen, réparation ou réglage électrique ou mécanique. 6. L’utilisation d’accessoires non recommandés ou non vendus par KitchenAid peut causer un incendie, une décharge électrique ou des blessures.
  • Página 21 15. Ne pas placer dans ce four pendant son fonctionnement des articles autres que les accessoires recommandés par KitchenAid. 16. Ne placer aucun des articles suivants dans le Four Grille-Pain : papier, carton, plastique ou autres éléments semblables.
  • Página 22 POUR COMMENCER Avant la première utilisation, nettoyer les pièces et accessoires (voir la section « Entretien et nettoyage »). Placer le four grille-pain sur une surface plane et sèche. Retirer tous les matériaux d’emballage et toutes les étiquettes, le cas échéant. Ouvrir la porte et aligner la grille avec les fentes pour la placer à...
  • Página 23 POUR COMMENCER RECOMMANDATION DE DURÉE – FONCTION FRITURE À AIR TEMPÉRATURE ALIMENT PORTION DURÉE °F (°C) Pépites de poulet 1 couche 425 °F (218 °C) 8 à 10 minutes Filets de poulet 1 couche 425 °F (218 °C) 13 à 15 minutes Ailes de poulet 1 couche 425 °F (218 °C) 18 à...
  • Página 24 FONCTIONS DE CUISSON POSITION PRÉRÉGLER FONCTION PLAGE DE PRÉ- DE GRILLE LA TEMPÉRA- TEMPS TEMPÉRATURE CHAUF- RECOMMAN- TURE PRÉDÉFINI CUISSON °F (°C) FAGE DÉE °F (°C) Dehydrate Upper/Lower 80 à 180 °F (déshydrata- (supérieur/ 150 °F (66 °C) 6 heures (27 à 82 °C) tion) inférieur) Proof Lower...
  • Página 25 POSITION DE LA GRILLE DU FOUR GRILLE-PAIN Position de la grille inférieure pour la Air Fry (friture à air), Bake (la cuisson au four), la Dehydrate (déshydratation), Keep Warm (le maintien au chaud), Pizza (la pizza), Proof (l’étuvage), Reheat (le réchauffage) Position de la grille supérieure pour Broil (griller), Dehydrate (déshydrater) UTILISER LA FONCTION DEHYDRATE...
  • Página 26 UTILISER LA FONCTION DEHYDRATE (DÉSHYDRATER) IMPORTANT : Toujours utiliser des gants isolants lors du retrait des plateaux ou des grilles. Lorsque le temps s’est complètement écoulé, le signal de fin retentit et la Friteuse à Air s’éteint par elle-même. UTILISER LA FONCTION PROOF (LEVÉE) La fonction Proof (levée) maintient un environnement chaud et idéal pour faire lever la pâte.
  • Página 27 UTILISATION DE LA FONCTION PIZZA (FROZEN (SURGELÉE)/FRESH (RÉFRIGÉRÉE)) La Fonction Pizza répartit la puissance de cuisson entre les éléments de chauffage supérieur et inférieur afin de maintenir la Température de Four souhaitée pour faire cuire une Pizza Maison ou Surgelée. Les températures préréglées sont 400 °F (204 °C) pour les Frozen Pizza (pizzas Surgelées) et 450 °F (232 °C) pour les Fresh...
  • Página 28 UTILISER LA FONCTION TOAST (GRILLAGE) DE BAGEL Au mode Toast (grille-pain), le four répartit la puissance de cuisson entre les éléments de chauffage supérieur et inférieur afin de maintenir la température de four souhaitée. Au mode Bagel, le four répartit la puissance de cuisson entre les éléments de chauffage supérieur et inférieur pour faire dorer le dessus des moitiés de bagels tout en chauffant légèrement l’extérieur.
  • Página 29 UTILISER LA FONCTION AIR FRY (FRITURE À AIR) Ouvrir la porte et placer les aliments au Lorsque le temps s’est complètement centre de la grille. Fermer la porte. écoulé, le signal de fin retenti et le Four Appuyer sur “Start” (mise en marche) pour Grille-Pain s’éteint par lui-même.
  • Página 30 UTILISER LA FONCTION BROIL (CUISSON AU GRIL) Seuls les éléments de cuisson du haut chauffent lorsque cette fonction est sélectionnée. Placer la lèchefrite directement sur la grille pour un brunissement égal et un nettoyage facile. La lèchefrite peut aussi être utilisée avec les réglages Bake (cuisson) et Keep Warm (maintien au chaud).
  • Página 31 UTILISER LA FONCTION REHEAT (RÉCHAUFFER) Ouvrir la porte et placer les aliments au Lorsque le temps s’est complètement centre de la grille. Fermer la porte. écoulé, le signal de fin retenti et le Four Appuyer sur “Start” (mise en marche) pour Grille-Pain s’éteint par lui-même.
  • Página 32 UTILISER LA FONCTION KEEP WARM (MAINTIEN AU CHAUD) Ouvrir la porte et placer les aliments au Lorsque le temps s’est complètement centre de la grille. Fermer la porte. écoulé, le signal de fin retenti et le Four Appuyer sur “Start” (mise en marche) pour Grille-Pain s’éteint par lui-même.
  • Página 33 SOINS ET NETTOYAGE IMPORTANT : Ne pas utiliser d’agents nettoyants, de nettoyants abrasifs ou de tampons à récurer en métal pour nettoyer les surfaces intérieures ou extérieures de la Friteuse à Air Ils pourraient rayer la surface. INTÉRIEUR : Les parois intérieures du four possèdent un revêtement antiadhésif.
  • Página 34 à moins que ces dommages ne résultent de vices de matériaux ou de fabrication et ne soient signalés à KitchenAid dans les 30 jours suivant la date de livraison. G. Décoloration, rouille ou oxydation des surfaces résultant d’environnements caustiques ou corrosifs (p.
  • Página 35 Mexique : Composer sans frais le 01 800 0022-767. /™ ©2023 KitchenAid. Tous droits réservés. Utilisé sous licence au Canada. ® In some European factories the letter "W" of the part code mentioned herein will be automatically W11670365A.indd 35...
  • Página 36 
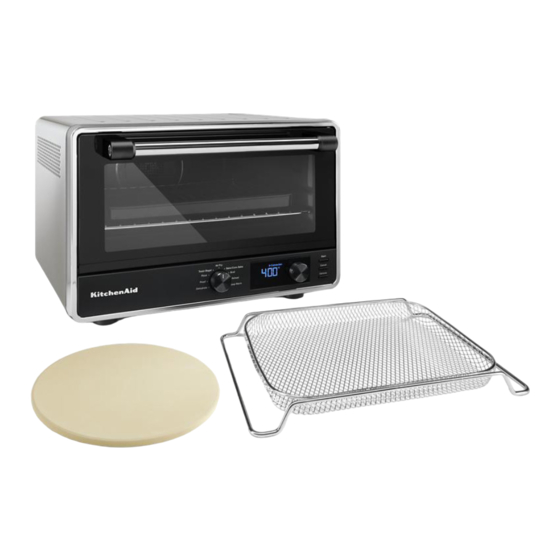
PIEZAS Y CARACTERÍSTICAS Ventana de vidrio reforzado Perilla de modos: Selector de modo de cocción Bandeja para migas removible Icono de precalentamiento Superficie de enfriamiento para la parrilla extraíble del horno Icono de tostar Recipiente esmaltado Icono de rosca Parrilla del horno de acero cromado Icono de tono Manija de la puerta Icono de fresco...
  • Página 37 Devuelva el aparato al lugar de servicio técnico autorizado más cercano para la inspección, la reparación o el ajuste eléctrico o mecánico. 6. El uso de aditamentos/accesorios no recomendados ni vendidos por KitchenAid puede provocar un incendio, choque eléctrico o lesión a las personas.
  • Página 38 15. No guarde ningún material diferente de los accesorios recomendados por KitchenAid en este Horno para mostrador cuando no esté en uso. 16. No ponga ninguno de los siguientes materiales en el Horno para mostrador: papel, cartulina, plástico o similares.
  • Página 39 INTRODUCCIÓN Antes del primer uso, limpie todas las piezas y accesorios (consulte la sección “Cuidado y limpieza”). Coloque el horno para mostrador en una superficie seca, plana y nivelada. Quite todos los materiales de empaque y las etiquetas, si los hay. Abra la puerta y alinee la rejilla con las Asegúrese de que todos los lados queden ranuras para las posiciones deseadas...
  • Página 40 INTRODUCCIÓN RECOMENDACIONES DE TIEMPO: FUNCIÓN FREÍDO SIN ACEITE TEMPERATURA ALIMENTOS PORCIÓN TIEMPO °F (°C) Croquetas de pollo 1 capa 425 °F (218 °C) 8-10 minutos Frituras de pollo 1 capa 425 °F (218 °C) 13-15 minutos Alitas de pollo 1 capa 425 °F (218 °C) 18-20 minutos Filetes de pescado 1 capa 450 °F (232 °C) 12-14 minutos...
  • Página 41 FUNCIONES DE COCCIÓN POSICIÓN FUNCIÓN TEMPERATU- RANGO DE TIEMPO PRECA- RECOMEN- RA PREFIJADA TEMPERATURA PREFIJA- LENTA- DADA DE LA COCCIÓN °F (°C) °F ( C) MIENTO REJILLA Upper/Lower Dehydrate 80–180 °F (Superior/ 150 °F (66 °C) 6 horas (deshidratar) (27–82 °C) Inferior) Proof (Lower) 80–100 °F 90 °F (32 °C) 30 minutos (leudar) Bajar...
  • Página 42 POSICIÓN DE LA REJILLA DEL HORNO PARA MOSTRADOR Posición inferior de la rejilla para Freír sin aceite, Hornear, Deshidratar, Mantener caliente, Pizza, Leudar, Recalentar Posición superior de la rejilla para Asar a la parrilla, Deshidratar USO DE LA FUNCIÓN DEHYDRATE (DESHIDRATAR) La opción Dehydrate (Deshidratar) se utiliza para eliminar la humedad del contenido de vegetales y frutas para secarlos y preservarlos.
  • Página 43 USO DE LA FUNCIÓN DEHYDRATE (DESHIDRATAR) IMPORTANTE: Use siempre guantes de cocina al extraer las bandejas o parrillas. Cuando haya pasado el tiempo, sonará la señal de término y la Freidora sin aceite se apagará automáticamente. USO DE LA FUNCIÓN PROOF (LEUDAR) La función Proof (Leudar) mantiene un ambiente cálido adecuado para que la levadura levante.
  • Página 44 USO DE LA FUNCIÓN PIZZA ( CONGELADA/FRESCA CONGELADA/FRESCA)) La función Pizza distribuye la potencia entre las resistencias superior e inferior para mantener la temperatura deseada del Horno para cocinar Pizza Casera o Congelada. Las temperaturas prefijadas son 400 °F (204 °C) para pizza Frozen (congelada) y Ponga la Perilla de modos en Pizza.
  • Página 45 USO DE LA FUNCIÓN TOAST OR BAGEL (TOSTAR O ROSCA) En el modo Toast (Tostar), el horno distribuye la potencia entre los calentadores superior e inferior para mantener la temperatura deseada. En el modo Bagel (Rosca), el horno distribuye la potencia entre los calentadores superior e inferior para darle un dorado agradable a la parte superior de las roscas cortadas y, a su vez, calentar la parte externa.
  • Página 46 USO DE LA FUNCIÓN AIR FRY (FREÍDO SIN ACEITE) Cuando haya pasado el tiempo, sonará Abra la puerta y coloque los alimentos en el la señal de término y el Horno para centro de la parrilla. Cierre la puerta. Mostrador se apagará automáticamente. Presione “Start”...
  • Página 47 USO DE LA FUNCIÓN BROIL (ASAR) Cuando se seleccione la función Broil (Asar), solamente se calentarán los elementos superiores. Use la bandeja de asar a la parrilla incluida directamente sobre la rejilla del horno para conseguir un dorado uniforme y una limpieza fácil. La bandeja de asar a la parrilla también se puede usar para los ajustes Bake (Hornear) y Keep Warm (Mantener Caliente).
  • Página 48 USO DE LA FUNCIÓN REHEAT (RECALENTAR) Abra la puerta y coloque los alimentos en Cuando haya pasado el tiempo, sonará el centro de la parrilla. Cierre la puerta. la señal de término y el Horno para Mostrador se apagará automáticamente. Presione para iniciar el ciclo.
  • Página 49 USO DE LA FUNCIÓN KEEP WARM (MANTENER CALIENTE) Abra la puerta y coloque los alimentos en el Cuando haya pasado el tiempo, sonará centro de la parrilla. Cierre la puerta. la señal de término y el Horno para Presione “Start” (Inicio) para iniciar el ciclo. Mostrador se apagará...
  • Página 50 GUÍA DE SOLUCIÓN DE PROBLEMAS ADVERTENCIA Peligro de Choque Eléctrico Conecte a un contacto de pared de conexión a tierra de 3 terminales. No quite la terminal de conexión a tierra. No use un adaptador. No use un cable eléctrico de extensión. No seguir estas instrucciones puede ocasionar la muerte, incendio o choque eléctrico.
  • Página 51 F. Daños estéticos, (es decir, rayaduras, abolladuras, desportilladuras u otro daño al acabado), a menos que estos se deban a defectos en los materiales o la mano de obra, y se le informe a KitchenAid en un lapso de 30 días a partir de la fecha de compra.
  • Página 52 Para obtener información acerca del servicio en México: Llame sin cargo al 01-800-0022-767. ®/™ ©2023 KitchenAid. Todos los derechos reservados. Usado bajo licencia en Canadá. In some European factories the letter "W" of the part code mentioned herein will be automatically W11670365A.indd 52 W11670365A.indd 52...
  • Página 53 CANADA: 1.800.807.6777 | KitchenAid.ca MEXICO: KitchenAid.com.mx LATIN AMERICA: KitchenAid-Latam.com /™ ©2023 KitchenAid. All rights reserved. Used under license in Canada. ® Tous droits réservés. Utilisé sous licence au Canada. Todos los derechos reservados. Usado bajo licencia en Canadá. 06/23 W11670365A In some European factories the letter "W"...