Descargar Imprimir esta página
Ocultar thumbs Ver también para OUTSTAR:

Publicidad

Idiomas disponibles
  • ES

Idiomas disponibles

Enlaces rápidos

1.2.0_DE_April2022

Publicidad

loading

Resumen de contenidos para Sena OUTSTAR

  • Página 1 1.2.0_DE_April2022...
  • Página 2 BLUETOOTH -HELM ® BENUTZERHANDBUCH 1.2.0 GERMAN...
  • Página 3 VERNETZT FAHREN Lauschen Sie Ihrer Lieblingsmusik, unterhalten Sie sich über die Sprechanlage mit Ihren Freunden, folgen Sie den Richtungsanweisungen Ihres GPS-Systems und vieles mehr – mit dem offenen OUTSTAR-Helm mit Bluetooth -Funktion ist das ® alles kein Problem. Da Bluetooth -Funktionen ®...
  • Página 4 Funktionen des Produkts zu profitieren. Unter sena.com/de erfahren Sie, wie Sie das Produkt aktualisieren. 2. Folgen Sie Sena auf Facebook, YouTube, Twitter und Instagram, um immer die neuesten Informationen zu unseren Produkten, hilfreiche Tipps und andere Ankündigungen zu Sena- Produkten zu erhalten.
  • Página 5 INHALT INFORMATIONEN ZUM BLUETOOTH-HELM OUTSTAR 1.1 Allgemeine Informationen 1.2 Produktdetails 1.2.1 Taste für Bluetooth-System 1.2.2 Abnehmbare Innenteile 1.3 Lieferumfang 1.4 Tragen des Helms 1.4.1 Helm aufsetzen 1.4.2 Helm abnehmen 1.4.3 Visierblende abnehmen 1.4.4 Visierblende anbringen 1.4.5 Wangenpolsterung abnehmen 1.4.6 Wangenpolsterung anbringen 1.4.7 Innenpolsterung herausnehmen...
  • Página 6 2.4 Lautstärkeregelung 2.5 Herunterladbare Sena-Software 2.5.1 Sena Device Manager HEADSET MIT ANDEREN BLUETOOTH-GERÄTEN KOPPELN 3.1 Koppeln mit einem Mobiltelefon 3.1.1 Erste Kopplung des OUTSTAR 3.1.2 Kopplung, wenn der OUTSTAR ausgeschaltet ist 3.2 Kopplung des zweiten Handys VERWENDEN EINES MOBILTELEFONS 4.1 Tätigen und Annehmen von Anrufen 4.2 Kurzwahl...
  • Página 7 ALLGEMEINE EINSTELLUNGEN 7.1 Funktionspriorität 7.2 Konfigurationsmenü 7.2.1 Kurzwahlnummern zuweisen 7.2.2 VOX-Telefon (standardmäßig aktiviert) 7.2.3 Sprachansage (standardmäßig aktiviert) 7.2.4 Alle Kopplungen löschen 7.3 Firmware-Aktualisierung FEHLERSUCHE 8.1 Reset bei Fehlfunktion 8.2 Zurücksetzen WARTUNG UND PFLEGE 9.1 Außenschale 9.2 Innenfutter 9.3 Aufbewahrung des Helms SCHNELLÜBERSICHT...
  • Página 8 Änderungen am Inhalt dieses Benutzerhandbuchs zum Helm sind ohne Benachrichtigung vorbehalten. Die Abbildungen weichen u. U. vom tatsächlichen Produkt ab. Die Urheberrechte des Benutzerhandbuchs liegen bei Sena Technologies, Inc. Die Vervielfältigung und das Kopieren des Benutzerhandbuchs ohne entsprechende Berechtigung sind strengstens untersagt.
  • Página 9 INFORMATIONEN ZUM BLUETOOTH-HELM OUTSTAR 1.2 Produktdetails Nr. Name Nr. Name Visierblende Hebel für Sonnenblende Sonnenblende Visierraster Lautsprecher Hintere Lüftungsöffnung Kinnriemen Schale Mikrofon Obere Lüftungsöffnung Drehknopf 3 4 5 Nr. Name Nr. Name Anschluss für Gleichstrom- Riemenversteller Ladegerät und zur Kinnriemen Firmware-Aktualisierung Druckschließe...
  • Página 10 INFORMATIONEN ZUM BLUETOOTH-HELM OUTSTAR 1.2.1 Taste für Bluetooth-System Drehen/gedrückt halten und drehen Drücken/gedrückt halten 1.2.2 Abnehmbare Innenteile Innenpolsterung Wangenpolsterung (R) Wangenpolsterung (L)
  • Página 11 INFORMATIONEN ZUM BLUETOOTH-HELM OUTSTAR 1.3 Lieferumfang Helm Helmtasche USB-Lade- und Aufsätze für das Reflektoren (4) Datenkabel Bügel-Mikrofon (2) 1.4 Tragen des Helms 1.4.1 Helm aufsetzen 1. Lockern Sie den Kinnriemen mithilfe des Rückhaltesystems. 2. Halten Sie den Helm mit Ihrer Hand offen und ziehen Sie ihn über den Kopf.
  • Página 12 INFORMATIONEN ZUM BLUETOOTH-HELM OUTSTAR 1.4.2 Helm abnehmen 1. Lockern Sie den Kinnriemen mithilfe des Rückhaltesystems. 2. Ziehen Sie den gepolsterten Kinnriemen vorsichtig heraus und setzen Sie den Helm ab. Hinweis: Wenn Sie nach dem Abnehmen des Helms den Kinnriemen schließen, vermeiden Sie Kratzer auf den Oberflächen, mit denen der Riemen in...
  • Página 13 INFORMATIONEN ZUM BLUETOOTH-HELM OUTSTAR 1.4.3 Visierblende abnehmen Riegel A 1. Entriegeln Sie die linke Seite der Visierblende, um Riegel A lösen zu können, und öffnen Sie die Visierblende vollständig. 2. Ziehen Sie die Visierblende nach außen, während Sie den Hebel des Visierrasters nach oben drücken.
  • Página 14 INFORMATIONEN ZUM BLUETOOTH-HELM OUTSTAR 1.4.4 Visierblende anbringen Riegel B Riegel D Riegel C Riegel E 1. Richten Sie die Riegel B, C, D und E wie auf der Abbildung oben gezeigt am Visierraster aus. 2. Setzen Sie die Riegel B bis E ins Visierraster ein, während Sie den Hebel des Visierrasters nach oben drücken.
  • Página 15 INFORMATIONEN ZUM BLUETOOTH-HELM OUTSTAR 1.4.5 Wangenpolsterung abnehmen 1. Öffnen Sie die 3 Druckknöpfe, mit der die Wangenpolsterung und der Helm verbunden sind. 2. Ziehen Sie die Wangenpolsterung nach oben heraus. 3. Gehen Sie auf der anderen Seite genauso vor.
  • Página 16 INFORMATIONEN ZUM BLUETOOTH-HELM OUTSTAR 1.4.6 Wangenpolsterung anbringen 1. Ziehen Sie den Kinnriemen durch das Loch in der Wangenpolsterung und schieben Sie die Plastikplatte der Polsterung zwischen Schale und EPS. 2. Befestigen Sie die Wangenpolsterung mithilfe der 3 Druckknöpfe. 3. Gehen Sie auf der anderen Seite genauso vor.
  • Página 17 INFORMATIONEN ZUM BLUETOOTH-HELM OUTSTAR 1.4.7 Innenpolsterung herausnehmen 1. Öffnen Sie die 2 hinteren Druckknöpfe der Innenpolsterung. 2. Ziehen Sie die Polsterung nach oben und schieben Sie Ihre Finger unter den vorderen Teil der Plastikplatte. Anschließend nehmen Sie die Platte heraus, indem...
  • Página 18 INFORMATIONEN ZUM BLUETOOTH-HELM OUTSTAR 1.4.8 Innenpolsterung anbringen 1. Setzen Sie die Plastikplatte entsprechend den 4 Noppen des vorderen Teils ein. 2. Befestigen Sie die Innenpolsterung mithilfe der 2 hinteren Druckknöpfe.
  • Página 19 INFORMATIONEN ZUM BLUETOOTH-HELM OUTSTAR 1.4.9 Sonnenblende abnehmen 1. Schieben Sie den Hebel für die Sonnenblende in die Richtung, die auf der Abbildung oben gezeigt wird, damit sich die Sonnenblende senkt. 2. Ziehen Sie eine Seite der Blende in die Richtung weg, die auf der Abbildung oben gezeigt wird.
  • Página 20 INFORMATIONEN ZUM BLUETOOTH-HELM OUTSTAR 1.4.10 Sonnenblende anbringen 1. Setzen Sie den Steckverbinder in seine Aussparung ein und drücken Sie auf die Sonnenblende, bis Sie einen Klick hören. 2. Gehen Sie auf der anderen Seite genauso vor.
  • Página 21 INFORMATIONEN ZUM BLUETOOTH-HELM OUTSTAR 1.5 Helmüberprüfung vor der Fahrt 1.5.1 Außenseite überprüfen Untersuchen Sie den Helm regelmäßig auf Schäden. Kleine, oberflächliche Kratzer beeinträchtigen die Schutzwirkung des Helms nicht. Falls der Helm schwerwiegender beschädigt ist (Risse, Dellen, abblätternde Farbe usw.), sollte er nicht mehr verwendet werden.
  • Página 22 Halten Sie den Drehknopf 5 Sekunden lang gedrückt. 2.2 Laden Das Bluetooth-System kann mit verschiedenen herkömmlichen Methoden über das USB-Lade- und Datenkabel geladen werden: Der OUTSTAR ist nur mit über USB aufladbaren Geräten mit einer Eingangsspannung von 5 V kompatibel. Je nach verwendeter Lademethode ist das Bluetooth-...
  • Página 23 Das Bluetooth-System wird während des Ladens automatisch ausgeschaltet. • Es kann auch ein USB-Ladegerät eines anderen Anbieters zum Laden von Sena-Produkten verwendet werden, solange es entweder eine FCC-, CE- oder IC-Zulassung hat. 2.3 Überprüfung des Akkuladezustands Beim Einschalten des Headsets zeigt die rote LED durch schnelles Blinken den Akkuladezustand an.
  • Página 24 ERSTE SCHRITTE: BLUETOOTH-SYSTEM 2.5 Herunterladbare Sena-Software 2.5.1 Sena Device Manager Mit dem Sena Device Manager können Sie die Firmware aktualisieren und Einstellungen direkt am PC oder Apple-Computer konfigurieren. Weitere Informationen zum Herunterladen des Sena Device Manager finden Sie unter sena.com/de.
  • Página 25 Funkgerätadapter Sena SR10. Verwenden Sie hierfür die Funktion „Koppeln mit einem Mobiltelefon“ oder „Kopplung des zweiten Handys“. Das Bluetooth- System kann zudem mit einem anderen Sena-Headset oder -Bluetooth-Systemen gekoppelt werden. 3.1 Koppeln mit einem Mobiltelefon Sie haben 2 Möglichkeiten, das Telefon zu koppeln.
  • Página 26 1. Halten Sie den Drehknopf 1 Sekunde lang gedrückt und drehen Sie ihn im Uhrzeigersinn. Die Sprachansage „Handy koppeln“ wird ausgegeben. 2. Wählen Sie den OUTSTAR in der Liste der gefundenen Geräte auf Ihrem Mobiltelefon aus. Geben Sie die PIN 0000 ein. Bei manchen Mobiltelefonen ist die PIN nicht erforderlich.
  • Página 27 2. Drehen Sie den Drehknopf, bis Sie die Sprachansage „Kopplung des zweiten Handys“ hören. Suchen Sie auf Ihrem Mobiltelefon nach Bluetooth-Geräten. 3. Wählen Sie den OUTSTAR in der Liste der gefundenen Geräte auf Ihrem Mobiltelefon aus. Geben Sie die PIN 0000 ein. Bei manchen Mobiltelefonen ist die PIN nicht erforderlich.
  • Página 28 VERWENDEN EINES MOBILTELEFONS 4.2 Kurzwahl 4.2.1 Kurzwahlnummern zuweisen Vor der Verwendung der Kurzwahlfunktion müssen zunächst Kurzwahlnummern zugewiesen werden. Die Voreinstellungen für die Kurzwahl werden im Einstellungsmenü festgelegt. 4.2.2 Kurzwahlnummern verwenden 1. Halten Sie den Drehknopf gedrückt und drehen Sie ihn gegen den Uhrzeigersinn. 2.
  • Página 29 5. BLUETOOTH-SPRECHANLAGE 5.1 Kopplung der Sprechanlage Es können bis zu drei andere Benutzer für Bluetooth- Kommunikationen über die Sprechanlage mit dem Helm gekoppelt werden. Gesprächsteilnehmer Gesprächsteilnehmer Gesprächsteilnehmer 1. Halten Sie den Drehknopf 5 Sekunden lang gedrückt und drehen Sie ihn im Uhrzeigersinn, wenn die beiden Helme (A und B) ausgeschaltet sind.
  • Página 30 BLUETOOTH-SPRECHANLAGE 5. Das Koppeln der Sprechanlage wird nach dem Prinzip Der Letzte wird zuerst bedient durchgeführt. Wurde ein Headset also zur Kommunikation über die Sprechanlage mit mehreren Headsets gekoppelt, wird das zuletzt gekoppelte Headset als erster Gesprächsteilnehmer verwendet. Die vorherigen Gesprächsteilnehmer werden dadurch zum zweiten bzw.
  • Página 31 BLUETOOTH-SPRECHANLAGE 5.2 Zwei-Wege-Sprechanlage Gehen Sie wie folgt vor, um mit einem Gesprächsteilnehmer eine Kommunikation über die Sprechanlage zu beginnen. Drücken Sie einmal den Drehknopf, um ein Gespräch mit dem ersten Gesprächsteilnehmer zu beginnen. Drücken Sie zweimal den Drehknopf, um ein Gespräch mit dem zweiten Gesprächsteilnehmer zu beginnen.
  • Página 32 6. STEREO-MUSIK 6.1 Wiedergabe von Musik mit Bluetooth-Geräten • Musik wiedergeben oder pausieren Halten Sie den Drehknopf 1 Sekunde lang gedrückt. • Nächster/vorheriger Titel Halten Sie den Drehknopf gedrückt und drehen Sie ihn im Uhrzeigersinn oder gegen den Uhrzeigersinn.
  • Página 33 7. ALLGEMEINE EINSTELLUNGEN 7.1 Funktionspriorität Das Bluetooth-System hat die folgende Prioritätenreihenfolge: (höchstes) Mobiltelefon Bluetooth-Sprechanlage (niedrigstes) Bluetooth-Stereomusik Eine Funktion mit niedrigerer Priorität wird stets durch eine Funktion mit höherer Priorität unterbrochen. 7.2 Konfigurationsmenü Sie können die Konfiguration des Bluetooth-Systems wie nachfolgend beschrieben im Sprachmenü festlegen. Halten Sie den Drehknopf zum Aufrufen der Konfiguration 5 Sekunden lang gedrückt und drehen Sie ihn im Uhrzeigersinn, wenn das Bluetooth-System ausgeschaltet ist.
  • Página 34 ALLGEMEINE EINSTELLUNGEN 7.2.1 Kurzwahlnummern zuweisen 1. Um eine Telefonnummer als Kurzwahl zuzuweisen, drehen Sie den Drehknopf, bis die Sprachansage „Kurzwahl“ ausgegeben wird. 2. Drücken Sie den Drehknopf. Daraufhin werden die Sprachansagen „Kurzwahl Eins“ und „Handy verbunden“ ausgegeben. – Drehen Sie den Drehknopf, um eine der drei Kurzwahlnummern auszuwählen.
  • Página 35 Kopplungen löschen“ hören, und drücken Sie anschließend zur Bestätigung den Drehknopf. 7.3 Firmware-Aktualisierung Das Bluetooth-System unterstützt Firmware- Aktualisierungen. Sie können die Firmware über den Sena Device Manager aktualisieren. Die neueste Software finden Sie auf der Sena-Website zu Bluetooth unter sena.com/de.
  • Página 36 8. FEHLERSUCHE 8.1 Reset bei Fehlfunktion Falls das Bluetooth-System nicht ordnungsgemäß funktioniert, können Sie das Gerät einfach zurücksetzen. Wenn das USB-Lade- und Datenkabel mit dem System an eine Stromversorgung angeschlossen wird, schaltet sich das System automatisch aus und es erfolgt ein Reset bei Fehlfunktion. 8.2 Zurücksetzen Wenn Sie das Headset auf die Werkseinstellungen zurücksetzen möchten, verwenden Sie die Funktion Zurücksetzen in...
  • Página 37 9. WARTUNG UND PFLEGE 9.1 Außenschale Reinigen Sie die Oberfläche mit einem weichen Tuch und etwas Wasser. Hinweis: Reinigen Sie den Helm nie mit Benzin, Diesel oder Verdünnungs- bzw. Lösungsmitteln. Diese Substanzen können schwere Schäden am Helm zur Folge haben, auch wenn keine Beschädigung sichtbar sein sollte.
  • Página 38 SCHNELLÜBERSICHT Bedienung Tastenbefehl Drehknopf 1 Sekunde lang Einschalten gedrückt halten und im Uhrzeigersinn drehen Grundfunktion Drehknopf 5 Sekunden lang Ausschalten gedrückt halten Lautstärkeregelung Drehknopf drehen Anruf entgegennehmen Drehknopf drücken und beenden Drehknopf gedrückt halten Sprachwahl und im Uhrzeigersinn drehen Mobiltelefon Drehknopf gedrückt halten Kurzwahl und gegen den Uhrzeigersinn drehen...
  • Página 39 Copyright © 2022 Sena Technologies, Inc. Alle Rechte vorbehalten. © 1998-2022 Sena Technologies, Inc. Alle Rechte vorbehalten. Sena Technologies, Inc. behält sich das Recht vor, ohne vorherige Ankündigung Änderungen und Verbesserungen an seinen Produkten vorzunehmen. Sena™ ist ein Warenzeichen von Sena Technologies, Inc. oder seinen Tochtergesellschaften in den USA oder anderen Ländern.
  • Página 40 Memo...
  • Página 41 1.2.0_EN_April2022...
  • Página 42 BLUETOOTH HELMET ® USER’S GUIDE 1.2.0 ENGLISH...
  • Página 43 RIDE CONNECTED Blast your favorite tunes, talk over the intercom with your buddies, hear directions from your GPS and more, all through your OUTSTAR Bluetooth ® Open-Face Helmet. With built-in Bluetooth ® capabilities, HD Intercom, technology has never felt so minimal or freeing.
  • Página 44 Visit sena.com to see how to update your product. 2. Users can follow Sena on Facebook, YouTube, Twitter and Instagram to receive the most up to date information on products, helpful tips and all other announcements regarding Sena products.
  • Página 45 TABLE OF CONTENTS ABOUT THE OUTSTAR BLUETOOTH HELMET 1.1 General Information 1.2 Product Details 1.2.1 Bluetooth System Button 1.2.2 Detachable Inner Parts 1.3 Package Contents 1.4 Wearing the Helmet 1.4.1 Putting on the Helmet 1.4.2 Removing the Helmet 1.4.3 Removing the Shield Visor 1.4.4 Installing the Shield Visor...
  • Página 46 2.5.1 Sena Device Manager PAIRING THE BLUETOOTH SYSTEM WITH OTHER BLUETOOTH DEVICES 3.1 Mobile Phone Pairing 3.1.1 Initially Pairing the OUTSTAR 3.1.2 Pairing When the OUTSTAR is Turned Off 3.2 Second Mobile Phone Pairing MOBILE PHONE USAGE 4.1 Making and Answering Calls 4.2 Speed Dialing...
  • Página 47 GENERAL SETTINGS 7.1 Function Priority 7.2 Configuration Menu 7.2.1 Assigning Speed Dial 7.2.2 VOX Phone (Default: Enable) 7.2.3 Voice Prompt (Default: Enable) 7.2.4 Delete All Pairings 7.3 Firmware Upgrades TROUBLESHOOTING 8.1 Fault Reset 8.2 Factory Reset MAINTENANCE AND CARE 9.1 Outer Shell 9.2 Inner Lining 9.3 Storing the Helmet QUICK REFERENCE...
  • Página 48 The contents of this helmet User’s Guide are subjected to change without notice. Its illustration may differ from the actual product. The copyrights for the User’s Guide belong to Sena Technologies, Inc. Reproduction or copying of the User’s Guide without permission is strictly prohibited.
  • Página 49 ABOUT THE OUTSTAR BLUETOOTH HELMET 1.2 Product Details No. Name No. Name Shield Visor Sun Visor Lever Sun Visor Shield Ratchet Speakers Rear Vent Chinstrap Shell Microphone Top Vent Jog Dial 3 4 5 No. Name No. Name Strap Adjuster DC Power Charging &...
  • Página 50 ABOUT THE OUTSTAR BLUETOOTH HELMET 1.2.1 Bluetooth System Button Rotate/Rotate while Pressing Tap/Press and Hold 1.2.2 Detachable Inner Parts Inner Pad Cheek Pad (R) Cheek Pad (L)
  • Página 51 ABOUT THE OUTSTAR BLUETOOTH HELMET 1.3 Package Contents Helmet Helmet Pouch Boom USB Power & Reflex Microphone Data Cable Stickers (4) Sponges (2) 1.4 Wearing the Helmet 1.4.1 Putting on the Helmet 1. Unfasten the chinstrap by using the retention system.
  • Página 52 ABOUT THE OUTSTAR BLUETOOTH HELMET 1.4.2 Removing the Helmet 1. Unfasten the chinstrap by using the retention system. 2. Gently pull the padded chinstrap outward and slide the helmet off your head. Note: Fastening the chinstrap after removing the helmet will help avoid scratching surfaces it’s placed upon.
  • Página 53 ABOUT THE OUTSTAR BLUETOOTH HELMET 1.4.3 Removing the Shield Visor Hook A 1. Unlatch the left side of the shield visor to detach it from hook A, and open the shield visor to the fully opened position. 2. Pull the shield visor outward while pushing the shield ratchet lever upward.
  • Página 54 ABOUT THE OUTSTAR BLUETOOTH HELMET 1.4.4 Installing the Shield Visor Hook B Hook D Hook C Hook E 1. Align hook B, hook C, hook D, and hook E to the shield ratchet as shown in the illustration above. 2. Insert hooks B-E into the shield ratchet while pushing the shield ratchet lever upward.
  • Página 55 ABOUT THE OUTSTAR BLUETOOTH HELMET 1.4.5 Removing the Cheek Pads 1. Unsnap the three fasteners of the cheek pad from the helmet. 2. Remove the cheek pad by pulling it upward. 3. Repeat the process on the opposite side.
  • Página 56 ABOUT THE OUTSTAR BLUETOOTH HELMET 1.4.6 Installing the Cheek Pads 1. Pass the chinstrap through the hole of the cheek pad and insert the cheek pad’s plastic plate into the space between the shell and EPS. 2. Snap the three fasteners of the cheek pad into place.
  • Página 57 ABOUT THE OUTSTAR BLUETOOTH HELMET 1.4.7 Removing the Inner Pad 1. Unsnap the two rear buttons of the inner pad. 2. Lift the pad upward and place your fingers under the plastic plate in the front section. Then, remove the...
  • Página 58 ABOUT THE OUTSTAR BLUETOOTH HELMET 1.4.8 Installing the Inner Pad 1. Align and install the plastic plate on the four sleeves of the front section. 2. Snap the two rear buttons of the inner pad into place.
  • Página 59 ABOUT THE OUTSTAR BLUETOOTH HELMET 1.4.9 Removing the Sun Visor 1. Slide the sun visor lever in the direction shown in the illustration above to lower the sun visor. 2. Pull one side of the visor in the direction shown in the illustration above.
  • Página 60 ABOUT THE OUTSTAR BLUETOOTH HELMET 1.4.10 Installing the Sun Visor 1. Insert the sun visor tab into its slot until you hear a click. 2. Repeat the process on the opposite side.
  • Página 61 ABOUT THE OUTSTAR BLUETOOTH HELMET 1.5 Pre-Ride Helmet Inspection 1.5.1 Checking the Exterior Check the helmet regularly for damage. Small, superficial scratches will not impair the helmet’s protective qualities. In the case of more serious damage (cracks, dents, flaking and cracking paint, etc.), the helmet should no longer be used.
  • Página 62 2.2 Charging The Bluetooth system can be charged using many common methods via the supplied USB power & data cable: the OUTSTAR is compatible with 5 V input USB- charged devices only. Depending upon the charging method, the Bluetooth system will be fully charged in about 3 hours.
  • Página 63 Please make sure to take off your helmet while charging. The Bluetooth system automatically turns off during charging. • Any 3rd party USB charger can be used with Sena products if the charger is approved by either the FCC, CE, or IC. 2.3 Checking the Battery Level When the headset is powering on, the red LED flashes rapidly indicating the battery level.
  • Página 64 Bluetooth system can pair with multiple Bluetooth devices such as mobile phone, MP3 player, GPS or Sena SR10 Two-Way Radio Adapter via Mobile Phone Pairing, Second Mobile Phone Pairing. The Bluetooth system can also be paired with another Sena headset or Bluetooth system.
  • Página 65 1. Rotate while pressing the Jog dial clockwise for 1 second. You will hear a voice prompt, “Phone pairing”. 2. Select the OUTSTAR in the list of the devices detected on the mobile phone. Enter 0000 for the PIN. Some mobile phones may not ask for the PIN.
  • Página 66 MOBILE PHONE USAGE 3. Select the OUTSTAR in the list of the devices detected on the mobile phone. Enter 0000 for the PIN. Some mobile phones may not ask for the PIN. 3.2 Second Mobile Phone Pairing Pairing with Additional Mobile Phone, GPS, MP3 Players or Sena SR10 Two-way Radio Adapter.
  • Página 67 MOBILE PHONE USAGE 4.2 Speed Dialing 4.2.1 Assigning Speed Dial Presets You need to assign speed dial numbers before using the speed dial. Speed Dial Presets could be assigned in the settings menu. 4.2.2 Using Speed Dial Presets 1. Rotate while pressing the Jog dial counterclockwise. 2.
  • Página 68 5. BLUETOOTH INTERCOM 5.1 Intercom Pairing Up to three other people can be paired with the helmet for Bluetooth intercom conversations. Intercom Intercom Intercom Friend B Friend C Friend D 1. Rotate while pressing the Jog dial clockwise for 5 seconds when the two helmet (A and B) are turned off.
  • Página 69 BLUETOOTH INTERCOM Last-Come, First-Served Intercom Friend 1 Intercom Intercom Friend 1 Friend 2 Intercom Intercom Intercom Friend 1 Friend 2 Friend 3 5.2 Two-way Intercom You can start an intercom conversation with one of any intercom friends by tapping the Jog Dial. Tap the Jog Dial once to intercom with the First Intercom Friend , tap the Jog Dial twice to intercom with the Second Intercom Friend , and tap the Jog Dial three times to intercom with the Third Intercom Friend .
  • Página 70 STEREO MUSIC = Tap the Jog Dial. Intercom Friend 1 = Double tap the Jog Dial. Intercom Friend 2 = Tap the Jog Dial three times. Intercom Friend 3 6. STEREO MUSIC 6.1 Playing Music with Bluetooth Devices • Play or Pause music Press and hold the Jog dial for 1 second.
  • Página 71 GENERAL SETTINGS Function Priority The Bluetooth system operates in the following order of priority: (highest) Mobile phone Bluetooth Intercom (lowest) Bluetooth stereo music A lower priority function is always interrupted by a higher priority function. 7.2 Configuration Menu You can set the configuration of the Bluetooth system by the voice menu instruction described below.
  • Página 72 GENERAL SETTINGS 7.2.1 Assigning Speed Dial 1. To assign a phone number as a speed dial, rotate the Jog dial until you hear a voice prompt, “Speed dial”. 2. Tap the Jog dial, and you will hear a voice prompt, “Speed dial one”...
  • Página 73 Jog dial to confirm. 7.3 Firmware Upgrades The Bluetooth system supports firmware upgrades. You can update the firmware using the Sena Device Manager. Please visit Sena Bluetooth website at sena.com to check the latest software downloads.
  • Página 74 MAINTENANCE AND CARE 9.1 Outer Shell Use a soft cloth and a small amount of water to remove bugs from the exterior. Note: Never use gasoline, diesel fuel, thinners or solvents to clean the helmet. These substances can cause serious damage to the helmet, even though the resulting damage may not be visible.
  • Página 75 QUICK REFERENCE Type Operation Button Command Rotate while pressing the Jog dial Power on clockwise for 1 second Basic Press and hold the Jog dial for Power off Function 5 seconds Volume Rotate the Jog dial adjustment Answer & end Tap the Jog dial phone call Rotate while pressing the Jog dial...
  • Página 76 Hero4 allowing for Bluetooth capabilities. The Bluetooth word mark and logos are owned by the Bluetooth ® SIG, Inc. and any use of such marks by Sena is under license. iPhone and iPod touch are registered trademarks of Apple Inc.
  • Página 77 1.2.0_FR_April2022...
  • Página 78 CASQUE BLUETOOTH ® MANUEL D’UTILISATION 1.2.0 FRENCH...
  • Página 79 ROULEZ CONNECTÉ Faites rugir vos morceaux favoris, parlez à vos copains sur l’intercom, écoutez les indications de votre GPS, etc., directement dans votre casque ouvert OUTSTAR Bluetooth . Avec ses ® fonctionnalités Bluetooth intégrées, l’Intercom ® HD, jamais la technologie n’a été si minimale ou légère.
  • Página 80 à ce produit. Rendez-vous sur sena.com/fr pour savoir comment mettre à jour votre produit. 2. Les utilisateurs peuvent suivre Sena sur Facebook, YouTube, Twitter et Instagram pour recevoir les informations les plus récentes sur...
  • Página 81 SOMMAIRE À PROPOS DU CASQUE BLUETOOTH OUTSTAR 1.1 Informations générales 1.2 Détails sur le produit 1.2.1 Bouton du système Bluetooth 1.2.2 Parties internes amovibles 1.3 Contenu du package 1.4 Port du casque 1.4.1 Mise en place du casque 1.4.2 Retrait du casque 1.4.3...
  • Página 82 APPAREILS BLUETOOTH 3.1 Couplage du téléphone mobile 3.1.1 Couplage initial du casque OUTSTAR 3.1.2 Couplage lorsque le OUTSTAR est éteint 25 3.2 Couplage d’un second téléphone mobile 26 UTILISATION DU TÉLÉPHONE MOBILE 4.1 Passer et répondre à des appels 4.2 Appel rapide 4.2.1...
  • Página 83 MUSIQUE EN STÉRÉO 6.1 Écouter de la musique avec des appareils Bluetooth PARAMÈTRES GÉNÉRAUX Priorité de fonctionnement 7.2 Configuration 7.2.1 Affecter un appel rapide 7.2.2 VOX téléphone (par défaut : activé) 7.2.3 Instructions vocales (par défaut : activé) 7.2.4 Annulation couplages 7.3 Mises à niveau du micrologiciel DÉPANNAGE 8.1 Réinitialisation par défaut 8.2 Réinitialisation...
  • Página 84 Le contenu du Manuel d’utilisation du casque est sujet à modifications sans préavis. Ses illustrations peuvent différer du produit réel. Les droits d’auteur du Manuel d’utilisation appartiennent à Sena Technologies, Inc. Toute reproduction ou copie du Manuel d’utilisation sans autorisation est strictement interdite.
  • Página 85 À PROPOS DU CASQUE BLUETOOTH OUTSTAR 1.2 Détails sur le produit Numéro Nom Numéro Nom Levier de la visière Visière pare-soleil Visière pare-soleil Levier de protection Haut-parleurs Aération arrière Mentonnière Coque Microphone Aération supérieure La molette 3 4 5 Numéro Nom Numéro Nom...
  • Página 86 À PROPOS DU CASQUE BLUETOOTH OUTSTAR 1.2.1 Bouton du système Bluetooth Tourner / Tourner tout en appuyant Appuyer / Appuyer et maintenir 1.2.2 Parties internes amovibles Rembourrage interne Rembourrage Rembourrage de joue (D) de joue (G)
  • Página 87 À PROPOS DU CASQUE BLUETOOTH OUTSTAR 1.3 Contenu du package Casque Sacoche de transport Câble Bonnettes de Adhésifs d’alimentation et microphone réfléchissants (4) de données USB sur tige (2) 1.4 Port du casque 1.4.1 Mise en place du casque 1. Desserrez la mentonnière à l’aide du système de maintien.
  • Página 88 À PROPOS DU CASQUE BLUETOOTH OUTSTAR 1.4.2 Retrait du casque 1. Desserrez la mentonnière à l’aide du système de maintien. 2. Tirez doucement la mentonnière rembourrée vers l’extérieur et retirez le casque de votre tête. Remarque : fixer la mentonnière après avoir retiré...
  • Página 89 À PROPOS DU CASQUE BLUETOOTH OUTSTAR 1.4.3 Retrait de la visière Crochet A 1. Déverrouillez le côté gauche de la visière pour la détacher du crochet A, puis ouvrez la visière en position complètement ouverte. 2. Tirez la visière vers l’extérieur tout en poussant le levier de protection vers le haut.
  • Página 90 À PROPOS DU CASQUE BLUETOOTH OUTSTAR 1.4.4 Mise en place de la visière Crochet B Crochet D Crochet C Crochet E 1. Alignez le crochet B, le crochet C, le crochet D et le crochet E sur le levier de protection comme indiqué dans l’illustration ci-dessus.
  • Página 91 À PROPOS DU CASQUE BLUETOOTH OUTSTAR 1.4.5 Retrait des rembourrages de joue 1. Déconnectez les trois fermetures du rembourrage de joue du casque. 2. Retirez le rembourrage de joue en le tirant vers le haut. 3. Répétez la même opération de l’autre côté.
  • Página 92 À PROPOS DU CASQUE BLUETOOTH OUTSTAR 1.4.6 Mise en place des rembourrages de joue 1. Passez la mentonnière dans le trou du rembourrage de joue et insérez la plaque de plastique du rembourrage de joue dans l’espace entre la coque et l’EPS.
  • Página 93 À PROPOS DU CASQUE BLUETOOTH OUTSTAR 1.4.7 Retrait du rembourrage interne 1. Déconnectez les deux boutons arrière du rembourrage interne. 2. Soulevez le rembourrage vers le haut et placez vos doigts sous la plaque de plastique dans la partie avant. Ensuite, retirez la plaque en l’éloignant de...
  • Página 94 À PROPOS DU CASQUE BLUETOOTH OUTSTAR 1.4.8 Mise en place du rembourrage interne 1. Alignez et installez la plaque en plastique sur les quatre manchons de la partie avant. 2. Connectez les deux boutons arrière du rembourrage interne.
  • Página 95 À PROPOS DU CASQUE BLUETOOTH OUTSTAR 1.4.9 Retrait de la visière pare-soleil 1. Faites glisser le levier de la visière pare-soleil dans la direction indiquée dans l’illustration ci-dessus pour abaisser la visière pare-soleil. 2. Tirez un côté de la visière dans la direction indiquée dans l’illustration ci-dessus.
  • Página 96 À PROPOS DU CASQUE BLUETOOTH OUTSTAR 1.4.10 Mise en place de la visière pare-soleil 1. Insérez l’onglet de la visière pare-soleil dans sa fente jusqu’à ce que vous entendiez un clic. 2. Répétez la même opération de l’autre côté.
  • Página 97 À PROPOS DU CASQUE BLUETOOTH OUTSTAR 1.5 Inspection du casque moto avant utilisation 1.5.1 Vérification des surfaces extérieures Vérifiez le casque moto régulièrement pour détecter la présence de dommages. Les petites rayures superficielles n’auront aucun impact sur les qualités protectrices du casque moto. En cas de dommages plus graves (fissures, bosses, écaille et peinture fendillée), le...
  • Página 98 2.2 Mise en charge Le système Bluetooth peut être rechargé en utilisant de nombreuses méthodes courantes via le câble d’alimentation et de données USB fourni : le OUTSTAR est compatible avec les appareils à recharge USB 5 V uniquement. Selon la méthode de mise en charge choisie, le système Bluetooth est entièrement rechargé...
  • Página 99 Le système Bluetooth s’éteint automatiquement pendant la mise en charge. • Un chargeur USB tiers peut être utilisé avec les produits Sena à condition que celui-ci soit aux normes FCC, CE ou IC. 2.3 Vérification du niveau de charge de la batterie...
  • Página 100 MISE EN ROUTE : SYSTÈME BLUETOOTH 2.5 Logiciel Sena téléchargeable 2.5.1 Sena Device Manager Sena Device Manager vous permet de mettre à jour le micrologiciel et de configurer ses paramètres directement à partir de votre PC ou d’un ordinateur Apple. Pour savoir comment télécharger Sena Device...
  • Página 101 à portée l’un de l’autre. Le système Bluetooth peut être couplé avec plusieurs appareils Bluetooth tels qu’un téléphone mobile, un lecteur MP3, un GPS ou un adaptateur radio bidirectionnelle Sena SR10 via les fonctions Couplage du téléphone mobile et Couplage d’un second téléphone mobile. Le système Bluetooth peut également être couplé...
  • Página 102 1. Tournez dans le sens horaire tout en appuyant sur la molette pendant 1 seconde. Vous entendez alors l’instruction vocale « Couplage téléphone ». 2. Sélectionnez le casque OUTSTAR dans la liste des appareils détectés sur le téléphone mobile. Saisissez le code PIN 0000. Certains téléphones mobiles ne vous demandent pas de saisir un code PIN.
  • Página 103 « Couplage d’un second téléphone mobile ». Recherchez des appareils Bluetooth sur votre téléphone mobile. 3. Sélectionnez le casque OUTSTAR dans la liste des appareils détectés sur le téléphone mobile. Saisissez le code PIN 0000. Certains téléphones mobiles ne vous demandent pas de saisir un code PIN.
  • Página 104 UTILISATION DU TÉLÉPHONE MOBILE 4.2 Appel rapide 4.2.1 Affecter des présélections d’appel rapide Avant d’utiliser la fonction d’appel rapide, vous devez lui affecter des numéros d’appel rapide. Les présélections d’appel rapide peuvent être affectées dans le menu Paramètres. 4.2.2 Utiliser des présélections d’appel rapide 1.
  • Página 105 5. INTERCOM BLUETOOTH 5.1 Couplage intercom Jusqu’à trois autres personnes peuvent être jumelées avec le casque pour les conversations par intercom Bluetooth. VOUS Interlocuteur Interlocuteur Interlocuteur intercom B intercom C intercom D 1. Tournez tout en appuyant sur la molette dans le sens horaire pendant 5 secondes lorsque deux casques (A et B) sont désactivés.
  • Página 106 INTERCOM BLUETOOTH 5. La file de couplage intercom fonctionne selon le principe du « dernier arrivé, premier servi » . Si un casque audio est couplé à plusieurs autres casques dans le cadre d’une conversation par intercom, le dernier casque couplé est défini comme le premier interlocuteur intercom .
  • Página 107 INTERCOM BLUETOOTH 5.2 Intercom bidirectionnel Vous pouvez commencer une conversation par intercom avec n’importe lequel de vos interlocuteurs intercom en appuyant sur la molette. Appuyez une fois sur la molette pour converser avec le premier interlocuteur intercom , appuyez deux fois sur la molette pour converser avec le deuxième interlocuteur intercom et appuyez trois fois sur la molette pour converser avec le troisième interlocuteur intercom .
  • Página 108 6. MUSIQUE EN STÉRÉO 6.1 Écouter de la musique avec des appareils Bluetooth • Lecture ou pause de la musique Appuyez sur la molette et maintenez-la enfoncée pendant 1 seconde. • Piste suivante / précédente Tournez dans le sens horaire ou anti-horaire tout en appuyant sur la molette.
  • Página 109 7. PARAMÈTRES GÉNÉRAUX 7.1 Priorité de fonctionnement L’ordre de priorité de fonctionnement du système Bluetooth est le suivant : (haute priorité) Téléphone mobile Intercom Bluetooth (basse priorité) Musique en stéréo Bluetooth Une fonction de priorité moindre peut toujours être interrompue par une fonction de plus haute priorité. 7.2 Configuration Vous pouvez configurer les paramètres du système Bluetooth à...
  • Página 110 PARAMÈTRES GÉNÉRAUX 7.2.1 Affecter un appel rapide 1. Pour désigner un numéro d’appel rapide, tournez la molette jusqu’à ce que vous entendiez l’instruction vocale « Appel rapide ». 2. Appuyez sur la molette jusqu’à ce que vous entendiez l’instruction vocale « Appel rapide un » et « Téléphone connecté ».
  • Página 111 Le micrologiciel du système Bluetooth peut être mis à jour. Vous pouvez mettre à jour le micrologiciel à l’aide du logiciel Sena Device Manager. Rendez-vous sur le site Sena Bluetooth à l’adresse sena.com/fr pour vérifier la disponibilité des téléchargements de logiciels.
  • Página 112 8. DÉPANNAGE 8.1 Réinitialisation par défaut Lorsque le système Bluetooth ne fonctionne pas correctement, vous pouvez facilement réinitialiser l’appareil. Lorsque le câble d’alimentation et de données USB est connecté à la source d’alimentation du système, celui-ci s’éteint automatiquement et une réinitialisation aux paramètres par défaut se produit.
  • Página 113 9. MAINTENANCE ET ENTRETIEN 9.1 Coque externe Utilisez un chiffon doux et un peu d’eau pour retirer les insectes de l’extérieur. Remarque : n’utilisez jamais d’essence, de carburant diesel, de diluants ou de solvants pour nettoyer le casque moto. Ces substances peuvent provoquer de sérieux dommages au casque moto, même si ces derniers peuvent ne pas être visibles.
  • Página 114 RÉFÉRENCE RAPIDE Type Fonctionnement Bouton Commande Tournez dans le sens horaire Mettre sous tout en appuyant sur la molette tension pendant 1 seconde Fonction Appuyez sur la molette et Mettre hors de base maintenez-la enfoncée pendant tension 5 secondes Réglage du Tourner la molette volume Répondre à...
  • Página 115 Hero4 afin de permettre l’utilisation de la fonction Bluetooth. La marque et les logos Bluetooth sont la propriété de ® Bluetooth SIG, Inc., et toute utilisation de ces marques par Sena s’effectue sous licence. iPhone et iPod touch sont des marques ®...
  • Página 116 Memo...
  • Página 117 1.2.0_IT_April2022...
  • Página 118 CASCO BLUETOOTH ® GUIDA DELL'UTENTE 1.2.0 ITALIAN...
  • Página 119 GUIDARE CONNESSI Il casco aperto Bluetooth OUTSTAR consente di ® ascoltare a tutto volume i propri brani preferiti, parlare tramite intercom con gli amici, ascoltare le indicazioni del GPS ed altro ancora. Grazie alle funzionalità Bluetooth integrate e ad HD ®...
  • Página 120 2. Gli utenti possono seguire Sena su Facebook, YouTube, Twitter e Instagram per ricevere le ultime informazioni sui prodotti, suggerimenti utili e tutti gli annunci relativi ai prodotti Sena. SENA Technologies, Inc. Assistenza clienti: sena.com...
  • Página 121 SOMMARIO INFO SUL CASCO BLUETOOTH OUTSTAR 1.1 Informazioni generali 1.2 Dettagli del prodotto 1.2.1 Pulsante del sistema Bluetooth 1.2.2 Parti interne sganciabili 1.3 Contenuto della confezione 1.4 Indossare il casco 1.4.1 Indossare il casco 1.4.2 Rimozione del casco 1.4.3 Rimozione della visiera parabrezza 1.4.4 Installazione della visiera parabrezza...
  • Página 122 BLUETOOTH CON ALTRI DISPOSITIVI BLUETOOTH 3.1 Accoppiamento con i cellulari 3.1.1 Accoppiamento iniziale di OUTSTAR 3.1.2 Accoppiamento con OUTSTAR spento 25 3.2 Accoppiamento secondo telefono USO CON I CELLULARI 4.1 Effettuare e rispondere alle telefonate 4.2 Composizione rapida 4.2.1 Assegnazione dei numeri di chiamata rapida preimpostati 4.2.2 Utilizzo dei numeri di chiamata rapida...
  • Página 123 MUSICA STEREO 6.1 Riproduzione della musica con dispositivi Bluetooth IMPOSTAZIONI GENERALI 7.1 Priorità delle funzioni 7.2 Menu configurazione 7.2.1 Assegnazione della chiamata rapida 7.2.2 VOX telefono (impostazione predefinita: abilitata) 7.2.3 Messaggio vocale (impostazione predefinita: abilitata) 7.2.4 Cancellare tutti gli accoppiamenti 7.3 Aggiornamenti firmware RISOLUZIONE DEI PROBLEMI 8.1 Reset dopo errore...
  • Página 124 Il contenuto di questa Guida dell'utente del casco è soggetto a modifiche senza preavviso. Le immagini in essa contenute potrebbero differire dal prodotto reale. I copyright della Guida dell'utente appartengono a Sena Technologies, Inc. È vietata la copia o la riproduzione della Guida dell'utente senza previo consenso.
  • Página 125 INFO SUL CASCO BLUETOOTH OUTSTAR 1.2 Dettagli del prodotto N. Nome N. Nome Visiera parabrezza Leva della visiera parasole Visiera parasole Fermo della visiera Apertura di ventilazione Auricolari posteriore Sottogola Calotta Apertura di ventilazione Microfono superiore Manopola 3 4 5 N.
  • Página 126 INFO SUL CASCO BLUETOOTH OUTSTAR 1.2.1 Pulsante del sistema Bluetooth Ruotare/Ruotare premendo Premere/Tenere premuto 1.2.2 Parti interne sganciabili Imbottitura interna Guanciale (D) Guanciale (S)
  • Página 127 INFO SUL CASCO BLUETOOTH OUTSTAR 1.3 Contenuto della confezione Casco Sacca portacasco Cavo USB Coprimicrofono Adesivi alimentazione e con asticella in catarifrangenti (4) trasferimento dati spugna (2) 1.4 Indossare il casco 1.4.1 Indossare il casco 1. Slacciare il sottogola agendo sul sistema di ritenzione.
  • Página 128 INFO SUL CASCO BLUETOOTH OUTSTAR 1.4.2 Rimozione del casco 1. Slacciare il sottogola agendo sul sistema di ritenzione. 2. Tirare delicatamente il sottogola imbottito verso l'esterno ed estrarre il casco dalla testa. Nota: allacciare il sottogola dopo aver rimosso il casco aiuterà...
  • Página 129 INFO SUL CASCO BLUETOOTH OUTSTAR 1.4.3 Rimozione della visiera parabrezza Gancio A 1. Sbloccare il lato sinistro della visiera parabrezza per sganciarla dal gancio A e aprire completamente la visiera parabrezza. 2. Tirare la visiera parabrezza verso l'esterno spingendo in alto la leva del fermo visiera.
  • Página 130 INFO SUL CASCO BLUETOOTH OUTSTAR 1.4.4 Installazione della visiera parabrezza Gancio B Gancio D Gancio C Gancio E 1. Allineare il gancio B, il gancio C, il gancio D e il gancio E al fermo della visiera, come illustrato nell'immagine sopra.
  • Página 131 INFO SUL CASCO BLUETOOTH OUTSTAR 1.4.5 Rimozione dei guanciali 1. Sganciare dal casco i tre bottoni a pressione del guanciale. 2. Rimuovere il guanciale tirandolo in alto. 3. Ripetere la procedura sul lato opposto.
  • Página 132 INFO SUL CASCO BLUETOOTH OUTSTAR 1.4.6 Installazione dei guanciali 1. Infilare il sottogola nel foro del guanciale e inserire la piastra in plastica del guanciale nello spazio tra la calotta e l'EPS. 2. Agganciare i tre bottoni a pressione del guanciale.
  • Página 133 INFO SUL CASCO BLUETOOTH OUTSTAR 1.4.7 Rimozione dell'imbottitura interna 1. Sganciare i due bottoni posizionati sul retro dell'imbottitura interna. 2. Sollevare in alto l'imbottitura e posizionare le dita sotto la piastra in plastica nella parte anteriore. Quindi, rimuovere la piastra estraendola dalla parte...
  • Página 134 INFO SUL CASCO BLUETOOTH OUTSTAR 1.4.8 Installazione dell'imbottitura interna 1. Allineare e installare la piastra in plastica sui quattro manicotti della parte anteriore. 2. Agganciare i due bottoni posizionati sul retro dell'imbottitura interna.
  • Página 135 INFO SUL CASCO BLUETOOTH OUTSTAR 1.4.9 Rimozione della visiera parasole 1. Far scorrere la leva della visiera parasole nella direzione indicata dall'immagine sopra per abbassare la visiera parasole. 2. Tirare un lato della visiera nella direzione indicata dall'immagine sopra. 3. Ripetere il passaggio 2 sul lato opposto.
  • Página 136 INFO SUL CASCO BLUETOOTH OUTSTAR 1.4.10 Installazione della visiera parasole 1. Inserire la linguetta della visiera parasole nel suo alloggiamento fino a sentire uno scatto. 2. Ripetere la procedura sul lato opposto.
  • Página 137 INFO SUL CASCO BLUETOOTH OUTSTAR 1.5 Ispezione del casco prima di guidare 1.5.1 Verifica della parte esterna Verificate regolarmente la presenza di eventuali danni sul casco. Piccoli graffi superficiali non riducono le qualità protettive del casco. In caso di danni più seri (crepe, ammaccature, sfaldature o crepe della vernice, ecc.), il casco non dovrebbe essere più...
  • Página 138 2.2 Ricarica È possibile caricare il sistema Bluetooth ricorrendo a numerosi metodi comuni, tramite il cavo USB di alimentazione e trasferimento dati: OUTSTAR è compatibile solo con dispositivi dotati di alimentazione USB da 5 V in ingresso. In base al metodo utilizzato, la ricarica completa del...
  • Página 139 Togliere il casco durante la ricarica. Il sistema Bluetooth si spegne automaticamente durante la ricarica. • Con i prodotti Sena può essere utilizzato un caricatore USB di qualunque marca con certificazione FCC, CE o IC. 2.3 Controllo del livello batteria In fase di accensione della cuffia, il LED rosso lampeggia rapidamente indicando il livello batteria.
  • Página 140 NOZIONI INTRODUTTIVE: SISTEMA BLUETOOTH 2.5 Software Sena scaricabili 2.5.1 Sena Device Manager Sena Device Manager consente di aggiornare il firmware e di configurare le relative impostazioni direttamente da PC o da computer Apple. Per ulteriori informazioni sul download di Sena Device Manager,...
  • Página 141 Sena SR10 tramite Accoppiamento con i cellulari e Accoppiamento con il secondo cellulare. Inoltre, il sistema Bluetooth può essere accoppiato con un'altra cuffia Sena o un altro sistema Bluetooth. 3.1 Accoppiamento con i cellulari Esistono due modi per accoppiare il telefono.
  • Página 142 Accoppiamento del sistema Bluetooth con altri dispositivi Bluetooth 2. Selezionare OUTSTAR dall’elenco dei dispositivi rilevati sul telefono. Inserire 0000 come PIN. Alcuni telefoni potrebbero non chiedere il PIN. Nota: • La modalità accoppiamento telefono resta attiva 3 minuti. • Per annullare l'accoppiamento telefono, premere la Manopola.
  • Página 143 2. Ruotare la manopola fino a quando viene emesso il messaggio vocale “Accoppiamento secondo telefono”. Cercare dispositivi Bluetooth sul telefono. 3. Selezionare OUTSTAR dall'elenco dei dispositivi rilevati sul telefono. Inserire 0000 come PIN. Alcuni telefoni potrebbero non chiedere il PIN.
  • Página 144 USO CON I CELLULARI 4.2 Composizione rapida 4.2.1 Assegnazione dei numeri di chiamata rapida preimpostati Prima di utilizzare la chiamata rapida, è necessario assegnare i numeri di chiamata rapida. I numeri di chiamata rapida preimpostati possono essere assegnati nel menu impostazioni. 4.2.2 Utilizzo dei numeri di chiamata rapida preimpostati 1.
  • Página 145 5. INTERCOM BLUETOOTH 5.1 Accoppiamento intercom È possibile accoppiare con il casco fino a tre persone aggiuntive per effettuare conversazioni intercom Bluetooth. UTENTE Amico Amico Amico intercom B intercom C intercom D 1. Ruotare premendo la manopola in senso orario per 5 secondi quando i due caschi (A e B) sono spenti.
  • Página 146 INTERCOM BLUETOOTH Last-Come, First-Served (LCFS, ovvero Ultimo arrivato, Primo servito) UTENTE Amico intercom 1 UTENTE Amico Amico intercom 1 intercom 2 UTENTE Amico Amico Amico intercom 1 intercom 2 intercom 3 5.2 Intercom a due voci È possibile avviare una conversazione intercom con uno degli amici intercom premendo la manopola.
  • Página 147 MUSICA STEREO = Premere la manopola. Amico intercom 1 = Premere due volte la manopola. Amico intercom 2 = Premere tre volte la manopola. Amico intercom 3 6. MUSICA STEREO 6.1 Riproduzione della musica con dispositivi Bluetooth • Riproduzione o messa in pausa della musica Tenere premuta la manopola per 1 secondo.
  • Página 148 7. IMPOSTAZIONI GENERALI 7.1 Priorità delle funzioni Il sistema Bluetooth funziona con il seguente ordine di priorità: (più alta) Telefono Intercom Bluetooth (più bassa) Musica stereo Bluetooth Una funzione con priorità più bassa sarà sempre interrotta da una funzione con priorità più alta. 7.2 Menu configurazione La configurazione del sistema Bluetooth può...
  • Página 149 IMPOSTAZIONI GENERALI 7.2.1 Assegnazione della chiamata rapida 1. Per assegnare un numero di telefono alla chiamata rapida, ruotare la manopola fino a quando viene emesso il messaggio vocale “Chiamata rapida”. 2. Premere la manopola, quindi viene emesso il messaggio vocale “Chiamata rapida uno” e “Telefono connesso”.
  • Página 150 7.3 Aggiornamenti firmware Il sistema Bluetooth supporta gli aggiornamenti del firmware. È possibile aggiornare il firmware utilizzando Sena Device Manager. Per verificare il software più recente disponibile per il download, visitare il sito Web Sena Bluetooth sena.com/it.
  • Página 151 8. RISOLUZIONE DEI PROBLEMI 8.1 Reset dopo errore Quando il sistema Bluetooth non funziona correttamente, è possibile resettare facilmente l'unità. Quando il cavo USB di ricarica e trasferimento dati collega una sorgente di alimentazione al sistema, il sistema si spegne automaticamente e si verifica un reset dopo errore.
  • Página 152 9. MANUTENZIONE E CURA 9.1 Calotta esterna Rimuovere gli insetti dalla parte esterna utilizzare un panno morbido e un po' d'acqua. Nota: non utilizzare benzina, gasolio, diluenti o solventi per pulire il casco. Tali sostanze possono provocare seri danni al casco, sebbene i danni derivanti potrebbero non essere visibili.
  • Página 153 GUIDA RAPIDA Tipo Funzionamento Comando pulsante Ruotare premendo la manopola Accensione in senso orario per 1 secondo Funzione Tenere premuta la manopola per Spegnimento di base 5 secondi Regolazione del Ruotare la manopola volume Risposta e conclusione di Premere la manopola una chiamata Composizione Ruotare premendo la manopola...
  • Página 154 Hero3 ed Hero4 che offre ® funzionalità Bluetooth. La parola e i loghi Bluetooth sono di proprietà di Bluetooth ® SIG, Inc. e qualsivoglia utilizzo di tali marchi da parte di Sena è concesso in licenza. iPhone ed iPod touch sono marchi ® ®...
  • Página 155 Memo...
  • Página 156 Memo...
  • Página 157 1.2.0_ES_April2022...
  • Página 158 CASCO BLUETOOTH ® GUÍA DEL USUARIO 1.2.0 SPANISH...
  • Página 159 VIAJE CONECTADO Ponga su música favorita a todo volumen, hable a través del intercomunicador con sus amigos, escuche las indicaciones de su GPS y mucho más, todo ello con el casco abierto OUTSTAR Bluetooth . Con funciones Bluetooth integradas ®...
  • Página 160 Visite sena.com/es para obtener información sobre cómo actualizar el producto. 2. Los usuarios pueden seguir a Sena en Facebook, YouTube, Twitter e Instagram para recibir la información más reciente sobre los productos, consejos útiles y cualquier otra novedad relacionada con los productos Sena.
  • Página 161 ÍNDICE ACERCA DEL CASCO BLUETOOTH OUTSTAR Información general 1.2 Detalles del producto 1.2.1 Botón del sistema Bluetooth 1.2.2 Partes interiores desmontables 1.3 Contenidos del envase 1.4 Llevar el casco 1.4.1 Ponerse el casco 1.4.2 Quitarse el casco 1.4.3 Retirar la visera de protección 1.4.4 Instalación de la visera de protección 13...
  • Página 162 2.5.1 Sena Device Manager EMPAREJAMIENTO DEL SISTEMA BLUETOOTH CON OTROS DISPOSITIVOS BLUETOOTH 3.1 Emparejar teléfono 3.1.1 Emparejamiento inicial del OUTSTAR 24 3.1.2 Emparejamiento con el OUTSTAR apagado 3.2 Emparejamiento de segundo teléfono móvil USO DEL TELÉFONO MÓVIL 4.1 Realizar y responder llamadas 4.2 Marcación Rápida...
  • Página 163 MÚSICA EN ESTÉREO 6.1 Reproducción de música con dispositivos Bluetooth CONFIGURACIÓN GENERAL Prioridad de las funciones 7.2 Menú de configuración 7.2.1 Asignación de marcación rápida 7.2.2 Teléfono VOX (valor predeterminado: activado) 7.2.3 Instruccion de voz (valor predeterminado: activado) 7.2.4 Borrar todos los emparejamientos 7.3 Actualizaciones de firmware SOLUCIÓN DE PROBLEMAS 8.1 Restablecimiento tras un fallo...
  • Página 164 El contenido de la Guía del usuario de este casco puede cambiar sin previo aviso. Sus ilustraciones pueden diferir del producto real. El copyright de la Guía del usuario pertenece a Sena Technologies, Inc. Quedan totalmente prohibidas la reproducción y copia de la Guía del usuario sin permiso.
  • Página 165 
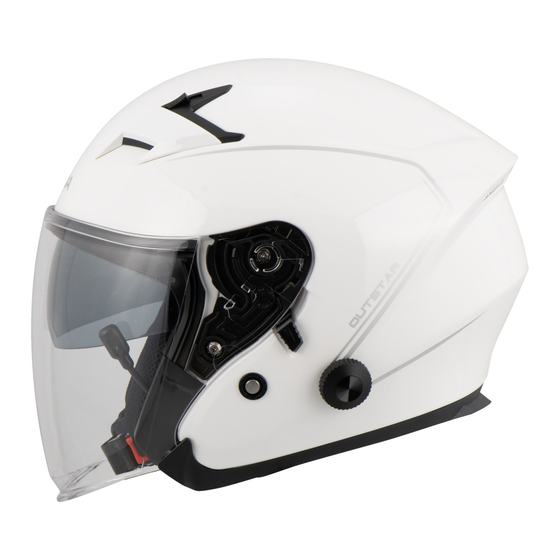
ACERCA DEL CASCO BLUETOOTH OUTSTAR 1.2 Detalles del producto N.º Nombre N.º Nombre Visera de protección Palanca de la visera solar Visera solar Trinquete de protección Altavoces Rejilla de ventilación trasera Barbiquejo Estructura Rejilla de ventilación Micrófono superior Mando giratorio de selección 3 4 5 N.º...
  • Página 166 ACERCA DEL CASCO BLUETOOTH OUTSTAR 1.2.1 Botón del sistema Bluetooth Girar/Pulsar y girar Pulsar/Mantener pulsado 1.2.2 Partes interiores desmontables Acolchado interior Acolchado interno Acolchado interno (derecha) (izquierda)
  • Página 167 ACERCA DEL CASCO BLUETOOTH OUTSTAR 1.3 Contenidos del envase Casco Bolsa para el casco Espuma de Cable USB de Etiquetas protección para corriente y datos reflectantes (4) el micrófono con brazo (2) 1.4 Llevar el casco 1.4.1 Ponerse el casco 1.
  • Página 168 ACERCA DEL CASCO BLUETOOTH OUTSTAR 1.4.2 Quitarse el casco 1. Afloje el barbiquejo con el sistema de retención. 2. Tire del barbiquejo acolchado hacia afuera con mucho cuidado y deslice el casco hacia afuera de su cabeza. Nota: si abrocha el barbiquejo después de quitarse el casco evitará...
  • Página 169 ACERCA DEL CASCO BLUETOOTH OUTSTAR 1.4.3 Retirar la visera de protección Gancho A 1. Retire el cierre del lado izquierdo de la visera de protección para desacoplarla del gancho A y abra la visera de protección hasta la posición totalmente abierta.
  • Página 170 ACERCA DEL CASCO BLUETOOTH OUTSTAR 1.4.4 Instalación de la visera de protección Gancho B Gancho D Gancho C Gancho E 1. Alinee los ganchos B, C, D y E con el trinquete de protección como se muestra en la ilustración anterior.
  • Página 171 ACERCA DEL CASCO BLUETOOTH OUTSTAR 1.4.5 Retirar los acolchados internos 1. Desencaje las tres fijaciones del acolchado interno del casco. 2. Retire el acolchado interno del casco. 3. Repita el paso 2 en el lado contrario.
  • Página 172 ACERCA DEL CASCO BLUETOOTH OUTSTAR 1.4.6 Instalar los acolchados internos 1. Pase el barbiquejo por el orificio del acolchado interno e introduzca la placa de plástico del acolchado interno a través del espacio entre la estructura y el EPS. 2. Encaje las tres fijaciones del acolchado interno del casco en su sitio.
  • Página 173 ACERCA DEL CASCO BLUETOOTH OUTSTAR 1.4.7 Retirar el acolchado interior 1. Desencaje los dos botones traseros del acolchado interior. 2. Levante el acolchado hacia arriba y coloque los dedos debajo de la placa de plástico situada en la parte delantera. A continuación, retire la placa tirando de...
  • Página 174 ACERCA DEL CASCO BLUETOOTH OUTSTAR 1.4.8 Instalar el acolchado interior 1. Alinee e instale la placa de plástico en los cuatro manguitos de la sección delantera. 2. Encaje los dos botones traseros del acolchado interior en su sitio.
  • Página 175 ACERCA DEL CASCO BLUETOOTH OUTSTAR 1.4.9 Retirar la visera solar 1. Deslice la palanca de la visera solar en la dirección mostrada en la ilustración anterior para bajar la visera solar. 2. Tire de uno de los lados de la visera en la dirección mostrada en la ilustración anterior.
  • Página 176 ACERCA DEL CASCO BLUETOOTH OUTSTAR 1.4.10 Instalar la visera solar 1. Introduzca la lengüeta de la visera solar en la ranura correspondiente hasta que escuche un clic. 2. Repita el paso 2 en el lado contrario.
  • Página 177 ACERCA DEL CASCO BLUETOOTH OUTSTAR 1.5 Inspección del casco antes de la conducción 1.5.1 Comprobar el exterior Compruebe el casco de forma habitual en busca de daños. Los arañazos pequeños y superficiales no afectarán al nivel de protección del casco. Si se producen daños más graves (grietas, abolladuras,...
  • Página 178 2.2 Carga El sistema Bluetooth se puede cargar mediante diversos métodos habituales con el cable USB de corriente y datos: el OUTSTAR solo es compatible con dispositivos USB cargados mediante entrada de 5 V. Dependiendo del método de carga, el sistema Bluetooth se cargará...
  • Página 179 • Puede utilizarse cualquier cargador USB de terceros con los productos Sena si el cargador cuenta con la aprobación de FCC, CE o IC. 2.3 Comprobación del nivel de batería Cuando se enciende el auricular, el LED parpadea rápidamente en color rojo, indicando el nivel de batería.
  • Página 180 INTRODUCCIÓN: SISTEMA BLUETOOTH 2.5 Software Sena descargable 2.5.1 Sena Device Manager Sena Device Manager le permite actualizar el firmware y configurar sus ajustes directamente desde su PC u ordenador Apple. Para obtener más información sobre cómo descargar Sena Device Manager, visite...
  • Página 181 El sistema Bluetooth puede emparejarse con varios dispositivos Bluetooth, como un teléfono móvil, un reproductor de MP3, un GPS o un adaptador de radio bidireccional Sena SR10, a través de Emparejar teléfono y Emparejamiento de segundo teléfono móvil. El sistema Bluetooth también puede emparejarse con otro auricular Sena o sistema Bluetooth.
  • Página 182 1. Pulse y gire el mando giratorio de selección hacia la derecha durante 1 segundo. Oirá la instrucción de voz “Emparejar teléfono”. 2. Seleccione el OUTSTAR en la lista de dispositivos detectados en el teléfono móvil. Introduzca el PIN 0000. Es posible que algunos teléfonos móviles no soliciten el PIN.
  • Página 183 “Emparejamiento de segundo teléfono móvil”. Busque dispositivos Bluetooth con su teléfono móvil. 3. Seleccione el OUTSTAR en la lista de dispositivos detectados en el teléfono móvil. Introduzca el PIN 0000. Es posible que algunos teléfonos móviles no...
  • Página 184 4. USO DEL TELÉFONO MÓVIL 4.1 Realizar y responder llamadas • Responder o finalizar una llamada Pulse el mando giratorio de selección. • Rechazar una llamada Mantenga pulsado el mando giratorio de selección durante 1 segundo. • Realizar una llamada con marcación por voz Pulse y gire el mando giratorio de selección hacia la derecha.
  • Página 185 USO DEL TELÉFONO MÓVIL 4.2.2 Utilizar preconfiguraciones de marcación rápida 1. Pulse y gire el mando giratorio de selección hacia la izquierda. 2. Gire el mando giratorio de selección para navegar por los menús. Oirá instrucciones de voz para cada elemento de menú.
  • Página 186 5. INTERCOMUNICADOR BLUETOOTH 5.1 Emparejamiento de intercomunicador Hasta tres personas más se pueden emparejar con el casco para conversaciones a través del intercomunicador Bluetooth. USTED Amigo de Amigo de Amigo de intercomunicador intercomunicador intercomunicador 1. Pulse y gire el mando giratorio de selección hacia la derecha durante 5 segundos mientras los dos cascos (A y B) están apagados.
  • Página 187 INTERCOMUNICADOR BLUETOOTH 5. La cola de emparejamiento con el intercomunicador es “Último en llegar, primero en ser atendido” . Si un auricular está emparejado con varios auriculares para conversaciones a través del intercomunicador, el último auricular emparejado se establece como primer amigo de intercomunicador .
  • Página 188 INTERCOMUNICADOR BLUETOOTH 5.2 Conversación a través del intercomunicador a dos vías Puede iniciar una conversación a través del intercomunicador con uno de sus amigos de intercomunicador pulsando el mando giratorio de selección. pulse el mando giratorio de selección una vez para hablar con el primer amigo de intercomunicador , pulse el mando giratorio de selección dos veces para hablar con el segundo amigo de intercomunicador y pulse el mando giratorio de selección tres...
  • Página 189 6. MÚSICA EN ESTÉREO 6.1 Reproducción de música con dispositivos Bluetooth • Reproducir o detener la música Mantenga pulsado el mando giratorio de selección durante 1 segundo. • Avanzar/retroceder pista Pulse y gire el mando giratorio de selección hacia la derecha o la izquierda.
  • Página 190 7. CONFIGURACIÓN GENERAL 7.1 Prioridad de las funciones El sistema Bluetooth utiliza el siguiente orden de prioridad: (mayor) Teléfono móvil Intercomunicador Bluetooth (menor) Música en estéreo Bluetooth Las funciones de mayor prioridad interrumpirán siempre las funciones de menor prioridad. 7.2 Menú de configuración Puede establecer la configuración del sistema Bluetooth mediante las instrucciones del menú...
  • Página 191 CONFIGURACIÓN GENERAL 7.2.1 Asignación de marcación rápida 1. Para asignar un número de teléfono como marcación rápida, gire el mando giratorio de selección hasta que escuche la instrucción de voz “Marcación rápida”. 2. Pulse el mando giratorio de selección y escuchará las instrucciones de voz “Marcación rápida uno”...
  • Página 192 7.3 Actualizaciones de firmware El sistema Bluetooth admite actualizaciones de firmware. Puede actualizar el firmware con Sena Device Manager. Visite el sitio web de Sena Bluetooth en la página sena.com/es para comprobar las descargas de software más recientes.
  • Página 193 8. SOLUCIÓN DE PROBLEMAS 8.1 Restablecimiento tras un fallo Si el sistema Bluetooth no funciona correctamente, puede restablecer la unidad de una forma sencilla. Cuando el cable USB de corriente y datos conecte suministro eléctrico al sistema, el sistema se apagará automáticamente y se realizará...
  • Página 194 9. MANTENIMIENTO Y CUIDADO 9.1 Cubierta exterior Utilice un paño suave y una pequeña cantidad de agua para eliminar los bichos del exterior. Nota: no utilice gasolina, gasóleo, diluyentes ni disolventes para limpiar el casco. Estas sustancias pueden dañar gravemente el casco, aunque no se vea el daño resultante.
  • Página 195 REFERENCIA RÁPIDA Tipo Funcionamiento Comando de botón Pulse y gire el mando giratorio Encendido de selección hacia la derecha durante 1 segundo Mantenga pulsado el mando Función básica Apagado giratorio de selección durante 5 segundos Ajuste de Gire el mando giratorio de volumen selección Responder y...
  • Página 196 Sena Technologies, Inc. se reserva el derecho a realizar cualquier cambio y mejora en su producto sin previo aviso. Sena™ es una marca comercial de Sena Technologies, Inc. o sus filiales en EE. UU. y en otros países. SF1™, SF2™, SF4™, SFR™, SRL™, Momentum™, Momentum INC™, Momentum Lite™,...