Celestron EXPLORER DX 130AZ Guía De Instalación Rápida
Tabla de contenido
Idiomas disponibles
Idiomas disponibles
Enlaces rápidos
Quick Setup Guide
ENGLISH
5 5
To attach the slow-motion knobs
fi rst locate the supplied hex key hidden inside the
slot in the front of your mount.
8 8
Slide the dovetail bar into the clamp at the top of the
mount and tighten the hand knob on the bottom of
the clamp to secure the telescope in place.
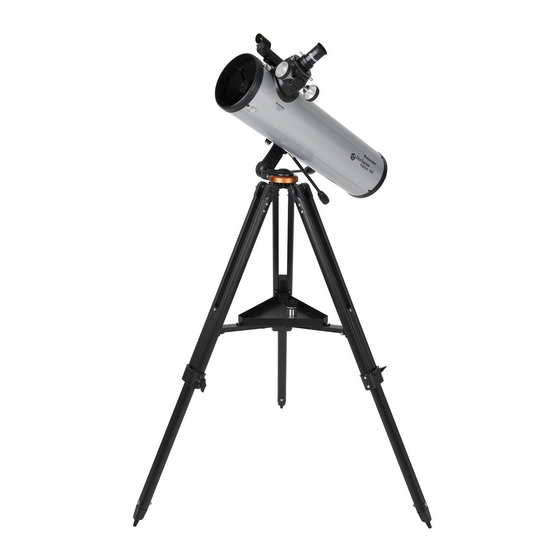
1 1
130AZ
Unpack your telescope and verify that all parts are
ITEM #22461
present. Your StarSense Explorer DX includes:
a telescope tube, a tripod and mount head, an
accessory bag, slow motion controls, an accessory
tray, two eyepieces, a fi nderscope, a StarSense
phone dock, StarSense Explorer app code card,
and a hex key (hidden inside the slot in the front of
the mount head).
3 3
Extend the legs of the tripod by loosening the three
hand knobs on each leg. Pull each leg section all
the way out and tighten the hand knobs to secure
them in place.
6 6
Place the slow-motion control knob over the
to your mount,
D-shaped gear shaft and push inward to make sure
it is fully seated. Use the hex key to tighten the
setscrews onto the gear shaft. Return the hex key to
its storage position in the front of the mount.
9 9
Remove the cap from the focuser and insert the barrel
of the 25 mmeyepiece into the focuser. Tighten the
setscrew to secure the eyepiece in place.
2
2
To set up the tripod, spread the legs outward until
they are fully extended and push down the center leg
brace.
4 4
Place the accessory tray on top of the center brace
and line up the three holes. Insert the three thumb
screws through the bottom of the leg brace and
thread them into the tray.
7 7
Hold the telescope tube next to the mount with the
dovetail bar on the tube facing the clamp on the top
of the mount arm.
10 10
Slide the fi nderscope bracket into the dovetail slot
on the telescope tube near the focuser. The large
window on the fi nder should be facing the front of
the telescope. Secure the bracket by tightening the
setscrew on the dovetail slot.
ENGLISH | 1
Tabla de contenido

Manuales relacionados para Celestron EXPLORER DX 130AZ


Resumen de contenidos para Celestron EXPLORER DX 130AZ
- Página 17 130AZ Guía de instalación rápida Desembale el telescopio y compruebe que estén Para instalar el trípode, separe las patas hacia fuera ESPAÑOL PRODUCTO # 22461 presentes todas las piezas. Su StarSense Explorer hasta que estén totalmente extendidas y empuje el DX incluye: un tubo de telescopio, un trípode y soporte de las patas central.
- Página 18 StarSense Explorer en su dispositivo móvil. naranja en la caja de su telescopio. Ejecute la Busque «Celestron StarSense Explorer» en Apple app. Cuando se solicite, introduzca el código de App Store o Google Play. La app tiene un gran activación de la tarjeta para activar la app.
- Página 19 Movimiento del telescopio El soporte StarSense Explorer DX tiene fi jaciones Para realizar ajustes precisos o seguir objetos deslizantes en ambos ejes. Para realizar movimientos celestes, gire ambos mandos de movimiento lento de gran tamaño con el telescopio, aguante una pata según sea necesario.
-
Página 20: Instalación Del Teléfono
Para obtener más información de este producto, visite la página de producto correspondiente en celestron.com AVISO SOLAR: No intente nunca observar el sol por un telescopio sin un fi ltro solar adecuado. www.celestron.com/pages/warranty ¿Necesita ayuda? Contacte con el soporte técnico de Celestron celestron.com/pages/technical-support 03-20 20 | ESPAÑOL...