Front Runner LASS026 Manual Del Usuario
Tabla de contenido
Idiomas disponibles
Idiomas disponibles
Enlaces rápidos
READ ME FIRST:
Thank you for purchasing a Front Runner Slimline II Load Bed Rack or Load Bar Kit.
Your Kit will contain the following items:
1.) A Slimline II Tray or Load Bar set
2.) Universal Load Bed Tracks
3.) Universal Load Bed Legs
This document will help you fit the Slimeline II Tray or Load Bars to your specific vehicle. If you are mounting
a Slimline II Tray, Please continue with Section 1. If you are fitting Load Bars, please refer to Section 2.
installation of slimline ii tray
Note: If you have not fitted the Universal Load Bed Tracks or Legs, fit them as per the Universal Load Bed
Track and Universal Load Bed Led Fitting Instructions (Documents TRBU001 & LASS026).
If your Slimline II Tray is not already assembled, assemble it as per the Slimline II Tray Universal
Assembly Instruction (Document RRSTUNI).
Adjust the two leg assemblies either side of the Midpoint of the Track so that they are 884 mm
A
(
)
apart-outside to outside as shown below.
B
(
)
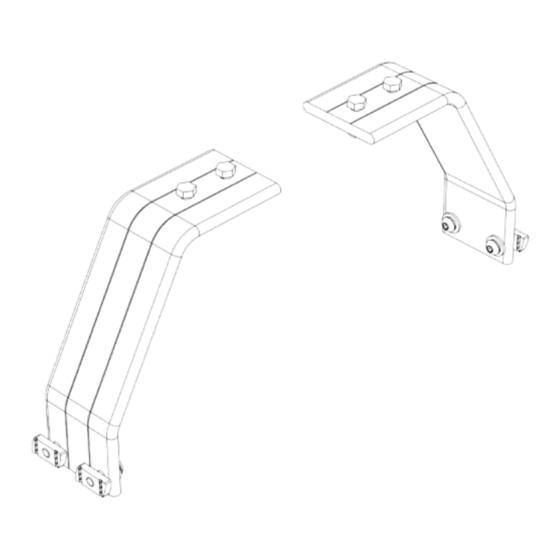
With your Rack in the upside down position ( Product
Sticker should be upside down ) and working with the
second Slat in, both front and rear, slide two M8 x 25 Hex
Bolts supplied with the Universal Load Bed Legs into
each end of the Slat using the machined Slots as shown.
REV_A00
Universal LOAD BED
TRAY & Load BArs
1
KRLBUNI
INSTALL TIME: 15 mins
Tabla de contenido

Manuales relacionados para Front Runner LASS026


Resumen de contenidos para Front Runner LASS026
-
Página 25: Advertencia Importante
LOS PRODUCTOS PARA SU AJUSTE, DESGASTE Y DAÑOS. POR LO TANTO, DEBE LEER Y COMPRENDER TODAS LAS INSTRUCCIONES Y PRECAUCIONES SUMINISTRADAS CON SU PRODUCTO FRONT RUNNER ANTES DE LA INSTALACIÓN O EL USO. SI USTED NO ENTIENDE TODAS LAS INSTRUCCIONES Y PRECAUCIONES, O SI NO TIENE EXPERIENCIA MECÁNICA Y NO ESTÁ... -
Página 26: Herramientas Necesarias
Pieza de ensamble gruesa Pieza de ensamble delgada Perfil lateral Esquina Barra combinada 28 X M8 x 25 Tornillo cabeza de botón 12 X Barra estándar M6 x 10 Tornillo cabeza de botón FIGURA 1.1 RRSTUNI_REV_A04 © 2019 FRONT RUNNER VEHICLE OUTFITTERS... -
Página 27: Montaje De Baca - Perfiles Laterales
Deslice el perfil lateral coincidente sobre las dos piezas de ensamble, recordando insertar una tuerca nyloc, y apriete una vez más usando un tornillo cabeza de botón M8 x 45. Repite los pasos anteriores para el otro lado. RRSTUNI_REV_A04 © 2019 FRONT RUNNER VEHICLE OUTFITTERS... -
Página 28: Montaje De Baca - Barras Combinadas
El orificio final del perfil lateral debe alinearse con el orificio en la barra combinada. Utilice un cabeza de botón M8 x 25 (artículo 8) y apriete ligeramente con una llave Allen de 5mm. RRSTUNI_REV_A04 © 2019 FRONT RUNNER VEHICLE OUTFITTERS... -
Página 29: Montaje De Baca - Barras Estándar
Con su llave Allen de 5mm, apriete todos los tornillos cabeza de botón. El ajuste de par recomendado para los tornillos cabeza de botón M8 es de 20 Nm o 15 ft lb. © 2019 FRONT RUNNER VEHICLE OUTFITTERS RRSTUNI_REV_A04... -
Página 30: Montaje De Baca - Deflector De Viento
Schnorr está por encima del canal ranura en T. Ensamble los elementos 2, 4 y 5 a ambos deflectores de viento LH & RH (artículo 3) como se muestra. RRSTUNI_REV_A04 © 2019 FRONT RUNNER VEHICLE OUTFITTERS... -
Página 31: Montaje De Baca -Esquinas
MONTAJE DE BACA - DEFLECTOR DE VIENTO EN LA CAJA HERRAMIENTAS NECESARIAS Baca portaequipaje Slimline II M8 Tornillo medio Deflector de viento (1LH + 1RH) Arandela de seguridad Schnorr M8 x 12 Tornillo cabeza de botón FIGURA 1.2 RRSTUNI_REV_A04 © 2019 FRONT RUNNER VEHICLE OUTFITTERS... - Página 32 Nota: Una vez que el bastidor está montado en el vehículo, se recomienda hacer una prueba de manejo. En el supuesto de que haya ruido excesivo del viento intente mover los dos deflectores ligeramente separados, dejando un hueco de unos 20-30mm. © 2019 FRONT RUNNER VEHICLE OUTFITTERS RRSTUNI_REV_A04...
-
Página 33: Consulte La Guía De Instalación De Su Vehículo
¡Es fácil! Cuida tu equipo Front Runner de la misma manera que haces con el exterior de tu vehículo: Enjuague con agua limpia y limpie con un paño suave y seco. Para manchas persistentes, usa un cepillo suave y un jabón suave.