Uline H-5334 Manual De Instrucciones
Tabla de contenido
Idiomas disponibles
Idiomas disponibles
Enlaces rápidos
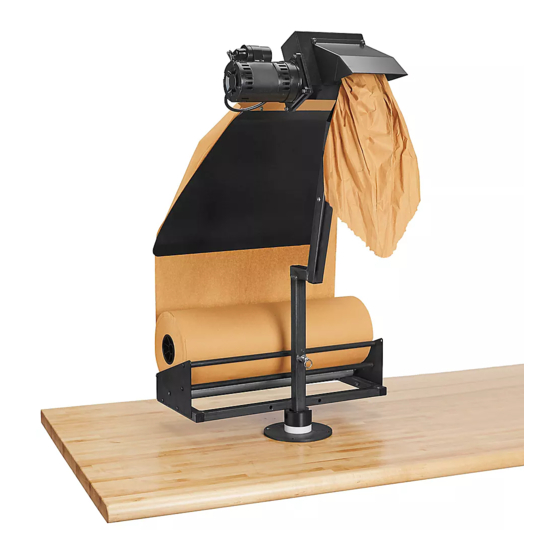
H-5334
TABLETOP PAPER
MACHINE
TOOLS INCLUDED
1/8"
5/16"
Allen Wrench
1.
Remove all parts from the three shipping cartons.
2. Position the tabletop base on flat workstation
surface.
3. Rotate the base so the
shaft channel is facing
the direction you want the
paper to exit the machine
from. (See Figure 1)
4. Fasten the base to
workstation using holes
in base. (See Figure 1)
NOTE: Mounting
bolts not included.
5. Rotate black collar so
the shaft channel is on
the opposite side of
the groove in the collar.
(See Figure 1)
6. Fasten spring-loaded
pin and spacer using a
1/2" wrench all the way
into the welded nut on
the front of the bottom
mast. (See Figure 2)
PAGE 1 OF 9
1-800-295-5510
uline.com
TOOL NEEDED
1/2" Wrench
ASSEMBLY
Figure 1
Shaft
Chan-
Black
Collar
Collar
Groove
Tabletop Base
Figure 2
Pour le français, consulter les pages 7-9.
7.
While pulling
spring-loaded
pin, place bottom
mast onto the
shaft of the
tabletop base.
Lower the body
so crossbar fits
into black collar
groove.
(See Figure 3)
8. Release spring-loaded pin and rotate body until the
pin clicks into the channel on the shaft.
9. Position top mast
so the paper exit
is facing front.
Insert the top mast
into the top of
the bottom mast.
Secure with
3/8-16 x 3/4" bolts
and 3/8" lock
washers (2 each).
(See Figure 4)
10. Pull spring-loaded
pin out and turn
unit 180 degrees.
Para Español, vea páginas 4-6.
Figure 3
Bottom
Mast
Black
Collar
Groove
Figure 4
Top
Mast
Bottom
Mast
0521 IH-5334
Tabla de contenido

Manuales relacionados para Uline H-5334


Resumen de contenidos para Uline H-5334
-
Página 4: Herramientas Incluidas
H-5334 800-295-5510 uline.mx PLEGADORA DE PAPEL – MESA HERRAMIENTAS INCLUIDAS HERRAMIENTA NECESARIA 1/8" 5/16" Llave de 1/2" Llave Allen ENSAMBLE Saque todas las partes de las tres cajas. 7. Jale el pin con Diagrama 3 resorte y coloque 2. Coloque la base sobre una superficie de trabajo el mástil inferior en... -
Página 5: Continuación De Ensamble
CONTINUACIÓN DE ENSAMBLE 11. Coloque la rampa de papel en el embudo de 12. Gire la unidad 180 grados para regresar a la entrada y fíjela con seis pernos de 10-32 x 1/2", posición original, con la salida de papel hacia asegurándose de que las cabezas de los pernos adelante. -
Página 6: Solución De Problemas
Repita hasta que las ruedas motrices ya no rasguen el papel. Si los problemas persisten, llame a Servicio a Clientes de Uline al 800-295-5510. 800-295-5510 PAGE 6 OF 9 0521 IH-5334...