Ecco EC7008-WK2 Manual De Instrucciones
Tabla de contenido
Idiomas disponibles
Idiomas disponibles
Enlaces rápidos
IMPORTANT! Read all instructions before installing and using. Installer: This manual must be delivered to the end user.
WARNING!
Failure to install or use this product according to manufacturer's recommendations may result in property damage, serious injury, and/
or death to those you are seeking to protect!
Do not install and/or operate this safety product unless you have read and understood the safety information
contained in this manual.
1.
Proper installation combined with operator training in the use, care, and maintenance of emergency warning devices are essential to
ensure the safety of emergency personnel and the public.
2.
Emergency warning devices often require high electrical voltages and/or currents. Exercise caution when working with live electrical
connections.
3.
This product must be properly grounded. Inadequate grounding and/or shorting of electrical connections can cause high current arcing,
which can cause personal injury and/or severe vehicle damage, including fire.
4.
Proper placement and installation is vital to the performance of this warning device. Install this product so that output performance of
the system is maximized and the controls are placed within convenient reach of the operator so that they can operate the system without
losing eye contact with the roadway.
5.
Do not install this product or route any wires in the deployment area of an air bag. Equipment mounted or located in an air bag
deployment area may reduce the effectiveness of the air bag or become a projectile that could cause serious personal injury or death.
Refer to the vehicle owner's manual for the air bag deployment area. It is the responsibility of the user/operator to determine a suitable
mounting location ensuring the safety of all passengers inside the vehicle particularly avoiding areas of potential head impact.
6.
It is the responsibility of the vehicle operator to ensure daily that all features of this product work correctly. In use, the vehicle operator
should ensure the projection of the warning signal is not blocked by vehicle components (i.e., open trunks or compartment doors),
people, vehicles or other obstructions.
7.
The use of this or any other warning device does not ensure all drivers can or will observe or react to an emergency warning signal.
Never take the right-of-way for granted. It is the vehicle operator's responsibility to be sure they can proceed safely before entering an
intersection, drive against traffic, respond at a high rate of speed, or walk on or around traffic lanes.
8.
This equipment is intended for use by authorized personnel only. The user is responsible for understanding and obeying all laws
regarding emergency warning devices. Therefore, the user should check all applicable city, state, and federal laws and regulations. The
manufacturer assumes no liability for any loss resulting from the use of this warning device.
Installation, Wiring and Function
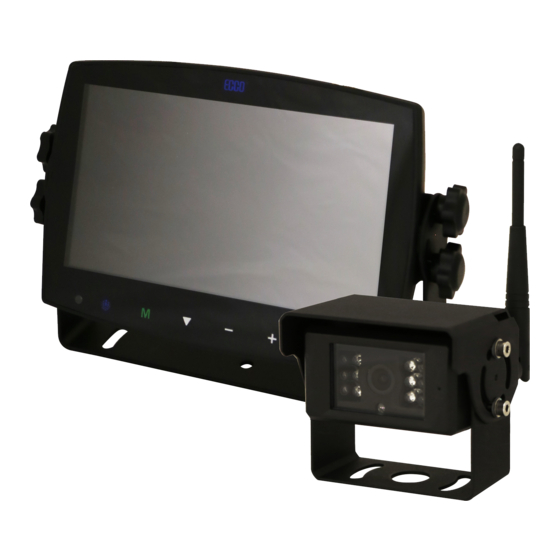
CAMERA SYSTEM MODEL EC7008-WK2
OPERATING INSTRUCTIONS:
Remote
Remote
Control
Control
Sensor
Sensor
Power
Power
Menu
Menu
Record/Select
Record/Select
Digital Color LCD Screen
Digital Color LED Screen
M
S
Camera Channel Select
Camera Channel Select
Volume Increase/Menu Navigation
Volume Increase/Menu Navigation
Volume Decrease/
Volume Decrease/Menu
Navigation
Menu Navigation
Installation Instructions
Wireless Camera/Monitor System
CAUTION!
When drilling into any vehicle surface, make sure that the
area is free from any electrical wires, fuel lines, vehicle
upholstery, etc. that could be damaged.
Ecante-5
Ecante-5
Loudspeaker
Loudspeaker
Dimming Sensor
Dimming Sensor
U-Support Bracket
U-Support Bracket
Mini SD Card
Mini SD Card Slot
Slot
Pedestal Mount Slot
Pedestal Mount Slot
Page 1 of 9
Tabla de contenido

Manuales relacionados para Ecco EC7008-WK2

Resumen de contenidos para Ecco EC7008-WK2
-
Página 10: Instalación, Cableado Y Funcionamiento
Instalación, cableado y funcionamiento ¡PRECAUCIÓN! Al perforar cualquier superficie del vehículo, asegúrese de MODELO DE SISTEMA DE CÁMARA EC7008-WK2 que no haya cables eléctricos, mangueras de combustible, INSTRUCCIONES DE OPERACIÓN: tapicería, etc. en el área que pudiesen dañarse. -
Página 11: Instrucciones De Cableado
¡ADVERTENCIA! 1. Alinee el control remoto con la ventana del receptor de señales remotas para operar. 2. Nunca desensamble el control remoto ni permita que alguien lo deje caer o lo moje. INSTRUCCIONES DE CABLEADO: ¡Importante! Impermeabilice todas las conexiones, ya sea dentro o fuera del vehículo, usando sellante y envolviéndolas con cinta aislante. Envuelva la cinta bien ajustada, traslapando por anchos de .5, para que no haya espacios sin cinta. -
Página 12: Identificación De Las Partes Del Monitor
IDENTIFICACIÓN DE LAS PARTES DEL MONITOR Presione para habilitar Presione para encender/ Press to enable or Press to turn on/off o deshabilitar la función disable mute the monitor apagar el monitor silencio. MUTE POWER Press OK button to Presione el botón OK Presione para mostrar el Press to show menu para ingresar a los ítems... -
Página 13: Modo De Visualización
MODO DE VISUALIZACIÓN REPRODUCCIÓN La carpeta se aumentará automáticamente a medida que aumenten los archivos de grabaciones; una carpeta puede contener un máximo de 997 archivos de video • Seleccione el modo de visualización. y se creará automáticamente una carpeta nueva cuando una carpeta esté llena. Cuanto mayor sea el número del archivo, más nuevo será;... - Página 14 CONFIGURACIÓN SISTEMA El valor de atenuación se puede ajustar solo cuando la opción automática está desactivada. • Seleccione para configurar el valor de atenuación de día y de noche. Presione “M” en el monitor o “menu” (Menú)en el control remoto para guardar y salir del menú.
-
Página 15: Modelo Del Monitor Ec7008-Wm2 Instalación Y Ensamblaje
ENCENDIDO FECHA Y HORA: Seleccione el ícono correspondiente para que se abra el teclado y establecer la fecha y la hora. • Presione el botón “+” o “-” en el monitor o VOL +/- (Volumen +/-) en el control • Seleccione la vista que desea mostrar tras el encendido. remoto para cambiar al número que se debe ajustar. -
Página 16: Repuestos Y Accesorios
Figura 2 Figura 3 Instrucciones de ensamblaje del pedestal: 1. Seleccione una superficie nivelada para la instalación. 2. Para ensamblar el pedestal usando el adhesivo, prepare la superficie usando alcohol isopropílico antes de la instalación. 3. Para ensamblar el pedestal usando tornillos, taladre orificios de montaje usando el pedestal como patrón y fíjelo con los accesorios suministrados al usuario. 4. -
Página 17: Solo Para Referencia
CAMÉRA MODÈLE EC2027-WC2 INSTALLATION ET MONTAGE : ¡Importante! Monte la cámara en el lugar que ofrezca la mejor vista del área que se encuentra directamente detrás del vehículo. Generalmente, los lugares de montaje hacia la parte superior del vehículo ofrecen el mejor campo de visión. Los lugares de montaje inferiores reducen el campo de visión y aumentan la probabilidad de daño ante las salpicaduras de la carretera. -
Página 18: Especificaciones
Especificaciones: Cámara EC2027-WC2 Monitor Monitor LCD EC7008-WK2 de 7” Dispositivo de imágenes 1/3” CMOS Tamaño de pantalla LCD 7” Sistema de TV PAL/NTSC Resolución 1024 x 3 (RGB) x 600 Dimensión de la matriz 728x488 píxeles Contraste 800:1 Área de sensibilidad 4.6228mm x 3.6112mm...