Empire EBL74 El Manual Del Propietario
Tabla de contenido
Idiomas disponibles
Idiomas disponibles
Enlaces rápidos
IMPORTANT SAFETY INFORMATION: Always read this manual first
before attempting to install or use this fireplace. For your safety, always
comply with all warnings and safety instructions contained in this manual
to prevent personal injury or property damage.
To view the full line of Empire products, please visit
www.empirecomfort.com
Owner's Manual
Model
EBL74
7214000200R02
Capítulos
Tabla de contenido

Manuales relacionados para Empire EBL74


Resumen de contenidos para Empire EBL74
- Página 21 Por su seguridad, cumpla siempre con todas las advertencias e instrucciones de seguridad que se incluyen en este manual para evitar lesiones y daños materiales. Para ver toda la línea de productos Empire, visite www.empirecomfort.com 7214000200R02...
- Página 22 Índice Bienvenido y felicitaciones ....3 INSTRUCCIONES IMPORTANTES ... 4 Guía de consulta rápida ..... . 6 Instalación de la chimenea .
-
Página 23: Bienvenido Y Felicitaciones
Bienvenido y felicitaciones Gracias y felicitaciones por haber adquirido una chimenea eléctrica Empire. Etiqueta del Etiqueta de número de serie clasificación con el número de modelo Lea atentamente y guarde estas instrucciones. PRECAUCIÓN: Antes de comenzar la instalación, asegúrese de leer las instrucciones y advertencias cuidadosamente. -
Página 24: Instrucciones Importantes
INSTRUCCIONES IMPORTANTES Siempre que utilice aparatos eléctri- funciona correctamente. Desconecte cos, siga las precauciones básicas el suministro eléctrico en el panel para reducir riesgos de incendio, central y solicite los servicios de un descarga eléctrica y lesiones físicas, electricista acreditado para verificar la por ejemplo: unidad antes de volver a utilizarla. - Página 25 INSTRUCCIONES IMPORTANTES ⑭ Utilícese la chimenea eléctri- ADVERTENCIA: El control remo- ca solo se indica en este manual. to contiene baterías pequeñas. Cualquier otro uso que no haya sido Manténgalo alejado de los niños. recomendado por el fabricante puede Si se ingiere, consulte con un provocar un incendio, una descarga médico inmediatamente.
-
Página 26: Guía De Consulta Rápida
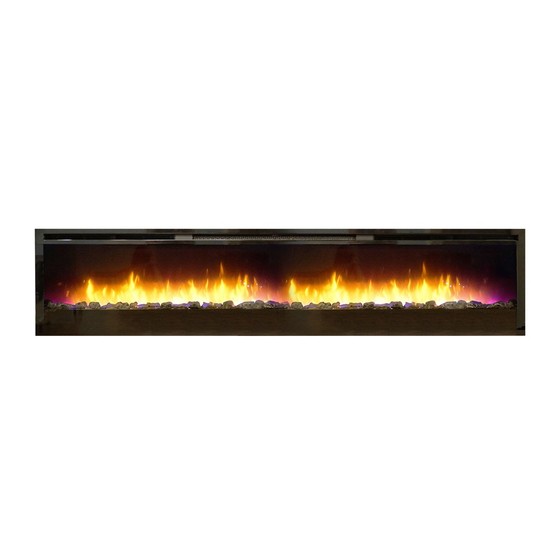
Guía de consulta rápida 1. Toda información eléctrica sobre Figura 1 su chimenea eléctrica la podrá encontrar en la etiqueta de clasi- [7.1 in.] ficación localizada al frente de la unidad, detrás del cristal. 2. Si tiene preguntas generales so- bre nuestros productos, envíenos un correo electrónico a info@empirecomfort.com. -
Página 27: Instalación De La Chimenea
Instalación de la chimenea Selección de la ubicación reglamentaciones aplicables para reducir el riesgo de incendio, Revise y tome en cuenta las siguien- descarga eléctrica y lesiones. tes condiciones antes de instalación: ADVERTENCIA: Para reducir el • Dimensiones de la unidad: 74.1 pu. riesgo de incendios, no almacene (1883 mm) x 19.4 pu. -
Página 28: Instalación Eléctrica
Instalación de la chimenea Instalación eléctrica 3. Retire la tapa de la unidad ubicadas al frente para tener ADVERTENCIA: Para reducir acceso a las conexiones el riesgo de incendio, descarga eléctricas. (Figura 3) eléctrica o lesiones, acuda siempre a un electricista certificado. - Página 29 Instalación de la chimenea Para instalaciones de 120V Figura 3 Utilice un cable de dos conductores de cubierta no metálica con el cable de tierra (3 cables en total) para el suministro eléctrico de entrada. PRECAUCIÓN: Utilice el cable adecuado para cumplir con los códigos municipales y nacionales de consumo de energía nominal.
-
Página 30: Instalación Del Montaje De Superficie
Instalación de la chimenea Instalación del montaje de Para instalaciones de 240V superficie Utilice un cable de tres conductores de cubierta no metálica con el cable PRECAUCIÓN: Se requiere de de tierra (4 cables en total) para el dos personas para diferentes suministro eléctrico de entrada en las pasos de este procedimiento. - Página 31 Instalación de la chimenea (3.8 cm) y las arandelas de mon- Figura 6 taje suministrados en la pared y/o en los taquetes. 6. Con ayuda de las herramientas de montaje adecuadas, instale el soporte inferior a la pared de modo que éste quede centra- da con respecto al soporte de montaje, a 13 ¾...
-
Página 32: Instalación Empotrada, Marco De 2X8
Instalación de la chimenea Instalación empotrada, marco 4. Inserte los cuatro tornillos para el montaje en los cuatro orificios de 2x8 localizados dentro del chasis de PRECAUCIÓN: Se requiere de la chimenea y luego en las vigas dos personas en varios pasos (Figura 8). -
Página 33: Instalación Del Cristal Delantero
Instalación de la chimenea Instalación del cristal delantero 1. Vierta y distribuya de manera Figura 9 uniforme los medios suministra- Bandeja dos en la bandeja de medios de la delantera chimenea. (Figura 9). 2. Monte con cuidado el ensamblaje del cristal delantero para que los ganchos del mismo se monten en el cristal delantero en la chimenea (Figura 9). -
Página 34: Funcionamiento
Funcionamiento Figura 11 Figura 12 Floating Display ra y la temperatura de admisión se ADVERTENCIA: Debe instalar la indicará en el Floating Display cámara de combustión eléctrica de NOTA: Cuando presione algún manera adecuada antes de utilizarla. botón, la temperatura de admisión Puede controlar la unidad por control aparecerá... - Página 35 Funcionamiento está desactivado, hay un retraso NOTA: Presione el botón y el de 30 segundo ventilador, donde el ventilador continuará funcionando botón en la unidad durante antes de apagarse. dos segundos para cambiar la tem- NOTA: La unidad se puede operar peratura de °C a °F, o vice versa.
-
Página 36: Temporizador De Apagado Automático
Funcionamiento do automático puede cancelarse de colores. Al pulsar el botón en cualquier momento presio- se detiene el ciclismo y mantiene nando repetidamente el botón la unidad en el color preferido, hasta que dicho temporizador no indicado por una "U" - Descongelar muestre nada en la pantalla. -
Página 37: Mantenimiento
Mantenimiento Limpieza de las superficies de ADVERTENCIA: Para reducir la chimenea el riesgo de incendio, descarga eléctrica o lesiones físicas, Utilice sólo un paño húmedo para desconecte el suministro eléctrico limpiar las superficies pintadas de antes de intentar cualquier tipo la chimenea. -
Página 38: Garantía
Empire En caso de defectos, Empire procederá garantiza que tales productos están libres de la siguiente manera: de defectos de materiales y de fabricación... - Página 39 únicamente por distribuidores de atención comercial del distribuidor o agentes de servicio de Empire autori- autorizado o agente de servicio ni de zados para proporcionar servicios bajo los costos de mano de obra. Tales cos- la garantía limitada.
- Página 40 Garantía Aplicación de legislaciones provinciales y estatales Esta garantía limitada le proporciona derechos legales específicos y puede que usted tenga también otros derechos que varían de una jurisdicción a otra. Las cláusulas de la convención de las Nacio- nes Unidas sobre Contratos de Venta de Mercancías no serán aplicables a esta ga- rantía limitada ni a la venta de productos cubiertos por esta garantía limitada.
- Página 41 Empire Comfort Systems Inc. Belleville, IL Si tiene preguntas generales sobre nuestros productos, envíenos un correo electrónico a info@empirecomfort.com. Si tiene alguna pregunta sobre servicio o reparación, comuníquese con su distribuidor.