Publicidad

Idiomas disponibles

Idiomas disponibles

Enlaces rápidos

AT815
AT814
AT810
Rechargeable Cordless
Tripleheader Shaver
Always here to help you
Register your product and get support at
www.norelco.com/register
Question?
Question?
Contact
Contact
Philips
Philips
Norelco
Norelco

Publicidad

Capítulos

Tabla de contenido
loading

Resumen de contenidos para Philips NORELCO AT815

  • Página 1 AT815 AT814 AT810 Rechargeable Cordless Tripleheader Shaver Always here to help you Question? Question? Contact Contact Register your product and get support at Philips Philips www.norelco.com/register Norelco Norelco...
  • Página 3 ENGLISH 4 ESPAÑOL 30 Congratulations on your purchase and welcome to Philips Norelco! To fully benefit from the support that Philips Norelco offers, register your product at www.norelco.com/register ¡Bienvenido a Philips Norelco y felicitaciones por su compra! Para utilizar los servicios de asistencia técnica de Philips Norelco, registre su producto en www.norelco.com/register...
  • Página 4: Important Safety Instructions

    2. Use this shaver for its intended household use as described in this manual. Do not use attachments not recommended by Philips Electronics North America Corporation. 3. Never operate this shaver/charging stand if it has a damaged cord or charging plug, if it is not working properly, if it has been dropped or damaged, or dropped into water while plugged in.
  • Página 5 ENGLISH 4. Keep the shaver, cord, charging stand and charging plug away from heated surfaces. 5. Never drop or insert any object into any opening. 6. Do not use the adapter in or near a power outlet that contains an electric air freshener to prevent damage to the adapter. 7.
  • Página 6 Men’s Shaver, the shaver should be used exclusively for 3 weeks. This allows your hair and skin enough time to adapt to the Philips Norelco Shaving System. If, after that period of time, you are not fully satisfied with your Philips Norelco Men’s Shaver, send the product back along with dated sales receipt and we’ll refund...
  • Página 7: Tabla De Contenido

    ENGLISH Table of Contents Features ............8-9 LED Multi-Purpose Display .......10 Before First Use ...........11 Charging ...........11-13 Recharging .............14 Quick Charge ..........14 Put It To The Test & Shaving Tips ..14-15 How to Shave With An Electric Shaver .......15-17 Trimming ..........17-18 Cleaning ............18-23 Replacing the Shaving Heads ....23-25 Storage ............25-26...
  • Página 8: Features

    ENGLISH Features Lift and Cut System Shaver Head Assembly Protective Cap Individually Floating Heads Shaver Head Release Button • Hair Chamber captures shaven hair Electronic On/Off Button Shaver Head Replacement Indicator LED Charge Indicators • Battery Charge, Full, Low & Quick Charge Indicators...
  • Página 9 Cordless - To shave without a cord Full 2-Year Warranty 45-Day Money-Back Guarantee How the Unique Philips Norelco Lift and Cut Shaving System Makes Close Comfortable: Groove channels Lifter raises hair Slots to cut long Holes to cut short...
  • Página 10: Led Multi-Purpose Display

    ENGLISH LED Multi-Purpose Display The display provides the following information: ◗ Charging Indicator -When the shaver is charging, the charging light blinks green. ◗ Full Charge Indicator -When the battery is fully charged, the charging light lights up green continuously. After approximately 30 minutes the charging light goes off to save energy.
  • Página 11: Before First Use

    ENGLISH Before First Use w Charge the shaver before you start using it (see ‘Charging’). Make sure the shaver is switched off before you start charging it. Important w Only use the power cord provided to charge the shaver. w The power plug transforms 100-240V AC to less than 24V DC.
  • Página 12 ENGLISH Charging with a Cord Connect cord directly to shaver and connect the charging plug into any 100V to 240V AC outlet. Use only the power cord provided. w An adaptor plug may be necessary for charging plug usage in some foreign countries. Use an attachment plug adaptor of the proper configuration for the power outlet.
  • Página 13 ENGLISH Charging in Charging Stand (AT815/AT814) w Always place shaver in stand in an upright position making sure charging contacts in bottom of stand fit into recess in bottom of shaver. w Always remove shaver from stand by lifting straight up. Do not tilt shaver. Place shaver in charging stand and connect the small plug of cord to charging stand.
  • Página 14: Recharging

    Use your new shaver exclusively for 3 weeks to fully enjoy the closeness of a Philips Norelco shave. w At first you may not get as close a shave as you expect, or your face may even become slightly irritated.
  • Página 15: How To Shave With An Electric Shaver

    ENGLISH w If you are still not convinced after 21 days, Philips Norelco will refund you the full purchase price as long as the request is received within 45 days of purchase. How To Shave With An Electric Shaver w This symbol on the shaver indicates that the shaver can be used in both the bath and shower.
  • Página 16 ENGLISH Turn shaver OFF by pressing the on/off button once. Clean the shaver after each use (see chapter ‘Cleaning’). Put the Protective Cap on the shaver to protect shaver heads. Wet Shaving You can also use the shaver on a wet face with shaving foam or gel.
  • Página 17: Trimming

    ENGLISH Move the shaving heads in circular movements over your skin. NOTE: Rinse the shaver under the tap regularly to ensure that it continues to glide smoothly over your skin. Turn shaver OFF, dry your face and thoroughly clean the shaver after each use (see chapter ‘Cleaning’).
  • Página 18: Cleaning

    ENGLISH Hold trimmer as shown and move in downward strokes with gentle pressure. Close trimmer by pressing trimmer down. Turn shaver OFF. Cleaning w Always clean your shaver after each use. w Always switch shaver OFF, unplug and remove power cord before cleaning. w Never clean, remove or replace head assembly while motor is on.
  • Página 19 ENGLISH Cleaning the Shaving Unit The shaving heads may be quickly cleaned after each use by rinsing with hot water: Water from the tap should be on a hot setting, BUT BE CAREFUL TO TEST WATER FIRST SO AS NOT TO BURN OR SCALD HANDS.
  • Página 20: Extra-Thorough Cleaning Method

    ENGLISH Clean outside of Shaver Head Assembly by running under hot water. Close the Shaver Head Assembly and shake off excess water. Be careful not to hit the shaving unit against anything while shaking off excess water. Open Shaver Head Assembly again and leave open to air dry.
  • Página 21 ENGLISH Press the Shaver Head Release Button to open the Shaver Head Assembly. Pull the shaving unit off the shaver. Turn the lock counterclockwise to unlock (A) and remove the retaining frame (B). Remove and clean one set of cutters and combs at a time.
  • Página 22 ENGLISH Clean the inside and outside of the comb with the brush supplied. For optimum performance, shaver cutters and combs should be cleaned in a degreasing liquid (e.g. alcohol) and lubricated with one drop of mineral oil (in the center of the head). This helps prevent wear of the shaving heads.
  • Página 23: Replacing The Shaving Heads

    6 months. Close trimmer by pressing trimmer down. Replacing the Shaving Heads w Replace the shaving heads once a year for optimal shaving results. w Replace damaged or worn shaver heads with model HQ8 Philips Norelco shaving heads only.
  • Página 24 ENGLISH Shaver Head Replacement Indicator w The shaver head replacement indicator symbol will light up orange continuously to remind you to replace your shaving heads. Turn shaver OFF, remove the charging plug from the outlet and power cord from the shaver.
  • Página 25: Storage

    ENGLISH Replace the frame and turn the lock clockwise until it locks into place. Insert the notch of the shaving unit into the slot in the top of the shaver (1) and then close the shaving unit (2). Press and hold the on/off button for at least 5 seconds to reset.
  • Página 26: Assistance

    Put the Protective Cap on shaver to protect heads. Assistance w For assistance, visit our website: www.philips.com/support or call toll free 1-800-243-3050 w Online information is available 24 hours a day, 7 days a week.
  • Página 27: Disposal

    ENGLISH Disposal w This Philips Norelco shaver contains a rechargeable lithium-ion battery which must be disposed of properly. w Contact your local town or city officials for battery disposal information or call 1-800-822-8837 or www.rbrc.com for battery drop-off locations. w For assistance, visit our website, www.philips.com/support or call toll free:...
  • Página 28: Accessories

    ENGLISH Accessories w Replacement Heads Model HQ8 - For maximum shaver performance, replace your Philips Norelco shaving heads once a year. w Philips Norelco Shaver Accessories may be purchased at a store near you, or on our website www.philips.com/store...
  • Página 29: Warranty

    Damage occurring during shipment is not covered by this warranty. NOTE: No other warranty, written or oral, is authorized by Philips Electronics North America Corporation. This warranty gives you specific legal rights, and you may also have other rights which vary from state to state.
  • Página 30: Instrucciones Importantes De Seguridad

    ESPAÑOL INSTRUCCIONES IMPORTANTES DE SEGURIDAD Cuando utilice un artefacto eléctrico, tome las precauciones básicas. Lea las instrucciones antes de utilizar este producto. PELIGRO Para reducir el riesgo de descarga eléctrica: 1. No intente sujetar una base de carga enchufada que se haya caído al agua.
  • Página 31: Para Reducir El Riesgo De Quemaduras, Incendios, Descargas Eléctricas Y Lesiones

    2. Utilice esta afeitadora para el uso doméstico al cual está destinada según se describe en este manual. No use accesorios no recomendados por Philips Electronics North America Corporation. 3. Nunca use esta afeitadora/base de carga si el cable o el conector de carga están dañados, si no funciona correctamente,...
  • Página 32: Garantía De Devolución Del Importe De 45 Días

    Esto permite que su pelo y su piel se acostumbren al sistema de afeitado Philips Norelco. Si después de este período de prueba no está satisfecho con los resul- tados de su afeitadora Philips Norelco, puede devolver el producto con el recibo de compra que contenga la fecha de adquisición y le reembolsaremos el precio de...
  • Página 33 ESPAÑOL Tabla de contenido Características ........34-35 Pantalla LED multiuso ......36-37 Antes del primer uso ........37 Carga ............37-40 Recarga ............40 Carga rápida ..........40 Prueba y consejos de afeitado ....41 Cómo usar una afeitadora eléctrica ............41-43 Recorte ............44 Limpieza ............44-50 Reemplazo de los cabezales de afeitado ..........50-52 Almacenamiento ..........53 Asistencia ............54...
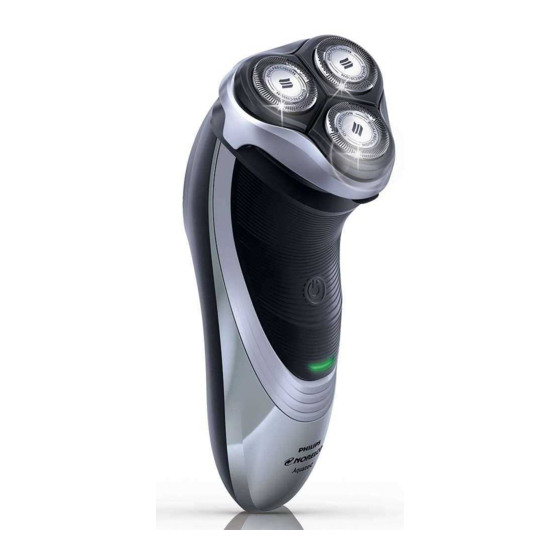
  • Página 34: Características

    ESPAÑOL Características Tecnología Super Lift y Cut Unidad del cabezal de afeitado Tapa protectora Cabezales flotantes individuales Botón de liberación del cabezal de afeitado • Cámara de recolección del pelo afeitado Botón de encendido/ apagado electrónico (ON/OFF) Indicador de sustitución del cabezel Indicadores de carga LED...
  • Página 35 Garantía total por 2 años Garantía de devolución del importe de 45 días Afeitado al ras con el exclusivo sistema de afeitado Lift and Cut de Philips: La ranura acerca la El sistema elevador Las ranuras cortan Los orificios cortan levanta el vello los vellos más...
  • Página 36: Pantalla Led Multiuso

    ESPAÑOL Pantalla LED multiuso La pantalla ofrece la siguiente información: w Indicador de carga Cuando la batería se está cargando, la luz verde del símbolo de batería parpadea. w Indicador de carga completa Cuando la batería está completamente cargada, la luz de carga permanece encendida de forma continua.
  • Página 37: Antes Del Primer Uso

    ESPAÑOL w Indicador de sustitución del cabezel -Una vez al año, dependiento de su frecuencia de uso, el símbolo indicador de sustitución del cabezel se encenderá en naranja continuamente como un recordatorio para reemplazar los cabezels. Antes del primer uso w Cargue la afeitadora antes de comenzar a usarla (consulte "Carga").
  • Página 38: Carga Por Medio De Un Cable

    ESPAÑOL w Una afeitadora completamente cargada proporciona un tiempo de afeitado sin cable de hasta 50 minutos. w Cuando cargue la afeitadora por primera vez o después de un largo período sin uso, cargue la afeitadora hasta que las luces de carga se mantengan encendidas de manera permanente.
  • Página 39 ESPAÑOL La carga y recarga demoran una hora completa. Una afeitadora completamente cargada proporciona un tiempo de afeitado sin cable de hasta 50 minutos. w Cuando la batería está completamente cargada, el símbolo blanco de batería permanece encendido. Después de 30 minutos aproximadamente, el símbolo de batería se apaga para ahorrar energía.
  • Página 40: Recarga

    ESPAÑOL El conector de carga realizará un proceso automático de conversión de sistemas de 100 V a 240 V de CA. w La pantalla de la afeitadora indicará que se está cargando. La carga y recarga demoran una hora completa. Una afeitadora completamente cargada proporciona un tiempo de afeitado sin cable de hasta 50 minutos.
  • Página 41: Prueba Y Consejos De Afeitado

    Es un hecho que la piel y la barba necesitan tiempo para acostumbrarse a un nuevo sistema de afeitado. w Utilice su nueva afeitadora Philips Norelco como método exclusivo de afeitado por 3 semanas para disfrutar de una piel suave.
  • Página 42: Afeitado Húmedo

    ESPAÑOL w Aféitese con la cara limpia para obtener mejores resultados. Afeitado Pulse el botón de encendido/apagado una vez para encender la afeitadora (posición ON). Aféitese en el sentido contrario al crecimiento del pelo, con movimientos circulares. Estire la piel con la mano libre para que las cuchillas puedan levantar y cortar la barba.
  • Página 43 ESPAÑOL Humedezca la piel. Colóquese crema o gel de afeitar en el rostro. Enjuague la unidad de afeitado bajo el grifo para que se deslice suavemente sobre la piel. Pulse el botón de encendido y apagado una vez para encender el artefacto. Desplace los cabezales de afeitado sobre la piel con movimientos circulares.
  • Página 44: Recorte

    ESPAÑOL Recorte Para recortar las patillas y el bigote: Encienda la afeitadora. Empuje hacia abajo el accionador del recortador. El recortador puede activarse con la afeitadora en funcionamiento. Sujete el recortador tal como se indica y muévalo con movimientos descendentes con una suave presión.
  • Página 45: Limpieza De La Unidad De Afeitado

    ESPAÑOL w No aplique presión en los peines. No toque los cabezales de afeitado con objetos duros para evitar deformar o dañar las ranuras de precisión. w No utilice la afeitadora si los peines están dañados o rotos para evitar sufrir lesiones en el rostro.
  • Página 46 ESPAÑOL Pulse el botón de liberación del cabezal de afeitado para abrir la unidad del cabezal de afeitado. Limpie el interior de los cabezales de afeitado y la cámara de recolección de pelo con agua caliente del grifo. Para limpiar el exterior de la unidad del cabezal de afeitado, enjuáguelo con agua caliente del grifo.
  • Página 47: Método De Limpieza A Fondo

    ESPAÑOL w Si la unidad de afeitado se suelta de la afeitadora, puede volver a encajarla fácilmente. w También puede limpiar la cámara de recogida del pelo sin agua con el cepillo que se suministra. Método de limpieza a fondo No mezcle las cuchillas y los peines, pues puede afectar el rendimiento del afeitado y pueden pasar varias semanas hasta que recupere el rendimiento...
  • Página 48 ESPAÑOL Gire la traba en el sentido contrario al de las agujas del reloj (A) y retire el marco de sujeción (B). Retire y limpie los conjuntos de cuchillas y peines de a uno por vez. Separe el cortador del peine y límpielo con el cepillo suministrado.
  • Página 49: Después De Cada Uso: Recortador

    ESPAÑOL Vuelva a colocarlos en la unidad del cabezal de la afeitadora. Verifique que los dos bordes en punta del cabezal encastren exactamente en las ranuras. Repita el proceso con los otros dos conjuntos de cuchillas y peines. Vuelva a colocar el marco y gire la traba en el sentido de las agujas del reloj hasta que encastre.
  • Página 50: Reemplazo De Los Cabezales De La Afeitadora

    Reemplace los cabezales de la afeitadora una vez por año para obtener resultados de afeitado óptimos. w Reemplace los cabezales dañados o desgastados únicamente por cabezales Philips Norelco modelo HQ8. Indicador de sustitución del cabezel w El símbolo indicador de sustitución del cabezel se encenderá...
  • Página 51: De Afeitado

    ESPAÑOL Pulse el botón de liberación del cabezal de afeitado para abrir la unidad del cabezal de afeitado. Extraiga la unidad de afeitado de la afeitadora. Gire la traba en el sentido contrario al de las agujas del reloj (A) y retire el marco de sujeción (B).
  • Página 52 ESPAÑOL Presione y mantenga presionado el botón encendido/apagado durante al menos 5 segundos reiniciar. El símbolo de afeitar 5 sec. 5 sec. naranja recambio cabezel indicador se apagará. NOTA: si la unidad de afeitado no cierra fácilmente, compruebe haber colocado los cabezales de afeitado correctamente y verifique que el marco de sujeción esté...
  • Página 53: Almacenamiento

    ESPAÑOL Almacenamiento w La afeitadora debe estar apagada. Desenchufe el cable de la toma eléctrica y la afeitadora antes de guardarla en un lugar seguro y seco, donde no se aplaste, golpee ni pueda sufrir daños. w Cuando guarde la afeitadora, no enrolle el cable alrededor de la unidad.
  • Página 54: Asistencia

    ESPAÑOL Asistencia w Para obtener asistencia, ingrese en nuestro sitio web: www.philips.com/support o llame al número gratuito:1-800-243-3050. w Información disponible por internet las 24 horas del día, los 7 días de la semana.
  • Página 55: Eliminación

    ESPAÑOL Eliminación w Esta afeitadora Philips Norelco contiene una batería recargable de iones de litio que debe desecharse de forma adecuada. w Para obtener información sobre la forma de desechar las baterías, comuníquese con las autoridades locales, llame al número 1-800-822-8837 o visite el sitio web www.rbrc.com...
  • Página 56 La garantía no cubre los daños producidos durante el envío. NOTA: Philips Electronics North America Corporation no autoriza ninguna otra garantía escrita o verbal. Esta garantía otorga al usuario derechos específicos, sin perjuicio de otros derechos de los que disponga en virtud de la legislación del estado.

Este manual también es adecuado para:

Norelco at814Norelco at810

Tabla de contenido