Tabla de contenido
Publicidad
Idiomas disponibles
Idiomas disponibles
Enlaces rápidos
Instruction Manual Manual de instrucciones
Manuel d' instruction
Thank you for choosing Richell's product. Please read this instruction manual carefully
before using this product, and keep for future reference. If you give this product to
someone else, please also give this instruction manual to the new owner. Please note
some parts of the figures shown below may be slightly different from the actual product,
for your better understanding of the structure and proper use.
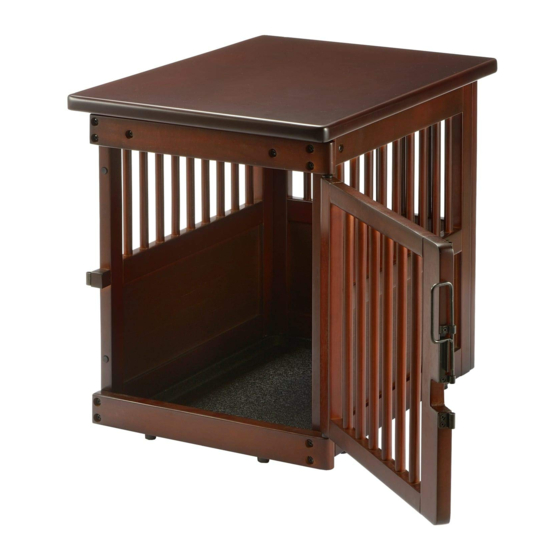
Features
lThe Small ( 80004 ) is designed for small size dogs, 8.8 - 17.6 lbs., the Medium
( 94916 ) is designed for small to medium size dogs, 8.8 - 44 lbs. and the Large
( 94917 ) is designed for small to large size dogs, 8.8 - 88 lbs.
lRemovable Sliding Tray for easy cleaning.
lThe door can be fully opened for easy pet access.
Parts
Before assembling this product, make sure the following parts are included:
Front Panel
Fixing Frame (Top) (1)
Door Panel (1)
Fixing Frame (Bottom) (1)
※Door Panel, Fixing
Frames and Securing
Securing
Washers are all in one
Washers
piece using Protective
(2)
Tapes.
What are the following signs?
The following signs are special remarks for safety use of the product.
Keep these remarks in mind before using this product.
Warnings!
: Remarks on inappropriate use which might cause death, serious injury and/or physical damage.
Cautions!
: Remarks on inappropriate use which might cause slight injury and/or physical damage.
Important!
: Remarks on inappropriate use which might cause trouble, damage and/or shorter life to product.
Instruction of Proper Use
Warnings!
lThe Small ( 80004 ) is designed for small size dogs, 8.8 - 17.6 lbs., the Medium ( 94916 ) is designed for small to medium size
dogs, 8.8 - 44 lbs. and the Large ( 94917 ) is designed for small to large size dogs, 8.8 - 88 lbs.
Do not use this product for any purpose other than its intended use.
lDo not use this product while your pet is leashed to avoid unexpected accidents/injuries, such as dog entanglement.
lMake sure each part is properly fixed in place and pay special attention to new-born puppies or tiny dogs to avoid unexpected
serious injury to pets and/or product damage by pet being caught between the frames.
lKeep this product in sight during use. Remove your pet from the confinement area when unattended to avoid unexpected injury
or death to your pet; pets behave unexpectedly when startled by thunder, lighting, or by other animals.
lDo not force to confine your pets when they are not used to be inside this product. Leave the Door open until they get familiar
with this product.
Cautions!
lDo not use this product for dogs out of this weight range to avoid unexpected accidents and/or escapes.
lWhen opening/closing the Door, be careful not to pinch your hands, fingers or pets. Make sure to check the Door locks properly
to avoid injury and/or escape.
lDo not lean or hang on to this product to avoid unexpected accidents and/or product damage.
lOnly use genuine parts and do not alter the product to avoid accidents and/or injury to self, pets or others.
lKeep this product away from all heat sources at all times to avoid unexpected product damage or burn-related injuries to self/pets.
lIf you notice anything wrong with product or installation site, discontinue its use at once.
lPay attention to sharp edges and corners while assembling this product to avoid personal injury.
Important!
lThis product is designed for indoor use only. Do not use it outdoors.
取扱 説 明 書
Left Side Panel (1)
Bolts
Flat Washers
Back Panel (1)
1
취급설명서
Right Side Panel (1)
Bag for Parts A
Bolts for Top
Panel (4)
(16)
Door Lock
Spring
Washers
(20)
(20)
UPC
80004/94916/94917
JAN
5069/5038/5039
Shown as Medium size
※
Top Panel (1)
Tray (1)
Stiffener (2)
Bag for Parts B
Door Lock
Screws
Receiver
Side
(6)
(1)
Receiver (1)
Publicidad
Tabla de contenido

Manuales relacionados para Richell 80004-1


Resumen de contenidos para Richell 80004-1
-
Página 5: Características
Gracias por elegir este producto de Richell. Por favor, lea este manual de instrucciones cuidadosamente antes de usar este producto, y consérvelo para consultas en el futuro. Si usted entrega este producto a otra persona, por favor entregue también este manual de instrucciones. Por favor observe que algunas piezas de las figuras mostradas abajo podrían ser un poco diferentes del producto real, para su mejor entendimiento de la estructura y uso apropiado. -
Página 6: Instalación Del Panel Trasero Y Los Paneles Laterales
Utilice un destornillador de cabeza cruciforme para el ensamblaje. Cómo ensamblar Termine de apretar todos los tornillos después de ensamblar el producto. ※ Panel Trasero Panel Lateral Derecho Instalación del Panel Trasero y los Orificio para el perno de Paneles Laterales fijación Sujete los Paneles Laterales Derecho/Izquierdo al Panel Trasero utilizando las arandelas planas, las... -
Página 7: Instalación Del Panel Superior
Instalación del Panel Superior (1) Inserte pasadores en la parte superior de los Paneles Laterales Derecho/Izquierdo (4 lugares) y los Paneles Traseros (1 lugar) en los orificios del lado trasero del Panel Superior. Orificio del lado trasero del Panel Superior Pasador en los Paneles Laterales (2)... -
Página 8: Cómo Utilizar El Receptor Lateral De Cerrojo De Puerta
¡Gracias! Diseñado por: Richell Corporation, Japan Distribuido por: Richell USA, Inc. Grand Prairie, Texas 75050 Teléfono: (972) 641-9795 Fax: (972) 641-8495... - Página 19 頂面板的安裝 (1) (2) 托盤的設置 (1) (2) ※...