Tabla de contenido
Publicidad
Idiomas disponibles
Idiomas disponibles
Enlaces rápidos
Bluetooth adapter
Bluetooth-Adapter / Adaptateur Bluetooth
Bluetooth adapter / Adaptador Bluetooth
Adattatore Bluetooth / Adaptador Bluetooth
KS-BTA200
MANUAL DE INSTRUCCIONES
ISTRUZIONI
INSTRUÇÕES
/
INSTRUCTIONS
BEDIENUNGSANLEITUNG
MANUEL D'INSTRUCTIONS
GEBRUIKSAANWIJZING
For customer Use:
Enter below the Model
No. and Serial No. which
are located on the top or
bottom of the cabinet.
Retain this information
for future reference.
Model No.
Serial No.
LVT1640-001A
[K]
Publicidad
Capítulos
Tabla de contenido

Manuales relacionados para JVC KS-BTA200


Resumen de contenidos para JVC KS-BTA200
- Página 1 Bluetooth adapter Bluetooth-Adapter / Adaptateur Bluetooth Bluetooth adapter / Adaptador Bluetooth Adattatore Bluetooth / Adaptador Bluetooth KS-BTA200 For customer Use: Enter below the Model INSTRUCTIONS No. and Serial No. which BEDIENUNGSANLEITUNG are located on the top or MANUEL D’INSTRUCTIONS bottom of the cabinet.
- Página 2 Declaration of Conformity with regard to the R&TTE Directive 1999/5/EC 0536 English: Español: Hereby, JVC, declares that this Por medio de la presente JVC declara KS-BTA200 is in compliance with the que el KS-BTA200 cumple con los essential requirements and other requisitos esenciales y cualesquiera...
- Página 3 övriga relevanta bestämmelser som framgår av direktiv 1999/5/EG. Íslenska: Magyar: Hér með lýsir JVC yfir því að KS-BTA200 Alulírott, JVC nyilatkozom, hogy a KS- er í samræmi við grunnkröfur og aðrar BTA200 megfelel a vonatkozó alapvetõ kröfur, sem gerðar eru í tilskipun követelményeknek és az 1999/5/EC...
- Página 4 – Consult the dealer or an experienced radio/TV technician for help. Caution: Changes or modifications not approved by JVC could void the user’s authority to operate the equipment. Information for Users on Disposal of Old Equipment This symbol indicates that the product with this symbol should not be disposed as general household waste at its end-of-life.
-
Página 5: Introduction
JVC car audio (IN-CAR ENTERTAINMENT) dealer. • This adapter has been designed exclusively for use with JVC’s car receivers. Do not use this adapter with any other car receiver. Precautions •... -
Página 6: About Bluetooth
Bluetooth SIG, Inc. and any use of such marks • Making/receiving a call by Victor Company of Japan, Limited (JVC) is under • Calling from phonebook licence. Other trademarks and trade names are those •... -
Página 7: Tabla De Contenido
Contents Bluetooth Audio Introduction Bluetooth Audio Operations ..29 Introduction ........ 3 Selecting a source ........... 29 Warnings ............3 Playback operations ........29 Precautions ............3 About Bluetooth ..........4 General information ..........4 Settings Getting Started ......6 Installation ............6 Other Settings ......30 Connecting to the receiver .........8 Basic procedure .......... -
Página 8: Getting Started
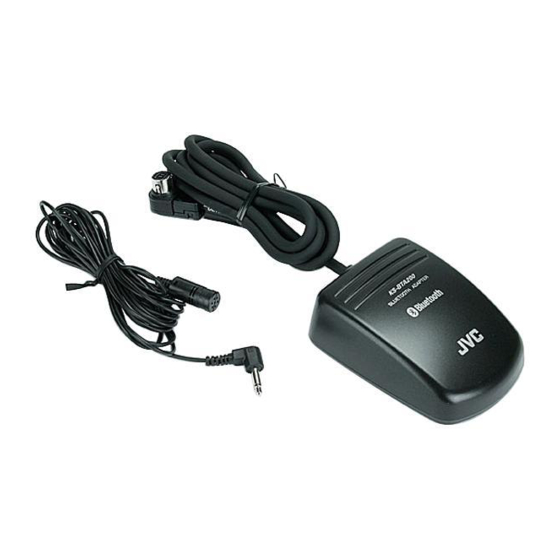
Getting Started Installation Warning Mounting the adapter unit Avoid installing the adapter unit and the microphone Wipe clean the selected surface sufficiently, and affix unit in the following places. the Velcro tape. – Where they would hinder your safety driving. Interface adapter unit –... -
Página 9: Installing The Microphone Unit
Installing the microphone unit Install the microphone unit. To install on the sun visor Attach the microphone to the microphone clip. Microphone unit (supplied) Microphone (supplied) To Interface adapter unit Secure the microphone cord using cord Microphone clip clamps (not supplied) if necessary. (supplied) To adjust the microphone angle To install on the steering column... -
Página 10: Connecting To The Receiver
Getting Started Connecting to the receiver Typical connection Turn off the power to the receiver and turn off the vehicle’s ignition switch before connecting or disconnecting the unit. To other external component (see below) From microphone unit Interface adapter unit CD Changer jack Receiver Signal cord... -
Página 11: Check The Type Of Your Receiver
Checking the type of your receiver Operating procedures through a receiver are different Example: type of the receiver depending on the type of the receiver. Type A Check the type of your receiver by the chart below. • If your answer is “Yes,” follow •... -
Página 12: Menu Structures
Getting Started Menu structures Indication language In this manual, English indications are used for purpose of explanation. You can change the indication language to other than English for some receivers. Refer to the instruction manual supplied with your receiver. Bluetooth Phone Dial / Dial Menu / DIAL * Select the method to make a call. - Página 13 Selectable only when your cellular phone is equipped with the voice recognition system. Excluding type D. Selectable only when “New Device“ is selected. Selectable only when the registered device is selected. Not selectable for “New Device“. If you wish to receive more information about Bluetooth, visit our JVC web site. Introduction...
-
Página 14: Bluetooth Connection
Bluetooth Connection • For details of the menu operations, refer to the instruction manual supplied with your receiver. • Indications on the display (monitor) and button names vary among the receivers. 7: 7 / BACK ex. SOURCE: SRC MENU: AV MENU, AV Menu Bluetooth Phone: Bluetooth PHONE, BT-PHONE New Device: New device, NEW DEVICE Preparation: Turn on the Bluetooth function of the Bluetooth device. - Página 15 for Type B Use the Bluetooth device to search for the unit. While “Bluetooth Phone” or • Enter the same PIN code (as entered in the “Bluetooth Audio” is selected as above step) on the device to be connected. the source, select “New Device.” “Connected (and the device name)”...
- Página 16 Bluetooth Connection Registering a Bluetooth device — Pairing (continued) for Type B To connect an available device from the unit While “Bluetooth Phone” or Use “Search” to establish connection with a “Bluetooth Audio” is selected as Bluetooth device from the unit. the source, select “New Device.”...
- Página 17 To connect a special device Use the following buttons to enter the PIN (Personal Identification Number) Some Bluetooth devices require some special procedures to establish Bluetooth connection for the Code of the device to be connected. first time. You need to select the device name for those 4/¢: Move the entry position.
- Página 18 Bluetooth Connection Registering a Bluetooth device — Pairing (continued) for Type C To delete the registered device You can register up to five Bluetooth devices. While “Bluetooth Phone” or If you want to connect a 6th device, delete one of the “Bluetooth Audio”...
-
Página 19: Connecting/Disconnecting The Device
for Type C Connecting/Disconnecting the device While “Bluetooth Phone” or “Bluetooth Audio” is selected as the source, select a registered device To connect a device manually you want to delete. Only one device can be connected at a time for each source (“Bluetooth Phone”... - Página 20 Bluetooth Connection Connecting/Disconnecting the device (continued) for Type D To disconnect a device You can disconnect a Bluetooth device. While “Bluetooth Phone” or “Bluetooth Audio” is selected as for Type A the source, press 4/¢ to select a Display “Bluetooth Phone” screen registered device.
-
Página 21: Bluetooth Phone
Bluetooth Phone Operations • Before you use a Bluetooth device with your receiver, connect a Bluetooth device. See “Bluetooth Connection” on page 12. • When the sound is stopped or interrupted during the use of a Bluetooth device, try the following remedies. -
Página 22: Calling A Number In The Phone Book
Bluetooth Phone Operations Calling a number in the phone book You can call a number from the phone book in the connected cellular phone. Before you use this function, transfer the phone book memory of the cellular phone to this unit (Refer to the instruction manual supplied with your cellular phone). -
Página 23: Advanced Operations
Advanced Operations Calling by voice command If your cellular phone is equipped with the voice recognition system, you can make a call by your voice. for Type A for Type C Display “Bluetooth Phone” screen. Press and hold MODE. “Say” appears on the display. Press and hold MENU. -
Página 24: Calling A Number From The Call History
Advanced Operations Calling a number from the call history This unit has three kinds of call histories — redial, received calls and missed calls. You can call a number using these call histories. for Type A for Type B Display the dial menu. Display the dial menu. -
Página 25: Calling The Last Call Number Directly - Redial
for Type C Calling the last call number directly — Redial Display the dial menu. This function is available only when the remote Select a call history. controller supplied with your receiver has the PHONE You can select from the following call histories; button. -
Página 26: Using Preset Numbers
Advanced Operations Using preset numbers You can preset up to six phone numbers. for Type C/Type D To store a preset number Select a phone number you want for Type A to preset from the number list (Phonebook, Redial, Received Calls or Select a phone number you want Missed Calls.) to preset from the number list... -
Página 27: Calling By Entering A Phone Number
Calling by entering a phone number You can make a call by entering a phone number on the receiver. for Type A for Type B Display the dial menu. Display the dial menu. Select “Phone Number.” Select “Phone Number.” Press 4/¢ /5/∞ to enter a Enter a phone number. - Página 28 Advanced Operations for Type C for Type D Display the dial menu. Display the dial menu. Select “PHONE NUMBER.” Select “NUMBER.” Press 4/¢ /5/∞ to enter a Press 4/¢, VOLUME +/– to ∞ phone number, then press the number enter a phone number, then press button 1.
-
Página 29: Receiving An Sms (Short Message Service)/ Text Message
Receiving an SMS Reading an SMS/ (Short Message Service)/ Text Message Text Message for Type A If your cellular phone can use SMS (Short Message Display “Bluetooth Phone” screen. Service)/Text Message, you can read the messages on Select “Mode” ] “Message.” the display (monitor) of the receiver. - Página 30 Advanced Operations for Type B for Type C Select “Bluetooth” ] “Message Press MODE, then select “Message Menu.” Menu.” Select a message history. Select a message history. You can select one of the following message You can select one of the following message histories;...
-
Página 31: Bluetooth Audio
Bluetooth Audio Operations • Before you use a Bluetooth device on your receiver, connect a Bluetooth device. See “Bluetooth Connection” on page 12. • When sound is stopped or interrupted during the use of a Bluetooth device, try the following remedies. -
Página 32: Settings
Other Settings Basic procedure for Type A for Type C Press MODE, then select “Settings.” Display “Bluetooth Phone” screen or select “Bluetooth Audio” as the Select an item. source. See “Setting items” on the next page. Select “Mode” ] “Setup” from the Press the following buttons to change menu. -
Página 33: Setting Items
Setting items You can change the following items in Setting menu (_: initial): Auto Connect Microphone Level / Mic Setting You can set to connect a Bluetooth device automatically Adjust a microphone volume. when the receiver is turned on. Level: 1, 2 , 3 Off: Does not connect any device automatically. -
Página 34: Troubleshooting
Troubleshooting What appears to be trouble is not always serious. Check the following points before calling a service center. Symptoms Remedies Bluetooth device does not detect the unit. • This unit can be connected with one Bluetooth cellular phone and one Bluetooth audio device at a time. While connecting a device, this unit cannot be detected from another device. -
Página 35: Specifications
The connected audio device cannot be controlled. • Check whether the connected audio device supports AVRCP. Bluetooth information: If you wish to receive more information about Bluetooth, visit our JVC web site. Specifications GENERAL BLUETOOTH SECTION Power Requirement:... - Página 36 Wir danken lhnen für den Kauf eines JVC Produkts. Bitte lesen Sie die Anleitung vollständig durch, bevor Sie das Gerät in Betrieb nehmen, um sicherzustellen, daß Sie alles vollständig verstehen und die bestmögliche Leistung des Geräts erhalten. Benutzerinformationen zur Entsorgung alter Geräte Dieses Symbol zeigt an, dass das damit gekennzeichnete Produkt nicht als normaler Haushaltsabfall entsorgt werden soll.
- Página 37 Wenn Ihr Fahrzeug mit einer anderen elektrischen Spannung als 12 V und negative Masse arbeitet, ist ein Spannungsinverter erforderlich, der bei einem Fachhändler für JVC car audio erhältlich ist. • Dieser Adapter wurde ausschließlich zur Verwendung mit Auto-Receivern von JVC entworfen. Verwenden Sie diesen Adapter nicht mit einem anderen Auto- Receiver.
-
Página 38: Über Bluetooth
Eigentum der Bluetooth SIG, Inc., und jegliche verwenden: Verwendung solcher Marken durch die Victor • Einen Ruf tätigen/empfangen Company of Japan, Limited (JVC) geschieht unter • Anrufen vom Telefonbuch Lizenz. Andere Warenzeichen und Handelsnamen • Anrufen mit Sprachbefehl sind Eigentum ihrer jeweiligen Besitzer und werden •... - Página 39 Inhalt Bluetooth-Audio Einleitung Bluetooth-Audiobedienungen ..29 Einleitung ........3 Wählen einer Quelle ........29 Warnungen ............3 Wiedergabebetrieb ........29 Vorsichtsmaßregeln ..........3 Über Bluetooth ..........4 Allgemeine Information ........4 Einstellungen Erste Schritte ....... 6 Andere Einstellungen ....30 Einbau ...............6 Grundlegendes Verfahren ....... 30 Anschließen an den Receiver ......8 Einstellpunkte ..........
-
Página 40: Erste Schritte
Erste Schritte Einbau Warnung Montage des Geräts Vermeiden Sie den Einbau des Adapters und Mikrofons Wischen Sie die gewählte Oberfläche gut sauber und an den folgenden Stellen. bringen Sie das Klettband an. – Wo die Teile sicheres Fahren verhindern. Schnittstellenadapter-Einheit –... - Página 41 Einbau der Mikrofoneinheit Installieren Sie die Mikrofoneinheit. Zum Anbringen auf der Sonnenblende Bringen Sie das Mikrofon am Mikrofonclip an. Mikrofoneinheit (mitgeliefert) Microfon (mitgeliefert) Zur Schnittstellenadapter- Einheit Sichern Sie das Mikrofonkabel mit Kabelklemmen Mikrofonclip (nicht mitgeliefert), wenn erforderlich. (mitgeliefert) Zum Anbringen an der Lenksäule Zum Einstellen des Mikrofonwinkels Bringen Sie die Mikrofoneinheit an der Oberseite der Lenksäule an.
-
Página 42: Anschließen An Den Receiver
Erste Schritte Anschließen an den Receiver Typischer Anschluss Immer den Receiver und die Zündung des Fahrzeugs mit dem Zündschlüssel ausschalten, bevor die Einheit angeschlossen oder abgetrennt wird. Zu anderen externen Komponenten (siehe unten) Von Mikrofon-Einheit Schnittstellenadapter-Einheit CD-Wechsler-Buchse Receiver Signalkabel (mitgeliefert für oder angebracht an die externe Komponente) •... -
Página 43: Prüfen Sie Den Typ Ihres Receivers
Prüfen des Typs des Receivers Bedienungsverfahren über einen Receiver können sich Beispiel: Typ des Receivers je nach Typ des Receivers unterscheiden. Typ A Prüfen Sie den Typ Ihres Receivers anhand der Tabelle unten. • Wenn Ihre Antwort „Ja“ ist, folgen Sie •... -
Página 44: Menü-Strukturen
Erste Schritte Menü-Strukturen Anzeigesprache In dieser Anleitung werden englischsprachige Anzeigen zur Erklärung verwendet. Sie können bei einigen Receivern die Anzeigesprache auf eine andere Sprache als Englisch umstellen. Siehe mit Ihrem Receiver mitgelieferte Bedienungsanleitung. Bluetooth-Telefon Dial / Dial Menu / DIAL * Wählen Sie die Methode zum Vornehmen eines Rufs. - Página 45 Nur wählbar, wenn das Handy mit dieser Spracherkennungssystem ausgestattet ist. Ausgenommen Typ D. Nur wählbar, wenn „New Device“ gewählt ist. Nur wählbar, wenn das registrierte Gerät gewählt ist. Nicht wählbar für „New Device“. Wenn Sie weitere Information über Bluetooth wünschen, besuchen Sie uns auf der JVC-Website. Einleitung...
-
Página 46: Bluetooth-Verbindung
Bluetooth-Verbindung • Einzelheiten über Menü-Bedienung siehe mit Ihrem Receiver mitgelieferte Bedienungsanleitungen. • Anzeigen im Display (Monitor) und Tastenbezeichnungen unterscheiden sich unter den Receivern. 7: 7 / BACK Beispiel: SOURCE: SRC MENU: AV MENU, AV Menu Bluetooth Phone: Bluetooth PHONE, BT-PHONE New Device: New device, NEW DEVICE Vorbereitung: Schalten Sie die Bluetooth-Funktion am Bluetooth-Gerät ein. - Página 47 für Typ B Verwenden Sie das Bluetooth-Gerät zum Suchen der Einheit. Während „Bluetooth Phone“ oder • Geben Sie den gleichen PIN-Code (wie im obigen „Bluetooth Audio“ als Quelle Schritt eingegeben) am anzuschließenden Gerät ein. gewählt ist, wählen Sie „New Device“. „Connected (und der Geräte-Name)“...
- Página 48 Bluetooth-Verbindung Registrieren eines Bluetooth-Geräts — Pairing (Fortsetzung) für Typ B Zum Anschluss eines verfügbaren Geräts von der Einheit Während „Bluetooth Phone“ Verwenden Sie „Search“ zur Herstellung der oder „Bluetooth Audio“ als Verbindung mit einem Bluetooth-Gerät von der Einheit. Quelle gewählt ist, wählen Sie „New Device“.
- Página 49 Zum Anschließen eines Spezialgeräts Verwenden Sie die folgenden Tasten, um den PIN-(Personal Identification Manche Bluetooth-Geräte erfordern spezielle Verfahren, um beim ersten Mal die Bluetooth-Verbindung Number) Code des anzuschließenden herzustellen. Sie müssen den Gerätenamen für diese Geräts einzugeben. Bluetooth-Geräte vor der Registrierung wählen. 4/¢: Verschieben Sie die Eingabeposition.
- Página 50 Bluetooth-Verbindung Registrieren eines Bluetooth-Geräts — Pairing (Fortsetzung) für Typ C Zum Löschen des registrierten Geräts Sie können bis zu fünf Bluetooth-Geräte registrieren. Während „Bluetooth Phone“ Wenn Sie ein 6. Gerät anschließen möchten, löschen Sie oder „Bluetooth Audio“ als eines der registrierten Geräte. Quelle gewählt ist, wählen Sie „New für Typ A device“.
-
Página 51: Anschließen/Abtrennen Des Geräts
für Typ C Anschließen/Abtrennen des Geräts Während „Bluetooth Phone“ oder „Bluetooth Audio“ als Quelle Zum manuellen Anschließen eines gewählt ist, wählen Sie ein zu löschen Geräts gewünschtes registriertes Gerät. Nur ein Gerät zur Zeit kann an jede Quelle Wählen Sie MODE, wählen Sie dann angeschlossen werden („Bluetooth Phone“... - Página 52 Bluetooth-Verbindung Anschließen/Abtrennen des Geräts (Fortsetzung) für Typ D Zum Abtrennen eines Geräts Sie können ein Bluetooth-Gerät abtrennen. Während „Bluetooth Phone“ oder „Bluetooth Audio“ als Quelle für Typ A gewählt ist, drücken Sie 4/¢, um Rufen Sie den „Bluetooth Phone“- ein registriertes Gerät zu wählen. Bildschirm auf oder wählen Sie Drücken Sie ∞, und wählen Sie dann „Bluetooth Audio“...
-
Página 53: Bluetooth-Telefon-Bedienungen
Bluetooth-Telefon-Bedienungen • Bevor Sie ein Bluetooth-Berät mit Ihrem Receiver verwenden, schließen Sie ein Bluetooth-Gerät an. Siehe „Bluetooth-Anschluss“ auf Seite 12. • Wenn der Ton während der Verwendung eines Bluetooth-Geräts gestoppt unterbrochen wird, probieren Sie eine der folgenden Abhilfen. • Schalten Sie die Stromversorgung des Receivers aus und dann wieder ein. •... -
Página 54: Anrufen Einer Nummer Im Telefonbuch
Bluetooth-Telefon-Bedienungen Anrufen einer Nummer im Telefonbuch Sie können eine Nummer aus dem Telefonbuch des angeschlossenen Handys anrufen. Bevor Sie diese Funktion verwenden, übertragen Sie den Telefonbuchspeicher des Handys zu dieser Einheit (siehe Bedienungsanleitung des Handys). • Bei manchen Handys wird das Telefonbuch automatisch übertragen. für Typ A für Typ C Rufen Sie das Anwählen-Menü... -
Página 55: Erweiterte Funktionen
Erweiterte Funktionen Anrufen mit Sprachbefehl Wenn Ihr Handy ein Spracherkennungssystem hat, können Sie mit Sprachbefehl anrufen. für Typ A für Typ C Halten Sie MODE gedrückt. Rufen Sie den Bildschirm „Bluetooth Phone“ auf. „Say“ erscheint im Display. • Sie können auch die Sprach-Anwahl- Halten Sie MENU gedrückt. -
Página 56: Anrufen Einer Nummer Aus Der Ruf-Historie
Erweiterte Funktionen Anrufen einer Nummer aus der Ruf-Historie Dieses Gerät hat drei Arten von Ruf Historien — Neuwahl, empfangene Rufe und verpasste Rufe. Sie können eine Nummer aus diesen Ruf-Historien anrufen. für Typ A für Typ B Rufen Sie das Anwählen-Menü auf. Rufen Sie das Anwählen-Menü... -
Página 57: Direktes Rufen Der Zuletzt Gerufenen Nummer - Redial
für Typ C Direktes Rufen der zuletzt gerufenen Nummer Rufen Sie das Anwählen-Menü auf. — Redial Wählen Sie eine Ruf-Historie. Sie können unter den folgenden Ruf-Historien Diese Funktion steht zur Verfügung, wenn die mit wählen; Ihrem Receiver mitgelieferte Fernbedienung eine Redial: PHONE-Taste hat. -
Página 58: Verwendung Von Kurzwahlnummern
Erweiterte Funktionen Verwendung von Kurzwahlnummern für Typ C/Typ D Sie können bis zu 6 Telefonnummern voreingeben. Zum Speichern einer Kurzwahlnummer Wählen Sie eine zur Kurzwahl gewünschte Telefonnummer aus der für Typ A Nummernliste (Phonebook, Redial, Wählen Sie eine zur Kurzwahl Received Calls oder Missed Calls). -
Página 59: Anruf Durch Eingabe Einer Telefonnummer
Anruf durch Eingabe einer Telefonnummer Sie können einen Anruf tätigen, indem Sie eine Telefonnummer am Receiver eingeben. für Typ A für Typ B Rufen Sie das Anwählen-Menü auf. Rufen Sie das Anwählen-Menü auf. Wählen Sie „Phone Number“. Wählen Sie „Phone Number“. Drücken Sie 4/¢... - Página 60 Erweiterte Funktionen für Typ C für Typ D Rufen Sie das Anwählen-Menü auf. Rufen Sie das Anwählen-Menü auf. Wählen Sie „PHONE NUMBER“. Wählen Sie „NUMBER“. Drücken Sie 4/¢ /5/∞ zur Drücken Sie 4/¢, VOLUME +/– zur Eingabe einer Eingabe einer Telefonnummer, und drücken Sie dann die Zifferntaste 1.
-
Página 61: Empfangen Von Sms (Short Message Service)/ Text-Meldungen
Empfangen von SMS Lesen einer SMS/ (Short Message Service)/ Text-Meldung Text-Meldungen für Typ A Wenn Ihr Handy SMS (Short Message Service)/ Rufen Sie den Bildschirm „Bluetooth Text-Meldungen verwenden kann, können Sie die Phone“ auf. Meldungen auf dem Display (Monitor) des Receivers lesen. - Página 62 Erweiterte Funktionen für Typ B für Typ C Wählen Sie „Bluetooth“ ] Wählen Sie MODE, wählen Sie dann „Message Menu“. „Message Menu“. Wählen Sie eine Meldungshistorie. Wählen Sie eine Meldungshistorie. Sie können einen der folgenden Meldungshistorie- Sie können einen der folgenden Meldungshistorie- Bildschirme wählen;...
-
Página 63: Bluetooth-Audiobedienungen
Bluetooth-Audiobedienungen • Bevor Sie ein Bluetooth-Berät an Ihrem Receiver verwenden, schließen Sie ein Bluetooth-Gerät an. Siehe „Bluetooth-Anschluss“ auf Seite 12. • Wenn der Ton während der Verwendung eines Bluetooth-Geräts gestoppt unterbrochen wird, probieren Sie eine der folgenden Abhilfen. • Schalten Sie die Stromversorgung des Receivers aus und dann wieder ein. •... -
Página 64: Andere Einstellungen
Andere Einstellungen Grundlegendes Verfahren für Typ A für Typ C Wählen Sie MODE, wählen Sie dann Rufen Sie den „Bluetooth Phone“- „Settings“. Bildschirm auf oder wählen Sie „Bluetooth Audio“ als Quelle. Wählen Sie einen Parameter. Wählen Sie „Mode“ ] „Setup“ aus Siehe „Einstellpunkte“... -
Página 65: Einstellpunkte
Einstellpunkte Sie können die folgenden Punkte im Setting-Menü ändern (_: Anfänglich): Auto Connect Microphone Level / Mic Setting Sie können das Bluetooth-Handy auf automatische Stellen Sie eine Mikrofonlautstärke ein. Verbindung einstellen, wenn der Receiver eingeschaltet Level: 1, 2 , 3 wird. -
Página 66: Störungssuche
Störungssuche Was wie eine Betriebsstörung erscheint, muss nicht immer ein ernstes Problem darstellen. Gehen Sie die folgenden Prüfpunkte durch, bevor Sie sich an den Kundendienst wenden. Symptome Abhilfe Das Bluetooth-Gerät erkennt nicht die Einheit. • Diese Einheit kann mit einem Bluetooth-Handy und einem Bluetooth-Audiogerät zur Zeit verbunden werden. -
Página 67: Technische Daten
Sie das Gerät erneut an. Das angeschlossene Audiogerät kann nicht gesteuert • Prüfen Sie, ob das angeschlossene Audiogerät AVRCP werden. unterstützt. Bluetooth-Information: Wenn Sie weitere Information über Bluetooth wünschen, besuchen Sie uns auf der JVC-Website. Technische Daten ALLGEMEINES BLUETOOTH-SEKTION Betriebsstromanforderungen: Bluetooth-Version:... - Página 68 Veuillez lire attentivement toutes les instructions avant d’utiliser l’appareil afin de bien comprendre son fonctionnement et d’obtenir les meilleures performances possibles. Précautions: Tout changement ou modification non approuvé par JVC peut annuler l’autorité de l’utilisateur d’utiliser l’appareil. Informations relatives à l’élimination des appareils usagés, à l’intention des utilisateurs Lorsque ce symbole figure sur le produit, cela signifie qu’il ne doit pas être...
-
Página 69: Avertissements
être acheté chez votre revendeur d’autoradio JVC. • Cet adaptateur a été conçu spécialement pour être utilisé avec un autoradio JVC. N’utilisez pas cet adaptateur avec un autre autoradio. Précautions • Cet adaptateur est conçu pour être utilisé avec les appareil Bluetooth (téléphone cellulaire/lecteurs... -
Página 70: À Propos De Bluetooth
Victor Company of Japan, Limited • Pour faire/recevoir un appel (JVC) est faite sous licence. Les autres marques • Appel à partir du répertoire téléphonique et noms de commerce sont la propriété de leur • Appel par commande vocale propriétaire respectif. - Página 71 Sommaire Audio Bluetooth Introduction Opérations audio Bluetooth ..29 Introduction ........ 3 Sélection d’une source........29 Avertissements ..........3 Opérations de lecture ........29 Précautions ............3 À propos de Bluetooth ........4 Réglages Informations générales ........4 Pour commencer ......6 Autres réglages ......30 Installation ............6 Procédure de base ..........
-
Página 72: Pour Commencer
Pour commencer Installation Avertissement Montage de l’appareil Évitez d’installer l’adaptateur et le microphone dans les Nettoyez bien la surface choisie et fixez-y la bande endroits suivants. Velcro. – Où ils peuvent gêner une conduite en toute sécurité. Adaptateur d’interface – Où ils peuvent être exposés aux rayons directs du soleil ou à... -
Página 73: Installation Du Microphone
Installation du microphone Installez le microphone. Pour installer le pare-soleil Fixez le microphone sur l’attache du microphone. Microphone (fourni) Microphone (fournie) À l’adaptateur d’interface Fixez si nécessaire le cordon du microphone en Attache du microphone utilisant des serre-fils (non fournis). (fournie) Pour ajuster l’angle du microphone Installation sur la colonne de direction... -
Página 74: Connexion À L'autoradio
Pour commencer Connexion à l’autoradio Connexion typique Mettez l’autoradio hors tension et coupez le contact du véhicule avant de connecter ou de déconnecter l’appareil. À un autre appareil extérieur (voir ci-dessous) À partir du microphone Adaptateur d’interface Prise du changeur de CD Autoradio Cordon de signal (fourni avec ou attaché... -
Página 75: Vérification Du Type De Votre Autoradio
Vérification du type de votre autoradio Les procédures d’utilisation à travers un autoradio Exemple: type d’autoradio diffèrent en fonction du type d’autoradio. Type A Vérifiez le type de votre autoradio en vous référant au tableau ci-dessous. • Si vous répondez “Oui”, suivez •... -
Página 76: Structures De Menu
Pour commencer Structures de menu Langue des indications Dans ce manuel, les indications en anglais sont utilisées à titre d’exemple. Vous pouvez changer la langue d’affichage sur une autre langue de l’anglais avec certains autoradios. Référez-vous au manuel d’instructions fourni avec votre autoradio. Téléphone Bluetooth Dial / Dial Menu / DIAL * Choisissez la méthode pour faire un appel. -
Página 77: Audio Bluetooth
Peut être choisi uniquement quand “New Device“ est choisi. Peut être choisi uniquement quand l’appareil enregistré est choisi. Ne peut pas être choisi pour “New Device“. Si vous souhaitez recevoir plus d’informations sur le système Bluetooth, consultez le site web de JVC. Introduction... -
Página 78: Connexion Bluetooth
Connexion Bluetooth • Pour des détails sur l’utilisation du menu, référez-vous au manuel d’instruction fourni avec votre autoradio. • Les indications sur l’affichage (moniteur) et les noms des touches varient d’un autoradio à l’autre. 7: 7 / BACK ex. SOURCE: SRC MENU: AV MENU, AV Menu Bluetooth Phone: Bluetooth PHONE, BT-PHONE, New Device: New device, NEW DEVICE... - Página 79 pour le Type B Utilisez l’appareil Bluetooth pour rechercher l’autoradio. Pendant que “Bluetooth Phone” ou • Entrez le même code PIN (que vous avez “Bluetooth Audio” est choisi comme entré à l’étape ci-dessus) sur le périphérique à source, choisissez “New Device”. connecter.
- Página 80 Connexion Bluetooth Enregistrement d’un appareil Bluetooth — Pairage (suite) pour le Type B Pour connecter un périphérique disponible à l’appareil Pendant que “Bluetooth Phone” Utilisez “Search” pour établir la connexion avec un ou “Bluetooth Audio” est choisi appareil Bluetooth à partir de l’autoradio. comme source, choisissez “New Device”.
-
Página 81: Pendant Que "Bluetooth Phone" Ou "Bluetooth Audio" Est Choisi
Pour connecter un appareil spécial Utilisez les touches suivantes pour entrer le code PIN (numéro Certains périphériques Bluetooth nécessitent une procédure spéciale pour établir la connexion Bluetooth d’identification personnel) du pour la première fois Pour ces périphériques Bluetooth, périphérique à connecter. vous devez choisir le nom du périphérique avant de 4/¢: Passez sur la position d’entrée. - Página 82 Connexion Bluetooth Enregistrement d’un appareil Bluetooth — Pairage (suite) pour le Type C Pour supprimer l’appareil enregistré Vous pouvez enregistrer un maximum de cinq appareils Pendant que “Bluetooth Phone” Bluetooth. ou “Bluetooth Audio” est choisi Si vous souhaitez connecter un 6e appareil, supprimez comme source, choisissez “New un des appareils enregistrés.
-
Página 83: Connexion/Déconnexion De L'appareil
pour le Type C Connexion/déconnexion de l’appareil Pendant que “Bluetooth Phone” ou “Bluetooth Audio” est choisi Pour connecter un appareil comme source, choisissez l’appareil que manuellement vous souhaitez supprimer. Un seul appareil peut être connecté en même Appuyez sur MODE, puis choisissez temps pour chaque source (“Bluetooth Phone”... - Página 84 Connexion Bluetooth Connexion/déconnexion de l’appareil (suite) pour le Type D Pour déconnecter un appareil Vous pouvez déconnecter un appareil Bluetooth. Pendant que “Bluetooth Phone” ou “Bluetooth Audio” est choisi pour le Type A comme source, appuyer sur 4/¢ Affichez l’écran “Bluetooth Phone” pour choisir un appareil enregistré.
-
Página 85: Opérations Du Téléphone Bluetooth
Opérations du téléphone Bluetooth • Avant d’utiliser un appareil Bluetooth avec votre autoradio, connectez un appareil Bluetooth. Référez-vous à “Connexion Bluetooth” à la page 12. • Si le son est coupé ou interrompu pendant l’utilisation d’un appareil Bluetooth, essayez les remèdes suivants. -
Página 86: Appel D'un Numéro Du Répertoire Téléphonique
Opérations du téléphone Bluetooth Appel d’un numéro du répertoire téléphonique Vous pouvez appeler un numéro à partir du répertoire téléphonique du téléphone portable connecté. Avant d’utiliser cette fonction, transférer la mémoire du répertoire téléphonique du téléphone portable dans cet appareil (référez-vous au manuel d’instruction fourni avec votre téléphone portable). •... -
Página 87: Opérations Avancées
Opérations avancées Appel par commande vocale Si votre téléphone portable est muni d’un système de reconnaissance vocale, vous pouvez faire des appel par commande vocale. pour le Type A pour le Type C Maintenez la touche MODE pressée. Affichez l’écran “Bluetooth Phone”. -
Página 88: Appel D'un Numéro À Partir De L'historique Des Appels
Opérations avancées Appel d’un numéro à partir de l’historique des appels Cet appareil possède trois types d’historique d’appels — les numéros composés, les appels reçus et les appels manqués. Vous pouvez appeler un numéro en utilisant ces historiques d’appels. pour le Type A pour le Type B Affichez le menu de composition de Affichez le menu de composition de... -
Página 89: Appel Du Dernier Numéro Composé Directement - Recomposition
pour le Type C Appel du dernier numéro composé directement — Affichez le menu de composition de numéro. Recomposition Choisissez un historique d’appels. Cette fonction est disponible quand la télécommande Vous pouvez choisir un des historiques d’appels fournie avec votre autoradio possède une touche suivants;... -
Página 90: Utilisation Des Numéros Préréglés
Opérations avancées Utilisation des numéros préréglés Vous pouvez prérégler un maximum de six numéros de pour le Type C/Type D téléphone. Choisissez le numéro de téléphone que Pour mémoriser un numéro préréglé vous souhaitez prérégler à partir de la liste des numéros (Phonebook, Redial, pour le Type A Received Calls ou Missed Calls). -
Página 91: Appel Par Entrée D'un Numéro De Téléphone
Appel par entrée d’un numéro de téléphone Vous pouvez faire un appel en entrant un numéro de téléphone sur l’autoradio. pour le Type A pour le Type B Affichez le menu de composition de Affichez le menu de composition de numéro. - Página 92 Opérations avancées pour le Type C pour le Type D Affichez le menu de composition de Affichez le menu de composition de numéro. numéro. Choisissez “PHONE NUMBER”. Choisissez “NUMBER”. Appuyez sur 4/¢ /5/∞ pour Appuyez sur 4/¢, VOLUME +/– pour entrer un numéro de entrer un numéro de téléphone, puis ∞...
-
Página 93: Réception D'un Sms (Service De Messages Courts)/ Message Textuel
Réception d’un SMS Lecture d’un SMS/ (Service de messages courts)/ Message textuel message textuel Pour le Type A Si vous utilisez un téléphone portable pouvant utiliser Affichez l’écran “Bluetooth les SMS (Services de messages courts)/Messages Phone”. textuels, vous pouvez lire les messages sur l’affichage (moniteur) de l’autoradio. - Página 94 Opérations avancées pour le Type B pour le Type C Choisissez “Bluetooth” ] Appuyez sur MODE, puis choisissez “Message Menu”. “Message Menu”. Choisissez un historique de messages. Choisissez un historique de messages. Vous pouvez choisir un des historiques de Vous pouvez choisir un des historiques de messages suivants;...
-
Página 95: Opérations Audio Bluetooth
Opérations audio Bluetooth • Avant d’utiliser un appareil Bluetooth sur votre autoradio, connectez un appareil Bluetooth. Référez-vous à “Connexion Bluetooth” à la page 12. • Si le son est coupé ou interrompu pendant l’utilisation d’un appareil Bluetooth, essayez les remèdes suivants. •... -
Página 96: Autres Réglages
Autres réglages Procédure de base pour le Type A pour le Type C Appuyez sur MODE, puis choisissez Affichez l’écran “Bluetooth Phone” “Settings”. ou choisissez “Bluetooth Audio” comme source. Choisissez un élément. Choisissez “Mode” ] “Setup” à Référez-vous à “Réglages possibles” à la page partir du menu. -
Página 97: Réglages Possibles
Réglages possibles Vous pouvez changer les options suivantes dans le menu de réglage (_: Réglage initial): Auto Connect Microphone Level / Mic Setting Vous choisir de vous connecter automatiquement à Ajuste le volume d’un microphone. un appareil Bluetooth quand l’autoradio est mis sous Level: 1, 2 , 3 tension. -
Página 98: Dépannage
Dépannage Ce qui apparaît être un problème n’est pas toujours sérieux. Vérifiez les points suivants avant d’appeler un centre de service. Symptôme Remèdes L’appareil Bluetooth ne détecte pas l’autoradio. • Cet autoradio peut être connecté à un téléphone portable Bluetooth et à un appareil audio Bluetooth en même temps. -
Página 99: Spécification
L’appareil audio connecté ne peut pas être • Vérifiez si l’appareil audio connecté prend en charge commandé. AVRCP. Informations sur le système Bluetooth: Si vous souhaitez recevoir plus d’informations sur le système Bluetooth, consultez le site web de JVC. Spécifications GÉNÉRALES SECTION BLUETOOTH Alimentation:... - Página 100 Hartelijk dank voor de aanschaf van dit JVC-product! Wij verzoeken u de gebruiksaanwijzing goed door te lezen voordat u het apparaat gaat gebruiken. Zo krijgt u een volledig inzicht in de functies van het apparaat en kunt u de mogelijkheden optimaal benutten.
- Página 101 GEAARDE AUTO’S. Indien uw auto geen 12 Volt, negatief geaard systeem gebruikt, is het gebruik van een voltage-adapter vereist en deze kan bij uw JVC auto-audiohandelaar worden aangeschaft. • Deze adapter is ontworpen voor exclusief gebruik met JVC auto-receivers. Gebruik deze adapter niet met andere auto-receivers.
-
Página 102: Algemene Informatie
• Bellen vanuit het telefoonboek markeringen en logo’s zijn eigendom van Bluetooth • Bellen op basis van stemcommando SIG, Inc. en Victor Company of Japan, Limited (JVC) gebruikt deze onder licentie. Overige handelsmerken • Bellen uit de gesprekken-geschiedenis en namen zijn eigendom van de overeenkomende –... - Página 103 Inhoudsopgave Introductie Bluetooth Audio Introductie ........3 Bediening van Bluetooth Waarschuwingen .......... 3 Audio ........29 Voorzorgen ........... 3 Kiezen van een bron ........29 Meer over Bluetooth ........4 Bediening voor weergave ....... 29 Algemene informatie ........4 Starten ..........6 Instellingen Installeren ............
-
Página 104: Starten
Starten Installeren Waarschuwing Bevestigen van het toestel Installeer de adapter en de microfoon niet op de Veeg het voor bevestiging gekozen oppervlak goed volgende plaatsen. schoon en bevestig het velcro-band. – Waar het een veilig besturen van de auto kan Interface-adapter hinderen. - Página 105 Installeren van de microfoon Installeer de microfoon. Installeren op de zonneklep Bevestig de microfoon op de microfoon-clip. Microfoon (bijgeleverd) Microfoon (bijgeleverd) Naar de interface-adapter Zet het microfoonsnoer indien nodig met snoerklemmen (niet bijgeleverd) vast. Microfoon-clip (bijgeleverd) Installeren op de stuurkolom Installeer de microfoon op de bovenkant van het Veranderen van de hoek van de stuurkolom.
-
Página 106: Aansluiten Op De Receiver
Starten Aansluiten op de receiver Standaard-verbinding Schakel de stroom van de receiver uit en draai de auto-contactsleutel naar de uit-stand alvorens het toestel aan te sluiten of te ontkoppelen. Naar ander extern component (zie hieronder) Van microfoon Interface-adapter CD-wisselaaraansluiting Receiver Signaalsnoer (bijgeleverd bij of bevestigd aan het externe component) •... -
Página 107: Controleren Van Het Type Van Uw Receiver
Controleren van het type van uw receiver De bedieningsprocedures via een receiver zijn Voorbeeld: type receiver verschillend afhankelijk van het type receiver. Type A Controleer het type van uw receiver aan de hand van de aanwijzingen hieronder. • Indien u “Ja” antwoordt, volg dan •... -
Página 108: Menu-Structuur
Starten Menu-structuur Taal voor aanduidingen In deze gebruiksaanwijzing worden Engelse aanduidingen voor de uitleg gebruikt. U kunt de taal voor de aanduidingen van het Engels naar een andere taal voor bepaalde receivers veranderen. Zie de bij uw receiver geleverde gebruiksaanwijzing. Bluetooth Phone Dial / Dial Menu / DIAL * Kies de methode voor het bellen. - Página 109 Uitgezonderd type D. Kan uitsluitend worden gekozen wanneer “New Device” is gekozen. Kan uitsluitend worden gekozen wanneer het geregistreerde apparaat is gekozen. Kan niet worden gekozen voor “New Device“. Ga naar de JVC website indien u meer informatie over Bluetooth wilt. Introductie...
-
Página 110: Bluetooth Verbinding
Bluetooth verbinding • Zie de bij de receiver geleverde gebruiksaanwijzing voor details aangaande de menubediening. • Aanduidingen op het display (de monitor) en namen van toetsen zijn verschillend afhankelijk van de receiver die u heeft. 7: 7 / BACK bijv. SOURCE: SRC MENU: AV MENU, AV Menu Bluetooth Phone: Bluetooth PHONE, BT-PHONE New Device: New device, NEW DEVICE... - Página 111 voor type B Gebruik de Bluetooth apparatuur om he toestel op te zoeken. Met “Bluetooth Phone” of • Voer dezelfde PIN-code in (als in de stap “Bluetooth Audio” als bron hierboven ingevoerd) op de te verbinden gekozen, kiest u “New Device”. apparatuur.
- Página 112 Bluetooth verbinding Registreren van Bluetooth apparatuur — Koppelen (vervolg) voor type B Verbinden van een beschikbaar apparaat met het toestel Met “Bluetooth Phone” of Gebruik “Search” om een verbinding met een “Bluetooth Audio” als bron Bluetooth apparaat vanaf het toestel te maken. gekozen, kiest u “New Device”.
- Página 113 Verbinden van een speciaal apparaat Gebruik de volgende toetsen voor Voor bepaalde Bluetooth apparaten moet u een het invoeren van de PIN (persoonlijk speciale procedure volgen indien u voor de eerste identificatienummer)-code van de te keer een Bluetooth verbinding wilt maken. U moet de verbinden apparatuur.
- Página 114 Bluetooth verbinding Registreren van Bluetooth apparatuur — Koppelen (vervolg) voor type C Wissen van geregistreerde apparatuur Met “Bluetooth Phone” of “Bluetooth Audio” als bron U kunt maximaal vijf Bluetooth apparaten registreren. Indien u het 6de apparaat wilt registreren, moet u eerst gekozen, kiest u “New device”.
-
Página 115: Verbinden/Ontkoppelen Van Apparatuur
voor type C Verbinden/ontkoppelen van apparatuur Met “Bluetooth Phone” of “Bluetooth Audio” als bron Handmatig verbinden van een gekozen, kiest u het te wissen, apparaat geregistreerde apparaat. U kunt voor iedere bron (“Bluetooth Phone” en Druk op MODE en kies vervolgens “Bluetooth Audio”) tegelijkertijd slechts één apparaat “Delete Pair”. - Página 116 Bluetooth verbinding Verbinden/ontkoppelen van apparatuur (vervolg) voor type D Ontkoppelen van een apparaat U kunt een Bluetooth apparaat ontkoppelen. Met “Bluetooth Phone” of “Bluetooth Audio” als bron voor type A gekozen, drukt u op 4/¢ om een Toon het “Bluetooth Phone” geregistreerd apparaat te kiezen.
-
Página 117: Bediening Voor Bluetooth Telefoon
Bediening voor Bluetooth telefoon • Alvorens gebruik van een Bluetooth apparaat met deze receiver, moet u het Bluetooth apparaat verbinden. Zie “Bluetooth verbinding” op bladzijde 12. • Neem een van de volgende maatregelen indien het geluid wordt gestopt of onderbroken tijdens het gebruik van een Bluetooth apparaat. -
Página 118: Bellen Van Een Nummer Uit Het Telefoonboek
Bediening voor Bluetooth telefoon Bellen van een nummer uit het telefoonboek U kunt een nummer uit het telefoonboek van de verbonden mobiele telefoon bellen. Alvorens gebruik van deze functie, moet u het telefoonboek-geheugen van de mobiele telefoon naar dit toestel versturen (zie de bij uw mobiele telefoon geleverde handleiding). -
Página 119: Geavanceerde Bediening
Geavanceerde bediening Bellen op basis van stemcommando Indien uw mobiele telefoon een stemherkennningssysteem heeft, kunt u een commando geven voor het bellen. voor type A voor type C Roep het “Bluetooth Phone” Houd MODE even ingedrukt. scherm op. “Say” verschijnt op het display. •... -
Página 120: Bellen Van Een Nummer Uit De Telefoongeschiedenislijst
Geavanceerde bediening Bellen van een nummer uit de telefoongeschiedenislijst Dit toestel heeft drie verschillende “geschiedenis” lijsten — nogmaals bellen, ontvangen gesprekken en gemiste gesprekken. U kunt een nummer met gebruik van deze geschiedenislijsten opbellen. voor type A voor type B Roep het belmenu op. -
Página 121: Direct Bellen Van Het Laatst Gebelde Nummer - Opnieuw Bellen
voor type C Direct bellen van het laatst gebelde nummer — Opnieuw Roep het belmenu op. bellen Kies een geschiedenislijst. U kunt een van de volgende geschiedenislijsten Deze functie kan worden gebruikt indien de bij de receiver kiezen; geleverde afstandsbediening een PHONE toets heeft. Redial: Recentelijk gebelde nummers. -
Página 122: Gebruik Van Voorkeurnummers
Geavanceerde bediening Gebruik van voorkeurnummers U kunt maximaal zes telefoonnummers vastleggen. voor type C/type D Bellen van een voorkeurnummer Kies het vast te leggen telefoonnummer uit de nummerlijst voor type A (Phonebook, Redial, Received Calls of Kies het vast te leggen Missed Calls). -
Página 123: Bellen Door Een Telefoonnummer In Te Voeren
Bellen door een telefoonnummer in te voeren U kunt een nummer bellen door het telefoonnummer met de receiver in te voeren. voor type A voor type B Roep het belmenu op. Roep het belmenu op. Kies “Phone Number”. Kies “Phone Number”. Druk op 4/¢... - Página 124 Geavanceerde bediening voor type C voor type D Roep het belmenu op. Roep het belmenu op. Kies “PHONE NUMBER”. Kies “NUMBER”. Druk op 4/¢ /5/∞ om het Druk op 4/¢, VOLUME +/– om telefoonnummer in te voeren en druk het telefoonnummer in te voeren en ∞...
-
Página 125: Ontvangst Van Sms (Short Message Service)/ Tekstboodschappen
Ontvangst van SMS Lezen van SMS/ (Short Message Service)/ Tekstboodschap Tekstboodschappen voor type A Indien uw mobiele telefoon voor SMS (Short Message Roep het “Bluetooth Phone” Service)/Tekstboodschap geschikt is, kunt u de scherm op. boodschappen op het display (de monitor) van de receiver lezen. - Página 126 Geavanceerde bediening voor type B voor type C Kies “Bluetooth” ] “Message Druk op MODE en kies vervolgens Menu”. “Message Menu”. Kies een boodschap-geschiedenislijst. Kies een boodschap-geschiedenislijst. U kunt een van de volgende geschiedenislijsten U kunt een van de volgende geschiedenislijsten kiezen;...
-
Página 127: Bediening Van Bluetooth Audio
Bediening van Bluetooth Audio • Alvorens gebruik van een Bluetooth apparaat met deze receiver, moet u het Bluetooth apparaat verbinden. Zie “Bluetooth verbinding” op bladzijde 12. • Neem een van de volgende maatregelen indien het geluid wordt gestopt of onderbroken tijdens het gebruik van een Bluetooth apparaat. -
Página 128: Overige Instellingen
Overige instellingen Basisprocedure voor type A voor type C Druk op MODE en kies vervolgens Toon het “Bluetooth Phone” “Settings”. scherm of kies “Bluetooth Audio” als bron. Kies een onderdeel. Kies “Mode” ] “Setup” van het Zie “Instelbare onderdelen” op de volgende menu. -
Página 129: Instelbare Onderdelen
Instelbare onderdelen U kunt de volgende onderdelen in het Setting menu veranderen (_: basisinstelling): Auto Connect Microphone Level / Mic Setting U kunt bepalen of een Bluetooth apparaat automatisch Stel het volume voor de microfoon in. moet worden verbonden wanneer de receiver wordt Level: 1, 2 , 3 ingeschakeld. -
Página 130: Oplossen Van Problemen
Oplossen van problemen Problemen zijn niet altijd van serieuze aard. Controleer de volgende punten alvorens een onderhoudscentrum te raadplegen. Symptomen Oplossingen Bluetooth apparatuur herkent het toestel niet. • Dit toestel kan tegelijkertijd slechts met één Bluetooth mobiele telefoon en één Bluetooth audio-apparaat worden verbonden. -
Página 131: Technische Gegevens
Verbonden audio-apparaat kan niet worden • Controleer of het verbonden audio-apparaat voor bediend. AVRCP geschikt is. Bluetooth informatie: Ga naar de JVC website indien u meer informatie over Bluetooth wilt. Technische gegevens ALGEMEEN BLUETOOTH GEDEELTE Stroomvereisten: Bluetooth versie:... -
Página 132: Información Para Los Usuarios Sobre La Eliminación De Equipos Usados
– Consulte a su distribuidor o a un técnico experto en radio/televisión. Precaución: Los cambios o modificaciones no aprobados por JVC pueden anular la autoridad del usuario para operar el equipo. Información para los usuarios sobre la eliminación de equipos usados Este símbolo indica que el producto que lleva este símbolo no debe desecharse... -
Página 133: Introducción
Si su vehículo no es del tipo con negativo a masa de 12 V, se requiere de un inversor de voltaje, que se podrá adquirir en un concesionario car audio de JVC. • Este adaptador ha sido diseñado para usarse exclusivamente con los receptores para automóvil... -
Página 134: Acerca De Bluetooth
Bluetooth con su receptor, de la siguiente manera: de Bluetooth SIG, Inc., y cualquier uso de los mismos • Cómo hacer/recibir una llamada por Victor Company of Japan, Limited (JVC) se realiza • Llamando desde la guía telefónica bajo licencia. Otras marcas y nombres comerciales •... - Página 135 Contenido Bluetooth Audio Introducción Operaciones de audio Introducción ........ 3 Bluetooth ......29 Advertencias ..........3 Precauciones ..........3 Seleccionando una fuente ......29 Acerca de Bluetooth ........4 Operaciones de reproducción ......29 Información general ........4 Procedimientos iniciales ....6 Ajustes Instalación ............
-
Página 136: Procedimientos Iniciales
Procedimientos iniciales Instalación Advertencia Montaje de la unidad Evite instalar el adaptador y la unidad de micrófono en Limpie bien la superficie seleccionada, y pegue la cinta los lugares siguientes. Velcro. – Donde puedan amenazar la seguridad de conducción. Unidad de adaptador de interfaz –... -
Página 137: Instalación De La Unidad De Micrófono
Instalación de la unidad de micrófono Instale la unidad de micrófono. Para instalar en la visera Fije el micrófono en la presilla para micrófono. Unidad de micrófono (suministrada) Micrófono (suministrada) A la unidad del adaptador de interfaz Si es necesario, asegure el cable del micrófono por medio de abrazaderas (no suministradas). -
Página 138: Conexión Al Receptor
Procedimientos iniciales Conexión al receptor Conexión típica Antes de conectar o desconectar la unidad, apague el receptor y desconecte el interruptor de encendido del vehiculo. A otro componente externo (véase debajo) Desde la unidad de micrófono Unidad de adaptador de interfaz Jack del cambiador de CD Receptor... -
Página 139: Verificar Qué Tipo De Receptor Tiene
Verificar qué tipo de receptor tiene Los procedimientos operacionales a través de un Ejemplo: tipo de receptor receptor difieren según el tipo de receptor. Tipo A Verifique el tipo de receptor que tiene refiriéndose al diagrama de abajo. • Si su respuesta es “Sí”, siga •... -
Página 140: Estructuras De Los Menús
Procedimientos iniciales Estructuras de los menús Idioma para las indicaciones En este manual, se utilizan indicaciones en inglés para las explicaciones. Para algunos receptores, el idioma de las indicaciones puede cambiarse a otro distinto del inglés. Consulte también el manual de instrucciones suministrado con su receptor. - Página 141 Se puede seleccionar solamente cuando se ha seleccionado “New Device“. Se puede seleccionar solamente cuando se ha seleccionado un dispositivo registrado. No se puede seleccionar para “New Device“. Si desea obtener más información sobre Bluetooth, visite el sitio web de JVC. Introducción...
-
Página 142: Conexión Bluetooth
Conexión Bluetooth • Para obtener detalles sobre las operaciones de los menús, consulte el manual de instrucciones entregado con su receptor. • Las indicaciones en la pantalla (monitor) y los nombres de los botones varían según los distintos receptores. 7: 7 / BACK Ej. - Página 143 para el Tipo B Utilice el dispositivo Bluetooth para efectuar la búsqueda de la unidad. Mientras se encuentra seleccionado • Ingrese el mismo código PIN (que el ingresado “Bluetooth Phone” o en el paso anterior) en el dispositivo que se va a “Bluetooth Audio”...
- Página 144 Conexión Bluetooth Registrando un dispositivo Bluetooth — Apareamiento (continuación) para el Tipo B Para conectar un dispositivo disponible desde la unidad Mientras se encuentra seleccionado Utilice “Search” para establecer la conexión con un “Bluetooth Phone” o dispositivo Bluetooth desde la unidad. “Bluetooth Audio”...
- Página 145 Para conectar un dispositivo especial Utilice los siguientes botones para Algunos dispositivos Bluetooth requieren un introducir el código PIN (Número de procedimiento especial para establecer la conexión identificación personal) del dispositivo Bluetooth por primera vez Para los dispositivos que desea conectar. Bluetooth, deberá...
- Página 146 Conexión Bluetooth Registrando un dispositivo Bluetooth — Apareamiento (continuación) para el Tipo C Para borrar el dispositivo registrado Podrá registrar hasta cinco dispositivos Bluetooth. Mientras se encuentra seleccionado Si desea conectar un sexto dispositivo, deberá borrar “Bluetooth Phone” o uno de los dispositivos registrados. “Bluetooth Audio”...
-
Página 147: Conexión/Desconexión Del Dispositivo
para el Tipo C Conexión/desconexión del dispositivo Mientras se encuentra seleccionado “Bluetooth Phone” o Para conectar un dispositivo de “Bluetooth Audio” como fuente, manera manual seleccione el dispositivo registrado que Solamente se puede conectar un dispositivo a la vez desea borrar. para cada fuente (“Bluetooth Phone”... - Página 148 Conexión Bluetooth Conexión/desconexión del dispositivo (continuación) para el Tipo D Para desconectar un dispositivo Puede desconectar un dispositivo Bluetooth. Mientras se encuentra seleccionado “Bluetooth Phone” o para el Tipo A “Bluetooth Audio” como fuente, pulse 4/¢ para seleccionar un Visualice la pantalla “Bluetooth dispositivo registrado.
-
Página 149: Operaciones Del Teléfono Bluetooth
Operaciones del teléfono Bluetooth • Antes de usar un dispositivo Bluetooth con su receptor, conecte un dispositivo Bluetooth. Véase “Conexión Bluetooth” en la página 12. • Cuando el sonido cesa o se interrumpe mientras está utilizando un dispositivo Bluetooth, intente realizar las siguientes acciones correctivas. -
Página 150: Llamando Un Número De La Guía Telefónica
Operaciones del teléfono Bluetooth Llamando un número de la guía telefónica Podrá llamar un número de la guía telefónica del teléfono celular conectado. Antes de utilizar esta función, transfiera a esta unidad, la memoria de la guía telefónica del teléfono celular (consulte el manual de instrucciones entregado con su teléfono celular). -
Página 151: Operaciones Avanzadas
Operaciones avanzadas Llamando mediante comando de voz Si su teléfono celular está equipado con el sistema de reconocimiento de voz, podrá hacer una llamada con su propia voz. para el Tipo A para el Tipo C Pulse y mantenga pulsado MODE. Visualice la pantalla “Bluetooth Phone”. -
Página 152: Llamando Un Número Desde El Historial De Llamadas
Operaciones avanzadas Llamando un número desde el historial de llamadas Esta unidad dispone de tres clases de historiales de llamadas — remarcación, llamadas recibidas y llamadas perdidas. Puede llamar un número utilizando estos historiales de llamadas. para el Tipo A para el Tipo B Visualice el menú... -
Página 153: Llamando Directamente El Último Número De Llamada - Remarcación
para el Tipo C Llamando directamente el último número de llamada Visualice el menú de marcación. — Remarcación Seleccione un historial de llamada. Podrá seleccionar entre los siguientes historiales Esta función se puede utilizar cuando el control remoto de llamadas; suministrado con su receptor dispone del botón Redial: PHONE. -
Página 154: Utilización De Los Números De Ajuste Previo
Operaciones avanzadas Utilización de los números de ajuste previo Puede memorizar hasta seis números telefónicos. para el Tipo C/Tipo D Para guardar un número preajustado Seleccione el número telefónico que desea memorizar de la lista de números para el Tipo A (Phonebook, Redial, Received Calls o Seleccione el número telefónico que Missed Calls). -
Página 155: Llamando Mediante Entrada De Número Telefónico
Llamando mediante entrada de número telefónico Podrá realizar una llamada introduciendo el número telefónico en el receptor. para el Tipo A para el Tipo B Visualice el menú de marcación. Visualice el menú de marcación. Seleccione “Phone Number”. Seleccione “Phone Number”. Pulse 4/¢... - Página 156 Operaciones avanzadas para el Tipo C para el Tipo D Visualice el menú de marcación. Visualice el menú de marcación. Seleccione “PHONE NUMBER”. Seleccione “NUMBER”. Pulse 4/¢ /5/∞ para ingresar Pulse 4/¢, VOLUME +/– para un número telefónico y, a continuación, ingresar un número telefónico y, a ∞...
-
Página 157: Recibiendo Un Sms (Servicio De Mensajes Cortos)/ Mensaje De Texto
Recibiendo un SMS Leyendo un SMS/ (Servicio de mensajes cortos)/ Mensaje de texto Mensaje de texto para el Tipo A Si su teléfono celular puede usar SMS (Servicio de Visualice la pantalla “Bluetooth mensajes cortos)/Mensaje de texto, podrá leer los Phone”. - Página 158 Operaciones avanzadas para el Tipo B para el Tipo C Seleccione “Bluetooth” ] Pulse MODE y, a continuación, “Message Menu”. seleccione “Message Menu”. Seleccione un historial de mensajes. Seleccione un historial de mensajes. Podrá seleccionar uno de los siguientes historiales Podrá...
-
Página 159: Operaciones De Audio Bluetooth
Operaciones de audio Bluetooth • Antes de usar un dispositivo Bluetooth en su receptor, conecte un dispositivo Bluetooth. Véase “Conexión Bluetooth” en la página 12. • Cuando el sonido cesa o se interrumpe mientras está utilizando un dispositivo Bluetooth, intente realizar las siguientes acciones correctivas. -
Página 160: Otras Configuraciones
Otras configuraciones Procedimiento básico para el Tipo A para el Tipo C Pulse MODE y, a continuación, Visualice la pantalla “Bluetooth seleccione “Settings”. Phone” o seleccione “Bluetooth Audio” como fuente. Seleccione una opción. Seleccione “Mode” ] “Setup” en el Véase “Opciones de ajuste” en la página siguiente. menú. -
Página 161: Opciones De Ajuste
Opciones de ajuste Puede cambiar las siguientes opciones en el menú Setting (_: Inicial): Auto Connect Microphone Level / Mic Setting Puede configurar para que se conecte automáticamente Ajusta el volumen del micrófono. un teléfono celular Bluetooth al encender el receptor. Level: 1, 2 , 3 Off: No se conecta automáticamente ningún... -
Página 162: Localización De Averías
Localización de averías Lo que aparenta ser una avería podría resolverse fácilmente. Verifique los siguientes puntos antes de llamar al centro de servicio. Síntomas Soluciones El dispositivo Bluetooth no detecta la unidad. • Esta unidad sólo se puede conectar con un teléfono celular Bluetooth y un dispositivo de audio Bluetooth a la vez. -
Página 163: Características Técnicas
No se puede controlar el dispositivo de audio • Vea si el dispositivo de audio conectado es compatible conectado. con AVRCP. Información Bluetooth: Si desea obtener más información sobre Bluetooth, visite el sitio web de JVC. Características técnicas GENERAL SECCIÓN DE BLUETOOTH Requisitos de potencia: Versión de Bluetooth:... - Página 164 JVC Technology Centre Europe GmbH Postfach 10 05 52 61145 Friedberg Germania Per I’Italia: “Si dichiara che il questo prodotto di marca JVC è conforme alle prescrizioni del Decreto Ministeriale n.548 del 28/08/95 pubblicato sulla Gazzetta Ufficiale della Repubblica Italiana n.301 del 28/12/95”...
- Página 165 JVC di apparecchi per auto. • L’adattatore è stato concepito esclusivamente per essere impiegato con i ricevitori di marca JVC per automezzi. Non deve quindi essere impiegato con ricevitori di altra marca. Precauzioni •...
-
Página 166: Informazioni Generali
Bluetooth SIG, Inc. e l’uso di tali ricevitore congiuntamente alle periferiche Bluetooth marchi fatto da Victor Company of Japan, Limited per: (JVC) è concesso in licenza. Altri marchi e nomi di • Chiamare e ricevere chiamate fabbrica appartengono ai rispettivi titolari. • Chiamare dalla rubrica telefonica •... - Página 167 Indice Funzione audio Bluetooth Introduzione Uso della funzione audio Introduzione ........ 3 Bluetooth ......29 Avvertenze ............3 Precauzioni ............3 Selezione della sorgente ......... 29 Bluetooth ............4 Comandi di riproduzione ......29 Informazioni generali ........4 Per iniziare ........6 Impostazioni Installazione ............6 Collegamento al ricevitore .........8 Altre impostazioni ......30 Controllo del tipo di ricevitore in uso ....9 Struttura dei menu .........
-
Página 168: Per Iniziare
Per iniziare Installazione Attenzione Installazione dell’adattatore Si deve evitare d’installare l’adattatore e il microfono Prima di procedere con l’installazione dell’adattatore nei seguenti luoghi: è bene pulire accuratamente la superfice scelta per – Ove potrebbero compromettere la sicurezza della l’installazione ed applicarvi quindi il nastro Velcro guida. -
Página 169: Installazione Del Microfono
Installazione del microfono Applicare il microfono nel punto stabilito. Fissare innanzi tutto il microfono all’apposito supporto a graffa. Per applicarlo all’aletta parasole Microfono (in dotazione) Microfono (in dotazione) All’adattatore Qualora necessario è possibile fissare il cavo Supporto a graffa del microfono del microfono usando un fermacavo (non in (in dotazione) dotazione). -
Página 170: Collegamento Al Ricevitore
Per iniziare Collegamento al ricevitore Collegamento tipico Prima di collegare o scollegare l’adattatore è raccomandabile spegnere il ricevitore e il motore del veicolo. A un componente esterno (vedere sotto) Dal microfono Adattatore Presa del cambia CD Ricevitore Cavo dei segnali (in dotazione oppure fornito con il componente esterno) •... -
Página 171: Controllo Del Tipo Di Ricevitore In Uso
Controllo del tipo di ricevitore in uso Le modalità di utilizzo attraverso un ricevitore variano Esempio: tipo di ricevitore in base al tipo di quest’ultimo. Tipo A Per controllare il tipo di ricevitore è stato predisposto il diagramma che segue. •... -
Página 172: Struttura Dei Menu
Per iniziare Struttura dei menu Lingua delle indicazioni A puro scopo illustrativo nel presente manuale s’impiegano indicazioni in lingua inglese. Con alcuni ricevitori è possibile usare una lingua delle indicazioni diversa dall’inglese. Si prega di vedere al riguardo il manuale d’istruzioni fornito con il ricevitore in uso. Telefono Bluetooth Dial / Dial Menu / DIAL * Seleziona il metodo di esecuzione delle chiamate. -
Página 173: Funzione Audio Bluetooth
Ad esclusione del tipo D. Selezionabile soltanto quando si seleziona “New Device“. Selezionabile soltanto quando si seleziona una periferica registrata. Non selezionabile se si tratta di “New Device“. Per ottenere maggiori informazioni sulla funzione Bluetooth s’invita a visitare il sito JVC. Introduzione... -
Página 174: Connessione Bluetooth
Connessione Bluetooth • Per maggiori informazioni in merito all’impiego dei menu si prega di consultare il manuale d’istruzioni fornito con il ricevitore in uso. • Le indicazioni sul display (monitor) e i nomi dei tasti variano a seconda del ricevitore in uso. 7: 7 / BACK Es.: SOURCE: SRC MENU: AV MENU, AV Menu... - Página 175 con il tipo B Avviare dalla periferica Bluetooth la ricerca dell’unità. Quale sorgente selezionare “Bluetooth • Inserire nella periferica da connettere lo stesso Phone” o “Bluetooth Audio” e codice PIN inserito al precedente passo della quindi selezionare “New Device”. procedura. Visualizzare il menu e selezionare Sullo schermo appare “Connected (seguito “Bluetooth”...
- Página 176 Connessione Bluetooth Registrazione delle periferiche Bluetooth — Accoppiamento (continua) con il tipo B Per connettere una periferica disponibile dall’unità Quale sorgente selezionare Per stabilire la connessione di una periferica Bluetooth “Bluetooth Phone” o da quest’ultima è necessario usare il comando “Bluetooth Audio”...
- Página 177 Per connettere una periferica speciale Con i tasti di seguito riportati inserire il codice PIN (numero personale Alcune periferiche Bluetooth richiedono una procedura speciale di prima connessione. Prima di registrare le d’identificazione) della periferica da periferiche Bluetooth è necessario selezionarne il nome. connettere.
- Página 178 Connessione Bluetooth Registrazione delle periferiche Bluetooth — Accoppiamento (continua) con il tipo C Per rimuovere le periferiche registrate È possibile registrare sino a cinque periferiche Quale sorgente selezionare Bluetooth. “Bluetooth Phone” o Per connettere una sesta periferica è pertanto “Bluetooth Audio” e quindi necessario rimuovere una di quelle già...
-
Página 179: Connessione E Disconnessione Delle Periferiche
con il tipo C Connessione e disconnessione delle periferiche Quale sorgente selezionare “Bluetooth Phone” o Per connettere manualmente una “Bluetooth Audio” e quindi periferica selezionare la periferica da rimuovere. Per ciascuna sorgente è possibile connettere una Premere MODE e selezionare sola periferica alla volta (“Bluetooth Phone”... - Página 180 Connessione Bluetooth Connessione e disconnessione delle periferiche (continua) con il tipo D Per disconnettere una periferica Una volta connesse, le periferiche Bluetooth possono Quale sorgente selezionare essere disconnesse. “Bluetooth Phone” o con il tipo A “Bluetooth Audio” e quindi premere 4/¢ sino a selezionare Visualizzare lo schermo “Bluetooth una periferica registrata.
-
Página 181: Uso Del Telefono Bluetooth
Uso del telefono Bluetooth • Prima di usare le periferiche Bluetooth con il ricevitore è innanzi tutto necessario connetterle. Si prega di vedere al riguardo la sezione “Connessione Bluetooth” a pagina 12. • Se durante l’uso di una periferica Bluetooth il suono dovesse arrestarsi o subire interruzioni si suggerisce di: •... -
Página 182: Chiamata Dei Numeri Della Rubrica Telefonica
Uso del telefono Bluetooth Chiamata dei numeri della rubrica telefonica È possibile chiamare i numeri telefonici salvati nella rubrica telefonica del telefono cellulare connesso. Prima di usare questa funzione è necessario trasferire in questa unità la rubrica telefonica del cellulare (con l’ausilio del manuale d’istruzioni di quest’ultimo). -
Página 183: Operazioni Avanzate
Operazioni avanzate Chiamate con comando vocale Se il telefono cellulare in uso è provvisto della capacità di riconoscimento vocale, è possibile eseguire le chiamate con un semplice comando vocale. con il tipo A con il tipo C Visualizzare lo schermo “Bluetooth Premere a lungo MODE. -
Página 184: Chiamata Dei Numeri Dall'elenco Storico Delle Chiamate
Operazioni avanzate Chiamata dei numeri dall’elenco storico delle chiamate Questa unità dispone di tre elenchi storici di chiamata: ultime chiamate fatte, ultime chiamate ricevute e ultime chiamate mancate. Il numero desiderato può quindi essere chiamato da uno di questi tre elenchi. con il tipo A con il tipo B Aprire il menu di chiamata. -
Página 185: Richiamata Diretta Delle Ultime Chiamate Fatte - Funzione Redial
con il tipo C Richiamata diretta delle ultime chiamate fatte — Funzione Aprire il menu di chiamata. Redial Selezionare l’elenco storico desiderato. Questa funzione è disponibile esclusivamente se il Selezionare il numero desiderato da uno dei telecomando fornito con il ricevitore in uso è provvisto seguenti elenchi storici: del tasto PHONE. -
Página 186: Chiamata Dei Numeri Preimpostati
Operazioni avanzate Chiamata dei numeri preimpostati È possibile preimpostare sino a sei numeri telefonici. con i tipi C e D Per memorizzare un numero Dall’elenco dei numeri telefonici preimpostato (Phonebook, Redial, Received Calls o Missed Calls) selezionare il numero da con il tipo A impostare. -
Página 187: Chiamata Con Composizione Diretta Del Numero
Chiamata con composizione diretta del numero Le chiamate possono altresì essere eseguite componendo il numero telefonico direttamente dal ricevitore. con il tipo A con il tipo B Aprire il menu di chiamata. Aprire il menu di chiamata. Selezionare “Phone Number”. Selezionare “Phone Number”. - Página 188 Operazioni avanzate con il tipo C con il tipo D Aprire il menu di chiamata. Aprire il menu di chiamata. Selezionare “PHONE NUMBER”. Selezionare “NUMBER”. Con i tasti 4/¢ /5/∞ comporre Premere 4/¢, VOLUME +/– il numero telefonico desiderato e sino a comportre il numero e premere ∞...
-
Página 189: Ricezione Degli Sms (Servizio Messaggi Brevi) O Dei Messaggi Di Solo Testo
Ricezione degli SMS (servizio Lettura degli SMS o dei messaggi brevi) o dei messaggi messaggi di solo testo di solo testo con il tipo A Se il telefono cellulare in uso è provvisto della capacità Visualizzare lo schermo “Bluetooth SMS (servizio messaggi brevi) o di messaggistica Phone”. - Página 190 Operazioni avanzate con il tipo B con il tipo C Selezionare “Bluetooth” ] Premere MODE e selezionare “Message Menu”. “Message Menu”. Selezionare uno degli elenchi storici dei Selezionare uno degli elenchi storici dei messaggi. messaggi. È possibile selezionare uno dei seguenti elenchi: È...
-
Página 191: Uso Della Funzione Audio Bluetooth
Uso della funzione audio Bluetooth • Prima di usare le periferiche Bluetooth con il ricevitore è innanzi tutto necessario connetterle. Si prega di vedere al riguardo la sezione “Connessione Bluetooth” a pagina 12. • Se durante l’uso di una periferica Bluetooth il suono dovesse arrestarsi o subire interruzioni si suggerisce di: •... -
Página 192: Altre Impostazioni
Altre impostazioni Procedura basica con il tipo A con il tipo C Premere MODE e selezionare Visualizzare lo schermo “Bluetooth “Settings”. Phone”, oppure quale sorgente selezionare “Bluetooth Audio”. Selezionare la voce d’interesse. Dal menu selezionare “Mode” ] Si prega di vedere al riguardo la sezione “Voci “Setup”. -
Página 193: Voci D'impostazione
Voci d’impostazione Dal menu delle impostazioni è possibile impostare le seguenti funzioni (_: Valore predefinito): Auto Connect Microphone Level / Mic Setting Determina la connessione automatica di una periferica Regola il volume del microfono. Bluetooth all’accensione del ricevitore. Level: 1, 2 , 3 Off: non connette automaticamente alcuna Version... -
Página 194: Risoluzione Dei Problemi
Risoluzione dei problemi Non sempre ciò che appare essere un problema serio in realtà lo è. Prima di rivolgersi ad un centro di assistenza si suggerisce pertanto di dar seguito ai controlli indicati nella seguente tabella: Sintomo Provvedimenti La periferica Bluetooth non rileva l’unità. •... -
Página 195: Caratteristiche Tecniche
Non risulta possibile gestire la periferica audio • Verificare che la periferica sia compatibile con il profilo connessa. di connessione remota AVRCP. Informazioni sulla funzione Bluetooth: Per ottenere maggiori informazioni sulla funzione Bluetooth s’invita a visitare il sito JVC. Caratteristiche tecniche GENERALI SEZIONE BLUETOOTH Alimentazione:... - Página 196 Obrigado por ter adquirido um produto JVC. Por favor, antes de utilizar o equipamento leia todas as instruções para adquirir o total conhecimento e o melhor desempenho possível do equipamento. Informações para os Utilizadores sobre a Eliminação de Equipamento Antigo Este símbolo indica que os produtos com este símbolo não devem ser...
-
Página 197: Introdução
12 V, é preciso utilizar um inversor de voltage, que pode ser adquirido em um revendedor de componentes de áudio JVC para veículos. • Este adaptador foi desenhado para uso exclusivo com receptores de automóvel JVC. Não utilize este adaptador com nenhum outro receptor de automóvel. Precauções •... -
Página 198: Sobre Bluetooth
Victor Company of Japan, Limited • Chamada por comando de voz (JVC) está sob licença. Os outros nomes comerciais e • Fazer uma chamada desde as histórias de chamadas marcas registadas são dos seus respectivos proprietários. - Página 199 Conteúdo Áudio Bluetooth Introdução Operações de áudio Bluetooth ..29 Introdução ........3 Selecção de uma fonte ........29 Advertências ............3 Operações de leitura ........29 Precauções ............3 Sobre Bluetooth ..........4 Informação geral ..........4 Definições Preparativos iniciais ..... 6 Instalação ............6 Outras definições .......30 Conexão ao receptor ..........8 Procedimento básico ........
-
Página 200: Advertências
Preparativos iniciais Instalação Advertência Montagem da unidade Evite instalar o adaptador e o microfone nos seguintes Limpe suficientemente a superfície seleccionada e fixe lugares. a fita Velcro. – Onde possam perturbar a condução segura. Unidade do adaptador de interface – Onde fiquem expostos à luz directa do sol ou ao calor desde o aquecedor, ou em lugares extremamente quentes. -
Página 201: Para Ajustar O Ângulo Do Microfone
Instalação da unidade do microfone Instale a unidade do microfone. Para instalar no pára-sol Fixe o microfone na mola de microfone. Unidade do microfone (fornecida) Microfone (fornecida) À unidade do adaptador de interface Mola de microfone Fixe o cabo do microfone utilizando abraçadeiras (fornecida) de cabo (não fornecidas) se for necessário. -
Página 202: Conexão Ao Receptor
Preparativos iniciais Conexão ao receptor Conexão típica Desligue a alimentação do receptor e desligue a chave de ignição do veículo antes de ligar ou desligar a unidade. A outro componente externo (veja abaixo) Do microfone Unidade do adaptador de interface Tomada para CD Changer Receptor Cabo de sinal... -
Página 203: Verificação Do Tipo Do Seu Receptor
Verificação do tipo do seu receptor Os procedimentos de operação em um receptor são Exemplo: tipo do receptor diferentes dependendo do tipo do receptor. Tipo A Verifique o tipo do seu receptor no quadro abaixo. • Se a sua resposta for “Sim”, siga •... -
Página 204: Estruturas Dos Menus
Preparativos iniciais Estruturas dos menus Idioma de indicação Neste manual, as indicações em inglês são utilizadas para o propósito de explicação. Pode alterar o idioma de indicação para outro diferente do inglês para alguns receptores. Consulte o manual de instruções fornecido com o seu receptor. Telefone Bluetooth Dial / Dial Menu / DIAL * Seleccione o método para fazer uma chamada. -
Página 205: Áudio Bluetooth
Seleccionável somente quando o telefone celular é equipado com o sistema de reconhecimento de voz. Excluindo o tipo D. Seleccionável somente quando “New Device” está seleccionado. Seleccionável somente quando um dispositivo registado está seleccionado. Não seleccionável para “New Device”. Se quiser receber mais informações sobre Bluetooth, visite o site da JVC na Web. Introdução... -
Página 206: Conexão Bluetooth
Conexão Bluetooth • Para mais detalhes sobre as operações com menu, consulte o manual de instruções fornecido com o seu receptor. • As indicações no visor (monitor) e nomes dos botões variam de acordo com os receptores. 7: 7 / BACK ex. - Página 207 para Tipo B Utilize o dispositivo Bluetooth para buscar o aparelho. Enquanto “Bluetooth Phone” ou • Introduza o mesmo código PIN (introduzido no “Bluetooth Audio” estiver seleccionado passo acima) no dispositivo a ser ligado. como a fonte, seleccione “New Device”. “Connected (e o nome do dispositivo)”...
- Página 208 Conexão Bluetooth Registo de um dispositivo Bluetooth — Emparelhamento (continuação) para Tipo B Para ligar uma dispositivo disponível desde o aparelho Enquanto “Bluetooth Phone” Utilize “Search” para estabelecer uma conexão com ou “Bluetooth Audio” estiver um dispositivo Bluetooth desde o aparelho. seleccionado como a fonte, seleccione “New Device”.
- Página 209 Para ligar um dispositivo especial Utilize os seguintes botões para introduzir o código PIN (Personal Alguns dispositivos Bluetooth requerem procedimentos especiais para estabelecer uma conexão Bluetooth pela Identification Number) do dispositivo a primeira vez É preciso seleccionar o nome do dispositivo ser ligado.
- Página 210 Conexão Bluetooth Registo de um dispositivo Bluetooth — Emparelhamento (continuação) para Tipo C Para apagar um dispositivo registado Pode registar até cinco dispositivos Bluetooth. Enquanto “Bluetooth Phone” Se quiser ligar um 6º dispositivo, apague um dos ou “Bluetooth Audio” estiver dispositivos registados.
-
Página 211: Conexão/Desconexão Do Dispositivo
para Tipo C Conexão/Desconexão do dispositivo Enquanto “Bluetooth Phone” ou “Bluetooth Audio” estiver Para ligar um dispositivo manualmente seleccionado como a fonte, seleccione Somente um dispositivo pode ser ligado de uma vez para o dispositivo registado que deseja cada fonte (“Bluetooth Phone” e “Bluetooth Audio”). apagar. - Página 212 Conexão Bluetooth Conexão/Desconexão do dispositivo (continuação) para Tipo D Para desligar um dispositivo Pode desligar um dispositivo Bluetooth. Enquanto “Bluetooth Phone” para Tipo A ou “Bluetooth Audio” estiver seleccionado como a fonte, prima Visualize o ecrã “Bluetooth Phone” 4/¢ para seleccionar um ou seleccione “Bluetooth Audio”...
-
Página 213: Operações Com Telefones Bluetooth
Operações com telefones Bluetooth • Antes de utilizar um dispositivo Bluetooth com o seu receptor, ligue um dispositivo Bluetooth. Consulte “Conexão Bluetooth” na página 12. • Quando o som for parado ou interrompido durante a utilização de um dispositivo Bluetooth, tente as seguintes medidas correctivas. -
Página 214: Chamada De Um Número Na Lista Telefónica
Operações com telefones Bluetooth Chamada de um número na lista telefónica Pode chamar um número da lista telefónica no telefone celular ligado. Antes de utilizar esta função, transfira a memória da lista telefónica do telefone celular para este aparelho (Consulte o manual de instruções fornecido com o seu telefone celular). -
Página 215: Operações Avançadas
Operações avançadas Chamada por comando de voz Se o seu telefone celular é equipado com um sistema de reconhecimento de voz, pode fazer uma chamada verbalmente. para Tipo A para Tipo C Mantenha MODE premido. Visualize o ecrã “Bluetooth Phone”. “Say”... -
Página 216: Chamada De Um Número Da História De Chamadas
Operações avançadas Chamada de um número da história de chamadas Este aparelho tem três tipos de histórias de chamadas — remarcação, chamadas recebidas e chamadas não atendidas. Pode chamar um número utilizando essas histórias de chamadas. para Tipo A para Tipo B Visualize o menu de marcação. -
Página 217: Chamada Do Número Da Última Chamada Directamente - Remarcação
para Tipo C Chamada do número da última chamada directamente — Visualize o menu de marcação. Remarcação Seleccione uma história de chamadas. Pode seleccionar entre as seguintes histórias de Esta função está disponível quando o telecomando chamadas; fornecido com o seu receptor tem um botão PHONE. Redial: Chamadas feitas recentemente. -
Página 218: Utilização Dos Botões Predefinidos
Operações avançadas Utilização dos botões predefinidos para Tipo C/Tipo D Pode predefinir até seis números de telefone. Para armazenar um número Seleccione o número de telefone que predefinido deseja predefinir da lista de números (Phonebook, Redial, Received Calls ou para Tipo A Missed Calls). -
Página 219: Chamada Introduzindo Um Número De Telefone
Chamada introduzindo um número de telefone Pode fazer uma chamada introduzindo um número de telefone no receptor. para Tipo A para Tipo B Visualize o menu de marcação. Visualize o menu de marcação. Seleccione “Phone Number”. Seleccione “Phone Number”. Prima 4/¢ /5/∞ para introduzir Introduza um número de telefone. - Página 220 Operações avançadas para Tipo C para Tipo D Visualize o menu de marcação. Visualize o menu de marcação. Seleccione “PHONE NUMBER”. Seleccione “NUMBER”. Prima 4/¢ /5/∞ para introduzir Prima 4/¢, VOLUME +/– para um número de telefone e, em seguida, introduzir um número de telefone e, ∞...
-
Página 221: Recepção De Uma Mensagem Sms (Short Message Service)/Mensagem De Texto
Recepção de uma mensagem Leitura de uma mensagem SMS/ SMS (Short Message Service)/ Mensagem de texto Mensagem de texto para Tipo A Se o seu telefone celular pode utilizar SMS (Short Visualize o ecrã “Bluetooth Message Service)/Mensagem de texto, pode ler as Phone”. - Página 222 Operações avançadas para Tipo B para Tipo C Seleccione “Bluetooth” ] Prima MODE e, em seguida, “Message Menu”. seleccione “Message Menu”. Seleccione uma história de mensagens. Seleccione uma história de mensagens. Pode seleccionar uma das seguintes histórias de Pode seleccionar uma das seguintes histórias de mensagens;...
-
Página 223: Operações De Áudio Bluetooth
Operações de áudio Bluetooth • Antes de utilizar um dispositivo Bluetooth com o seu receptor, ligue um dispositivo Bluetooth. Consulte “Conexão Bluetooth” na página 12. • Quando o som for parado ou interrompido durante a utilização de um dispositivo Bluetooth, tente as seguintes medidas correctivas. -
Página 224: Outras Definições
Outras definições Procedimento básico para Tipo A para Tipo C Prima MODE e, em seguida, Visualize o ecrã “Bluetooth Phone” “Settings”. ou seleccione “Bluetooth Audio” como a fonte. Seleccione um item. Seleccione “Mode” ] “Setup” do Consulte “Itens de definição” na página seguinte. menu. -
Página 225: Itens De Definição
Itens de definição Pode alterar os seguintes itens no menu Setting (_: inicial): Auto Connect Microphone Level / Mic Setting Pode configurar o receptor para um dispositivo Ajuste o volume do microfone. Bluetooth quando o mesmo for ligado. Level: 1, 2 , 3 Off: Nenhum dispositivo é... -
Página 226: Localização E Solução De Problemas
Localização e solução de problemas Nem sempre o que parece ser um problema é realmente um problema. Verifique os seguintes pontos antes de chamar um centro de serviço. Sintomas Soluções O dispositivo Bluetooth não detecta o aparelho. • Este aparelho só pode ser ligado com um telefone celular Bluetooth e um dispositivo de áudio Bluetooth por vez. -
Página 227: Especificações
O dispositivo de áudio ligado não pode ser • Verifique se o dispositivo de áudio ligado suporta controlado. AVRCP. Informação Bluetooth: Se quiser receber mais informações sobre Bluetooth, visite o site da JVC na Web. Especificações GENERALIDADES SECÇÃO DA FUNÇÃO BLUETOOTH Requisitos de energia: Versão Bluetooth:... - Página 229 Εισαγωγή Εισαγωγή...
- Página 230 Εισαγωγή...
- Página 231 Περιεχόμενα Bluetooth Ήχου Εισαγωγή ......29 Ρυθμίσεις ........31 Σύνδεση Άλλα Τηλέφωνο Bluetooth Εισαγωγή...
- Página 232 Γρήγορα αποτελέσματα...
- Página 233 Εισαγωγή...
- Página 234 Γρήγορα αποτελέσματα Συγκρότημα προσαρμογέα διασύνδεσης ∆έκτης...
- Página 235 Tύπος A Tύπος Β Tύπος A Tύπος Β Tύπος C Tύπος C Tύπος D Tύπος D Εισαγωγή...
- Página 236 Γρήγορα αποτελέσματα...
- Página 237 Εισαγωγή...
- Página 238 Σύνδεση Bluetooth 7: 7 / BACK SOURCE: SRC MENU: AV MENU, AV Menu Bluetooth Phone: Bluetooth PHONE, BT-PHONE New Device: New device, NEW DEVICE Τύπος A Bluetooth Phone Bluetooth Audio Τύπος A 5 ∞ Device MENU Mode ] Open 4 ¢ 5 ∞ Bluetooth Audio Τύπος...
- Página 239 Τύπος Β Bluetooth Phone Bluetooth Audio New Device Bluetooth ] Open Connected Τύπος D Bluetooth Phone Bluetooth 4 ¢ Audio ∞ OPEN 4 ¢ VOLUME +/– Connected ∞: Τύπος C Bluetooth Phone Bluetooth Audio New Device MODE Open 4 ¢ CONNECT 5 ∞...
- Página 240 Σύνδεση Bluetooth Τύπος Β Search Bluetooth Phone Bluetooth Audio New Device Τύπος A Bluetooth ] Search Bluetooth Phone Bluetooth Audio 5 ∞ Device Mode ] Search Connected 4 ¢ 5 ∞ Τύπος C Bluetooth Phone Connect Bluetooth Audio 5 ∞ 4 ¢...
- Página 241 4 ¢ 5 ∞ Τύπος A Bluetooth Phone Bluetooth Connected Audio 5 ∞ Τύπος D Device Bluetooth Phone Bluetooth Mode ] Special 4 ¢ Audio Device ∞ SEARCH Open Search Τύπος Β Bluetooth Phone Bluetooth Audio New device 4 ¢ VOLUME +/–...
- Página 242 Σύνδεση Bluetooth Τύπος C Bluetooth Phone Bluetooth Audio New Device MODE Τύπος A Special Device Bluetooth Phone Bluetooth Audio 5 ∞ Open Search Mode ] Delete Pair Τύπος D Bluetooth Phone Bluetooth Audio 4 ¢ Τύπος Β ∞ SPECIAL Bluetooth Phone Bluetooth Audio OPEN Bluetooth ] Delete...
- Página 243 Τύπος C Bluetooth Phone Bluetooth Audio MODE Τύπος A Delete Pair Bluetooth Phone Bluetooth Audio 5 ∞ Τύπος D Mode ] Connection Bluetooth Phone Bluetooth Audio 4 ¢ Τύπος Β Bluetooth ∞ Phone Bluetooth Audio DELETE Bluetooth ] Connect Τύπος C Bluetooth Phone Bluetooth Audio...
- Página 244 Σύνδεση Bluetooth Τύπος D Bluetooth Phone Τύπος A Bluetooth Audio 4 ¢ Bluetooth Phone Bluetooth Audio ∞ Mode ] CONNECT Disconnection Τύπος Β Μπορείτε να συνδέσετε αυτόματα το κινητό τηλέφωνο Bluetooth όταν είναι ενεργοποιημένος ο δέκτης. Bluetooth Phone Βλ. “Auto Connect”, στη σελίδα 31. Bluetooth Audio Bluetooth ] Disconnect...
-
Página 245: Bluetooth Phone
Λειτουργίες τηλεφώνου Bluetooth 7: 7 / BACK SOURCE: SRC MENU: AV MENU, AV Menu Bluetooth Phone: Bluetooth PHONE, BT-PHONE New Device: New device, NEW DEVICE Receiving Call Bluetooth Phone Τύπος A Tύπος A MENU /ATT +/– PHONE MAP SRC Τύπος B/Τύπος C/Τύπος D Τύπος... - Página 246 Λειτουργίες τηλεφώνου Bluetooth Τύπος A Τύπος C Phonebook Phonebook Τύπος Β Τύπος D Phonebook PH BOOK ∞...
- Página 247 Προηγμένες λειτουργίες Τύπος A Τύπος C Bluetooth Phone ΜODE MENU Voice Voice Error Error Τύπος D Τύπος Β ΜODE MENU Name VOICE ERROR Voice Dialing Error Τηλέφωνο Bluetooth...
- Página 248 Προηγμένες λειτουργίες Τύπος A Τύπος Β...
- Página 249 Τύπος C Στο τηλεχειριστήριο μόνο PHONE PHONE Τύπος D Τύπος A /ATT +/– ∞ MAP SRC Τύπος B/Τύπος C/Τύπος D /ATT VOL +/– Μοντέλο με πίνακα αφής Receiving Call Τηλέφωνο Bluetooth...
- Página 250 Προηγμένες λειτουργίες Τύπος C/Tύπος D Τύπος A Τύπος A/Τύπος B 5 ∞ Μοντέλο με πίνακα αφής Τύπος B Τύπος C/Tύπος D Μοντέλο με πίνακα αφής...
- Página 251 Τύπος A Τύπος Β Phone Number Phone Number 4 ¢ 5 ∞ Dial 4 ¢ 5 ∞: ENT: Μπορείτε να αποθηκεύσετε τον αριθμό τηλεφώνου που εισάγατε στη λίστα προεπιλεγμένων αριθμών. Πιέστε και κρατήστε πιεσμένο το πλήκτρο ENT ή πιέστε “PRESET” στον πίνακα αφής για να εμφανιστεί η λίστα Μπορείτε...
-
Página 252: Phone Number
Προηγμένες λειτουργίες Τύπος C Τύπος D PHONE NUMBER NUMBER 4 ¢ 5 ∞ 4 ¢ VOLUME + – ∞ 4 ¢: 4 ¢: VOLUME +/– 5 ∞ Μπορείτε να αποθηκεύσετε τον αριθμό τηλεφώνου που εισάγατε στη λίστα προεπιλεγμένων αριθμών. Πιέστε και Μπορείτε... - Página 253 Τύπος A Bluetooth Phone Mode ] Message Receiving Message/ Receiving MSG/RCV MSG Τύπος A/Τύπος B Τύπος C Τύπος D RCV MSG Unread Μπορείτε να ρυθμίσετε το δέκτη ώστε να αγνοεί την άφιξη του μηνύματος κατά τη λήψη SMS/Μηνύματος κειμένου. Ανατρέξτε στην ενότητα “Message Info” στη σελίδα 31. Τηλέφωνο...
- Página 254 Προηγμένες λειτουργίες Τύπος C Τύπος Β Bluetooth ] MODE Message Menu Message Menu Τύπος D...
-
Página 255: Bluetooth Audio
Λειτουργίες Bluetooth Ήχου 7: 7 / BACK SOURCE SRC Bluetooth Audio Bluetooth AUDIO, BT-AUDIO Τύπος A/Τύπος B Bluetooth Audio Τύπος A ¢: Bluetooth Audio Τύπος C Bluetooth Audio Τύπος B/Τύπος C/Τύπος D ¢ Bluetooth Audio Τύπος D SOURCE Bluetooth Audio ¢... - Página 256 Άλλες ρυθμίσεις Τύπος C Τύπος A MODE Bluetooth Settings Phone Bluetooth Audio Mode ] Setup 5 ∞ Τύπος D 5 ∞ ENT: Bluetooth Phone Τύπος Β Bluetooth Audio ∞ 4 ¢ SETTINGS Bluetooth ] Settings VOLUME +/– ∞:...
- Página 257 Level 1, 2 , 3 Last Order Reject Auto Manual Ρυθμίσεις...
-
Página 258: Αντιμετώπιση Προβλημάτων
Αντιμετώπιση προβλημάτων Μερικές φορές το πρόβλημα που παρουσιάζεται δεν είναι τόσο σοβαρό όσο φαίνεται εκ πρώτης όψεως. Προτού απευθυνθείτε σε κέντρο σέρβις, ελέγξτε τα ακόλουθα σημεία. Συμπτώματα Διορθωτικές ενέργειες Η συσκευή Bluetooth δεν ανιχνεύει τη μονάδα. • Η μονάδα αυτή μπορεί να συνδεθεί με ένα κινητό τηλέφωνο... - Página 259 Δεν είναι δυνατός ο χειρισμός της συνδεδεμένης • Ελέγξτε αν η συνδεδεμένη συσκευή ήχου υποστηρίζει συσκευής ήχου. το προφίλ AVRCP. Πληροφορίες σχετικά με το Bluetooth: Αν επιθυμείτε να λάβετε περισσότερες πληροφορίες σχετικά με το Bluetooth, επισκεφτείτε την ιστοσελίδα της JVC. Προδιαγραφές ΓΕΝΙΚΑ ΤΜΗΜΑ BLUETOOTH Απαιτήσεις ρεύματος: Έκδοση...
- Página 260 ขอขอบพระคุ ณ ที ่ เ ลื อ กซื ้ อ ผลิ ต ภั ณ ฑ์ ข อง JVC กรุ ณ าอ่ า นคำแนะนำทั ้ ง หมดโดยละเอี ย ดก่ อ นการใช้ ง าน เพื ่ อ ให้ เ ข้ า ใจชั ด เจน และเพื ่ อ ให้ ไ ด้ ร ั บ ประสิ ท ธิ ภ าพสู ง สุ ด ในการใช้ ง านผลิ ต ภั ณ ฑ...
- Página 261 • อะแดปเตอร์ น ี ้ ไ ด้ ร ั บ การออกแบบให้ ใ ช้ ก ั บ อุ ป กรณ์ ร ั บ สั ญ ญาณในรถยนต์ ข อง JVC เท่ า นั ้ น อย่ า ใช้ อ ะแดปเตอร์ น ี ้ ก ั บ...
- Página 262 • อะแดปเตอร์ น ี ้ ร องรั บ เฉพาะอุ ป กรณ์ ร ั บ สั ญ ญาณในรถยนต์ ข อง JVC ที ่ พ ร้ อ มใช้ ง าน Bluetooth เท่ า นั ้ น • โปรดอ่ า นรายชื ่ อ (รวมอยู ่ ใ นกล่ อ ง) เพื ่ อ ดู ป ระเทศที ่ ค ุ ณ...
- Página 263 สารบั ญ การใช้ ง านระบบเสี ย ง Bluetooth บทนำ การใช้ ง านระบบเสี ย ง Bluetooth ..29 บทนำ ..........3 การเลื อ กแหล่ ง สั ญ ญาณ ........29 คำเตื อ น ...............3 การใช้ ง านการเล่ น ...........29 ข้ อ ควรระวั ง เบื ้ อ งต้ น ..........3 เกี...
-
Página 264: คำเตื อ น
การเริ ่ ม ต้ น ใช้ ง าน การติ ด ตั ้ ง คำเตื อ น การติ ด ตั ้ ง เครื ่ อ ง หลี ก เลี ่ ย งการติ ด ตั ้ ง ชุ ด อะแดปเตอร์ แ ละไมโครโฟนในบริ เ วณ เช็... - Página 265 การติ ด ตั ้ ง ชุ ด ไมโครโฟน ติ ด ตั ้ ง ชุ ด ไมโครโฟน เมื ่ อ ติ ด ตั ้ ง ที ่ แ ผ่ น บั ง แดด ติ ด ไมโครโฟนกั บ ตั ว หนี บ ไมค์ ชุ...
-
Página 266: การเชื ่ อ มต่ อ กั บ เครื ่ อ งรั บ สั ญ ญาณ
การเริ ่ ม ต้ น ใช้ ง าน การเชื ่ อ มต่ อ กั บ เครื ่ อ งรั บ สั ญ ญาณ การเชื ่ อ มต่ อ แบบทั ่ ว ไป ปิ ด เครื ่ อ งรั บ สั ญ ญาณและปิ ด สวิ ต ช์ ส ตาร์ ท รถยนต์ ก ่ อ นเชื ่ อ มต่ อ หรื อ ปลดการเชื ่ อ มต่ อ กั บ เครื ่ อ งนี ้ ต่... -
Página 267: ตรวจสอบประเภทของเครื ่ อ งรั บ สั ญ ญาณ
การตรวจสอบประเภทของเครื ่ อ งรั บ สั ญ ญาณ ขั ้ น ตอนการทำงานผ่ า นทางเครื ่ อ งรั บ สั ญ ญาณจะแตกต่ า งกั น ตั ว อย่ า ง: ประเภทของเครื ่ อ งรั บ สั ญ ญาณ ขึ ้ น อยู ่ ก ั บ ประเภทของเครื ่ อ งรั บ สั ญ ญาณ ประเภท... -
Página 268: โครงสร้ า งเมน
การเริ ่ ม ต้ น ใช้ ง าน โครงสร้ า งเมนู ภาษาที ่ ร ะบุ ในคู ่ ม ื อ นี ้ ใช้ ก ารระบุ ด ้ ว ยภาษาอั ง กฤษเพื ่ อ จุ ด ประสงค์ ใ นการขยายความ คุ ณ สามารถเปลี ่ ย นภาษาที ่ ร ะบุ เ ป็ น ภาษาอื ่ น ที ่ ไ ม่ ใ ช่ ภ าษาอั งกฤษ... - Página 269 สามารถเลื อ กได้ เ มื ่ อ มี ก ารเลื อ กอุ ป กรณ์ ท ี ่ ล งทะเบี ย นไว้ แ ล้ ว เท่ า นั ้ น ไม่ ส ามารถเลื อ กได้ ส ำหรั บ “New Device” หากคุ ณ ต้ อ งการทราบข้ อ มู ล เพิ ่ ม เติ ม เกี ่ ย วกั บ Bluetooth โปรดเยี ่ ย มชมเว็ บ ไซต์ JVC ของเรา บทนำ...
-
Página 270: การเชื ่ อ มต่ อ Bluetooth
การเชื ่ อ มต่ อ Bluetooth • สำหรั บ รายละเอี ย ดเกี ่ ย วกั บ การใช้ เ มนู โปรดดู ค ู ่ ม ื อ คำแนะนำที ่ ใ ห้ ม าพร้ อ มกั บ เครื ่ อ งรั บ ของคุ ณ •... - Página 271 สำหรั บ ประเภท B ใช้ อ ุ ป กรณ์ Bluetooth เพื ่ อ ค้ น หาเครื ่ อ ง • ป้ อ นรหั ส PIN เดี ย วกั น (ที ่ ป ้ อ นในขั ้ น ตอนข้ า งต้ น ) ขณะที...
-
Página 272: การลงทะเบี ย นอุ ป กรณ์ Bluetooth - การจั บ ค
การเชื ่ อ มต่ อ Bluetooth การลงทะเบี ย นอุ ป กรณ์ Bluetooth — การจั บ คู ่ (ต่ อ ) ในการเชื ่ อ มต่ อ กั บ อุ ป กรณ์ ท ี ่ ว ่ า งอยู ่ จ ากเครื ่ อ ง สำหรั... - Página 273 การเชื ่ อ มต่ อ กั บ อุ ป กรณ์ พ ิ เ ศษ ใช้ ป ุ ่ ม ต่ อ ไปนี ้ เ พื ่ อ ป้ อ นรหั ส PIN (หมายเลขระบุ เ ครื ่ อ ง) ของอุ ป กรณ์ ท ี ่ จ ะเชื ่ อ มต่ อ อุ...
- Página 274 การเชื ่ อ มต่ อ Bluetooth การลงทะเบี ย นอุ ป กรณ์ Bluetooth — การจั บ คู ่ (ต่ อ ) สำหรั บ ประเภท C การลบอุ ป กรณ์ ท ี ่ ล งทะเบี ย นไว้ คุ ณ สามารถลงทะเบี ย นอุ ป กรณ์ Bluetooth ได้ ถ ึ ง 5 เครื ่ อ ง ขณะที...
-
Página 275: การเชื ่ อ มต่ อ /ตั ด การเชื ่ อ มต่ อ อุ ป กรณ
สำหรั บ ประเภท C การเชื ่ อ มต่ อ /ตั ด การเชื ่ อ มต่ อ อุ ป กรณ์ ขณะที ่ เ ลื อ ก “Bluetooth Phone” หรื อ การเชื ่ อ มต่ อ กั บ อุ ป กรณ์ ด ้ ว ยตนเอง “Bluetooth Audio”... - Página 276 การเชื ่ อ มต่ อ Bluetooth การเชื ่ อ มต่ อ /ตั ด การเชื ่ อ มต่ อ อุ ป กรณ์ ( ต่ อ ) สำหรั บ ประเภท D การตั ด การเชื ่ อ มต่ อ กั บ อุ ป กรณ์ คุ...
-
Página 277: การใช้ ง านโทรศั พ ท์ Bluetooth
การใช้ ง านโทรศั พ ท์ Bluetooth • ก่ อ นที ่ ค ุ ณ จะใช้ อ ุ ป กรณ์ Bluetooth กั บ เครื ่ อ งรั บ ให้ เ ชื ่ อ มต่ อ อุ ป กรณ์ Bluetooth โปรดดู ท ี ่ “การเชื ่ อ มต่ อ Bluetooth” ที... -
Página 278: การโทรโดยใช้ ห มายเลขในสมุ ด โทรศั พ ท
การทำงานพื ้ น ฐาน การโทรโดยใช้ ห มายเลขในสมุ ด โทรศั พ ท์ คุ ณ สามารถโทรออกโดยใช้ ห มายเลขในสมุ ด โทรศั พ ท์ ใ นโทรศั พ ท์ เ ซลลู ล าร์ ก่ อ นที ่ ค ุ ณ จะใช้ ฟ ั ง ก์ ช ั น นี ้ ให้ ถ ่ า ยโอนหน่ ว ยความจำสมุ ด โทรศั พ ท์ ข องโทรศั พ ท์ เ ซลลู ล าร์ ไ ปยั ง อุ ป กรณ์ น ี ้ (โปรดดู ค ู ่ ม ื อ คำแนะนำที ่ ใ ห้ ม า พร้... -
Página 279: การทำงานขั ้ น สู ง
การทำงานขั ้ น สู ง โทรออกโดยใช้ เ สี ย งสั ่ ง งาน ถ้ า โทรศั พ ท์ เ ซลลู ล าร์ ข องคุ ณ มี ร ะบบจดจำเสี ย งติ ด ตั ้ ง ไว้ คุ ณ จะสามารถโทรออกโดยใช้ เ สี ย งพู ด ของคุ ณ สำหรั... -
Página 280: การโทรโดยใช้ ห มายเลขจากประวั ต ิ ก ารโทร
การทำงานขั ้ น สู ง การโทรโดยใช้ ห มายเลขจากประวั ต ิ ก ารโทร อุ ป กรณ์ น ี ้ ม ี ป ระวั ต ิ ก ารโทรสามชนิ ด — เรี ย กซ้ ำ , เบอร์ ท ี ่ ร ั บ สาย และเบอร์ ท ี ่ ไ ม่ ไ ด้ ร ั บ สาย คุ ณ สามารถโทรออกโดยใช้ ป ระวั ต ิ ก าร โทรเหล่... -
Página 281: การโทรโดยใช้ ห มายเลขที ่ โ ทรออกล่ า สุ ด โดยตรง
การโทรโดยใช้ ห มายเลขที ่ โ ทรออกล่ า สุ ด สำหรั บ ประเภท C โดยตรง— เรี ย กซ้ ำ แสดงเมนู โ ทรออก ฟั ง ก์ ช ั น นี ้ ใ ช้ ไ ด้ เ มื ่ อ รี โ มทคอนโทรลที ่ ม าพร้ อ มกั บ เครื ่ อ งรั บ มี ป ุ ่ ม เลื... -
Página 282: การใช้ ห มายเลขที ่ ก ำหนดไว้ ล ่ ว งหน้ า
การทำงานขั ้ น สู ง การใช้ ห มายเลขที ่ ก ำหนดไว้ ล ่ ว งหน้ า สำหรั บ ประเภท C/ประเภท D คุ ณ สามารถตั ้ ง เบอร์ โ ทรศั พ ท์ ล ่ ว งหน้ า ได้ ส ู ง สุ ด หกเบอร์ การจั... -
Página 283: การโทรโดยการกดหมายเลขโทรศั พ ท
การโทรโดยการกดหมายเลขโทรศั พ ท์ คุ ณ สามารถโทรออกด้ ว ยการป้ อ นเบอร์ โ ทรศั พ ท์ บ นเครื ่ อ งรั บ สำหรั บ ประเภท A สำหรั บ ประเภท B แสดงเมนู โ ทรออก แสดงเมนู โ ทรออก เลื อ ก “Phone Number” เลื อ ก “Phone Number” กด... - Página 284 การทำงานขั ้ น สู ง สำหรั บ ประเภท C สำหรั บ ประเภท D แสดงเมนู โ ทรออก แสดงเมนู โ ทรออก เลื อ ก “PHONE NUMBER” เลื อ ก “NUMBER” กด 4/¢ /5/∞ เพื ่ อ ป้ อ นเบอร์ โ ทรศั พ ท์ กด...
-
Página 285: การรั บ Sms (บริ ก ารข้ อ ความแบบสั ้ น )
การรั บ SMS/ (บริ ก ารข้ อ ความแบบสั ้ น )/ การอ่ า น SMS/ข้ อ ความตั ว อั ก ษร ข้ อ ความตั ว อั ก ษร สำหรั บ ประเภท A ถ้ า โทรศั พ ท์ เ ซลลู ล าร์ ข องคุ ณ สามารถใช้ SMS แสดงหน้... - Página 286 การทำงานขั ้ น สู ง สำหรั บ ประเภท B สำหรั บ ประเภท C เลื อ ก “Bluetooth” ] “Message กด MODE จากนั ้ น เลื อ ก “Message Menu” Menu” เลื อ กประวั ต ิ ข ้ อ ความ เลื อ กประวั ต ิ ข ้ อ ความ คุ...
-
Página 287: การใช้ ง านระบบเสี ย ง Bluetooth
การใช้ ง านระบบเสี ย ง Bluetooth • ก่ อ นที ่ ค ุ ณ จะใช้ อ ุ ป กรณ์ Bluetooth กั บ เครื ่ อ งรั บ ให้ เ ชื ่ อ มต่ อ อุ ป กรณ์ Bluetooth โปรดดู ท ี ่ “การเชื ่ อ มต่ อ Bluetooth” ที... -
Página 288: การตั ้ ง ค่ า อื ่ น ๆ
การตั ้ ง ค่ า อื ่ น ๆ ขั ้ น ตอนพื ้ น ฐาน สำหรั บ ประเภท A สำหรั บ ประเภท C แสดงหน้ า จอ “Bluetooth Phone” กด MODE แล้ ว เลื อ ก “Settings” หรื อ เลื อ ก “Bluetooth Audio” เลื... -
Página 289: การตั ้ ง ค่ า รายการต่ า งๆ
การตั ้ ง ค่ า รายการต่ า งๆ คุ ณ สามารถเปลี ่ ย นรายการต่ อ ไปนี ้ ใ นเมนู ก ารตั ้ ง ค่ า (_: เริ ่ ม ต้ น ): Auto Connect Microphone Level / Mic Setting คุ ณ สามารถตั ้ ง ให้ เ ชื ่ อ มต่ อ อุ ป กรณ์ Bluetooth โดยอั ต โนมั ต ิ เ มื ่ อ ปรั... -
Página 290: การแก้ ไ ขปั ญ หา
การแก้ ไ ขปั ญ หา ปั ญ หาที ่ เ กิ ด ขึ ้ น บางครั ้ ง อาจไม่ ใ ช่ ป ั ญ หาขั ้ น ร้ า ยแรง โปรดตรวจสอบดั ง ต่ อ ไปนี ้ ก ่ อ นที ่ จ ะติ ด ต่ อ ศู น ย์ บ ริ ก าร อาการ... -
Página 291: ข้ อ มู ล จำเพาะ
• ตรวจสอบว่ า อุ ป กรณ์ เ สี ย งที ่ เ ชื ่ อ มต่ อ รองรั บ AVRCP หรื อ ไม่ ข้ อ มู ล Bluetooth หากคุ ณ ต้ อ งการทราบข้ อ มู ล เพิ ่ ม เติ ม เกี ่ ย วกั บ Bluetooth โปรดเยี ่ ย มชมเว็ บ ไซต์ JVC ของเรา ข้ อ มู ล จำเพาะ... - Página 292 EN, GE, FR, NL, SP, IT, PR, GR, TH © 2006 Victor Company of Japan, Limited 1206MNMMDWJEIN...