
Manuales relacionados para Palmer Pocket Amp ACOUSTIC


Resumen de contenidos para Palmer Pocket Amp ACOUSTIC
- Página 1 POCKET AMP ACOUSTIC USER´S MANUAL BEDIENUNGSANLEITUNG MANUEL D`UTILISATION MANUAL DE USUARIO...
-
Página 2: Preventive Measures
PREVENTIVE MEASURES 1.Please read these instructions carefully. 2.Keep all information and instructions in a safe place. 3.Follow the instructions. 4.Observe all safety warnings. Never remove safety warnings or other information from the equipment. 5.Use the equipment only in the intended manner and for the intended purpose. - Página 3 16.After connecting the equipment, check all cables in order to prevent damage or accidents, e.g., due to tripping hazards. 17.During transport, make certain that the equipment cannot fall down and possibly cause property damage and personal injuries. 18.If your equipment is no longer functioning properly, if fluids or objects have gotten inside the equipment or if it has been damaged in anot her way, switch it off immediately and unplug it from the mains outlet (if it is a powered device).
- Página 4 25.Do not step on the power cord. Make certain that the power cable does not become kinked, especially at the mains outlet and/or power adapter and the equipment connector. 26.When connecting the equipment, make certain that the power cord or power adapter is always freely accessible. Always disconnect the equipment from the power supply if the equipment is not in use or if you want to clean the equipment.
-
Página 5: Sicherheitshinweise
The lightning flash with arrowhead symbol within an equilateral triangle is intended to alert the user to the presence of uninsulated “dangerous voltage” within the product’s enclosure that may be of sufficient magnitude to constitute a risk of electrical shock. The exclamation mark within an equilateral triangle is intended to alert the user to the presence of important operating and maintenance instructions. - Página 6 3.Befolgen Sie die Anweisungen. 4.Beachten Sie alle Warnhinweise. Entfernen Sie keine Sicherheitshinweise oder andere Informationen vom Gerät. 5.Verwenden Sie das Gerät nur in der vorgesehenen Art und Weise. 6.Verwenden Sie ausschließlich stabile und passende Stative bzw. Befestigungen (bei Festinstallationen). Stellen Sie sicher, dass Wandhalterungen ordnungsgemäß...
- Página 7 17.Achten Sie beim Transport darauf, dass das Gerät nicht herunterfallen und dabei möglicherweise Sach- und Personenschäden verursachen kann. 18.Wenn Ihr Gerät nicht mehr ordnungsgemäß funktioniert, Flüssigkeiten oder Gegenstände in das Geräteinnere gelangt sind, oder das Gerät anderweitig beschädigt wurde, schalten Sie es sofort aus und trennen es von der Netzsteckdose (sofern es sich um ein aktives Gerät handelt).
- Página 8 25.Treten Sie nicht auf das Netzkabel. Sorgen Sie dafür, dass spannungsführende Kabel speziell an der Netzbuchse bzw. am Netzadapter und der Gerätebuchse nicht geknickt werden. 26. Achten Sie bei der Verkabelung des Geräts immer darauf, dass das Netzkabel bzw. der Netzadapter stets frei zugänglich ist. Trennen Sie das Gerät stets von der Stromzuführung, wenn das Gerät nicht benutzt wird, oder Sie das Gerät reinigen möchten.
- Página 9 keine Teile, die vom Bediener repariert oder gewartet werden können. Lassen Sie Reparaturen ausschließlich von qualifiziertem Servicepersonal durchführen. Das gleichschenkelige Dreieck mit Blitzsymbol warnt vor nichtisolierten, gefährlichen Spannungen im Geräteinneren, die einen elektrischen Schlag verursachen können. Das gleichschenkelige Dreieck mit Ausrufungszeichen kennzeichnet wichtige Bedienungs- und Wartungshinweise.
-
Página 10: Mesures Préventives
MESURES PRÉVENTIVES 1.Veuillez lire attentivement ce manuel. 2.Rangez tous les documents d‘information et d‘instructions en lieu sûr. 3.Veuillez suivre toutes les instructions 4.Observez tous les messages d‘avertissement N‘enlevez pas de l‘appareil les étiquettes de sécurité ou autres informations. 5.N‘utilisez l‘appareil que pour des applications et de la façon appropriées. - Página 11 avec des matériaux, des liquides ou des gaz inflammables. 12.Vérifiez qu‘aucune projection ou liquide ne puisse s‘introduire dans l‘appareil. Ne posez sur l‘appareil aucun objet renfermant du liquide : vase, verre d‘eau... 13.Vérifiez qu‘aucun petit objet ne puisse tomber à l‘intérieur de l‘appareil.
- Página 12 l‘endommager. Ne mettez l‘appareil sous tension que lorsqu‘il est parvenu à la température de la pièce. 24.Avant de relier l‘appareil à la prise murale, vérifiez que la valeur et la fréquence de tension secteur sur laquelle il est réglé correspondent bien à la valeur et à la fréquence de la tension secteur locale.
-
Página 13: Attention Niveaux Sonores Élevés Sur Les Produits Audio
mécanisme avant d‘enlever le cordon secteur. Attention, lorsque vous retirez le câble secteur, à ne pas faire bouger l‘appareil, ce qui pourrait se traduire par un risque de chute, de blesser quelqu‘un, ou tout autre dommage. Manipulez toujours le cordon secteur avec soin. -
Página 14: Medidas De Seguridad
En tant que fabricant, Adam Hall est tenu de vous avertir formellement des risques relatifs à la santé. Risques provoqués par une exposition prolongée à des niveaux sonores élevés : Lors de l’utilisation de ce produit, il est possible d’atteindre des niveaux de pression sonore (exprimés en dB SPL) élevés, susceptibles de provoquer des dommages auditifs irréparables chez les artistes, les techniciens et le public. - Página 15 8.Evite instalar el equipo cerca de radiadores, acumuladores de calor, estufas o cualquier otra fuente de calor. Asegúrese de que el equipo esté instalado en un lugar con ventilación suficiente para evitar cualquier sobrecalentamiento. 9.No coloque sobre el equipo fuentes de llamas sin protección, por ejemplo, velas encendidas.
-
Página 16: Para Los Equipos Con Toma Eléctrica
PARA LOS EQUIPOS CON TOMA ELÉCTRICA 22.ADVERTENCIA: Si el cable eléctrico está provisto de un contacto de protección, debe conectarse a una toma eléctrica con conexión a tierra. No desactivar nunca esta conexión de protección a tierra del cable eléctrico. 23.Si el equipo ha estado expuesto a un cambio brusco de temperatura (por ejemplo, después del transporte), no lo encienda inmediatamente. - Página 17 autorizado. 29. Para desconectar completamente el equipo de la tensión eléctrica, desenchufe el cable eléctrico o el adaptador de corriente de la toma eléctrica. 30. Si el equipo dispone de un enchufe eléctrico Volex, deberá desbloquearse el Volex del equipo para desenchufarlo. Esto implica que un tirón en el cable eléctrico puede desplazar el equipo y provocar daños personales o materiales.
- Página 18 ADVERTENCIA ¡ALTO VOLUMEN! Este equipo se destina a un uso profesional. Por consiguiente, si se aplica a un uso comercial, estará sujeto a las normas y reglamentos de la Asociación para la prevención de accidentes de su sector profesional. Como fabricante, Adam Hall tiene la obligación de informar formalmente a los usuarios de la existencia de posibles riesgos para la salud.
- Página 20 EINFÜHRUNG / INTRODUCTION / INTRODUCTION / INTRODUCCIÓN EINFÜHRUNG Vielen Dank, dass Sie sich für den PALMER Acoustic Pocket Amp entschieden haben! Mit zahlreichen Funktionen und der Wahl von präsenten modernen, warmen Vintage- oder neutralen Grundsounds ist er ein echtes Allzweck-Werkzeug. Er eignet sich für Gitarren, Bässe, Banjos, Resonatorgitarren, Geigen, Cellos und...
-
Página 21: Introducción
INTRODUCCIÓN Muchas gracias por su decisión de comprar el Acoustic Pocket Amp de Palmer. Es una auténtica herramienta multiuso, pues está equipado con numerosas funciones y brinda la opción de escoger entre un sonido muy actual, un sonido clásico cálido o un soni- do de base neutro. - Página 22 SCHNELLEINSTIEG / QUICK APPLICATION GUIDE / PRÉSENTATION RAPIDE / GUÍA RÁPIDA SCHNELLEINSTIEG EFFECTS PEDAL Um den Acoustic Pocket Amp für alternative Klangeinstellungen oder Solo-Sounds zu nutzen, schließen Sie Ihr Instrument an den Eingang (17) an und verbinden den Ausgang (22) mit Ihrem Verstärker. PREAMP UND DI-BOX Zum Einsatz als Preamp und/oder DI-Box schließen Sie Ihr Instrument an den Eingang (17) an und verbinden Sie den...
- Página 23 1/4” input (17) and connect the balanced XLR output (21) to a mic input of your PA or recording mixer. Adjust the channel’s input gain and/or the Pocket Amp Acoustic volume to prevent clipping. Please refer to the user manual of your mixer.
-
Página 24: Preamplificador Y Caja De Inyección Directa
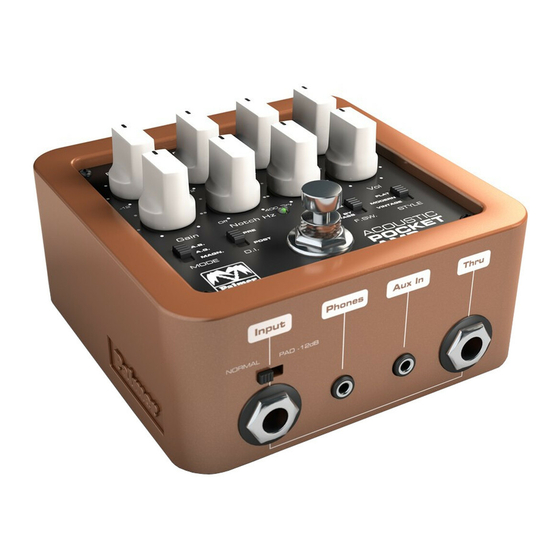
AMPLIFICATEUR D’EXERCICE Pour vous exercer avec un playback, connectez un casque ou des écouteurs à la sortie correspondante (18) et un lecteur audio (un lecteur MP3 par exemple) à l’entrée AUX (19). Réglez le vo- lume du playback depuis le lecteur audio. GUÍA RÁPIDA PEDAL DE EFECTOS Con el fin de utilizar el Acoustic Pocket Amp para ajustes de... - Página 25 ANSCHLÜSSE UND BEDIENELEMENTE / CONNECTIONS AND CONTROLS / CONNECTEURS ET CONTRÔLES / CONECTORES Y CONTROLES ANSCHLÜSSE UND BEDIENELEMENTE 1) SIGNAL- UND PEAK-ANZEIGE Diese LED leuchtet grün, wenn am Eingang ein Signal anliegt. Sie wird amberfarben, wenn Übersteuern droht und blinkt rot bei Pegelspitzen.
- Página 26 Sie die Lautstärke des Instruments oder schalten Sie auf PAD (16), um ein Übersteuern auszuschließen. Wird ein Kabel an den Eingang (17) angeschlossen, führt der Pocket Amp Acoustic eine Statusprüfung durch (LED rot, amber, grün in Folge für jeweils 3 Sekunden.
-
Página 27: Mode Selector
9) VOLUME Der VOLUME-Regler stellt die Ausgangslautstärke ein. Er ist im Bypass-Modus nicht aktiv. 10) MODE SELECTOR Der MODE-Schalter wählt präzise abgestimmte Frequenzpresets: MAGN ist für akustische Gitarren mit Magnettonabnehmern konzipiert, A.G. bewirkt eine Bassabsenkung, die u.a. für Geigen und zur Vermeidung von Korpusgeräuschen wirkungsvoll ist. -
Página 28: Led-Statusanzeige
Instrumentenwechsel geeignet. 15) LED-STATUSANZEIGE Diese LED leuchtet grün im Bypass- und Mute-Modus und rot, wenn der Pocket Amp Acoustic aktiviert ist. 16) DÄMPFUNGSSCHALTER Stellen Sie hier in Verbindung mit (1) den korrekten Eingangspegel für Ihr Instrument ein. Achten Sie darauf, dass die Signal- und Peak-Anzeige nicht dauerhaft rot leuchtet. - Página 29 Beseitigung von Rückkopplung durch tieffrequente Resonanzen. 25) FX INSERT Über diese Stereo-Klinkenbuchse können Sie zusätzliche Effekte in den Pocket Amp Acoustic einschleifen. Dazu benötigen Sie ein In- sert-Kabel Stereoklinke auf 2 Monoklinken (SEND = Spitze, RETURN = Ring, SCHIRM = Masse).
- Página 30 If it stays red lower the instrument’s volume or engage the PAD switch (16) to avoid clipping. When plugging a cable into the input (17) the Pocket Amp Acoustic performs a status check (LED red, amber, green for 3 seconds each).
- Página 31 8) BLEND The BLEND control adjusts the ratio of the direct and processed signals, in the DRY position the unprocessed signal only is present at the output.. 9) VOLUME The VOLUME control adjusts the overall output level. It is inactive when the Acoustic Pocket Amp is bypassed.
-
Página 32: On/Off Indicator
(see 12). 15) ON/OFF INDICATOR This LED lights green when the Pocket Amp Acoustic is in bypass or mute mode. It turns red when sound processing is activated. 16) PAD SWITCH Use this switch in conjunctio with (1) to set the appropriate input level for your instrument. -
Página 33: Ground Lift Switch
1/4” stereo to dual 1/4” mono plug Y-cable (SEND = tip, RETURN = ring, SHIELD = ground). 26) 9V DC INPUT For mains operation, connect a suitable optional 9V DC (min. 200 mA) power adapter to this center negative barrel jack (e.g. Palmer PW9V). - Página 34 NOTE: THE ACOUSTIC POCKET AMP SWITCHES ON AUTOMATICALLY WHEN INSERTING A ¼” JACK INTO THE UNIT’S INPUT. ALWAYS UNPLUG WHEN NOT IN USE TO AVOID BATTERY DRAIN. CONNECTEURS ET CONTRÔLES 1) AFFICHAGE SIGNAL ET CRÊTE Cette LED s’allume en vert lorsque l’entrée reçoit un signal. Elle devient couleur ambre lorsque le signal est à...
- Página 35 7) NOTCH Ce potentiomètre permet d’éliminer l’effet Larsen dû à des résonances. La fonction s’étend sur une gamme de fréquences de 20 Hz (butée gauche, OFF) à 400 Hz (butée droite). La position du milieu correspond à 90 Hz. La gamme de fréquences sélectionnée est alors abaissée sur une bande très étroite sans nuire au son général de l’instrument.
- Página 36 12) FONCTION DE COMMUTATION Vous décidez ici si le sélecteur au pied active ou désactive l’Acoustic Pocket Amp ou sélectionne THRU (20) comme sortie, auquel cas l’appareil est mis en sourdine (MUTE). Cela permet également de changer d’instrument de façon silencieuse. 13) STYLE Le commutateur STYLE sélectionne le son de base de l’Acoustic Pocket Amp.
- Página 37 18) PHONES Cette prise jack stéréo 3,5 mm permet de raccorder un casque ou des écouteurs. 19) AUX IN Cette entrée permet de connecter un lecteur audio stéréo à l’Acoustic Pocket Amp. Avant de les raccorder l’un à l’autre, réglez le volume au minimum sur le lecteur audio pour éviter tout dommage auditif.
- Página 38 LED se mantiene iluminado de color rojo durante más tiempo, disminuya el volumen del instrumento o conmute a PAD (16) para impedir la saturación. Al conectar un cable a la entrada (17) , el Pocket Amp Acoustic ejecuta una comprobación de estado (este LED se...
-
Página 39: Regulación Del Sonido
ilumina durante 3 segundos cada vez cambiando de rojo a ámbar y luego a verde). Si no hay ninguna señal de entrada, el LED permanece apagado. 2 - 5) REGULACIÓN DEL SONIDO El ecualizador de 3 bandas está diseñado especialmente para instrumentos de cuerda acústicos. -
Página 40: Función De Conmutación
9) VOLUME El regulador VOLUME permite ajustar el volumen de salida. No está activo en el modo Bypass. 10) MODE SELECTOR El conmutador de MODO selecciona presets de frecuencia adaptados con precisión: MAGN está ideado para guitarras acústicas con pastillas magnéticas;... -
Página 41: Conmutador Bypass
15) INDICADOR LED DE ESTADO Este LED se ilumina de color verde en los modos de BYPASS y MUTE, y de color rojo al activarse el Pocket Amp Acoustic. 16) CONMUTADOR DE ATENUACIÓN Con este conmutador se ajusta, en combinación con el indicador (1), el nivel de entrada correcto para su instrumento. -
Página 42: Conmutador De Polaridad
25) FX INSERT A través de esta toma jack estéreo se pueden incorporar efec- tos adicionales en el Pocket Amp Acoustic. Para ello se necesita un jack estéreo con cable de inserción en dos jacks mono (SEND = Pico, RETURN = Anillo, SCHIRM = Masa). - Página 43 9 V adecuada que puede adquirirse como accesorio (mínimo 200 mA), por ejemplo, la fuente PALMER PW9V. NOTA IMPORTANTE: EL ACOUSTIC POCKET AMP SE ENCIENDE AUTOMÁTICAMENTE AL CONECTAR UN INSTRUMENTO A LA TOMA DE ENTRADA (17). EN EL FUN- CIONAMIENTO A BATERÍA, PARA EVITAR QUE ESTA SE DESCARGUE PREMATU-...
- Página 44 SPEZIFIKATIONEN / SPECIFICATIONS / ARACTÉRISTIQUES / ESPECIFICACIONES SPEZIFIKATIONEN Produktart Gitarreneffekte Vorverstärker Anzahl Eingänge Eingangsanschlüsse 6,3 mm Klinke Eingangsimpedanz 1 M OHM Anzahl Ausgänge Ausgangsanschlüsse 6,3 MM KLINKE Ausgangsimpedanz 100 OHM (XLR) / (TRS) - 500 OHM Bedienelemente Bass, Gain, Mid Frequency, Mode, Notch, Blend, DI, Footswitch, Highs, Mid, Style, Volume Anzeigeelemente...
- Página 45 SPECIFICATIONS Product type Guitar Effects Type Preamp Inputs Input connectors 6.3 mm jack Input impedance 1 M OHM(S) Outputs Output connectors 6.3 MM JACK Output impedance 100 OHM (XLR) / (TRS) - 500 OHM(S) Controls Di, footswitch, highs, mid frequen- cy, Notch, Bass, Blend, Gain, Mid, mode, Style, volume Indicators...
- Página 46 CARACTÉRISTIQUES Type de produit Pédale d’effets pour guitares Catégorie Préamplificateur Nombre d’entrées Connecteurs d’entrée Jack 6,3 mm Impédance d’entrée 1 MΩ Nombre de sorties Connecteurs de sortie JACK 6,3 MM Impédance de sortie 100 Ω (XLR)/500 Ω (TRS) Éléments de commande Bass, Gain, Mid Frequency, Mode, Notch, Blend, DI, Footswitch, Highs, Mid, Style, Volume...
-
Página 47: Especificaciones
ESPECIFICACIONES Tipo de producto Efectos de guitarra Tipo Preamplificador Número de entradas Conectores de entrada Jack de 6,3 mm Impedancia de entrada 1 M OHM Número de salidas Conexiones de salida JACK DE 6,3 MM Impedancia de salida 100 OHM (XLR) / (TRS) - 500 OHM Mandos Bass, Gain, Mid Frequency, Mode, Notch, Blend, DI, Footswitch, Highs,... - Página 48 HERSTELLERERKLÄRUNGEN / MANUFACTURER´S DECLARATIONS / GARANTIE FABRICANT / GARANTÍA DEL FABRICANTE HERSTELLERGARANTIE & HAFTUNGSBESCHRÄNKUNG Unsere aktuellen Garantiebedingungen und Haftungsbeschränkung fin- den Sie unter: https://cdn-shop.adamhall.com/media/pdf/Manufactu- rers-Declarations-PALMER_DE_EN_ES_FR.pdf. Im Service Fall wenden Sie sich bitte an Adam Hall GmbH, Adam-Hall-Str. 1, 61267 Neu Anspach / E-Mail Info@adamhall.com / +49 (0)6081 / 9419-0.
-
Página 49: Correct Disposal Of This Product
service for a product, please contact Adam Hall GmbH, Adam-Hall- Str. 1, 61267 Neu Anspach / Email: Info@adamhall.com / +49 (0)6081 / 9419-0. CORRECT DISPOSAL OF THIS PRODUCT (valid in the European Union and other European countries with a differentiated waste collection system) This symbol on the product, or on its documents indicates that the device may not be treated as household waste. -
Página 50: Eliminación Correcta De Este Producto
pratiquant le tri des déchets) La présence de ce symbole sur le produit ou sur la documentation correspondante indique qu‘en fin de vie, le produit ne doit pas être jeté avec les déchets nor- maux, afin d‘éviter tout dommage à l‘environnement ou aux per- sonnes consécutive à... - Página 51 debidos al vertido incontrolado de desechos. La recogida selecti- va ayuda a su posterior reciclaje y fomenta la reutilización sostenible de los componentes de este equipo. Si es un particu- lar, póngase en contacto con el distribuidor donde adquirió este producto, o con el ayuntamiento, para informarse sobre el reciclaje adecuado de este equipo.
- Página 52 WWW.PALMER-GERMANY.COM PALMER IS A BRAND OF THE ADAM HALL GROUP ADAM HALL GMBH ∙ ADAM-HALL-STR. 1 61267 NEU-ANSPACH ∙ GERMANY FON: (+49) 6081 / 94 19 - 0 ∙ FAX: (+49) 6081 / 94 19 - 1000 WWW.ADAMHALL.COM REV:01...