testo 0572 Manual De Instrucciones

testo 0572 Manual De Instrucciones

Impresora portátil testo para registradores de datos
Tabla de contenido

Publicidad

Idiomas disponibles
  • ES

Idiomas disponibles

  • ESPAÑOL, página 27

Enlaces rápidos

Mobiler Drucker für Datenlogger 0572 0576
Bedienungsanleitung
Mobile printer for data loggers 0572 0576
Instruction manual
L'imprimante testo mobile pour enregistreur de
données 0572 0576
Mode d'emploi
Impresora portátil testo para registradores de datos
0572 0576
Manual de instrucciones
Stampante mobile per data logger 0572 0576
Istruzioni per l'uso
Mobiele printer voor gegevenslogschrijvers 0572 0576
Gebruiksaanwijzing
Портативный принтер для логгеров
данных 0572 0576
Руководство пользователя

Publicidad

Tabla de contenido
loading

Resumen de contenidos para testo 0572

  • Página 1 Mobiler Drucker für Datenlogger 0572 0576 Bedienungsanleitung Mobile printer for data loggers 0572 0576 Instruction manual L'imprimante testo mobile pour enregistreur de données 0572 0576 Mode d'emploi Impresora portátil testo para registradores de datos 0572 0576 Manual de instrucciones Stampante mobile per data logger 0572 0576...
  • Página 2 German ......................3 English ......................11 French ......................19 Spanish ....................... 27 Italian......................35 Dutch ......................43 Russian ....................... 51...
  • Página 3: Sicherheit Und Umwelt

    (lokale Vorschriften beachten) oder geben Sie das Produkt an Testo zur Entsorgung zurück. Leistungsbeschreibung 2.1. Verwendung Der testo mobile Drucker für Datenlogger dient zum Erstellen von Protokollausdrucken, in Verbindung mit kompatiblen Geräten: • testo 175/176 (ab Baujahr 2011) • testo 184 (ab Baujahr 2013) 2.2.
  • Página 4 5-6 h Akku-Standzeit > 6 h (20°C / 68 °F Umgebungstemperatur) Garantie 2 Jahre (außer Druckwerk, Akku-Pack) Garantiebedin- Garantiebedingungen: siehe Internetseite gungen www.testo.com/warranty Zubehör/Ersatzteile Beschreibung Artikel-Nr. Netzteil 5 V mit 1,0 A 0554 1105 Micro-USB-Leitung 0449 0134 Ersatz-Thermopapier, 6 Rollen...
  • Página 5 3 Produktbeschreibung Produktbeschreibung 3.1. Übersicht 1 Anzeige Betriebsmodus 2 Bedientaste Ein/Aus 3 Bedientaste Papiervorschub / Drucken 4 Papierrolle (bedruckbare Seite außen) 5 Papierfachabdeckung 6 Magnethalterung (Rückseite) WARNUNG Magnetisches Feld Kann gesundheitsgefährdend für Träger von Herzschrittmachern sein. > Mindestabstand von 15 cm zwischen Herzschrittmacher und Drucker einhalten.
  • Página 6: Anzeige Des Betriebsmodus

    3 Produktbeschreibung ACHTUNG Magnetisches Feld Beschädigung anderer Geräte! > Sicherheitsabstand zu Produkten einhalten, die durch Magnetismus beschädigt werden können (z. B. Monitore, Computer, Kreditkarten). 7 Auflagefläche für Datenlogger 8 Micro-USB-Anschluss zum Verbinden mit dem Netzteil oder dem PC. 3.2. Anzeige des Betriebsmodus Funktion •...
  • Página 7: Funktionen Der Bedientasten

    Akku laden Der Akku kann nur bei einer Umgebungstemperatur von ±0...+35 °C geladen werden. Ist der Akku komplett entladen, beträgt die Ladezeit bei Raumtemperatur mit dem testo-Netzteil ca. 6 h. > Akku-Ladegerät (0554 1105) an eine Netzsteckdose und den Drucker anschließen.
  • Página 8: Papier Einlegen

    4 Erste Schritte 4.2. Papier einlegen 1. Papierfachabdeckung nach oben klappen. 2. Papierrolle einlegen, siehe Abbildung. 3. Papierfachabdeckung schließen. 4.3. Sprachversion einstellen ✓ Drucker ist ausgeschaltet. > 2 s drücken. Konfigurationsmodus ist aktiviert. Automatischer Ausdruck der verfügbaren Sprachversionen. Die aktuelle ausgewählte Sprache ist mit einem * gekenn- zeichnet.
  • Página 9: Produkt Verwenden

    Grafikausdruck (nur testo 175 / testo 176) Es kann eingestellt werden, ob ein Ausdruck Grafik anzeigen soll oder nicht. Grafikausdruck aktivieren 1. USB-Verbindung zwischen testo 175 / testo 176 und dem Drucker trennen. ✓ Drucker befindet sich im Bereitschaftsmodus. gleichzeitig drücken.
  • Página 10: Daten Drucken Testo 184

    5 Produkt verwenden 5.2. Daten drucken testo 184 ✓ Drucker ist eingeschaltet. 1. Das testo 184 auf die gekennzeichnete Fläche halten (Abstand ca. 0 - 10 mm). Die Druckererkennung erfolgt automatisch und die Daten werden übertragen. 2. testo 184 entfernen.
  • Página 11: Safety And The Environment

    (observe local regulations) or return the product to Testo for disposal. Specifications 2.1. The testo mobile printer for data loggers is used to produce report printouts, in conjunction with compatible devices: • testo 175/176 (manufactured during or after 2011) •...
  • Página 12 > 6 h (20 °C / 68 °F ambient temperature) battery life Warranty 2 years (excl. printer mechanism, rechargeable battery pack) Warranty terms Warranty terms: see website www.testo.com/warranty Accessories/spare parts Description Item no. Mains unit 5 V / 1.0 A 0554 1105 Micro USB cable...
  • Página 13: Product Description

    3 Product description Product description 3.1. Overview 1 Operating mode indicator 2 On/Off control key 3 Paper feed / print control key 4 Paper roll (printable side out) 5 Paper compartment cover 6 Magnetic holder (on back) WARNING Magnetic field May be harmful to those with pacemakers.
  • Página 14: Operating Mode Indicator

    3 Product description CAUTION Magnetic field Damage to other devices! > Keep a safe distance away from products that could be damaged by the effects of magnetism (e.g. monitors, computers or credit cards). 7 Contact surface for data logger 8 Micro USB connection for connecting to the mains unit or the 3.2.
  • Página 15: Control Key Functions

    ±0 to +35 °C. If the rechargeable battery has been completely discharged, charging time at room temperature using the testo mains unit is approx. 6 h. > Connect battery charger (0554 1105) to a mains socket and connect the printer.
  • Página 16: Inserting Paper

    4 First steps 4.2. Inserting paper 1. Flip paper compartment cover up. 2. Insert paper roll, see illustration. 3. Close paper compartment cover. 4.3. Setting the language version ✓ Printer is switched off. 1. Press > 2 s. Configuration mode is activated. Automatic printout of the available language versions.
  • Página 17: Using The Product

    Using the product 5.1. Printing data, testo 175 and testo176 ✓ Printer is switched on. 1. Connect the printer and testo175 / testo 176 via the micro USB cable. Printer detection is automatic and is indicated as a message. 2. Press briefly.
  • Página 18: Printing Data, Testo 184

    5.2. Printing data, testo 184 ✓ Printer is switched on. 1. Move the testo 184 up to the indicated area (distance approx. 0 - 10 mm). The printer is detected automatically and the data is transferred. 2. Remove testo 184.
  • Página 19: Sécurité Et Environnement

    > Au terme de la durée d'utilisation du produit, apportez-le dans un centre de collecte sélective des déchets d'équipements électriques et électroniques (respectez les règlements locaux en vigueur) ou renvoyez-le à Testo en vue de son élimination. Description 2.1. Utilisation L'imprimante testo mobile pour enregistreur de données sert à...
  • Página 20 68 °F) Garantie 2 ans (sauf système d'impression, accumulateur) Conditions de Conditions de garantie : cf. site Internet garantie www.testo.com/warranty Accessoires / Pièces de rechange Description Réf. Bloc d'alimentation 5 V avec 1,0 A 0554 1105 Câble Micro-USB 0449 0134 Recharges de papier thermique ;...
  • Página 21: Description Du Produit

    3 Description du produit Description du produit 3.1. Aperçu 1 Affichage du mode de fonctionnement 2 Touche de commande Marche / Arrêt 3 Touche de commande Avance du papier / Impression 4 Rouleau de papier (face imprimable vers l'extérieur) 5 Capot du compartiment à papier 6 Fixation magnétique (au dos) AVERTISSEMENT Champ magnétique...
  • Página 22: Affichage Du Mode De Fonctionnement

    3 Description du produit ATTENTION Champ magnétique Endommagement d'autres appareils ! > Respecter les distances de sécurité par rapport aux produits pouvant être endommagés par le champ magnétique (par ex. moniteurs, ordinateurs, cartes de crédit,...). 7 Support pour enregistreur de données 8 Raccord Micro-USB pour la connexion du bloc d'alimentation ou d'un PC.
  • Página 23: Fonctions Des Touches De Commande

    ± 0...+35 °C. Lorsque l'accumulateur est complètement déchargé, la durée de chargement à température ambiante est d'env. 6 heures avec le bloc d'alimentation testo. > Raccorder le chargeur (0554 1105) à une prise électrique et à l'imprimante.
  • Página 24: Mise En Place Du Papier

    4 Prise en main 4.2. Mise en place du papier 1. Rabattre le capot du compartiment à papier vers le haut. 2. Mettre le rouleau de papier en place ; cf. illustration. 3. Fermer le capot du compartiment à papier. 4.3.
  • Página 25: Utilisation Du Produit

    Permet de définir sur les graphiques doivent apparaître ou non à l'impression. Activation de l'impression des graphiques 1. Débrancher la connexion USB entre le testo 175 / testo 176 et l'imprimante. ✓ L'imprimante est opérationnelle. 2. Appuyer simultanément sur Impression du format.
  • Página 26 Les données sont imprimées (la LED clignote en vert). 5.2. Impression de données avec le testo 184 ✓ L'imprimante est allumée. 1. Placer le testo 184 à l'endroit marqué (à une distance d'env. 0 à 10 mm). L'imprimante est automatiquement détectée et les données sont transférées.
  • Página 27: Seguridad Y Eliminación

    Existe un sistema de recogida independiente para estos productos. Especificaciones 2.1. La impresora portátil testo para registradores de datos se utiliza para crear impresiones de protocolos, en combinación con dispositivos compatibles: • testo 175/176 (a partir del año de construcción 2011) •...
  • Página 28 Garantía 2 años (excepto mecanismo de impresión y pack de baterías) Condiciones de la Condiciones de la garantía: véase garantía www.testo.com/warranty Accesorios/repuestos Descripción N° de artículo Fuente de alimentación 5 V / CC / 1.0 A 0554 1105 Cable micro USB 0449 0134 Papel térmico de recambio, 6 rollos...
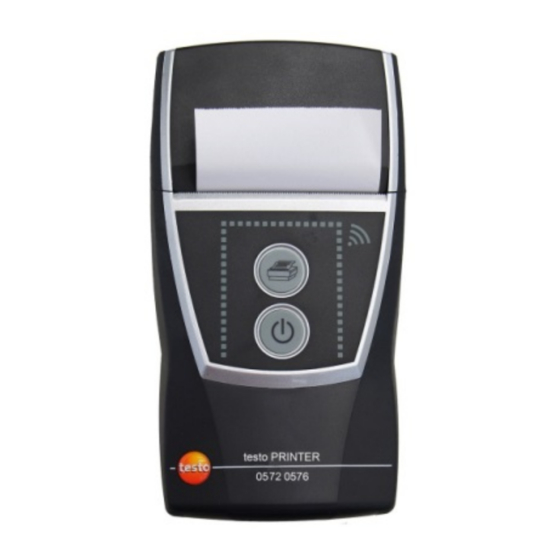
  • Página 29: Descripción Del Producto

    3 Descripción del producto Descripción del producto 3.1. Visión global 1 Indicación del modo de funcionamiento 2 Botón de mando encendido/apagado 3 Botón de mando avance de papel / imprimir 4 Rollo de papel (lado de impresión hacia fuera) 5 Cubierta de la bandeja de papel 6 Sujeción magnética (lado trasero) ADVERTENCIA Campo magnético...
  • Página 30: Indicación Del Modo De Funcionamiento

    3 Descripción del producto ATENCIÓN Campo magnético ¡Posibles daños a otros aparatos! > Mantenga la distancia seguridad prescrita a objetos que pueda dañar el magnetismo (como pantallas de ordenador, ordenadores, marcapasos o tarjetas de crédito). 7 Superficie de apoyo para registrador de datos 8 Conexión micro USB para conectar con la fuente de alimentación o el PC.
  • Página 31: Funciones De Los Botones De Mando

    ±0...+35 °C. Si la batería está totalmente descargada, tardará unas 6 horas en volver a recargarse a temperatura ambiente con la fuente de alimentación testo. > Conectar el cargador para pila recargable (0554 1105) a un alimentador de red y a la impresora.
  • Página 32: Colocación Del Papel

    4 Primeros pasos 4.2. Colocación del papel 1. Levantar la tapa de la bandeja de papel. 2. Colocar el rollo de papel, véase la ilustración. 3. Cerrar la tapa de la bandeja de papel. 4.3. Configurar el idioma ✓ La impresora está apagada. 1.
  • Página 33: Utilización Del Producto

    Se puede ajustar si una impresión debe contener gráficas o no. Activar la impresión de gráficas 1. Interrumpir la conexión USB entre el testo 175 / testo 176 y la impresora. ✓ La impresora se encuentra en modo de espera.
  • Página 34: Impresión De Datos Testo 184

    5 Utilización del producto 5.2. Impresión de datos testo 184 ✓ La impresora está encendida. 1. Sostener el testo 184 sobre la superficie marcada (distancia: aprox. 0 - 10 mm). La detección de la impresora se efectúa automáticamente y se transfieren los datos.
  • Página 35: Sicurezza E Ambiente

    > Smaltire le batterie difettose o esauste in conformità con le disposizioni di legge vigenti. > Al termine della vita operativa dello strumento, smaltirlo nella raccolta differenziata per dispositivi elettrici/elettronici (secondo le norme vigenti) oppure restituirlo a testo per lo smaltimento. Descrizione delle prestazioni 2.1. Utilizzo...
  • Página 36 > 6 h (temperatura ambiente 20 °C / 68 °F) Garanzia 2 anni (eccetto testina di stampa, batteria) Condizioni di Per le condizioni di garanzia consultare la garanzia pagina web www.testo.com/warranty Accessori/Ricambi Descrizione N° art. Alimentatore 5 V da 1.0 A 0554 1105...
  • Página 37: Descrizione Del Prodotto

    3 Descrizione del prodotto Descrizione del prodotto 3.1. Panoramica 1 LED modalità operativa 2 Tasto ON/OFF 3 Tasto avanzamento carta / stampa 4 Rotolo di carta (lato stampabile rivolto verso l'esterno) 5 Coperchio del vano portacarta 6 Dispositivo di fissaggio magnetico (sul retro) AVVERTENZA Campo magnetico Può...
  • Página 38: Visualizzazione Della Modalità Operativa

    3 Descrizione del prodotto ATTENZIONE Campo magnetico Danneggiamento di altri strumenti! > Mantenere una distanza di sicurezza da prodotti che potrebbero essere danneggiati dai campi magnetici (p.es. monitor, computer, carte di credito). 7 Superficie di appoggio del data logger 8 Porta micro-USB per il collegamento all'alimentatore o al PC. 3.2.
  • Página 39: Funzioni Dei Tasti

    ±0...+35 °C. Se la batteria è completamente scarica, il tempo necessario per la ricarica a temperatura ambiente con l'alimentatore testo è di circa 6 h. > Collegare il caricatore (0554 1105) a una presa elettrica e quindi alla stampante.
  • Página 40: Introdurre La Carta

    4 Prima di utilizzare lo strumento 4.2. Introdurre la carta 1. Sollevare il coperchio del vano portacarta. 2. Inserire il ritolo di carta come illustrato nella figura. 3. Chiudere il coperchio portacarta. 4.3. Impostazione della lingua ✓ La stampante è spenta. 1.
  • Página 41: Utilizzare Il Prodotto

    Stampa del grafico (solo testo 175 / 176) È possibile impostare se visualizzare o meno la stampa del grafico. Attivazione della stampa del grafico 1. Scollegare la connessione USB tra lo strumento testo 175 / testo 176 e la stampante. ✓ La stampante è operativa.
  • Página 42: Stampa Dei Dati Testo 184

    5 Utilizzare il prodotto 5.2. Stampa dei dati testo 184 ✓ La stampante è accesa. 1. Appoggiare lo strumento testo 184 come illustrato nella figura (distanza circa 0 - 10 mm). La stampante viene rilevata automaticamente e i dati vengono trasferiti.
  • Página 43: Veiligheid En Milieu

    (houd u aan de plaatselijke voorschriften) of lever het in bij Testo voor verantwoorde verwerking. Functionele beschrijving 2.1. Toepassing De testo mobiele printer voor gegevenslogschrijvers dient voor het opstellen van protocoluitdraaien, in combinatie met compatibele instrumenten: • testo 175/176 (vanaf bouwjaar 2011) •...
  • Página 44 Eigenschap Waarden Accu-standtijd > 6 h (20 °C / 68 °F omgevingstemperatuur) Garantie 2 jaar (behalve afdrukapparaat, accu-pack) Garantievoorwaarden Garantievoorwaarden: zie internetsite www.testo.com/warranty Toebehoren/Onderdelen Beschrijving Artikel-nr. Netadapter 5 V met 1.0 A 0554 1105 Micro-USB-leiding 0449 0134 Thermisch papier (reserve), 6 rollen...
  • Página 45: Indicatie Van De Bedrijfsmodus

    3 Produktbeschrijving 1 Indicatie bedrijfsmodus 2 Bedieningstoets Aan/Uit 3 Bedieningstoets papierdoorvoer / afdrukken 4 Papierrol (bedrukbare zijde buiten) 5 Afdekking papiervak 6 Magneethouder (achterkant) WAARSCHUWING Magnetisch veld Kan schadelijk zijn voor de gezondheid van dragers van pacemakers. > Minimum afstand van 15 cm tussen pacemaker en printer aanhouden.
  • Página 46 3 Produktbeschrijving Functie • Rust-modus, wordt na 2 minuten zonder toetsbediening automatisch geactiveerd • Rust-modus, wordt na 5 minuten geactiveerd, als er een verbinding met de logger bestaat en gegevens werden uitgelezen. als de logger gereed is voor de uitdraai, maar de toets niet wordt ingedrukt.
  • Página 47: Functies Van De Bedieningstoetsen

    De accu kan alleen bij een omgevingstemperatuur van ±0...+35 °C worden geladen. Als de accu compleet ontladen is, dan bedraagt de laadtijd bij ruimtetemperatuur met de testo netadapter ca. 6 uur. > Acculader (0554 1105) aansluiten aan een contactdoos en de printer.
  • Página 48: Papier Erin Leggen

    4 Eerste stappen 4.2. Papier erin leggen 1. Afdekking van het papiervak naar boven klappen. 2. Papierrol erin leggen, zie afbeelding. 3. Afdekking van het papiervak sluiten. 4.3. Taalversie instellen ✓ Printer is uitgeschakeld. > 2 s indrukken. Configuratiemodus is geactiveerd. Automatische uitdraai van de beschikbare taalversies.
  • Página 49: Product Gebruiken

    Product gebruiken 5.1. Gegevens afdrukken testo 175 en testo 176 ✓ Printer is ingeschakeld. 1. Printer en testo 175 / testo 176 verbinden met de micro-USB- kabel. De printer wordt automatisch herkend, en dit wordt als melding afgedrukt. kort indrukken.
  • Página 50: Gegevens Afdrukken Testo 184

    5 Product gebruiken 5.2. Gegevens afdrukken testo 184 ✓ Printer is ingeschakeld. 1. De testo 184 op het gekenmerkte vlak houden (afstand ca. 0 - 10 mm). De printer wordt automatisch herkend en de gegevens worden overgedragen. 2. testo 184 verwijderen.
  • Página 51: Безопасность И Окружающая Среда

    Использование Мобильный принтер testo для логгеров данных используется для распечатки отчетов; может использоваться со следующими приборами: • testo 175/176 (с датой производства 2011 г. и позже) • testo 184 (с датой производства 2013 г. и позже) 2.2. Технические характеристики Общие характеристики...
  • Página 52 > 6 ч (при окружающей температуре 20 °C аккумулятора / 68 °F) Гарантия 2 года (кроме печатающего механизма и аккумуляторной батареи) Условия гарантии См на сайте www.testo.ru Принадлежности / запасные части Описание № заказа Блок питания 5 В / 1.0 A 0554 1105 Микро-USB кабель...
  • Página 53 3 Описание прибора Описание прибора 3.1. Обзор 1 Индикатор режима работы 2 Кнопка вкл./выкл. 3 Кнопка подачи бумаги / печати 4 Бумага (печатной стороной вверх) 5 Крышка отсека для бумаги 6 Магнитный держатель (задняя сторона) ПРЕДУПРЕЖДЕНИЕ Магнитное поле Может быть опасно для людей с кардиостимуляторами. >...
  • Página 54: Индикатор Режима Работы

    3 Описание прибора ВНИМАНИЕ Магнитное поле Возможно повреждение других устройств! > Не подносите близко к устройствам, которые можно повредить магнитным полем (мониторы, компьютеры, кредитные карты). 7 Контактная поверхность для логгера данных 8 Микро USB порт для подключения к ПК или блока питания. 3.2.
  • Página 55: Первые Шаги

    Зарядка аккумулятора возможна только при температуре окружающей среды от ±0 до +35 °C. Если аккумулятор был полностью разряжен, время зарядки при комнатной температуре с использованием блока питания testo займет около 6 часов. > Подключите зарядное устройство (0554 1105) к розетке и...
  • Página 56: Загрузка Бумаги

    3. Сохраните выбранный язык и выйдите из режима настройки: кратко нажмите 4.4. Пробная печать ✓ Принтер выключен. > Одновременно нажмите и Будет запущена пробная печать. 4.5. Печать графиков (только для testo 175 / testo 176) Вы можете выбрать необходимость отображения графиков на распечатках.
  • Página 57: Использование Прибора

    5 Использование прибора Активировать распечатку графиков 1. Отключите USB соединение между testo 175 / testo 176 и принтером. ✓ Принтер в режиме ожидания. 2. Одновременно нажмите и Будет распечатан формат печати. Выбранный на данный момент формат печати отмечен *. При необходимости формат печати можно изменить.
  • Página 58: Печать Данных, Testo 184

    5 Использование прибора 5.2. Печать данных, testo 184 ✓ Принтер включен. 1. Поднесите testo 184 к указанной области (на расстоянии примерно 0 - 10 мм). Принтер распознается автоматически и начнется передача данных. 2. Уберите testo 184. 3. Начнется печать. > Распечатать все записанные данные: удерживайте...
  • Página 60 AG Testo-Straße 1, 79853 Lenzkirch Tel.: 07653 681-0, Fax: 07653 681-7699 info@testo.de www.testo-international.com 0973 0519 de en fr es it nl ru 01...

Este manual también es adecuado para:

0576

Tabla de contenido