Panasonic ES8109 Instrucciones De Operación
Ocultar thumbs Ver también para ES8109:

Publicidad

Idiomas disponibles

Idiomas disponibles

Enlaces rápidos

English
Français
Español
Before operating this unit, please read these instructions completely.
Il est recommandé de lire attentivement ce manuel avant d'utiliser l'appareil.
2
12
22
Operating Instructions
Manuel d'utilisation
Rechargeable Shaver
Rasoir rechargeable
Model No. ES8109
N° de modèle ES8109

Publicidad

Tabla de contenido
loading

Resumen de contenidos para Panasonic ES8109

  • Página 1 Operating Instructions Manuel d’utilisation Rechargeable Shaver Rasoir rechargeable Model No. ES8109 N° de modèle ES8109 English Français Español Before operating this unit, please read these instructions completely. Il est recommandé de lire attentivement ce manuel avant d’utiliser l’appareil.
  • Página 2: Important Safety Instructions

    IMPORTANT SAFETY INSTRUCTIONS . Use this appliance only for its intended use as described in this manual. Do not use attachments not recommended by the When using an electrical appliance, basic manufacturer. precautions should always be followed, including 3. Never operate this appliance if it has a the following: damaged cord or plug, if it is not working Read all instructions before using this appliance.
  • Página 3 Treat yourself to wet lather shaves for at least three weeks and Disconnect the power cord when storing the shaver. Do not notice the difference. Your Panasonic Wet/Dry shaver requires a bend the power cord or wrap it around the shaver. Do not leave little time to get used to because your skin and beard need this shaver within the reach of small children.
  • Página 4: Parts Identification

     Adaptor (RE7-40)  Water tank cap Parts identification  Power cord  Clean lamp  Appliance plug  Dry lamp  Self-cleaning recharger  Charge lamp    (Referred to as the  Status lamp SELECT CLEAN  CHARGE ...
  • Página 5 Charging with the self-cleaning recharger Thoroughly wipe off any drops of water on or around the recharger so that it is dry before charging it. Attach the detergent Remove the protective cartridge and the cap  and then attach water tank to the the shaver. Turn the shaver off before self-cleaning • attaching. recharger. Check that the outer foil is not •...
  • Página 6: Using The Shaver

    Reading the LCD panel Using the shaver The LCD panel shows the remaining battery capacity from 0% to 100%, in 10% increments. 10 minutes after After charging is While charging charging is completed completed 90˚ Press the OFF/ON Hold the shaver as The indicators The indicators blink The indicators blink once every once every  switch.
  • Página 7 • the status lamp is illuminated. Use the below chart as a guide. Only use self-cleaning recharger detergent for Panasonic shavers. • Always change the detergent cartridge and the cleaning liquid in the •...
  • Página 8: Cleaning The Shaver

    Cleaning the shaver SELECT CLEAN CHARGE STATUS Insert the appliance Remove the Press [SELECT] to select the course. plug. protective cap  and Each time you press [SELECT], the course changes from “Clean/ then attach the • Plug in the adaptor. Dry/Charge”  “Clean/Dry”  “Dry/Charge”  “Dry”  “Charge”. shaver. The courses start approximately 6 seconds after they are •...
  • Página 9 Cleaning with the self-cleaning recharger (continued) 1 Follow the steps outlined below if the status lamp blinks or glows Cleaning the shaver without the self-cleaning during the “Clean/Dry/Charge” course or the “Clean/Dry” course. recharger Blinks Glows We recommend that you clean Correctly set the Remove the shaver from the self- your shaver with the self-cleaning detergent cartridge and cleaning recharger and then...
  • Página 10: Replacing The System Outer Foil And The Inner Blades

    Replacing the inner blades Caution for turbo mode 1. Press the foil frame release Shaving in turbo mode may damage your skin. Turn the shaver • buttons and lift the system off and then on again to cancel turbo mode. outer foil upwards as Do not place your fingers on the OFF/ON switch while using •...
  • Página 11: Removing The Built-In Rechargeable Battery

    Beard trimmings may clog the drain at the bottom of the cleaning tray.  In this case, you cannot clean or dry the shaver.   Push the beard trimmings down through the drain with a tooth pick etc. FOR YOUR CONVENIENCE, WE HAVE ESTABLISHED A TOLL- FREE (IN USA ONLY) NATIONAL ACCESSORY PURCHASE HOT LINE AT 1-800-332-5368. IN CANADA, CONTACT PANASONIC CANADA INC. AT THE ADDRESS OR TELEPHONE NUMBER ON THE BACK PAGE.
  • Página 12: Consignes De Sécurité Importantes

    3. N’utilisez jamais cet appareil si le cordon ou la CONSIGNES DE SÉCURITÉ IMPORTANTES fiche est endommagé, s’il ne fonctionne pas Lors de l’utilisation d’un appareil électrique, il faut correctement, s’il est tombé, endommagé ou toujours prendre des précautions de base, y compris tombé...
  • Página 13 Il vous faudra un peu de temps Ne nettoyez pas l’adaptateur du chargeur autonettoyant avec de l’eau pour vous habituer à votre rasoir Panasonic sec/mouillé car votre peau car cela l’endommagera ou entraînera une électrocution. Ne retirez et votre barbe ont besoin d’un mois environ pour s’adapter à...
  • Página 14: Identification Des Pièces

     Chargeur autonettoyant  Témoin de séchage (DRY) Identification des pièces (Appelé “Chargeur”.)  Témoin de chargement  Cartouche de détergent (CHARGE)   Réservoir d’eau  Témoin d’état    Prise  Bouton de sélection SELECT CLEAN  CHARGE ...
  • Página 15 Chargement à l’aide du chargeur autonettoyant Essuyez avec soin toute trace d’eau sur ou à proximité du chargeur afin qu’il soit bien sec avant le démarrage du chargement. Fixez la cartouche de Retirez le couvercle de détergent et le protection puis fixez le réservoir d’eau sur le rasoir.
  • Página 16: Utilisation Du Rasoir

    À propos du panneau ACL Utilisation du rasoir Le panneau ACL indique la charge restante de la pile, allant de 0% à 100%, par pas de 10%. 10 minutes après la fin Pendant le Une fois le chargement chargement terminé du chargement 90˚...
  • Página 17 Remplacez la cartouche de solution du système de rasage HydraClean™ quand nettoyage. le témoin d’état s’allume. Le tableau cidessous peut vous servir de guide. • N’utilisez que le détergent spécial pour chargeur autonettoyant de rasoir Panasonic. Rasage Nettoyage Utilisation •...
  • Página 18 Nettoyage du rasoir SELECT CLEAN CHARGE STATUS Insérez la prise dans Retirez le couvercle de Appuyez sur [SELECT] pour sélectionner l’utilisation l’appareil. protection puis fixez le souhaitée. rasoir. • Chaque fois que vous appuyez sur [SELECT], l’utilisation passe à Branchez l’adaptateur. “Nettoyage/Sec/Chargement”...
  • Página 19 Nettoyage à l’aide du chargeur autonettoyant (suite) 1 Effectuer les opérations suivantes si le témoin d’état clignote ou Nettoyage du rasoir sans le chargeur autonettoyant s’allume pendant l’utilisation en mode “Nettoyage/Sec/Chargement” ou “Nettoyage/Sec”. Nous vous recommandons de Clignote Allumé nettoyer votre rasoir à l’aide du chargeur à...
  • Página 20: Remplacement De La Grille De Protection Du Système Et Des Lames Intérieures

    Remplacement des lames intérieures Avertissement concernant le mode turbo 1. Appuyez sur les boutons et • Le rasage en mode turbo pourrait blesser votre peau. Éteignez le soulevez comme indiqué sur rasoir et rallumez-le pour annuler le mode turbo. l’illustration. •...
  • Página 21: Retrait De La Batterie Rechargeable Intégrée

    2. Essuyez doucement toute trace Retrait de la batterie rechargeable intégrée de poils collés à l’intérieur du plateau de nettoyage à l’aide d’un ATTENTION: chiffon ou d’un mouchoir en papier humidifié avec de l’eau. L’appareil que vous vous êtes procuré est alimenté par une batterie au lithium-ion.
  • Página 22: Instrucciones De Seguridad Importantes

    recomendado por el fabricante. INSTRUCCIONES DE SEGURIDAD IMPORTANTES 3. Nunca utilice el dispositivo si tiene el cordón o el Al utilizar un dispositivo eléctrico, deben seguirse enchufe dañado, si no funciona correctamente, o siempre unas precauciones básicas que incluyen si se ha caído, dañado o mojado. Devuelva el las siguientes: dispositivo a un centro de servicio para Lea todas las instrucciones antes de utilizar este...
  • Página 23 Cuídese con afeitados de espuma tres semanas y observe la No limpie el adaptador ni el recargador de limpieza automática con diferencia. Su afeitadora Panasonic en Mojado/Seco requiere algo de agua, ya que los dañaría o causaría descargas eléctricas. No retire la tiempo para ajustarse debido a que su piel y barba necesitan alrededor afeitadora del recargador de limpieza automática mientras utiliza un...
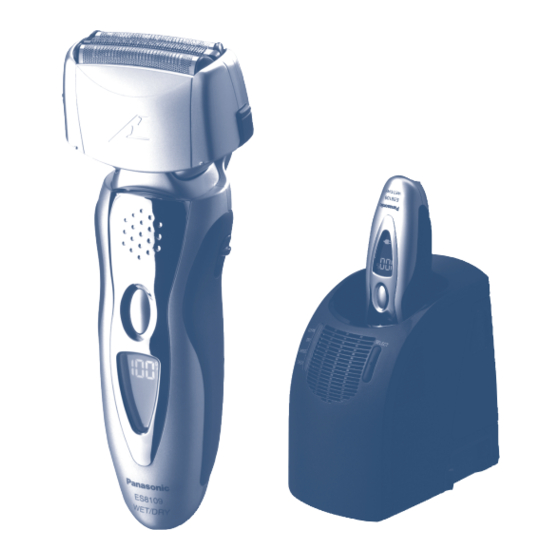
  • Página 24: Identificación De Las Partes

     Adaptador (RE7-40)  Conexión Identificación de las partes  Cable de alimentación  Tapa del depósito de agua  Clavija del aparato  Lámpara de limpieza   Recargador de limpieza  Lámpara de secado    Lámpara de carga SELECT automática CLEAN...
  • Página 25: Carga Con El Recargador De Limpieza Automática

    Carga con el recargador de limpieza automática Frote cuidadosamente las gotas de agua que puedan quedar en o alrededor del recargador para que quede seco antes de cargarlo. Instale el cartucho de Retire la tapa protectora detergente y el y, a continuación, instale depósito de agua en el la afeitadora.
  • Página 26: Acerca Del Panel Lcd

    Acerca del panel LCD Utilización de la afeitadora El panel LCD muestra la capacidad restante de la batería desde 0% a 100%, en incrementos de 10%. 10 minutos después Cuando la carga se Durante la carga de completarse la haya completado carga 90˚...
  • Página 27: Limpieza Con El Recargador De Limpieza Automática

    Utilice la tabla siguiente como guía. • Utilice solamente el detergente especial para el recargador de limpieza automática para afeitadoras Panasonic. Afeitado Limpieza Reutilización •...
  • Página 28: Limpieza De La Afeitadora

    Limpieza de la afeitadora SELECT CLEAN CHARGE STATUS Inserte el enchufe del Retire la tapa protectora Pulse [SELECT] para seleccionar el programa. dispositivo. y, a continuación, instale la afeitadora. • Cada vez que pulse [SELECT], el programa cambiará de “Limpiar/Secar/ Enchufe el adaptador.
  • Página 29: Limpieza De La Afeitadora Sin El Recargador De Limpieza Automática

    Limpieza con el recargador de limpieza automática (continuación) 1 Realice estas acciones si la lámpara de estado parpadea o se ilumina Limpieza de la afeitadora sin el recargador de durante el programa “Limpiar/Secar/Cargar” o el programa “Limpiar/Secar”. limpieza automática Parpadea Se ilumina Recomendamos limpiar su afeitadora Coloque correctamente el...
  • Página 30: Sustitución De La Lámina Exterior Del Sistema Y Las Cuchillas Internas

    Sustitución de las cuchillas internas Precauciones para el modo turbo 1. Pulse los botones y levántelas • Afeitar con el modo turbo podría dañar su piel. Apague la afeitadora y hacia arriba como se muestra en enciéndala de nuevo para cancelar el modo turbo. la ilustración.
  • Página 31: Retirar La Batería Recargable Interna

    2. Frote suavemente cualquier Retirar la batería recargable interna recorte de barba adherido al interior de la bandeja de limpieza ATENCIÓN: con un paño o pañuelo de papel El producto que ha comprado se alimenta con una batería de iones Litio humedecido con agua.
  • Página 32 IN USA CONTACT: Panasonic Consumer Electronics Company One Panasonic Way F-3 Secaucus, NJ 07094 IN PUERTO RICO CONTACT: Panasonic Puerto Rico, Inc. San Gabriel Industrial Park 65th Infantry Avenue KM9.5 Carolina, Puerto Rico 00630 IN CANADA CONTACT: AU CANADA, CONTACTER: Panasonic Canada Inc. 5770 Ambler Drive, Mississauga, Ontario L4W T3 (905) 64-5010 En México: Panasonic de México, S.A de C.V. México D.F. Amores 110, Col. del Valle, 03100 Tel: 54 88 10 00 Service • Assistance • Accessories...

Tabla de contenido