Freestyle WORKOUT 2.0 Manual Del Usuario
Idiomas disponibles
Idiomas disponibles
Enlaces rápidos
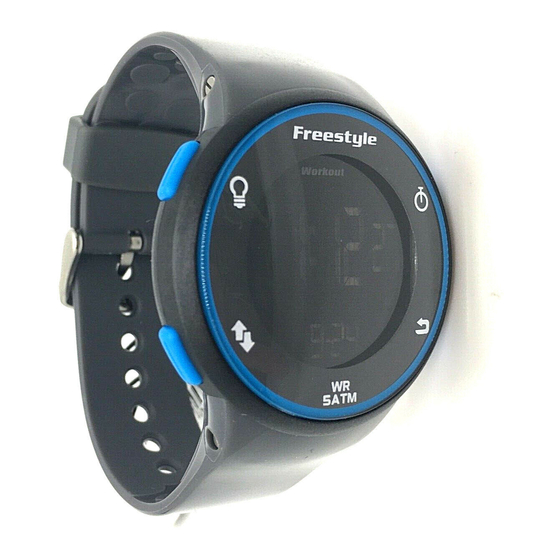
WORKOUT 2.0
S5
S4
S3
S1. Light Button
S2. Stop/Reset Button
S3. Start/Split Button
S4. Mode Button
S5. Set/Recall Button
DISPLAY MODES:
The watch has five display modes:
HOME TIME / FOREIGN TIME (T2),
CHRONOGRAPH (CHRONO), TIMER,
HEAT TIMER (HT TMR) and ALARM.
To change from one display mode to
another, press S4 button once.
NOTE: In any setting mode, if there is
no manipulation for approximately 2-3
minutes, the watch will automatically
save the entered data and exit the set-
ting procedure.
HOME AND FOREIGN DISPLAY:
To display FOREIGN TIME mode, press
and hold S2 button when HOME TIME
mode is displayed. The mode descrip-
tion (T2) will be displayed and blink
for approximately 3 seconds before
switching to FOREIGN TIME mode. To
change back to HOME TIME mode,
press and hold S2 button again.
TO SET THE TIME AND CALENDAR:
1. Press S4 button to select HOME
TIME / FOREIGN TIME mode.
2. Press and hold S5 button for
approximately 3 seconds, the mes-
sage "HOLD TO SET" will be dis-
played and the time zone selection
will blink.
3. Press S2 or S3 button to toggle
between HOME TIME (TIME 1) and
FOREIGN TIME (TIME 2) mode to
set.
4. Press S4 button, the hour digits will
blink.
5. Press S3 button to increase the
value or S2 button to decrease it.
Holding down the button with speed
up the process.
6. Press S4 button, the minute digits
will blink.
7. Press S3 button to increase the
value or S2 button to decrease it.
Holding down the button will speed
up the process.
8. Press S4 button, the second digits
will blink.
9. Press S2 or S3 button to reset the
second digits to 00.
10. Follow the same pattern to set the
month, date, year, hour format and
calendar format, day (of the week)
language, hourly chime option and
button beep option.
11. To set the hour format, press S2 or
S3 button to toggle between 12-
hour and 24-hour format.
12. To set the calendar format, press
S2 or S3 button to toggle between
MM-DD (month-date) and DD-MM
(date-month) format.
13. To set the day language, press S2
or S3 button to cycle among Eng-
lish, Spanish and French.
14. To set the hourly chime, press S2 or
S3 button to turn it ON or OFF.
15. To set the button beep, press S2 or
S1
S3 button to turn it ON or OFF.
16. When finished making all the set-
tings, press S5 button to confirm.
NOTE: The day is automatically set in
accordance with the date. The date can
S2
be set within the range of 1 January
2000 to 31 December 2099.
NOTE: The seconds count is syn-
chronized between HOME TIME and
FOREIGN TIME mode.
TO USE THE CHRONOGRAPH:
1. Press S4 button to select CHRONO-
GRAPH mode.
2. The chronograph will then be
displayed in its current state –
reset, running, or stopped.
3. To resume a counting, press S3
button to resume from where it left
off.
4. To start a new counting, reset the
chronograph to zero first.
Press S2 button to stop counting,
then press and hold S2 button
for approximately 3 seconds. The
message "HOLD TO RESET" will be
displayed and the counter will be
reset to zero.
For changing the chronograph display
format:
1. Press S4 button to select CHRONO-
GRAPH mode.
2. To enter into chronograph display
format setting, press S5 button
when the chronograph is in reset
state which there is no lap record,
or press S4 button when the watch
is in RECALL mode (Please refer
to "TO USE THE RECALL FUNC-
TION" paragraph).
3. Press S2 or S3 button to toggle
between LAP/SPL (lap time on top
line and split time on bottom line)
and SPL/LAP (split time on top line
and lap time on bottom line) format.
4. When finished making all the set-
tings, press S5 button to confirm.
NOTE: Illustration of lap time and
split time:
a) Lap time – individual lap time.
b) Split time – cumulative lap time.
For the measurement of elapsed time,
In CHRONOGRAPH mode,
1. Press S3 button to start counting.
2. To stop counting, press S2 button.
Press S3 button to resume from
where it left off.
3. To reset to zero, press S2 button to
stop counting and then press and
hold S2 button.
For the measurement of split time,
In CHRONOGRAPH mode,
1. Press S3 button to start counting.
2. While the chronograph is running,
press S3 button to register a lap.
The chronograph is still running in
the background.
After approximately 10 seconds, the
currently accumulated time will be
displayed.
3. Repeat the last step until all the
laps have been registered.
4. To stop counting, press S2 button.
Press S3 button to resume from
where it left off.
5. To reset to zero, press S2 button to
stop counting and then press and
hold S2 button.
NOTE: The chronograph can register
up to a maximum of 99 laps, of which
the first 75 laps will be recorded and
stored in RECALL mode.
NOTE: You can leave the chronograph
running while switching over to other
operating modes.
TO USE THE RECALL FUNCTION:
In CHRONOGRAPH mode,
1. Press S5 button to select RECALL
mode.
2. If the chronograph is running, you
can press S2 or S3 button to scroll
through the recorded individual lap
time and split time.
If the chronograph is stopped, you
can press S2 or S3 button to scroll
through the recorded individual lap
time, split time and total elapsed
time.
3. Press S5 button to return to CHRO-
NOGRAPH mode.
NOTE: The recall function is available
only when there is lap record stored.
NOTE: The lap record will be cleared
when the chronograph is reset.
TO SET THE TIMER:
1. Press S4 button to select TIMER
mode.
2. Press S5 button, the message
"SET" will be displayed and the
timer interval selection will blink.
3. Press S2 or S3 to select among
interval 1, interval 2, interval 3,
interval 4 and interval 5.
4. Press S4 button, the hour digits will
blink.
5. Press S3 button to increase the
value or S2 button to decrease it.
Holding down the button will speed
up the process.
6. Press S4 button, the minute digits
will blink.
7. Press S3 button to increase the
value or S2 button to decrease it.
Holding down the button will speed
up the process.
8. Press S4 button, the second digits
will blink.
9. Press S3 button to increase the
value or S2 button to decrease it.
Holding down the button will speed
up the process.
10. Press S4 button, the action-at-end
selection will blink.
11. Press S2 or S3 button to toggle
between STOP AT END (STOP) and
REPEAT AT END (REPEAT).
12. When finished making all the set-
tings, press S5 button to confirm.
NOTE: Illustration of the action-at-end
selections:
a) STOP AT END – the timer will stop
when the countdown reaches zero.
b) REPEAT AT END – the timer will
reload and repeat the countdown
when the countdown reaches zero.
TO USE THE TIMER:
1. Press S4 button to select TIMER
mode.
2. The timer will be displayed in its
current state – reset, running, or
stopped.
3. To resume a counting, press S3
button to resume from where it left
off.
4. To start a new counting, reload the
ENGLISH

Manuales relacionados para Freestyle WORKOUT 2.0


Resumen de contenidos para Freestyle WORKOUT 2.0
- Página 3 ESPAÑOL WORKOUT 2.0 semana, idioma, opción de aviso de la cuenta. Pulse el botón S3 para la hora en punto, y la opción de retomar la cuenta ahí donde se sonido al pulsar botones. quedó. 11. Para configurar el formato de 3. Para volver a cero, pulse el botón la hora, pulse el botón S2 ó S3 para S2 para interrumpir la cuenta y cambiar entre los formatos de 12 y después mantenga pulsado el de 24 horas. botón S2. 12. Para ajustar el formato del cal endario, pulse el botón S2 ó S3 para Para medir el tiempo dividido, cambiar entre los formatos MM-DD En modo CRONÓMETRO, (mes-día) y DD-MM (día-mes). 1. Pulse el botón S3 para empezar a 13. Para configurar el idioma, pulse contar. el botón S2 ó S3 para cambiar entre 2. Mientras el cronómetro está en inglés, español y francés. marcha, pulse el botón S3 para 14. Para configurar el aviso de la hora registrar una vuelta. El cronómetro en punto, pulse el botón S2 o S3 seguirá contando por detrás. para encenderlo o apagarlo. Al cabo de 10 segundos, verá el 15. Para configurar el sonido de los tiempo acumulado hasta el mo botones al pulsar, pulse el botón S2...
- Página 4 “SET” y la entrada de la alarma parpadeará. 3. Pulse el botón S2 o S3 para mov- erse entre las entradas de alarma 1, 2, 3, 4 y 5. 4. Pulse el botón S4. Los dígitos de las horas parpadearán. 5. Pulse el botón S3 para aumentar el dígito, o pulse el botón S2 para reducirlo. Mantenga pulsado el botón para acelerar el proceso. 6. Pulse el botón S4. Los dígitos de los minutos parpadearán. 7. Pulse el botón S3 para aumentar el dígito, o pulse el botón S2 para reducirlo. Mantenga pulsado el botón para acelerar el proceso. 8. Pulse el botón S4. La frecuencia de la alarma parpadeará. 9. Pulse los botones S3 ó S2 para ambia la frecuencia de alarma que quiere seleccionar (DAILY, WEEK- DAYS, WEEKENDS and day of the week: diaria, días de la semana, fines de semana, día de la semana en particular). Para reducir la huella del carbono, 10. Después de hacer todos los ajustes las instrucciones de Freestyle se han necesarios, pulse el botón S5 para imprimido con tinta de soja en papel confirmarlo. reciclado.