HAMPTON BAY 51398 Guía De Uso Y Cuidado
Tabla de contenido
Idiomas disponibles
Idiomas disponibles
Enlaces rápidos
Item #610-015, 608-891
Model #51398, 51399
UL model #52-MAL
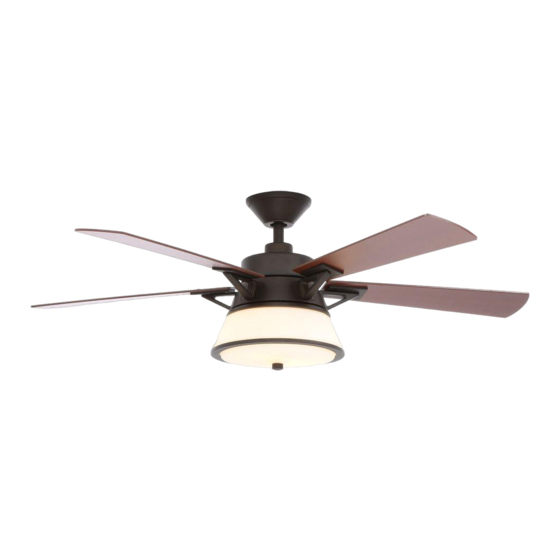
USE AND CARE GUIDE
MARLOWE 52-INCH CEILING FAN
Questions, problems, missing parts? Before returning to the store,
call Hampton Bay Customer Service
8 a.m. - 6 p.m., EST, Monday-Friday.
1-877-527-0313
HAMPTONBAY.COM
THANK YOU
We appreciate the trust and confidence you have placed in Hampton Bay through the purchase of this ceiling fan. We strive to continually create
quality products designed to enhance your home. Visit us online to see our full line of products available for your home improvement needs.
Thank you for choosing Hampton Bay!
Capítulos
Tabla de contenido
Solución de problemas

Manuales relacionados para HAMPTON BAY 51398


Resumen de contenidos para HAMPTON BAY 51398
-
Página 16: Ventilador De Techo Marlowe, De 52 Plg (1,32 M)
GRACIAS POR TU COMPRA Apreciamos la confianza que has depositado en Hampton Bay al comprar este ventilador de techo. Nos esforzamos para continuamente crear productos de calidad diseñados para tu hogar. Visítanos por Internet para ver nuestra línea completa de productos disponibles para las necesidades... -
Página 17: Información De Seguridad
Tabla de Contenido Tabla de Contenido ............. 2 Ensamblaje ................7 Información de Seguridad ..........2 Funcionamiento ..............13 Garantía ................3 Mantenimiento y Limpieza..........14 Preinstalación ..............3 Solución de Problemas ............. 14 Instalación ................6 Información de Seguridad Todo el cableado debe cumplir con el Código Nacional ADVERTENCIA: Para reducir el riesgo de lesiones de Electricidad ANSI/NFPA 70-1999 y con los códigos locales... -
Página 18: Garantía
Cualquier servicio técnico conducido por personas no autorizadas anulará la garantía. No hay ninguna otra garantía expresa. Mediante la presente Hampton Bay se exime de cualquier garantía, incluyendo pero sin limitarse a aquellas de comercialización e idoneidad para un fin particular, de acuerdo a lo contemplado por la ley. -
Página 19: Herrajes Incluidos
Preinstalación (continuación) HERRAJES INCLUIDOS NOTA: No se muestra el tamaño real de los herrajes. Pieza Descripción Cantidad Pieza Descripción Cantidad Tornillos para el montaje de aspas Pasador de cierre Tuerca de plástico para conectar Tornillo adicional para soporte de cables aspas con contratuerca Pasador de soporte... -
Página 20: Contenido Del Paquete
Preinstalación (continuación) CONTENIDO DEL PAQUETE Pieza Descripción Cantidad Pieza Descripción Cantidad Soporte de montaje deslizante Aspa (dentro de la cubierta) Soporte de aspa Ensamblaje de tubo bajante/bola Ensamblaje del soporte del kit de Cubierta con aro incorporado luces Cubierta decorativa del collarín del Tazón de vidrio motor Control remoto/receptor... -
Página 21: Instalación
Instalación OPCIONES DE MONTAJE NOTA: Tal vez necesites un tubo bajante más largo para ADVERTENCIA: Para reducir el riesgo de incendio, descarga eléctrica o lesiones personales, monta el ventilador sobre una caja eléctrica mantener la altura mínima adecuada de las aspas, al marcada como “aprobada como soporte de ventiladores de 35 lb (15,9 instalar el ventilador en un techo inclinado. -
Página 22: Ensamblaje - Montaje Estándar En Techo
Ensamblaje – Montaje Estándar en Techo Preparación para el montaje Disposición de los cables □ □ Inserta los cables que salen por la parte superior del Retira el aro (O) de la cubierta (C), girándolo hacia la derecha motor del ventilador (E) en la cubierta decorativa del hasta soltarlo. -
Página 23: Ensamblaje - Cómo Colgar El Ventilador
Ensamblaje – Cómo Colgar el Ventilador Cómo fijar el ventilador Cómo colgar el ventilador a la caja eléctrica □ Con cuidado alza el ensamblaje del motor del ventilador (E) ADVERTENCIA: Para reducir el riesgo de incendio, hasta el soporte de montaje deslizante (A). descarga eléctrica o lesiones personales, monta el □... -
Página 24: Ensamblaje
Ensamblaje – Cómo Colgar el Ventilador (continuación) Cómo configurar los códigos Cómo instalar el receptor del control remoto ADVERTENCIA: Para reducir el riesgo de incendio o de descarga NOTA: Las frecuencias del receptor y control remoto han sido eléctrica, recuerda desconectar la electricidad. El cableado preconfiguradas en la fábrica. - Página 25 Ensamblaje – Cómo Colgar el Ventilador (continuación) Cómo hacer las conexiones eléctricas Cómo montar el ventilador ADVERTENCIA: Cada cable no suministrado con este ventilador está ADVERTENCIA: Cuando uses el ensamblaje del tubo bajante/ diseñado para aceptar hasta un circuito eléctrico de casa de calibre bola estándar, la pestaña en el aro en la parte inferior del soporte 12 y dos cables del ventilador.
-
Página 26: Ensamblaje - Cómo Unir Las Aspas Del Ventilador
Ensamblaje – Cómo Unir las Aspas del Ventilador Cómo unir las aspas del ventilador Cómo montar las aspas ensambladas NOTA:Las aspas de tu ventilador son reversibles. Elige □ Coloca el aspa en la carcasa del motor del ventilador (E) el acabado del aspa que mejor resalte tu decoración. alineando los dos orificios del soporte del aspa (H) con los dos □... -
Página 27: Ensamblaje - Cómo Instalar El Kit De Luces
Ensamblaje – Cómo Instalar el Kit de Luces Cómo instalar el kit de luces Cómo instalar la carcasa del kit de luces □ Quita un tornillo (P) de la carcasa del kit de luces (F). Afloja los PRECAUCIÓN: Para disminuir el riesgo de descarga eléctrica, otros dos tornillos, sin quitarlos. -
Página 28: Funcionamiento
Funcionamiento Clima cálido - (Hacia adelante) Un flujo de aire descendente crea un NOTA: El interruptor de reversa está ubicado en la superficie de efecto de enfriamiento. Esto te permite fijar tu aire acondicionado en la carcasa del motor. Apaga el ventilador y espera hasta que las una configuración más alta sin afectar tu comodidad. -
Página 29: Mantenimiento Y Limpieza
Mantenimiento y limpieza ADVERTENCIA: Asegúrate de que la corriente esté apagada antes de limpiar el ventilador. □ Debido al movimiento natural del ventilador, algunas conexiones pueden aflojarse. Revisa las conexiones de soporte, soportes y accesorios de aspas dos veces al año. Verifica que estén seguros. No es necesario desmontar el ventilador del techo. □... - Página 30 ¿Preguntas, problemas o piezas faltantes? Antes de regresar a la tienda, llama al Servicio al Cliente de Hampton Bay de Lunes a Viernes entre 8 a.m. y 6 p.m., (Hora del Este de EE. UU.) 1-877-527-0313 HAMPTONBAY.COM Conserva este manual para uso en el futuro.