Publicidad

Idiomas disponibles
  • ES

Idiomas disponibles

  • ESPAÑOL, página 20

Enlaces rápidos

Notice 12L Inox.qxd
14/11/2001
09:36
Page 1
S.A. SEB 21260 SELONGEY CEDEX, R.C. DIJON B 302 412 226
RÉF. 3303252, 1
ère
ÉDITION, NOVEMBRE 2001, IMPRIMÉ EN FRANCE
TOUS DROITS RÉSERVÉS

Publicidad

Tabla de contenido
loading

Resumen de contenidos para TEFAL 5203

  • Página 1 Notice 12L Inox.qxd 14/11/2001 09:36 Page 1 S.A. SEB 21260 SELONGEY CEDEX, R.C. DIJON B 302 412 226 RÉF. 3303252, 1 ère ÉDITION, NOVEMBRE 2001, IMPRIMÉ EN FRANCE TOUS DROITS RÉSERVÉS...
  • Página 2 Notice 12L Inox.qxd 12/11/2001 14:46 Page 2 Mini Four 12 L u Guide utilisateur u User’s Manual u Benutzer- handbuch u Guida per l’utilizzatore u Gebruiks- aanwijzing u Instrucciones de uso u Guia do utilizador u Brugsanvisning...
  • Página 3: Schéma Descriptif

    Notice 12L Inox.qxd 12/11/2001 14:46 Page 3 Schéma descriptif Grille à 3 positions Porte en verre Résistance inférieure Bouton Arrêt et Thermostat Connaître votre four Grille trois positions Veillez à bien remettre le Votre four est équipé d’une grille bouton sur la position 0 à la fin de plate pouvant se placer à...
  • Página 4: Utiliser Votre Four

    Notice 12L Inox.qxd 12/11/2001 14:46 Page 4 Utiliser votre four Mise en route et cuisson Surveiller de temps en temps votre Choisir le plat qui convient pour cuisson. votre préparation. Placer la grille à Fin de cuisson la hauteur souhaitée. A la fin de la cuisson, arrêter Disposer le plat avec les aliments votre...
  • Página 5: Consignes De Sécurité

    Notice 12L Inox.qxd 12/11/2001 14:46 Page 5 Consignes de sécurité Prenez le temps de lire • Afin d’éviter les chocs électriques, ne toutes les instructions et plongez pas le fil électrique, la prise de reportez-vous au «guide de courant ou l’appareil dans l’eau ou un l’utilisateur».
  • Página 6 Notice 12L Inox.qxd 12/11/2001 14:46 Page 6 Descriptive diagram 3-position grill Glass door Lower resistance Stop and thermostat button Understanding your oven 3-position grill Make sure the button is Your oven is fitted with a flat grill on 0 when cooking is finished, which can be placed at three otherwise the oven will continue different levels, so as to maximize...
  • Página 7: Using Your Oven

    Notice 12L Inox.qxd 12/11/2001 14:46 Page 7 Using your oven Starting-up and cooking The oven heats up. Watch the Choose the dish appropriate for cooking from time to time. your preparation. End of cooking Place the grill at the required At the end of cooking time, turn off height.
  • Página 8: Safety Instructions

    Notice 12L Inox.qxd 12/11/2001 14:46 Page 8 Safety instructions Please take the time to read • In order to avoid electric shocks, keep the instructions thoroughly the electric wire, plug or appliance and refer to the «User’s away from water or any other liquid. Guide».
  • Página 9: Wiring Instructions

    If you lose this cover your socket outlet, it should be please do not use the plug. You removed from the mains lead and may contact Tefal UK Limited for a disposed of safely. The flexible cord replacement. insulation should be stripped back...
  • Página 10: Schematische Darstellung

    Notice 12L Inox.qxd 12/11/2001 14:46 Page 10 Schematische Darstellung Rost, 3-fach verstellbar Glastür Ein-/Ausschalter Untere Heizschlange und Thermostat Funktionen Dreifach verstellbarer Rost Darauf achten, dass der Ihr Ofen verfügt über einen flachen Knopf nach Backvorgang wieder Rost, der sich dreifach verstellen in Position 0 gebracht wird, lässt (3 Stufen) und so den andernfalls läuft man Gefahr, dass...
  • Página 11 Notice 12L Inox.qxd 12/11/2001 14:46 Page 11 Gebrauch Einschalten und Backvorgang Temperatur stellen. Wählen Sie die Schüssel, die sich Der Ofen heizt sich auf. Von Zeit zu für Ihre Zubereitung am besten Zeit Backvorgang prüfen. eignet. Rost auf die gewünschte Ende des Backvorgangs Stufe stellen.
  • Página 12: Wichtige Vorsichtsmaßnahmen

    Notice 12L Inox.qxd 12/11/2001 14:46 Page 12 Wichtige Vorsichtsmaßnahmen Nehmen Sie sich die Zeit • Um elektrische Schläge zu vermeiden, alle Anweisungen zu lesen das Stromkabel, den Stecker oder das und schlagen Sie in Ihrem Gerät niemals in Wasser oder eine «Benutzerhandbuch»...
  • Página 13: Schema Descrittivo

    Notice 12L Inox.qxd 12/11/2001 14:46 Page 13 Schema descrittivo Griglia a 3 posizioni Sportello in vetro Manopola Marcia-Arresto Resistenza inferiore e Termostato Conoscere il vostro forno Griglia a 3 posizioni Alla fine della cottura, non Il vostro forno è munito di una dimenticare di rimettere la griglia piatta che può...
  • Página 14 Notice 12L Inox.qxd 12/11/2001 14:46 Page 14 Installare il vostro apparecchio Mettere in funzione regolando il Poggiate il vostro forno su un piano di termostato sulla posizione 280°C. lavoro stabile. Fate in modo che l'aria possa circolare liberamente intorno Si può produrre una all'apparecchio.
  • Página 15 Notice 12L Inox.qxd 12/11/2001 14:46 Page 15 Pulire il vostro forno Prima di procedere ad una opera- Per i modelli con la capote inox: zione di manutenzione o alla utilizzare insieme uno straccio pulizia, togliete la spina e lasciate morbido con un prodotto per pulire raffreddare l’apparecchio.
  • Página 16: Belangrijkste Onderdelen

    Notice 12L Inox.qxd 12/11/2001 14:46 Page 16 Belangrijkste onderdelen Grillrooster met 3 hoogtestanden Glazen ovendeur Aan/Uit-knop Onderelement en thermostaat Leer uw oven kennen Grillrooster met Let er altijd goed op de 3 hoogtestanden knop aan het einde van de baktijd Dit rooster kan op 3 verschillende terug op 0 te zetten, anders blijft hoogtes in de oven geplaatst...
  • Página 17 Notice 12L Inox.qxd 12/11/2001 14:46 Page 17 daadwerkelijk doet. Neem de oven oven de allereerste keer leeg en de accessoires met een vochtig (zonder rooster) en met gesloten doekje af en droog ze na. ovendeur gedurende ca. 15 min. aan te laten staan om de «nieuwe» Het allereerste gebruik geur te doen verdwijnen.
  • Página 18 Notice 12L Inox.qxd 12/11/2001 14:46 Page 18 Schoonmaken Haal vóór elke schoonmaak- en Het grillrooster kan op gebruikelijke onderhoudsbeurt de stekker uit het wijze met de hand of in de stopcontact en laat het apparaat vaatwasmachine afgewassen voldoende afkoelen. worden. Neem de buitenkant met een vochtig doekje en wat Geen (koud) water tegen de glazen afwasmiddel af.
  • Página 19: Veiligheidsvoorschriften

    Notice 12L Inox.qxd 12/11/2001 14:46 Page 19 Veiligheidsvoorschriften Lees aandachtig alle voor- gebruik indien nodig ovenhandschoenen. schriften en raadpleeg de • Om elektrische schokken te vermijden, «gebruiksaanwijzing». het snoer, het stopcontact of het • Dit apparaat voldoet aan de geldende apparaat buiten contact van water of veiligheidsnormen en aan de volgende een andere vloeistof houden.
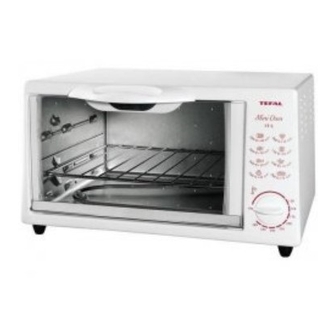
  • Página 20: Descripción Del Aparato

    Notice 12L Inox.qxd 12/11/2001 14:46 Page 20 Descripción del aparato Rejilla con 3 posiciones Puerta de vidrio Resistencia inferior Botón Paro y Termostato Conozca su horno Rejilla con 3 posiciones Al finalizar la cocción, Este horno está equipado con una asegúrese de que haya vuelto rejilla que podrá...
  • Página 21: Utilización

    Notice 12L Inox.qxd 12/11/2001 14:46 Page 21 Utilización Puesta en marcha y cocción Vigile de vez en cuando la cocción. Escoja la fuente o plato adecuada a Fin de la cocción su preparación. Coloque la rejilla a Al finalizar la cocción, vuelva a la altura deseada.
  • Página 22: Normas De Seguridad

    • Teniendo en cuenta la diversidad de En este caso, lleve el aparato al Servicio normas en vigor, si el aparato va a Técnico Tefal más cercano a su utilizarse en un país diferente al de su domicilio para evitar cualquier peligro.
  • Página 23: Esquema Descritivo

    Notice 12L Inox.qxd 12/11/2001 14:46 Page 23 Esquema descritivo Grelha com 3 posições Porta de vidro Botão parar Resistência inferior + Termostato Conhecer o seu forno Grelha de três posições Tenha o devido cuidado de O seu forno está equipado com colocar novamente o botão na uma grelha que pode colocar-se a posição 0 no fim da cozedura...
  • Página 24 Notice 12L Inox.qxd 12/11/2001 14:46 Page 24 Utilize o seu forno Colocação em começa a aquecer. funcionamento/cozedura Verifique de vez em quando a sua Escolher o recipiente que convém cozedura. para o seu cozinhado. Fim de cozedura Coloque a grelha à altura desejada. No fim da cozedura, desligue o Coloque o recipiente com os forno pondo o botão termostato...
  • Página 25: Instruções De Segurança

    Notice 12L Inox.qxd 12/11/2001 14:46 Page 25 Instruções de segurança É melhor ler todas as instru- • De forma a evitar choques eléctricos, ções e consultar o seu «guia não mergulhe o fio eléctrico, a ficha ou do utilizador». o aparelho em água ou outro líquido. •...
  • Página 26 Notice 12L Inox.qxd 12/11/2001 14:46 Page 26 Beskrivelse Ovnrist med 3 positioner Ovndør i glas Varmelegeme i Stopknap og termostat ovnbunden Præsentation af ovnen Ovnrist med 3 positioner Sluk ovnen ved at indstille Ovnen er udstyret med en flad rist, knappen på...
  • Página 27 Notice 12L Inox.qxd 12/11/2001 14:46 Page 27 Brug af ovnen Tænde og bruge ovnen knappen. Ovnen begynder at Vælg altid fade og bageforme, der varme. Overvåg tilberedningen fra passer pågældende tid til anden. tilberedning. Sæt ovnristen ind i Når tilberedningstiden er slut den ønskede højde i ovnen.
  • Página 28 Notice 12L Inox.qxd 12/11/2001 14:46 Page 28 Sikkerhedsregler Brug den nødvendige tid til • Ovnens ledning, stik eller selve at læse brugsanvisningen, apparatet må aldrig neddyppes i vand og følg dens instruktioner. eller i en anden væske, da det kan medføre elektrisk stød.

Tabla de contenido