Publicidad
CONTACT US FIRST
CONTACT US FIRST
sauder.com
sauder.com
sauder.com
BEFORE MAKING ANY RETURNS TO THE STORE.
BEFORE MAKING ANY RETURNS TO THE STORE.
sauder.com/service
Visit
Prefer the phone? Give us a ring at
Customer Service is available Monday-Friday - 9 a.m. to 5:30 p.m. EST (except holidays)
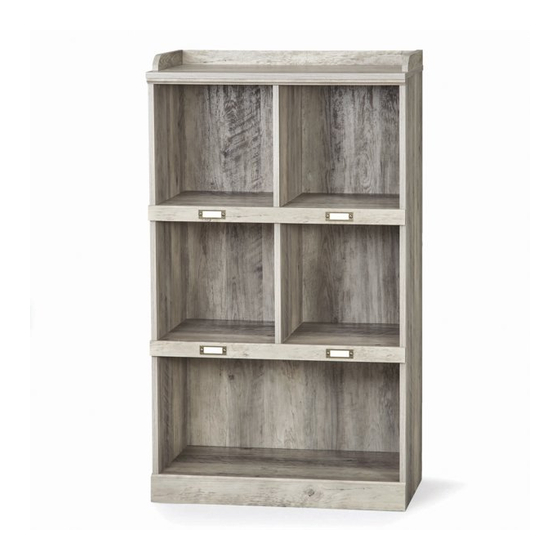
Storage Organizer
Model 422647
Share your journey!
to order replacement parts, view video assembly tips, or chat with a live rep.
1-800-445-1527
.
You'll love what we
have in storage.
NOTE: THIS INSTRUCTION
BOOKLET CONTAINS IMPORTANT
SAFETY INFORMATION.
PLEASE READ AND KEEP FOR
FUTURE REFERENCE.
English pg 1-18
Français pg 19-21
Español pg 22-24
Lot # 531686
Purchased: __________________
07/17/19
Publicidad
Tabla de contenido

Manuales relacionados para Sauder 422647


Resumen de contenidos para Sauder 422647
- Página 1 Customer Service is available Monday-Friday - 9 a.m. to 5:30 p.m. EST (except holidays) You'll love what we have in storage. Storage Organizer NOTE: THIS INSTRUCTION BOOKLET CONTAINS IMPORTANT SAFETY INFORMATION. Model 422647 PLEASE READ AND KEEP FOR FUTURE REFERENCE. English pg 1-18 Français pg 19-21 Español pg 22-24 Share your journey!
- Página 2 Table of Contents Assembly Tools Required Part Identifi cation No. 2 Phillips Screwdriver Tip Shown Actual Size Hardware Identifi cation Assembly Steps 5-18 Skip the power trip. Français 19-21 This time. Español 22-24 Safety 25-26 Warranty Page 2 www.sauder.com 422647...
-
Página 3: Part Identifi Cation
UPPER SHELF (1) SIDE RAIL (2) LEFT END (1) LOWER SHELF (1) BACK RAIL (1) UPPER UPRIGHT (1) BOTTOM (1) FRONT MOLDING (1) LOWER UPRIGHT (1) BACK (1) SHELF MOLDING (2) TOP (1) FRONT SKIRT (1) 422647 www.sauder.com Page 3... - Página 4 FURNITURE TIPPING RESTRAINT KIT - 1 CARD HOLDER - 4 BLACK 1-3/16" FLAT HEAD SCREW - 11 BLACK 7/8" FLAT HEAD SCREW - 3 BLACK 1/2" PAN HEAD SCREW - 43 BLACK 5/16" MACHINE SCREW - 8 Page 4 www.sauder.com 422647...
- Página 5 fl oor. Turn eighteen CAM SCREWS (2) into the ENDS (A and B) å and TOP (E). NOTE: Be sure to use the exact holes shown in the TOP. å (18 used) 422647 www.sauder.com Page 5...
- Página 6 MACHINE SCREWS (9). The hole is closer to this edge. Open end The hole is closer to this edge. Curved edge BLACK 1/2" PAN HEAD SCREW (9 used) (9 used for the METAL BRACKETS) Short end Page 6 www.sauder.com 422647...
- Página 7 Righty tighty. Lefty loosey. Notched edge S u r f a c i t h h o l w i t l e s r f a BLACK 1-3/16" FLAT HEAD SCREW (2 used in this step) 422647 www.sauder.com Page 7...
- Página 8 Fasten the LOWER UPRIGHT (D) to the UPPER SHELF (F). å Tighten two HIDDEN CAMS. The arrow must point toward the edge of the board. Finished edge S u r f a c i t h h o l Arrow Page 8 www.sauder.com 422647...
- Página 9 Fasten the LOWER SHELF (G) to the LOWER UPRIGHT (D). å Use two BLACK 1-3/16" FLAT HEAD SCREWS (6). w i t l e s r f a BLACK 1-3/16" FLAT HEAD SCREW (2 used in this step) 422647 www.sauder.com Page 9...
- Página 10 Fasten the SHELF MOLDINGS (N) to the SHELVES (F and G). å Use six BLACK 1/2" PAN HEAD SCREWS (8) through the METAL BRACKETS on the SHELF MOLDINGS and into the SHELVES. BLACK 1/2" PAN HEAD SCREW (6 used for the SHELF MOLDINGS) Page 10 www.sauder.com 422647...
- Página 11 Fasten the LEFT END (B) to the SHELVES (F and G). å Tighten four HIDDEN CAMS. Notched edge S u r f a c i t h o u t C (4 used) R E W Arrow 422647 www.sauder.com Page 11...
- Página 12 Fasten the BOTTOM (H) to the LEFT END (B). Tighten two å Rome. This can be built HIDDEN CAMS. in a day. These holes must be here. o l e w i t r f a Arrow Page 12 www.sauder.com 422647...
- Página 13 Fasten the FRONT SKIRT (J) to the BOTTOM (H). Use å three BLACK 1/2" PAN HEAD SCREWS (8) through the METAL BRACKETS on the FRONT SKIRT and into the BOTTOM. Curved edge BLACK 1/2" PAN HEAD SCREW (3 used in this step) 422647 www.sauder.com Page 13...
- Página 14 NOTE: You may need to lift up on the SHELVES and å BOTTOM slightly to let the RIGHT END sit underneath the FRONT SKIRT (J) and SHELF MOLDINGS (N). Notched edge S u r f a c i t h Arrow (6 used) Page 14 www.sauder.com 422647...
- Página 15 å BLACK 1-3/16" FLAT HEAD SCREWS (6). Finished edge BLACK 1-3/16" FLAT HEAD SCREW (7 used in this step) Finished edge Unfi nished edge Curved edge BLACK 7/8" FLAT HEAD SCREW (3 used in this step) 422647 www.sauder.com Page 15...
- Página 16 Push six HIDDEN CAMS (1) into the ENDS (A and B) and å UPPER UPRIGHT (C). Hey! It's starting to look Fasten the TOP (E) to the ENDS (A and B) and UPPER å like something! UPRIGHT (C). Tighten six HIDDEN CAMS. Arrow (6 used) Page 16 www.sauder.com 422647...
- Página 17 Fasten the BACK (I) to your unit using the BLACK 1/2" PAN å BACK fastened. The unit may collapse. HEAD SCREWS (8). The label should be here. BLACK 1/2" PAN HEAD SCREW (25 used in this step) Do not use this hole. 422647 www.sauder.com Page 17...
- Página 18 Use the 5/8" screw through the small hole in a bracket and into the back edge of the TOP (E). Small hole 25 lbs. 30 lbs. total (16 used) To cover HIDDEN CAMS 30 lbs. total 50 lbs. Page 18 www.sauder.com 422647...
-
Página 19: Liste De Pièces
Modèle 422647 Organisateur de Rangement Utilisez les instructions d’ a ssemblage en français avec les NOUS SOMMES LA POUR VOUS AIDER! schémas étape par étape du manuel d’instruction en anglais. Nous faisons de notre mieux pour nous assurer que votre meuble Chaque étape en français correspond à... - Página 20 Faire tourner deux VIS D'EXCENTRIQUE (2) dans les trous exacts illustrés dans la TABLETTE SUPÉRIEURE (F). Enfoncer deux EXCENTRIQUES ESCAMOTABLES (1) dans le MONTANT INFÉRIEUR (D). Fixer le MONTANT INFÉRIEUR (D) à la TABLETTE SUPÉRIEURE (F). Serrer deux EXCENTRIQUES ESCAMOTABLES. Page 20 www.sauder.com 422647...
- Página 21 ÉTAPE 12 Enfoncer six EXCENTRIQUES ESCAMOTABLES (1) dans les EXTRÉMITÉS (A et B) et le MONTANT SUPÉRIEUR SUPÉRIEUR (C). Fixer le DESSUS (E) aux EXTRÉMITÉS (A et B) et au MONTANT SUPÉRIEUR (C). Serrer six EXCENTRIQUES ESCAMOTABLES. 422647 www.sauder.com Page 21...
-
Página 22: Organizador De Almacenamiento
EXTREMO DERECHO ..........1 EXCÉNTRICO ESCONDIDO ......20 su referencia futura. Si necesita ponerse en EXTREMO IZQUIERDO ..........1 BIELA DE EXCÉNTRICO ........20 contacto con Sauder en PARAL SUPERIOR ............1 SOPORTE DE METAL ..........9 cuanto a esta unidad, PARAL INFERIOR ............1 PORTA DE TARJETAS ..........4 refi... - Página 23 Atornille dos BIELAS DE EXCÉNTRICO (2) dentro de los agujeros correspondientes indicados del ESTANTE SUPERIOR (F). Empuje dos EXCÉNTRICOS ESCONDIDOS (1) en el PARAL INFERIOR (D). Fije el PARAL INFERIOR (D) al ESTANTE SUPERIOR (F). Apriete dos EXCÉNTRICOS ESCONDIDOS. 422647 www.sauder.com Page 23...
- Página 24 Empuje seis EXCÉNTRICOS ESCONDIDOS (1) dentro de los EXTREMOS (A y B) y del PARAL SUPERIOR (C). Fije el PANEL SUPERIOR (E) a los EXTREMOS (A y B) y al PARAL SUPERIOR (C). Apriete seis EXCÉNTRICOS ESCONDIDOS. Page 24 www.sauder.com 422647...
- Página 25 TOUJOURS décharger les tablettes et les tiroirs, en commençant par les surface supérieures, avant de déplacer le meuble. NE JAMAIS pousser ou tirer un meuble sur de la moquette. Demander à une autre personne de le soulever correctement pour le déplacer et/ou le repositionner. 422647 www.sauder.com Page 25...
- Página 26 SIEMPRE descargue los estantes y cajones, empezando con las superfi cies superiores, antes de moverlo. NUNCA empuje ni tire de los muebles sobre una alfombra. Obtenga que un amigo le ayude a levantarlo correctamente para moverlo y/o reposicionarlo. Page 26 www.sauder.com 422647...
-
Página 27: Garantía Limitada De 1 Año
à compter de la date d'achat la première fois et qui sont signalés à Sauder dans les limites de couverture de la contre tout défaut de matériaux ou de fabrication des composantes de mobilier Sauder. -
Página 28: If You Need Assistance
Walmart.com in the product detail page. General Conformity Certifi cate 1. This certifi cate applies to the Sauder Global Sourcing Product identifi ed by this Instruction Book. 2. This certifi cate applies to compliance of this product with the CPSC Ban on Lead-Containing Paint (16 CFR 1303).