Tabla de contenido
Publicidad
Idiomas disponibles
Idiomas disponibles
Enlaces rápidos
Publicidad
Tabla de contenido

Manuales relacionados para Xiaomi dreame


Resumen de contenidos para Xiaomi dreame
- Página 1 Dreame Cordless Vacuum Cleaner User Manual For further information, please go to www.dreame.tech Manufactured by: Dreame Technology (Tianjin) Limited Address: 1-1-804-8, North, Finance Trade Center, 6865, Yazhou Road, Dongjiang Free Trade Zone, Tianjin Pilot Free Trade Zone, Tianjin, China...
- Página 2 Беспроводной пылесос Dreame · · · · · · · · · · · · · · · · 49 Benvenuto in Dreame - aspirapolvere senza fili · · · · · · · · · · · · · · · · · · · · · · · · · · · · · · · · · · · · · · · · · 65 Manual de usuario de la aspiradora inalámbrica Dreame...
-
Página 3: Safety Instructions
The soft roller brushbar, battery, metal connector pin, and vacuum are electrically We Dreame Technology (Tianjin) Limited, hereby, declares that this equipment is in conductive and should not be immersed in water or other liquid. Make sure to dry all filters compliance with the applicable Directives and European Norms, and amendments. -
Página 4: Part Names
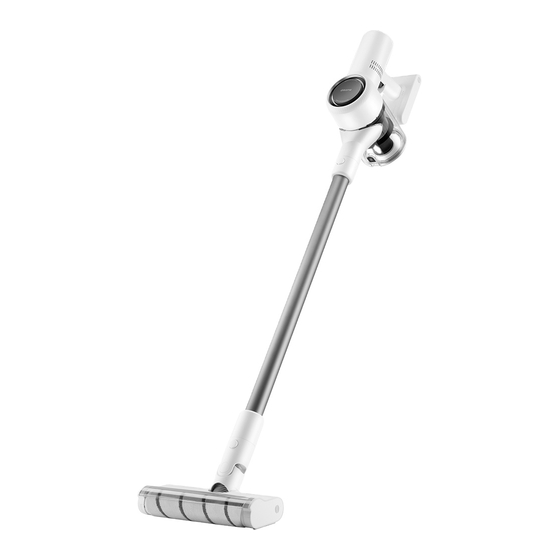
Product Overview Product Overview Part Names Accessories Speed Adjustment Charging Port Button On/Off Switch Turbo Mode 2-in-1 Crevice Nozzle 2-in-1 Brush Nozzle Stretch Soft Hose Push to turn on Standard Mode Release to turn off Cyclone Assembly Eco Mode Dust Compartment Release Button Extension Rod Release Button... - Página 5 Installation Vacuum and Accessories Installation Diagram Insert till it clicks into place...
-
Página 6: How To Use
Installation How to Use Installing the 2-in-1 Charging & Storage Mount Note: 1. The 2-in-1 charging & storage mount is an optional accessory, you can install it based on your 1. Fully charge the vacuum before using it for the first time. This will take about 4 hours. requirements. -
Página 7: Care & Maintenance
How to Use Care & Maintenance Using Different Attachments Tips: 1. Always use genuine parts to keep your warranty from being voided. Mini-Motorized Nozzle: Strong vibrations 2-in-1 Crevice Nozzle: Suitable for 2. If the filter or nozzle becomes clogged, the vacuum will stop working shortly after being yield deep cleaning action for removing vacuuming cracks, corners of doors and mites and dust from mattresses and fabric... - Página 8 Care & Maintenance Care & Maintenance Cleaning the Cyclone Assembly Cleaning the HEPA Filter Assembly 1. Rotate the cyclone assembly in the direction illustrated to unlock it, then remove the cyclone 1. Place the vacuum securely on a flat surface, then turn the HEPA filter assembly cover in the assembly.
- Página 9 Care & Maintenance Care & Maintenance Cleaning the Soft Roller Nozzle and Mini-Motorized Nozzle Cleaning the Mini-Motorized Nozzle Note: To prevent injury from accidentally turning on the vacuum, make sure the Soft Roller 1. Use a coin as illustrated to rotate the 2.
-
Página 10: Weee Information
WEEE Information If the vacuum is not working properly, please refer to the troubleshooting table below. All products bearing this symbol are waste electrical and electronic equipment (WEEE as in directive 2012/19/EU) which should not be mixed with unsorted household waste. Instead, you should protect human health and the environment by handing over your waste equipment to a designated collection point for the Errors Possible Causes... -
Página 11: Consignes De Sécurité
Soyez vigilant lorsque vous utilisez ce produit à proximité d’ enfants. Les enfants Utilisez uniquement des accessoires et des pièces de rechange approuvées par Dreame. ne sont pas autorisés à nettoyer ou à entretenir l’ aspirateur sans la surveillance d’ un N’... -
Página 12: Présentation Du Produit
Présentation du produit Product Overview Nom des pièces Accessoires Bouton de réglage Port de recharge de la vitesse Bouton Marche/Arrêt Mode Turbo Suceur fente 2-en-1 Suceur brosse 2-en-1 Tuyau souple extensible Appuyer pour mettre en marche Mode standard Relâcher pour arrêter Ensemble cyclone Mode éco Bouton de déverrouillage... - Página 13 Installation Schéma d’ installation de l’ aspirateur et des accessoires Insérer jusqu’ à entendre un déclic...
-
Página 14: Mode D'utilisation
Installation Mode d’utilisation Installation de la station de charge et de stockage 2-en-1 Remarque : 1. Cette station est un accessoire facultatif que vous pouvez installer en fonction de vos 1. Chargez entièrement la batterie de l’ aspirateur avant la première utilisation. Cette opération besoins. -
Página 15: Entretien Et Maintenance
Mode d’utilisation Entretien et maintenance Utilisation des différents accessoires Astuces : 1. Utilisez toujours des pièces d’ origine, faute de quoi la garantie pourrait être annulée. Brosse électrique anti-acariens : Émet de Suceur fente 2-en-1 : Adapté à 2. En cas d’ obstruction du filtre ou du suceur, l’ aspirateur s’ arrête de fonctionner peu après fortes vibrations pour un nettoyage en l’... - Página 16 Entretien et maintenance Entretien et maintenance Nettoyage de l’ensemble cyclone Nettoyage de l’ensemble filtre HEPA 1. Faites tourner l’ ensemble cyclone dans le sens de déverrouillage indiqué, puis retirez-le. 1. Fixez l’ aspirateur solidement sur une surface plane, puis faites tourner le couvercle de l’...
- Página 17 Entretien et maintenance Entretien et maintenance Nettoyage de la brosse douce et de la brosse électrique Nettoyage de la brosse électrique anti-acariens anti-acariens 1. Utilisez une pièce comme illustré pour 2. Une fois la tête de brosse faire tourner le verrou dans le sens déverrouillée, retirez-la de la brosse Remarque : Pour éviter toute blessure lors de la mise sous tension de l’...
- Página 18 Informations DEEE En cas de dysfonctionnement de l’ aspirateur, consultez le tableau ci-dessous. Tous les produits portant ce symbole deviennent des déchets d’ équipements électriques et électroniques (DEEE dans la Directive européenne 2012/19/UE) qui ne doivent pas être mélangés aux déchets ménagers non triés. Vous devez contribuer à...
-
Página 19: Sicherheitshinweise
Ladegerätes kann zu einer Entzündung des Lithium-Akkus führen. Der Staubsauger darf nicht benutzt werden, um brennbare oder entzündliche Wir, Dreame Technology (Tianjin) Limited bestätigen hiermit, dass dieses Gerät mit den Flüssigkeiten wie Benzin, Bleiche, Ammoniak, Abflussreiniger oder andere Flüssigkeiten geltenden Verordnungen und europäischen Normen sowie etwaigen Ergänzungen in aufzusaugen. - Página 20 Produktüberblick Produktüberblick Teilebezeichnung Zubehör Geschwindigkeitsregler Ladeanschluss Turbomodus Ein-/Aus-Schalter 2-in-1 Spaltdüse 2-in-1 Bürstendüse Stretchbarer, weicher Schlauch Standardmodus Zum Einschalten drücken Zum Ausschalten loslassen Eco-Modus Zyklon-Baugruppe Freigabetaste des Staubbehälters Entriegelungstaste für Verlängerungsstange HEPA Filtereinheit Weiche Bürstenrolle Elektrische Milbenbürste Netzteil 2-in-1 Lade- und Aufbewahrungshalterung (einschließlich 2 x Schrauben, 2 x Dübel) Entriegelungstaste für Bürstenkopf...
- Página 21 Installation Installationsdiagramm für Staubsauger und Zubehör Hineinstecken, bis ein Klick ertönt...
- Página 22 Installation Benutzungt Installation der 2-in-1 Lade- und Aufbewahrungshalterung Hinweis: 1. Die 2-in-1 Lade- und Aufbewahrungshalterung ist ein optionales Zubehörteil, das Sie nach 1. Laden Sie den Staubsauger vor dem ersten Einsatz bitte vollständig auf. Das nimmt etwa 4 Ihrem persönlichen Bedarf montieren können. Stunden in Anspruch.
-
Página 23: Pflege Und Wartung
Benutzung Pflege und Wartung Benutzung verschiedener Zubehörteile Tipps: 1. Verwenden Sie stets Originalteile, um ein Erlöschen der Garantie zu vermeiden. Elektrische Milbenbürste: Durch starke 2-in-1 Spaltendüse: Geeignet für das 2. Falls der Filter oder die Düse verstopft sind, wird der Staubsauger kurz nach Einschalten den Vibrationen können Matratzen und andere Saugen in Spalten, in Ecken von Türen Textiloberflächen gründlich von Milben und... - Página 24 Pflege und Wartung Pflege und Wartung Reinigung der Cyclone-Baugruppe Reinigung der HEPA-Filtereinheit 1. Drehen Sie die Cyclone-Baugruppe in die angegebene Richtung, um die Verriegelung zu 1. Platzieren Sie den Staubsauger sicher auf einer flachen Oberfläche, drehen Sie die lösen. Entfernen Sie die Cyclone-Baugruppe. Abdeckung der HEPA-Filtereinheit in die angegebene Richtung und entfernen Sie die HEPA-Filtereinheit.
- Página 25 Pflege und Wartung Pflege und Wartung Reinigung der weichen Bürstenrolle und der elektrischen Reinigung der elektrischen Milbenbürste Milbenbürste 1. Drehen Sie mit Hilfe einer Münze die 2. Nachdem Sie den Bürstenkopf Verriegelung gegen den Uhrzeigersinn bis entriegelt haben, entfernen Sie ihn von Hinweis: Um eine Verletzung durch eine versehentliche Aktivierung des Staubsaugers zu zum Klick (siehe Abbildung).
- Página 26 WEEE-Informationen Falls der Staubsauger nicht korrekt funktionieren sollte, beachten Sie bitte die folgende Tabelle, um eine Problemlösung zu finden. Alle mit diesem Symbol gekennzeichneten Produkte sind Elektroschrott und Elektrogeräte (WEEE entsprechend EU-Richtlinie 2012/19/EU) und dürfen nicht mit unsortiertem Haushaltsmüll vermischt werden. Schützen Sie stattdessen Ihre Mitmenschen und die Umwelt, indem Sie Ihre zu entsorgenden Geräte an eine Fehler Mögliche Ursachen...
-
Página 27: Инструкции По Технике Безопасности
правильно установить щетку с мягким валиком, отсек для пыли и фильтр. Используйте только оригинальное зарядное устройство. Никогда не используйте Мы, компания Dreame Technology (Tianjin) Limited. настоящим заявляем, что данное неоригинальное зарядное устройство, поскольку это может привести к оборудование соответствует требованиям всех действующих директив ЕС и... -
Página 28: Обзор Устройства
Обзор устройства Обзор устройства Наименования деталей Аксессуары Кнопка регулировки Разъем для зарядки скорости Кнопка включения и Турборежим выключения Щелевая насадка "2 в 1" Насадка-щетка "2 в 1" эластичный мягкий шланг Стандартный режим Нажмите, чтобы включить Отпустите, чтобы выключить Энергосберегающий Циклонный блок режим... - Página 29 Установка Схема установки пылесоса и аксессуаров Вставляйте, пока не услышите щелчок...
- Página 30 Установка Инструкция Установка крепления для зарядки и хранения "2 в 1" Примечание. 1. Крепление для зарядки и хранения "2 в 1" — это дополнительный аксессуар, который 1. Перед первым использованием полностью зарядите пылесос. Это займет около 4 можно установить при необходимости. часов.
-
Página 31: Уход И Техническое Обслуживание
Инструкция Уход и техническое обслуживание Использование разных насадок Советы. 1. Используйте оригинальные запчасти, иначе гарантия может быть аннулирована. Электрическая щетка против клещей: Щелевая насадка "2 в 1": 2. Если фильтр или насадка засорены, пылесос прекратит работать сразу после сильные вибрации обеспечивают глубокое подходит... - Página 32 Уход и техническое обслуживание Уход и техническое обслуживание Очистка циклонного блока Очистка блока HEPA-фильтра 1. Поверните циклонный блок в указанном направлении, чтобы разблокировать, а 1. Поместите пылесос на безопасную, ровную поверхность, затем поверните крышку затем снимите его. блока HEPA-фильтра в указанном направлении и снимите его. Примечание.
- Página 33 Уход и техническое обслуживание Уход и техническое обслуживание Очистка щетки с мягким валиком и электрической Очистка электрической щетки против клещей щетки против клещей 1. С помощью монетки (как показано 2. Разблокировав головку щетки, на рисунке) поверните замок против снимите ее с электрической щетки Примечание.
-
Página 34: Вопросы И Ответы
Вопросы и ответы Информация об утилизации и переработке отходов Если пылесос не работает должным образом, см. приведенную ниже таблицу устранения неполадок. электрического и электронного оборудования Все изделия, обозначенные символом раздельного сбора отработанного электрического и электронного оборудования (WEEE, директива 2012/19/EU), следует утилизировать отдельно от несортируемых бытовых отходов. -
Página 35: Istruzioni Di Sicurezza
La spazzola morbida a rullo, la batteria, il pin del connettore metallico e l'aspirapolvere conducono elettricità e non devono essere immersi in acqua o altri liquidi. Assicurarsi di Nosotros, Dreame Technology (Tianjin) Limited, por la presente, declaramos que el asciugare tutti i filtri dopo la pulizia. -
Página 36: Panoramica Del Prodotto
Panoramica del prodotto Panoramica del prodotto Nomi dei componenti Accessori Pulsante di regolazione Porta di ricarica della velocità Interruttore On/Off Modalità Turbo Ugello per fessure 2-in-1 Ugello a spazzola 2-in-1 tubo flessibile elasticizzato Premere per accendere Modalità standard Rilasciare per spegnere Modalità... - Página 37 Installazione Diagramma di installazione aspirapolvere e accessori Inserire fino a udire un clic che indica il posizionamento corretto...
-
Página 38: Modalità D'utilizzo
Installazione Modalità d'utilizzo Installazione del supporto di ricarica e appoggio 2-in-1 Nota: 1. Il supporto di ricarica e appoggio 2-in-1 è un accessorio opzionale, che può essere installato 1. prima del primo utilizzo, caricare completamente l'aspirapolvere. La carica completa in base alle proprie esigenze. richiederà... -
Página 39: Cura E Manutenzione
Modalità d'utilizzo Cura e manutenzione Uso dei diversi accessori Consigli: 1.usare sempre parti originali per evitare che la garanzia decada. Spazzola elettrica per acari: Ugello per fessure 2-in-1: 2. Se il filtro o l'ugello si intasa, l'aspiratore smette di funzionare poco dopo l'accensione. Per le forti vibrazioni producono una profonda azione consente di aspirare in fessure, angoli di porte e ripristinare il normale funzionamento, pulire il filtro o l'ugello. -
Página 40: Pulizia Del Filtro Hepa
Cura e manutenzione Cura e manutenzione Pulizia del sistema ciclonico Pulizia del filtro HEPA 1. Ruotare il sistema ciclonico nella direzione mostrata per sbloccarlo, quindi rimuoverlo. 1. Appoggiare l'aspirapolvere su una superficie piana in modo che sia stabile, quindi girare il coperchio del filtro HEPA nella direzione indicata e rimuovere il filtro HEPA. - Página 41 Cura e manutenzione Cura e manutenzione Pulizia della spazzola morbida a rullo e della spazzola Pulizia della spazzola elettrica per acari elettrica per acari 1. Usare una monetina come illustrato 2. Dopo aver sbloccato la testa, per ruotare il blocco in senso antiorario rimuoverla dalla spazzola elettrica per Nota: per evitare lesioni causate dall'accensione accidentale dell'aspirapolvere, finché...
-
Página 42: Informazioni Raee
Informazioni RAEE Se l'aspirapolvere non funziona correttamente, fare riferimento alla tabella di risoluzione dei problemi riportata di seguito. Tutti i prodotti contrassegnati da questo simbolo sono rifiuti di apparecchiature elettriche ed elettroniche (RAEE in base alla direttiva 2012/19/UE) che non devono essere smaltiti assieme a rifiuti domestici non differenziati. -
Página 43: Instrucciones De Seguridad
Asegúrese de secar todos los filtros después de la limpieza. Con la presente, Dreame Technology (Tianjin) Limited dichiara che questo apparecchio è conforme alle direttive applicabili e alle norme europee, nonché ai relativi emendamenti. -
Página 44: Descripción General Del Producto
Descripción General del Producto Descripción General del Producto Nombres de las partes Accesorios Botón de ajuste de Puerto de Carga velocidad Interruptor Modo Turbo Encendido/Apagado Boquilla para hendiduras 2 en 1 Boquilla de cepillo 2 en 1 manguera suave y elástica Modo estándar Pulse para encender Suelte para apagar... -
Página 45: Instalación
Instalación Diagrama de instalación para accesorios y aspiradora Inserte hasta que encaje en su sitio... -
Página 46: Modo De Uso
Instalación Modo de Uso Instalación del soporte de carga y almacenamiento 2 en 1 Nota: 1. El soporte de carga y almacenamiento 2 en 1 es un accesorio opcional, puede instalarlo 1. Cargue completamente el aspirador antes de usarlo por primera vez. Esto tomará alrededor según sus necesidades. -
Página 47: Cuidado Y Mantenimiento
Modo de Uso Cuidado y mantenimiento Uso de diferentes accesorios Consejos: 1. Utilice siempre piezas originales para evitar que se anule la garantía. Cepillo eléctrico para ácaros: Boquilla para hendiduras 2 en 1: 2. Si el filtro o la boquilla se obstruye, el aspirador dejará de funcionar poco después de sus fuertes vibraciones producen una limpieza adecuada para aspirar grietas, esquinas de encenderse. -
Página 48: Limpieza Del Conjunto Del Ciclón
Cuidado y mantenimiento Cuidado y mantenimiento Limpieza del conjunto del ciclón Limpieza del conjunto del filtro HEPA 1. Gire el conjunto del ciclón en la dirección ilustrada para desbloquearlo y, a continuación, 1. Coloque el aspirador firmemente sobre una superficie plana, luego gire la cubierta del retire el conjunto del ciclón. -
Página 49: Limpieza De La Barra De Rodillos Blandos Y Del Cepillo Eléctrico Para Ácaros
Cuidado y mantenimiento Cuidado y mantenimiento Limpieza de la barra de rodillos blandos y del cepillo Limpieza del cepillo eléctrico para ácaros eléctrico para ácaros 1. Use una moneda como se ilustra para 2. Después de desbloquear el cabezal del girar la cerradura en sentido contrario a cepillo, retírelo del cepillo eléctrico de Nota: para evitar lesiones al encender accidentalmente el aspirador, asegúrese de que la... -
Página 50: Preguntas Frecuentes
Preguntas frecuentes Información sobre RAEE Si el aspirador no funciona correctamente, consulte la siguiente tabla de solución de problemas. Todos los productos que llevan este símbolo son residuos de aparatos eléctricos y Errores Posibles causas Soluciones electrónicos (RAEE según la directiva 2012/19/UE) que no deben mezclarse con residuos domésticos sin clasificar. - Página 63 106cm 106cm...
- Página 65 24 hrs 24 hrs 24 hrs 24 hrs...
- Página 66 24 hrs 24 hrs...