Publicidad

Idiomas disponibles

Idiomas disponibles

Enlaces rápidos

2785
2785
AZ
AZ
Portable CD Mini System
BA ND
T U N E R
D IG IT A L
LE C T
C E S E
S O U R
R O N IC
E LE C T
R SY ST EM
EX SP EA KE
BA SS RE FL
Toll Free Help Line
Ligne d'assistance en service libre
Linea de ayuda telefónica sin cargo
800-531-0039

Publicidad

Tabla de contenido
loading

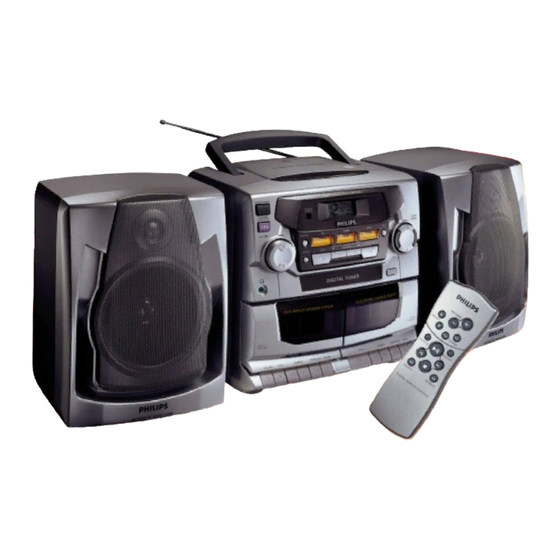
Resumen de contenidos para Philips AZ 2785

  • Página 1 2785 2785 Portable CD Mini System BA ND T U N E R D IG IT A L LE C T C E S E S O U R R O N IC E LE C T R SY ST EM EX SP EA KE BA SS RE FL Toll Free Help Line...
  • Página 2 Return your Warranty Registration card today to ensure you receive all the benefits you’re entitled to. • Once your Philips purchase is • So complete and return the Warranty Registration Card enclosed with your registered, you’re eligible to receive all the privileges of owning a Philips purchase at once.
  • Página 3 TUN ER TAP E PRO G STO P SEA RCH PLA Y/P AU SE BAN D – – SPEAKERS 4 MAINS & for AZ 2765 model only...
  • Página 4 CAUTION Use of controls or adjustments or performance of procedures other than herein may result in hazardous radiation exposure. ATTENTION L’utilisation des commandes ou réglages ou le non-respect des procédures ci- incluses peuvent se traduire par une exposition dangereuse à l’irradiation. ATENCIÓN El uso de mandos o ajustes o la ejecucción de métodos que no sean los aquí...
  • Página 5: Tabla De Contenido

    INDEX English Safety instructions..2, 4 + 6 CD Player ......12-14 Limited warranty .......7 Cassette recorder....15 Controls ........8 Recording ......15-16 Power supply......9 Maintenance ......17 Speakers........10 Troubleshooting.......18 Digital tuner ......11 Français Conseils de sécurité ..4, 19 + 20 Lecteur de CD ....26-28 Garantie limitée ......21 Platine Cassette ......29 Commandes......22...
  • Página 6: Safety Instructions

    IMPORTANT SAFETY INSTRUCTIONS – Read before operating equipment This product was designed and manufactured A polarized plug has two blades with one wider to meet strict quality and safety standards. than the other. A grounding type plug has two There are, however, some installation and blades and a third grounding prong.The wide operation precautions which you should be blade or the third prong are provided for your...
  • Página 7: Limited Warranty

    Adjustments of the controls discussed there may save you a trip. This warranty gives you specific legal rights.You may have other rights which vary from state/province to state/province. Philips Service Solutions Group, P.O. Box 2976, Longview, Texas 75606, (903) 242-4800 EL6095T002 / MAC5433 / 1-97...
  • Página 8: Controls

    CONTROLS TOP AND FRONT PANELS SEARCH ¡ , ™ / 5 , 6 1 POWER - ON/OFF switch CD: - to skip or search a passage/ track 2 DBB (Dynamic Bass Boost) - to enhance backwards or forward bass response Tuner: - to tune to a station (down,up) 3 VOLUME - to adjust volume level PLAY/PAUSE 2;...
  • Página 9: Power Supply

    POWER SUPPLY Whenever convenient, use the power supply if you want to conserve battery life. Make sure you remove the plug from the set and wall outlet before inserting batteries. BATTERIES (OPTIONAL) 1. Open the battery compartment and insert six batteries, type MAIN R-20, UM-1 or D-cells, (preferably alkaline) with the correct polarity as indicated by the "...
  • Página 10: Speakers

    SPEAKERS REMOVABLE LOUDSPEAKERS Taking off the speakers Keep the lever (found on the back corner of the speaker) pressed and slide the speaker upwards. Attaching the speakers Slide the speakers from above into the sleeves on the sides of the cabinet.
  • Página 11: Tuning To Radio Stations

    DIGITAL TUNER TUNING TO RADIO STATIONS 1. Press POWER to on position. 2. Press TUNER source button. – The TUNER indicator lights up. 3. Press BAND once or more to select the desired FM/ AM waveband. 4. To tune to a radio station press SEARCH ¡ or ™ for more than TU NE R 1 second and release when the frequency in the display starts to change.
  • Página 12: Cd Player

    CD PLAYER DISPLAY INDICATION FOR CD FUNCTIONS CD door open CD inserted – In stop mode total track number and total playback time – During CD playback elapsed playback time of current track and current track number – PAUSE elapsed playback time freezes and flashes PROGRAM REPEAT ALL when you program a selected track number...
  • Página 13: Selecting A Different Track

    CD PLAYER PLAYING A CD 1. Press POWER to on position. 2. Press CD source button. – The CD indicator lights up. 3. To open the CD door, press OPEN on the CD door. 4. Insert a CD with the printed side facing up and press the CD door gently to close.
  • Página 14 CD PLAYER DIFFERENT PLAY MODES : SHUFFLE AND REPEAT The SHUFFLE and REPEAT buttons allow you to select various play modes. The modes can be selected or changed during TU NE R TA PE PR OG playback. ST OP SE AR CH PL AY /PA US E SHUFFLE - all tracks are played in random order REPEAT - plays the current track continuously...
  • Página 15: Cassette Recorder

    CASSETTE RECORDER RECORDING PLAYING A CASSETTE 1. Press POWER to on position. 2. Press TAPE source button. TU NE R – The TAPE indicator lights up. TA PE PR OG ST OP 3. Press STOP•EJECT 9/ to open the cassette holder and SE AR CH PL AY /PA US E insert a cassette.
  • Página 16 RECORDING Dubbing: Copying from deck 2 to 1 For best results, use mains power or fresh batteries. 1. Select TAPE source. 2. Press both STOP•EJECT 9/ keys and insert a recorded tape TU NE R TA PE PR OG ST OP into deck 2 and a suitable tape for recording in deck 1.
  • Página 17: Maintenance

    MAINTENANCE PRECAUTIONS AND SYSTEM MAINTENANCE • Place the set on a hard, flat surface so that the system does not tilt. • Do not expose the set, batteries, CDs or cassettes to humidity, rain, sand or excessive heat caused by heating equipment or direct sunlight.
  • Página 18: Environmental Information

    TROUBLESHOOTING If a fault occurs, first check the points listed below before taking the set for repair. If you are unable to remedy a problem by following these hints, consult your dealer or service center. WARNING: Do not open the set as there is a risk of electric shock. Under no circumstances should you try to repair the set yourself, as this would invalidate the warranty.
  • Página 19: Vérification Confirmation De Garantie

    • Dès que l’achat de votre appareil • Remplissez et renvoyez votre carte Philips est enregistré, vous avez droit à d’enregistrement de garantie jointe à tous les avantages dont bénéficient les votre appareil sans tarder.Vous...
  • Página 20: Consignes De Sécurité Importantes

    CONSIGNES DE SÉCURITÉ IMPORTANTES – A lire avant toute utilisation du matériel Ce produit a été conçu et fabriqué en accord Une prise polarisée est dotée de deux lames dont avec des normes de sécurité et de qualité très une plus large que l'autre. Une prise de terre est strictes.
  • Página 21: Garantie Limitée

    Cette garantie vous donne des droits légaux spécifiques et vous pourriez avoir d’autres droits qui varient d’état en état et de province en province. Philips Service Solutions Group, P.O. Box 2976, Longview, Texas 75606, É.U., (903) 242-4800 EL6095T002 / MAC5433 / 1-99...
  • Página 22: Commandes

    COMMANDES PANNEAUX SUPÉRIEUR ET AVANT PLAY/PAUSE 2; - pour démarrer ou 1 POWER - coulisse ON/OFF (marche/arrêt) 2 DBB (Dynamic Bass Boost) - pour améliorer interrompre la lecture CD les graves PROG - pour programmer les plages CD et 3 VOLUME - pour régler le niveau du volume passer en revue le programme 4 CD, TUNER, TAPE - pour sélectionner la CD: - pour programmer les plages CD et...
  • Página 23: Alimentation

    ALIMENTATION Si possible, utilisez l’alimentation secteur pour garantir la longévité des piles. Assurez-vous toujours d’avoir débranché la fiche de l’équipement et de la prise murale avant d’introduire les piles. PILES (EN OPTION) 1. Ouvrez le compartiment piles et introduisez les six piles, type MAIN R-20, UM-1 ou cellules D (de préférence alcaline) de polarité...
  • Página 24: Haut-Parleurs

    HAUT-PARLEURS HAUT-PARLEURS DEMONTABLES Dépose des haut-parleurs Appuyez et enfoncez le levier (au coin arrière du haut-parleur) et faire coulisser le haut-parleur vers le haut. Mise en place des haut-parleurs Faites coulisser les haut-parleurs par le haut en les introduisant dans les coulisses latérales du boîtier. Les haut-parleurs se mettront en position avec un déclic.
  • Página 25: Syntoniseur Numérique

    SYNTONISEUR NUMÉRIQUE SYNTONISATION DES STATIONS RADIO 1. Appuyez POWER pour mettre en marche (on). 2. Appuyez sur la touche de source TUNER. – Le témoin TUNER s’allume. 3. Appuyez une ou plusieurs fois sur BAND pour sélectionner la longueur d’onde FM/ AM désirée. 4.
  • Página 26: Lecteur De Cd

    LECTEUR DE CD AFFICHAGE DES FONCTIONS CD couvercle de lecteur CD ouvert CD inséré – En mode d’arrêt nombre total de plages et durée de lecture totale. – Pendant la lecture de CD temps de lecture écoulé de plage en cours et référence de plage –...
  • Página 27: Lecture D'un Cd

    LECTEUR DE CD LECTURE D’UN CD 1. Appuyez POWER pour mettre en marche (on). 2. Appuyez sur le bouton de source CD. – L’indicateur CD s’allume. 3. Pour ouvrir le couvercle de CD, appuyez sur OPEN pour ouvrir. 4. Insérez un disque CD, section imprimée visible, et appuyez doucement pour fermer le couvercle.
  • Página 28 LECTEUR DE CD DIVERS MODES DE LECTURE: SHUFFLE ET REPEAT Les boutons SHUFFLE et REPEAT vous permettent de sélectionner divers modes de lecture. Les modes peuvent être sélectionnés ou TU NE R TA PE PR OG modifiés en cours de lecture. ST OP SE AR CH PL AY /PA US E...
  • Página 29: Enregistrement

    PLATINE CASSETTE ENREGISTREMENT LECTURE DE CASSETTE 1. Appuyez POWER pour mettre en marche (on). 2. Appuyez sur le bouton de source TAPE. – L’indicateur TAPE s’allume. TU NE R TA PE PR OG 3. Appuyez sur STOP•EJECT 9/ pour ouvrir le compartiment ST OP SE AR CH PL AY /PA US E...
  • Página 30 ENREGISTREMENT Enregistrement: Copie de la platine 2 vers la platine 1 Pour obtenir des résultats optimaux, utilisez l’alimentation secteur ou des piles neuves. TU NE R 1. Appuyez sur le bouton de source TAPE. TA PE PR OG 2. Appuyez sur les deux boutons STOP•EJECT 9/ et insérez une ST OP SE AR CH PL AY /PA US E...
  • Página 31: Entretien

    ENTRETIEN PRÉCAUTIONS ET MAINTENANCE DU SYSTÈME • Placez l’équipement sur une surface plane et dure de sorte que le système ne soit pas disposé sous un certain angle. • Ne pas exposer l’équipement ni les piles ni les CD ni les cassettes à...
  • Página 32: Informations Relatives À L'environnement

    DÉPANNAGE Si une erreur se produit, contrôlez d’abord les points indiqués dans la liste ci-dessous avant d’emmener l’équipement chez le réparateur. Si vous ne parvenez pas à remédier aux problèmes à partir de ces indications, consultez votre concessionnaire ou le centre de service après-vente. ATTENTION: Ne jamais ouvrir vous-même l’équipement au risque de recevoir des chocs électriques.
  • Página 33: Verificación Confirmación De La Garantía Del Dueño

    • Una vez que se registre la compra de • Sírvase llenar y devolver en seguida su aparato Philips, Ud. tiene derecho a la Tarjeta de Registro de la Garantía todas las ventajas correspondientes al empacada con su aparato.
  • Página 34: Instrucciones Importantes De Seguridad

    INSTRUCCIONES IMPORTANTES DE SEGURIDAD – Léalas antes de poner en marcha el equipo EEste producto ha sido diseñado y fabricado para Las que disponen de toma de tierra tienen dos patillas y una tercera que es la de conexión a cumplir normativas rigurosas en materia de calidad tierra.Tanto la patilla más ancha como la toma y seguridad.
  • Página 35: Garantie Limitada

    Esta garantía le otorga derechos legales específicos y usted podría gozar de otros derechos que varían de un estado a otro. Philips Service Solutions Group, P.O. Box 2976, Longview, Texas, U.S.A. 75606, (903) 242-4800 EL6095T002 / MAC5433 / 1-99...
  • Página 36: Controles

    CONTROLES PANELES SUPERIOR Y FRONTAL PLAY/PAUSE 2; - para iniciar o interrumpir 1 POWER - botón deslizante ON/OFF (encendido/apagado) la reproducción de un CD 2 DBB (Dynamic Bass Boost) - para realzar los PROG - para programar pistas y repasar el graves programa 3 VOLUME - para ajustar el volumen...
  • Página 37: Mando A Distancia

    ALIMENTACIÓN Si prefiere puede utilizar el suministro de la red para ahorrar la energía de las pilas. Antes de introducir las pilas asegúrese de que ha desconectado el cable tanto del aparato y como del suministro de la red. PILAS (OPCIONALES) 1.
  • Página 38: Altavoces Desmontables

    ALTAVOCES ALTAVOCES DESMONTABLES Separación de los altavoces Mantenga la palanca (situada en la esquina trasera del altavoz) presionada y deslice el altavoz hacia arriba. Para montar los altavoces Deslice los altavoces desde arriba en las ranuras de los lados de la carcasa.
  • Página 39: Sintonizador Digital

    SINTONIZADOR DIGITAL SINTONIZACIÓN DE EMISORAS 1. Pulse POWER para encender (on). 2. Pulse el botón de fuente TUNER. – El indicador TUNER se enciende. 3. Pulse BAND una o más veces para seleccionar la banda de ondas FM/ AM deseada. 4.
  • Página 40: Reproductor De Cd

    REPRODUCTOR DE CD INDICACIÓN EN PANTALLA DE LAS FUNCIONES DEL CD puerta de la bandeja del CD abierta se ha introducido un CD – En el modo de parada número total de pistas y el tiempo de reproducción total – Durante la reproducción de un CD el tiempo transcurrido de reproducción de la pista actual y el número de pista –...
  • Página 41: Para Reproducir Un Cd

    REPRODUCTOR DE CD PARA REPRODUCIR UN CD 1. Pulse POWER para encender (on). 2. Pulse el botón de la fuente CD. – El indicador CD se enciende. 3. Para abrir la puerta de la bandeja de CD, pulse OPEN en la puerta. 4.
  • Página 42: Modos De Reproducción Diferentes: Shuffle Y Repeat

    REPRODUCTOR DE CD MODOS DE REPRODUCCIÓN DIFERENTES: SHUFFLE Y REPEAT Los botones de SHUFFLE y REPEAT le permiten seleccionar varios modos de reproducción. Los modos se pueden seleccionar o TU NE R TA PE PR OG cambiar durante la reproducción. ST OP SE AR CH PL AY /PA US E...
  • Página 43: Reproductor De Casetes

    REPRODUCTOR DE CASETES GRABACIÓN REPRODUCCIÓN DE UNA CASETE 1. Pulse POWER para encender (on). 2. Pulse el botón de la fuente TAPE. TU NE R – Se enciende el indicador TAPE. TA PE PR OG ST OP 3. Pulse STOP•EJECT 9/ para abrir el sujeta-casetes e SE AR CH PL AY /PA US E insertar una cinta.
  • Página 44: Grabación De Cd Sincronizada (Synchro)

    GRABACIÓN Duplicación: Copiar de la platina 2 en 1 Para obtener los mejores resultados utilice el suministro de la red o pilas nuevas. TU NE R 1. Seleccione la fuente TAPE. TA PE PR OG ST OP 2. Pulse ambos botones STOP•EJECT 9/ e inserte una cinta SE AR CH PL AY /PA US E grabada en la platina 2 y una cinta apropiada en la platina 1.
  • Página 45: Mantenimiento Del Sistema Y Precauciones

    MANTENIMIENTO MANTENIMIENTO DEL SISTEMA Y PRECAUCIONES • Coloque el aparato sobre una superficie firme y lisa para que no se tambalee. • No exponga el aparato, las pilas, los discos compactos o las casetes a la humedad, lluvia, arena o al calor excesivo emitido por las calefactores o la luz del sol directa.
  • Página 46: Resolución De Problemas

    RESOLUCIÓN DE PROBLEMAS Si ocurre una avería, siga primero los consejos que se dan más abajo antes de llevar a reparar el aparato. Si no es capaz de solucionar el problema siguiendo estos consejos, consulte con su proveedor o centro de servicio. ADVERTENCIA: No desmonte el aparato o correrá...
  • Página 47: Class 1 Laser Product

    AZ2785 - Portable CD Mini System PHILIPS CONSUMER ELECTRONICS COMPANY A Division of Philips Electronics North America Corporation Knoxville, Tennessee 37914-1810, U.S.A. Meet Philips at the Internet http://www.philips.com CLASS 1 LASER PRODUCT Printed in China...

Tabla de contenido