Publicidad

Idiomas disponibles
  • ES

Idiomas disponibles

Enlaces rápidos

IR Blitzgerät für Wildkameras
10028945

Publicidad

Tabla de contenido
loading

Resumen de contenidos para Duramaxx 10028945

  • Página 1 IR Blitzgerät für Wildkameras 10028945...
  • Página 2: Tabla De Contenido

    Bedienungsanleitung Warnung / Sicherheitshinweise Grundlegendes Lieferumfang und Geräteübersicht Vorbereitung Gebrauch Hinweise zur Entsorgung / Konformitätserklärung User Manual Mode d‘emploi Manual de instrucciones Istruzioni per l‘uso...
  • Página 3: Warnung / Sicherheitshinweise

    Sehr geehrter Kunde, wir gratulieren Ihnen zum Erwerb Ihres Gerätes. Lesen Sie die folgenden Anschluss- und An- wendungshinweise sorgfältig durch und befolgen Sie diese, um möglichen technischen Schäden vorzubeugen. Für Schäden, die durch Missachtung der Sicherheitshinweise und unsachgemä- ßen Gebrauch entstehen, übernehmen wir keine Haftung. Sicherheitshinweise •...
  • Página 4: Lieferumfang Und Geräteübersicht

    Lieferumfang und Geräteübersicht Hauptgerät Gurt Sender mit Schwanenhals-IR-Sensor Sensor-Halterung 2 x Antenne (für Sender und Blitz) Schutzfolie (x2) Benötigt (optional): Batterie 23A, 12V Bedienungsanleitung) Übersicht über die Bedienteile (S. 4) Work Group Code Switch (Mäuseklavier) Distanz-Sensor Ohne Belegung IR-EXT (Ausgang) Batterie-Check PW SW Batterie-LED...
  • Página 6: Vorbereitung

    Vorbereitung • Einsetzen der Batterien: Es ist empfehlenswert für den Betrieb des BlackFlash Alkaline- Batterien vom Typ „D“ zu benutzen. Setzen Sie vier Stück davon in das Batteriefach ein (siehe S.5). Beachten Sie dabei die korrekte Polarität. Mischen Sie nicht alte mit neuen Batterien.
  • Página 7 • Bringen Sie den BlackFlash an der gewünschten Stelle an. Diese sollte nicht mehr als etwa 20 Meter von der Kamera selbst entfernt sein. Drücken Sie den TEST-Knopf. Die TRANSMIT-LED muss auf voller Helligkeit, um sicherzustellen, dass die Übertragung ein- wandfrei ist und die Entfernung vom Sender nicht zu groß...
  • Página 8: Gebrauch

    Gebrauch Nachdem alle Einstellungen und die Montage vorgenommen wurden und ein Testlauf erfolg- reich durchgeführt wurde, ist das Gerät betriebsbereit. Schalten Sie das Gerät ein. Bevor Sie das Gebiet verlassen, checken Sie nocheinmal, ob alle Öffnungen verschlossen sind (Gummipropfen für die IN- und OUT-Buchsen) und der Licht- Sensor des Senders nicht verdeckt ist.
  • Página 9: Hinweise Zur Entsorgung / Konformitätserklärung

    Hinweise zur Entsorgung Elektroaltgeräte Befindet sich die diese Abbildung (durchgestrichene Mülltonne auf Rädern) auf dem Produkt, gilt die Europäische Richtlinie 2002/96/EG. Diese Produkte dürfen nicht mit dem normalen Hausmüll entsorgt werden. Informieren Sie sich über die örtlichen Regelungen zur getrennten Sammlung elektrischer und elektronischer Gerätschaften.
  • Página 10: Important Safety Instructions

    Dear Customer, Congratulations on purchasing this product. Please read and follow these instructions, in order to avoid damaging the item. We do not cover any damages that may arise from improper use of the item or the disregard of the safety instructions. Important Safety Instructions •...
  • Página 11: Scope Of Delivery

    Overview Scope of Delivery IR Flash main unit Belt Trasmitter with swan neck flash sensor Sensor holder 2 x Antenna (for transmitter and flash) Shielding shield (x2) (optional): Battery 23A, 12V instruction manual) Controls Overview (see p.11) Work Group Code Switch Distance test indicator LED - reserved - IR-EXT (output)
  • Página 13 Preparation Batteries: The device requires 4 pcs good quality D cell Alkaline batteries for the best • result in operation. Do not mix old and new batteries together. After installing batteries according to the polarity mold on the cabinet into the compartment, push the BAT-Check button once and see if the Bat-Test LED lights up to verify the correct battery polarity.
  • Página 14 • Install the BlackFlash at the desired location. This should, however, not be in any gre- ater distance than 50ft from the transmitter/camera team. Press the TEST button. The TRANSMIT LED should lighten up in full brightness to make sure the transmission is flaw- less and the distance is not too great.
  • Página 15 Operation Slide the PW SW of Booster to ON. It always will synchronize with your camera or CCTV for each event. It only consumes a very low power at stand-by mode. Work Groups If you would like to add more wireless boosters to work at a time to get more illumination, you can place unlimited IRX-22BW boosters with a same coding to group together under one trans- mitter.
  • Página 16: Environment Concerns

    Environment Concerns According to the European waste regulation 2002/96/EG this symbol on the product or on its packaging indicates that this product may not be treated as household waste. Instead it should be taken to the appropriate collection point for the recycling of electrical and electronic equipment. By ensuring this product is disposed of correctly, you will hep prevent potential negative consequen- ces for the environment and human health, which could otherwise be caused by inappropriate waste handling of this product.
  • Página 17: Informations De Base

    Chère cliente, cher client, Toutes nos félicitations pour l’acquisition de ce nouvel appareil. Veuillez lire attentivement et respecter les instructions de ce mode d’emploi afin d’éviter d’éventuels dommages. Nous ne saurions être tenus pour responsables des dommages dus au non-respect des consignes et à la mauvaise utilisation de l’appareil.
  • Página 18: Mode D'emploi

    Contenu de l’emballage et aperçu de l’appareil Appareil de base Sangle Transmetteur avec capteur IR en col-de-cygne Fixation du capteur 2 x Antenne (pour le transmetteur et le flash) Cache protecteur (x2) (en option) : piles 23 A, 12 V Mode d’emploi) Apercu des élements de commande (S.
  • Página 20 Préparation • Installation des piles : il est recommandé d’utiliser des piles alcalines de type « D » pour le fonctionnement du BlackFlash. Introduire quatre unités dans le compartiment des piles (cf. p. 5). Bien respecter les polarités. Ne pas associer des nouvelles piles avec d’anciennes.
  • Página 21 • Installer le Blackflash à l’emplacement souhaité. La distance qui le sépare du piège caméra ne doit pas être supérieure à 20 mètres. Appuyer sur le bouton TEST. Si le voyant LED de transmission est très lumineux, cela signifie que la transmission est impeccable et que la distance par rapport au capteur n’est pas trop grande.
  • Página 22: Remplacement Des Piles

    Utilisation L’appareil est prêt à l’emploi une fois que le paramétrage, le montage et le test ont été effec- tués avec succès. Mettre l’appareil en marche. Avant de quitter le périmètre défini, vérifier de nouveau que toutes les ouvertures de l’appareil sont hermétiques (fermetures en caoutchouc pour les prises femel- les IN et OUT) et que le capteur de lumière du transmetteur n’est pas obstrué.
  • Página 23: Information Sur Le Recyclage

    Information sur le recyclage Appareils électriques et électroniques usagés Vous trouverez sur le produit l’image ci-contre (une poubelle sur roues, bar- rée d'une croix), ce qui indique que le produit se trouve soumis à la directi- ve européenne 2002/96/CE. Renseignez-vous sur les dispositions en vigueur dans votre région concernant la collecte séparée des appareils électriques et électroniques.
  • Página 24: Indicaciones De Seguridad

    Estimado cliente: Le felicitamos por la adquisición de este producto. Lea atentamente el siguiente manual y siga cuidadosamente las instrucciones de uso con el fin de evitar posibles daños. La empresa no se responsabiliza de los daños ocasionados por un uso indebido del producto o por haber desaten- dido las indicaciones de seguridad.
  • Página 25: Contenido Del Envío Y Descripción Del Aparato

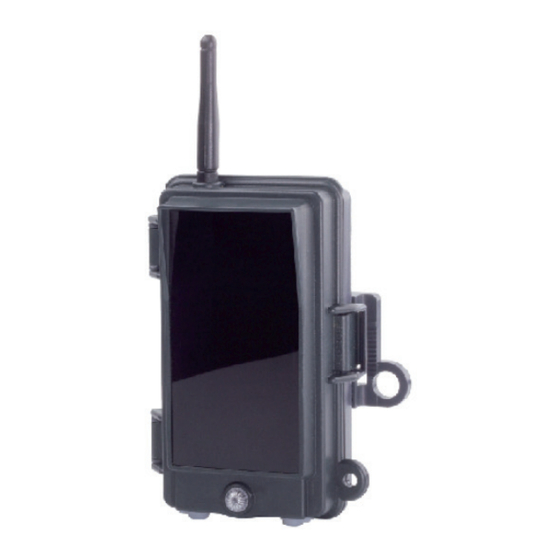
    Contenido del envío y descripción del aparato Dispositivo principal Correa Emisor con sensor flash IR tipo cuello Soporte del sensor de cisne Antenas x2 (para emisor y flash) Plástico protector (x2) (Opcional): pila 23A, 12V Manual de instrucciones) Descripción de las partes (pág. 25) Interruptor para el código del work Sensor de distancia group...
  • Página 27: Preparación

    Preparación • Colocación de las pilas: se recomienda utilizar pilas alcalinas del tipo “D” para el Black- Flash. Introduzca cuatro unidades dentro del compartimento para las pilas (consulte pág. 5). Colóquelas de acuerdo con la polaridad indicada. No mezcle pilas nuevas con otras usadas.
  • Página 28 • Instale el BlackFlash en la localización deseada. Esta no debe situarse a más de 20 m de distancia de la cámara. Pulse el botón TEST. El TRANSMIT-LED debe estar despejado para garantizar que la transmisión se produce sin problemas y que no hay demasiada distancia con respecto al emisor.
  • Página 29: Utilización

    Utilización Una vez haya realizado los ajustes pertinentes, haya finalizado el montaje y la comprobación se haya superado con éxito, el dispositivo estará listo para su funcionamiento. Encienda el aparato. Antes de abandonar la zona, compruebe una vez más que todos los orifi- cios están sellados (tapones de goma para los conectores IN y OUT) y que el sensor de luz del transmisor no esté...
  • Página 30: Indicaciones Para La Retirada Del Aparato

    Indicaciones para la retirada del aparato Si el aparato lleva adherida la ilustración de la izquierda (el contenedor de basura tachado) entonces rige la normativa europea, directiva 2002/96/CE. Este producto no debe arrojarse a un contenedor de basura común. Infórme- se sobre las leyes territoriales que regulan la recogida separada de aparatos eléctricos y electrónicos.
  • Página 31: Avvertenze Di Sicurezza

    Gentile cliente, La ringraziamo per aver acquistato il nostro dispositivo. La preghiamo di leggere attentamente le seguenti istruzioni e di seguirle per evitare eventuali danni. Non ci assumiamo alcuna responsabilità per danni derivati da una mancata osservazione delle avvertenze di sicurezza e da un uso improprio del dispositivo. Avvertenze di sicurezza •...
  • Página 32 Consegna e descrizione prodotto Dispositivo principale Cinghia Trasmettitore a collo d’oca con senso- Supporto sensore re a infrarossi Antenna 2x Schermo protettivo (2x) Opzionale: batteria 23A, 12V Manuale di istruzioni Descrizione dei comandi (p 32) Work Group Code Switch Sensore distanza -inattivo- IR-EXT (uscita) BAT CHECK (controllo batteria)
  • Página 34 Preparazione • Inserire le batterie: si consiglia di utilizzare batterie alcaline di tipo "D". Inserirne quat- tro nel vano batteria apposito (vedi p.5). Rispettare la corretta polarità. Non mischiare batterie nuove e vecchie. Dopo l'inserimento delle batterie, premere BAT CHECK per testare la corretta polarità e il funzionamento delle batterie.
  • Página 35 • Installare il dispositivo nel punto desiderato. Si consiglia di scegliere un punto che non sia distante più di circa 20 metri dalla fotocamera/trasmettitore. Premere il pulsante TEST. Il TRANSMIT-LED deve illuminarsi al massimo, per essere certi che la trasmissione avven- ga senza problemi e che la distanza dal trasmettitore non sia troppo grande.
  • Página 36: Sostituzione Della Batteria

    Utilizzo Dopo che tutte le impostazioni e il montaggio sono stati effettuati e i test sono stati eseguiti con successo, il dispositivo è pronto per l’uso. Accendere il dispositivo. Prima di lasciare l'area, assicurarsi che tutte le aperture siano chiuse (tappo di gomma per le prese IN e OUT) e che il sensore del trasmettitore non sia coperto.
  • Página 37: Smaltimento

    Smaltimento Dispositivi elettrici Se sul prodotto è presente la figura a sinistra (il cassonetto dei rifiuti mobile sbarrato), si applica la direttiva europea 2002/96/CE. Questi prodotti non possono essere smaltiti con i rifiuti normali. Informarsi sulle disposizioni vi- genti in merito alla raccolta separata di dispositivi elettrici ed elettronici. Non smaltire i vecchi dispositivi con i rifiuti domestici.

Tabla de contenido