Napa TW12RHQR Instrucciones De Operación
Tabla de contenido
Idiomas disponibles
Idiomas disponibles
Enlaces rápidos
TW12RHQR
TW12RHQR
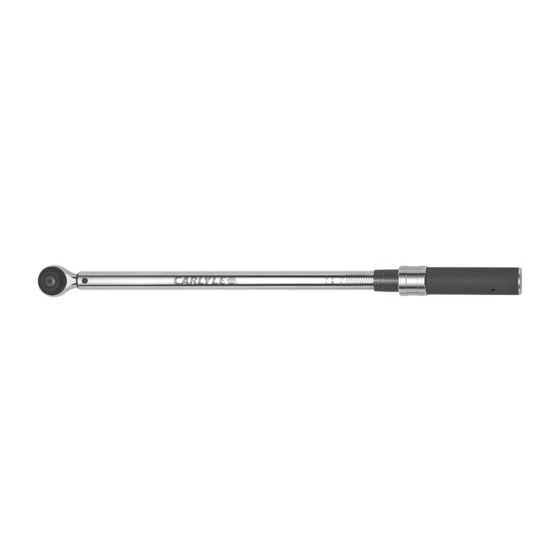
1/2" Round Head Click Style Torque Wrench
1/2" Torque Range . . . . . . . . . . . . . . . . . . . . . . . . . . . . . . . . . . . . . . 30-250 ft. lbs.
Torque Accuracy . . . . . . . . . . . . . . . . . . . . . . . . . . . . . . . . . . . CW±4% CCW±4%
Unit Selection . . . . . . . . . . . . . . . . . . . . . . . . . . . . . . . . . . . . . . . . . . . . Ft.lbs., N-m
Head Type . . . . . . . . . . . . . . . . . . . . . . . . . . . . . . . . . . . . . . . . . . . . . . . . . . . Fixed
Gear Teeth . . . . . . . . . . . . . . . . . . . . . . . . . . . . . . . . . . . . . . . . . . . . . . . . . . . . . 72
TW12RHQR
SPECIFICATIONS
1
WARNING
AlwAys reAd
instructions
before using
tools
AlwAys weAr
sAfety
goggles
not
wAterproof
Rev. 12/16/13
Tabla de contenido

Manuales relacionados para Napa TW12RHQR


Resumen de contenidos para Napa TW12RHQR
-
Página 7: Especificaciones
TW12RHQR TW12RHQR Torquímetros Tipo "Clicker" de Cabeza Redonda 1/2" ESPECIFICACIONES ADVERTENCIA Rango de Torsión 1/2" ......30 N-m / 250 libras-pie sieMpre leA lAs Precisión de Torsión. - Página 8 Nota: Algunos estados no permiten la exclusión ni limitación de daños incidentales ni consecuenciales por lo que la limitación o exclusión anterior puede no ser aplicable para usted. Para servicio de garantía y servicios de recalibrado/certificación, comuníquese con: Torque Wrench Repair Facility 315 Hawkins Rd. Travelers Rest, SC 29690 Phone: 866.496.8423 • Fax: 864.834.6651 NOTA IMPORTANTE SOBRE EL ENVÍO: Para evitar daños durante el envío al momento de devolver su torquímetro para reparaciones, por favor envuelva su torquímetro Carlyle en su estuche moldeado original (si viene incluido con su modelo) y empáquelo seguramente con el fin de que esté resistente a los choques de impacto durante el transporte. TW12RHQR Rev. 12/16/13...
-
Página 9: Características Y Funciones
3. Escala mayor 5. Cuello que bloquea 7. Mango anti-deslizante 2. Cuerpo 4. Escala menor 6. Encaje de trinquete LAS PARTES DE REPUESTO DISPONIBLES COMO: RSTW12RHQREC Tapa terminal para TW12RHQR RSTW12RHQRHRP Equipo de reparación de cabeza RSTW12RHQRCS Estuche moldead por soplado para TW12RHQR para TW12RHQR Ninguna otra parte está disponible debido a la sensibilidad de este modelo profesional. Utilice por favor el centro de reparación alistado bajo la declaración de garantía para todas las reparaciones dentro y fuera de garantía. REPOSICIÓN DEL EQUIPO DE CABEZA... - Página 10 Asegúrese que la marcha se inserte en el lado empotrado de la culata. Ver la fig. 4. Paso 5: Coloque el impulsor completado de la culata sobre una superficie plana. Agarre la placa direccional y oriente el pasador con la punta del resorte en forma de corazón, asegurándose que el pasador se encaje en el hueco. Ver la fig. 5. TW12RHQR Rev. 12/16/13...
- Página 11 Apriete la tuerca, sosteniendo el extremo de del impulsor con la llave. Ver la fig. 7. Fig.7 Paso 8: Instale las partes #9, 8, 7 en dicho orden. Al mismo tiempo que se sostenga estos componentes en su lugar, instale con un tornillo #10 en el centro de los componentes y apriete con un impulsor T-8 hasta que estén plenamente sujetados. El sbore apretado puede afectar cómo el trinquete pueda cambiar de sentido. Ver la fig. 8. Para asegurar que el impulsor esté funcionando, gire la placa direccional de CW a CCW, tomando el tiempo para Fig.8 girar el impulsor en cada sentido. TW12RHQR Rev. 12/16/13...
-
Página 12: Operación
NO intente abrir el mecanismo interno del torquímetro por ningún motivo. Si esto se llegara a pasar, se anularía la garantía. 2. No sumerja el torquímetro en agua ni en ningún otro líquido. 3. Cuando no está en uso, siempre almacene el torquímetro en su estuche protector. Antes de almacenarlo, asegúrese que se haya reajustado el ajuste de torsión nuevamente a cero. Hacer caso omiso podría anular su garantía. 4. Es necesario el recalibrado una vez al año o cada 5000 ciclos para mantener la precisión. El uso de un torquímetro que no sea calibrado regularmente podría ocasionar daños a la herramienta o a la propiedad personal. TW12RHQR Rev. 12/16/13...