Chicco Lullaby Manual Del Propietário
Tabla de contenido
Idiomas disponibles
Idiomas disponibles
Enlaces rápidos
Read all instructions BEFORE
assembly and USE of product.
KEEP INSTRUCTIONS FOR
FUTURE USE.
Lea todas las instrucciones ANTES
de armar y USAR este producto.
GUARDE LAS INSTRUCCIONES
PARA USO FUTURO.
Lullaby
Lullaby LX
Lullaby SE
Owner's Manual
Manual del propietario
©2013 Artsana USA, INC. 03/13
IS0088.3ES
Tabla de contenido

Manuales relacionados para Chicco Lullaby


Resumen de contenidos para Chicco Lullaby
- Página 1 USE of product. KEEP INSTRUCTIONS FOR FUTURE USE. Lea todas las instrucciones ANTES de armar y USAR este producto. GUARDE LAS INSTRUCCIONES PARA USO FUTURO. Lullaby Lullaby LX Lullaby SE Owner's Manual Manual del propietario ©2013 Artsana USA, INC. 03/13 IS0088.3ES...
- Página 21 Assembling Changing Table Instalación de la mesa para cambiar al bebé 14A, B & C. Stretch fabric cover over metal end pieces. Turn changer over and secure underneath with Velcro. Nets face outward. 14A, B & C. Estire los extremos con malla sobre el soporte de metal.
- Página 22 Assembling Changing Table Instalación de la mesa para cambiar al bebé 15A. Attach the two buckles on the end panel of the changing table to the buckles on the long side of the playard. Repeat on other side of changing table. 15A.
- Página 23 Assembling Changing Table Instalación de la mesa para cambiar al bebé 16. Zip the zipper on the side of the changing table to the end panel of the playard. NOTE: All 4 buckles and the zipper must be securely fastened when changing table is in use.
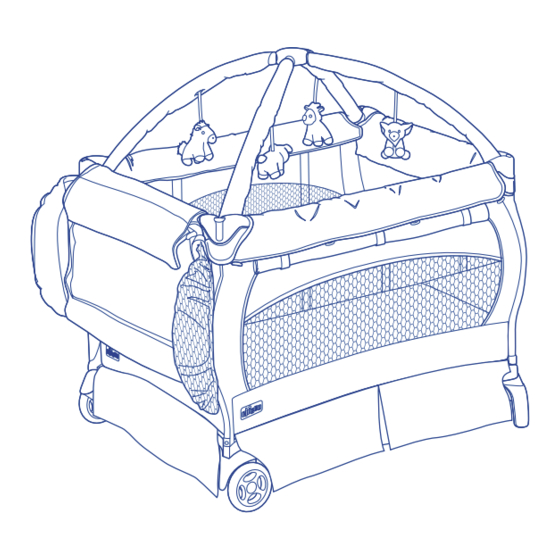
- Página 24 Assembling the Toy Gym Arch Cómo armar el arco del gimnasio para bebés WARNING ADVERTENCIA Recommended use from birth to 5 Uso recomendado: del nacimiento months. The toy gym is intended for hasta los 5 meses. El gimnasio está visual stimulation and is not intended diseñado como estímulo visual y no to be grasped by the child.
- Página 25 Assembling the Toy Gym Arch Cómo armar el arco del gimnasio para bebés WARNING ADVERTENCIA DO NOT attach Toy Gym arch to NO instale el arco del gimnasio de juguetes (Toy Gym) a la colchoneta mattress pad while in playard. del piso mientras está...
- Página 26 Assembling the Toy Gym Arch Cómo armar el arco del gimnasio para bebés 19. Use the hook and loop straps at the end of each toy gym leg. Pass the strap through the D-ring under the mattress pad, and fasten. 19.
- Página 27 Assembling the Toy Gym Arch Cómo armar el arco del gimnasio para bebés 20. Thread Toy strap through button hole on Toy Gym and secure using hook and loop tabs (as shown). Repeat for remaining toys. 20. Pase la correa de cada juguete por el orificio del botón del gimnasio y fíjela mediante el gancho y las lengüetas de bucle (como muestra...
- Página 28 Operate NiteLite Electronics (Select models) Para utilizar los componentes electrónicos NiteLite (modelos selectos) ADVERTENCIA WARNING No mezcle pilas nuevas y viejas. No Do not mix old and new batteries. mezcla pilas alcalinas, comunes Do not mix alkaline, standard (carbono-zinc) o rechargeables (carbon-zinc), or rechargeable (nickel- (niquel-cadmio).
- Página 29 Operate NiteLite Electronics (Select models) Para utilizar los componentes electrónicos NiteLite (modelos selectos) 22. Place Lullaby NiteLite electronics over any corner cap as shown. Press down gently ensuring that it is resting securely into place. DO NOT force. 22. Ponga los componentes electrónicos Lullaby NiteLite sobre...
- Página 30 Operate NiteLite Electronics (Select models) Para utilizar los componentes electrónicos NiteLite (modelos selectos) 23A. The Lullaby NiteLite has (3) modes: SOUND: The SOUND ( ) position plays nature sounds. The SOUND ( selection will cycle through 3 different sounds for 10 minutes and go into standby/sleep mode.
- Página 31 Operate NiteLite Electronics (Select models) Para utilizar los componentes electrónicos NiteLite (modelos selectos) 23. Lullaby NiteLite tiene (3) modos: SONIDO: La posición SONIDO ( reproduce sonidos de la naturaleza. La selección SONIDO ( ) pasará por 3 sonidos diferentes durante 10 minutos y se pondrá...
- Página 32 Operating the Remote Control (Select models) Operación del control remoto (modelos selectos) 24A. To operate the remote control: Slide the power button on the Nitelite to the Melody or Sound position. Point the remote control directly toward the NiteLite. The remote must be within 10 feet of the electronics unit to send a signal.
- Página 33 Operating the Remote Control (Select models) Operación del control remoto (modelos selectos) 24B. With the switch in the MELODY ( ) or SOUND ( ) position you can activate the following: VOLUME: To increase the sound, press the ( ) side of the button. To decrease the sound, press the ( ) side of the button.
-
Página 34: Melodía O Sonido
Operating the Remote Control (Select models) Operación del control remoto (modelos selectos) 24B. Con el interruptor en la posición MELODÍA ( ) o SONIDO ( ) puede activar lo siguiente: VOLUMEN: Presione el lateral ( ) del botón para aumentar el sonido. Presione el lateral ( ) del botón para disminuir el sonido. - Página 35 Operating the Remote Control (Select models) Operación del control remoto (modelos selectos) 25. The bassinet is equipped with a side pocket for the remote control on certain models. 25. La cuna está equipada con un bolsillo en el costado para el control remoto en algunos modelos.
- Página 36 Packing Up the Playard Empaquetado del corralito de juguetes 26. Top rails cannot be unlocked first. Remove bassinet, gym, pad, and NiteLite. Pull up on the center floor hub release strap and lift the center hub up as far as possible. 26.
- Página 37 Packing Up the Playard Empaquetado del corralito de juguetes 28. Pull up on the center floor hub release strap and gather playard legs towards the center. 28. Tire de la correa de liberación de la base central del piso y lleve las patas del corralito hacia el centro.
- Página 38 Packing Up the Playard Empaquetado del corralito de juguetes 30. Keep instructions for future use. 30. Guarde las istrucciones par uso futuro.
-
Página 39: Troubleshooting Guide
Before top rails can be locked, the center floor hub must be pulled up as high as the 4 corners. If needed pull up on the center floor hub release strap. If necessary, pull the release strap up with one hand and lock rails one at a time. Call Chicco Customer Service (p. 54). -
Página 40: Guia De Desperfectos
Los rieles superiores del corralito deben estar completamente en posición vertical y trabados. El piso del corralito debe estar plano. LOS COMPONENTES ELECTRóNICOS LULLABY NITELITE NO CABEN EN LAS TAPAS DE LA ESQUINA: No fuerce los componentes electrónicos sobre las tapas de la esquina. Prueba otra esquina. -
Página 41: Cleaning And Maintenance
Do not dry clean. Periodically wipe clean plastic parts with a soft damp cloth. Always dry the metal parts to prevent the formation of rust if the lullaby has come into contact with water. MAINTENANCE Periodically check the lullaby for loose screws, worn parts, torn material or stitching. -
Página 42: Limpieza Y Mantenimiento
Reemplace o repare las piezas en caso de que sea necesario. Sólo utilice piezas de repuesto de Chicco. Mantenga el corralito en un lugar seco. Si el corralito se moja ábralo y deje que se seque por completo. La exposición prolongada a la luz directa del sol puede hacer que la tela pierda el color y que las piezas plásticas se deformen. -
Página 43: For More Information Más Información
For More Information Más información If you have any questions or comments about this product, or are missing any of the parts. Please do not return this product to the store. Contact us in one of the following ways: Si tiene preguntas o sugerencias sobre este producto, o falta alguna de las partes, no devuelva este producto a la tienda. - Página 44 www.chiccousa.com...