FILL-RITE FR1200C Manual De Operación Y Seguridad
Idiomas disponibles
Idiomas disponibles
Tabla de contenido
FR1200C / FR2400C
FR4200D / FR4400
DC FUEL TRANSFER PUMP
Owner's Operation & Safety Manual
for EXPLOSION-PROOF & RAIN-PROOF
ATEX Certified Models
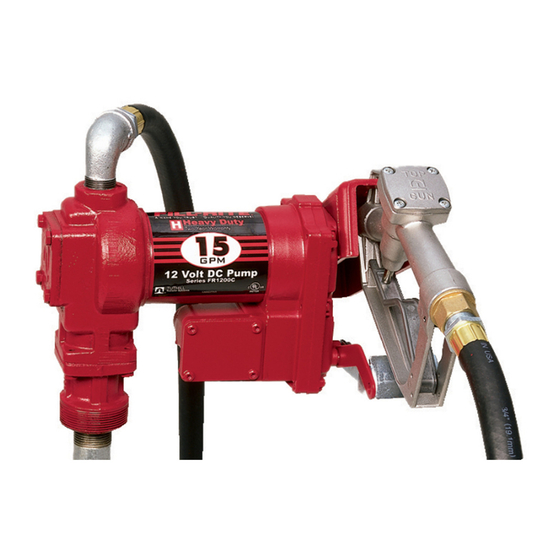
FR1210C
(shown)
SAFETY INSTRUCTIONS
To ensure safe and efficient operation, it is essential to read and follow
each of these warnings and precautions.
1. Do NOT smoke near pump or use pump near an open flame.
Fire could result.
2. Disconnect power to pump before servicing pump.
3. Take motors needing service to an authorized repair shop to
maintain "explosion-proof" and "rain-proof" integrity.
4. A Fill-Rite filter should be used on pump outlet to ensure that no
foreign material is transferred to fuel tank.
5. The pump motor is equipped with thermal overload protection.
If overheated, it will shut itself off without any damage to the
windings. Move ON / OFF lever to the 'OFF' position to reset
pump.
6. Tank or barrel should be anchored to prevent tipping in both
the full and empty conditions.
7. To minimize static electricity build-up, keep nozzle in contact
with container being filled.
DANGER
Electrical wiring should be done by a
licensed electrician in compliance with
local, state and national electrical code
as appropriate. Rigid conduit should be
used and a proper ground must be pro-
vided to avoid the possibility of electrical
shock. Failure to comply with this warn-
ing could result in serious injury and/or
loss of property. Use only static wire,
conductive hose when pumping
flammable fluids.
WARNING
This product should not be used for fluid transfer into aircraft. This
product is not suited for use with fluids for human consumption or
fluids containing water.
FR1211C
(shown)
GENERAL DESCRIPTION
The Fill-Rite Series
FR1200C, FR2400C, FR4200D and FR4400
products are positive displacement, rotary vane pumps. Their rugged
motors are explosion-proof and rain-proof to ensure a long life of
dependability.
PUMPS INSTALLATION INSTRUCTIONS
Use Teflon® Tape on all pipe threads.
Do NOT install additional foot valves or check valves that do
not have a pressure relief valve.
1. Tightly screw suction pipe (1200KTG9099) into inlet flange
(1200F6465) of pumping unit.
2. Extend suction pipe into tank or barrel to within 3" of tank bottom.
Do not rest suction pipe on bottom of tank.
3. Screw inlet flange of pump into tank or barrel opening. Inlet flange
must be completely and securely threaded into an undamaged tank
or barrel bung.
ELECTRICAL INSTALLATION INSTRUCTIONS
1. Install pump. Read and understand all of the electrical wiring
instructions before proceeding.
2. Remove pump's electrical junction box cover and straighten the 3
wires to make the stripped wire ends accessible outside of the
junction box.
3. Install wires from the power source to the junction box according
to all electrical codes. Attach the brown wire to the positive supply
and the blue wire to the negative supply. Use green wire inside
the junction box and the lug on motor to ground / earth / bond
the pump as required by electrical codes.
CAUTION: Do not connect the positive or negative power
to the green wire or external lug as this could cause a
fire.
4. Fold wires into junction box and replace cover making sure the
gasket is in place. Make sure all screws are seated so there is no
space between the cover and the junction box.
For Vehicle Installation
Follow steps 1 through 4 above.
A. Pass the electrical wires to the source of the vehicle power
system, supporting the wires as necessary and protecting it from
sharp edges, heat, and anything that could damage the wires.
B. To determine if the vehicle electrical system is negative (-) or
positive (+) ground, check the battery marking of the terminal that
is wired to the vehicle frame or motor block.
the pump will connect to positive battery post and the blue wire
from the pump will connect to negative battery post.
C. Attach one end of the fuse holder to the end of the ungrounded
wire. Make a solid electrical connection with the other end of the
fuse holder to the ungrounded side of the
electrical connection to the grounded side of the battery with the
remaining pump wire.
cable is recommended.
CAUTION: Do not attempt to power the pump from vehicle
wiring
thinner than 12 gage
wire because these thin wires could overheat and cause a
fire.
D. Check all connections to make sure they are connected per
instructions and all electrical codes. Install the 30 amp slow blow
fuse in the fuse holder. The installation is now complete.
1
The brown wire from
battery. Make a solid
The battery terminal or the end of the battery
such as the cigarette lighter
Tabla de contenido

Manuales relacionados para FILL-RITE FR1200C


Resumen de contenidos para FILL-RITE FR1200C
- Página 5 “certificado a prueba de lluvia”. 4. Se deberá usar un Fill-Rite filtro en la salida de la bomba para asegurare de que no se transfieren materiales extraños al ATENCIÓN: No conecte el terminal positivo o negativo de tanque de combustible.
- Página 6 Para aminorar el aumento constante de electricidad, mantenga boquilla en contacto con el contenedor que se esta llenando. INSTALACIÓN La bomba debe instalarse de conformidad con la norma EN 60079- FR1200C FR2400C FR4200C FR4400C GUÍA DE DESPERFECTPOS Baja capacidad No se puede cebar labomba Excesivo tierra en la rejilla.
-
Página 7: Lista De Piezas
PIEZA ITM PIEZA DESCRIPCIÓN NO. NO. DESCRIPCIÓN 1 1200F6465 Brida de entrada 20 FRH07512 Manguera 3/4"x12pies(FR1200C,FR2400C 2 100F0760 Rejilla FRH10012 Manguera 1" x 12 pies (FR4200D, FR4400) 3 100F0790 Junta de entrada 21 1200KTG9099 Tubo de aspiración, acero (Pesado) 4 1200F2756 Válvula de desvio... - Página 8 Tuthill Transfer Systems ("Fabricante") garantiaz a cada comprador NINGÚN CASO SERÁ EL FABRICANTE RESPONSABLE POR DAÑOS consumidor de sus productos Fill-Rite (el "Comprador"), a contar de CONSECUENTES, NI SERÁ EL FABRICANTERESPONSABLE POR la facturacion o boleta de venta, que la mercancía de su fabricación RECLAMACIONES DE DAÑOS QUE SURJAN DE LA FABRICACIÓN,...