Tabla de contenido
Publicidad
Idiomas disponibles
Idiomas disponibles
Enlaces rápidos
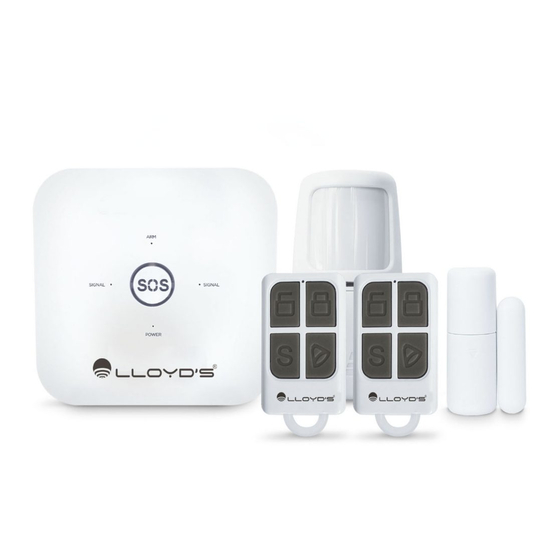
Sistema de alarma inalámbrica
Marca: Lloyd´s
Modelo: LA-543
Lloyd´s te ayuda a hacer tu casa inteligente
Toma el control desde una sola App y convierte tus espacios en lugares
seguros, eficientes, cómodos y divertidos.
GUÍA RÁPIDA DE INSTALACIÓN
FAVOR DE LEER LA PRESENTE GUÍA DE INSTALACIÓN ANTES DE OPERAR SU
PRODUCTO
"La operación de este equipo está sujeta a las siguientes dos condiciones: (1) es posible que este
equipo o dispositivo no cause interferencia perjudicial y (2) este equipo o dispositivo debe aceptar cualquier
interferencia, incluyendo la que pueda causar su operación no deseada".
Publicidad
Tabla de contenido

Resumen de contenidos para Lloyd's LA-543
- Página 1 Sistema de alarma inalámbrica Marca: Lloyd´s Modelo: LA-543 Lloyd´s te ayuda a hacer tu casa inteligente Toma el control desde una sola App y convierte tus espacios en lugares seguros, eficientes, cómodos y divertidos. GUÍA RÁPIDA DE INSTALACIÓN FAVOR DE LEER LA PRESENTE GUÍA DE INSTALACIÓN ANTES DE OPERAR SU PRODUCTO “La operación de este equipo está...
-
Página 2: Introducción
Introducción Este sistema de alarma inalámbrica está diseñado para brindar protección las 24 horas del día durante todo el año. Cuenta con tecnología digital de seguridad avanzada, la cual garantiza una tasa baja de falsas alarmas. Su diseño es simple y de gran durabilidad. Incluye funciones anti-robo, anti-intrusos y de alarma SOS. - Página 3 Diagrama de la unidad principal SIGNAL STATUS POWER Cuando la luz ARM está encendida significa que la alarma está activada. Cuando la luz ARM está apagada significa que la alarma está desactivada. Cuando la luz ARM parpadea significa que la alarma está suspendida. Cuando la luz STATUS parpadea significa que la alarma está...
-
Página 4: Configuración Del Sistema De Alarma
Configuración del sistema de alarma Instale una tarjeta SIM en la ranura correspondiente de la unidad principal. Conecte la unidad principal a la corriente eléctrica a través del adaptador de ca/cc, se escuchará un mensaje de bienvenida. La alarma buscará una red GSM y la luz SIGNAL parpadeará una vez por segundo. Cuando la luz SIGNAL parpadee una vez cada 3 segundos, significará... -
Página 5: Añadir Dispositivo
Añadir dispositivo Abra la App Lloyds Smart, seleccione “+” (esquina superior derecha) (1), elija el tipo de dispositivo que desea añadir, En este caso vaya a “Seguridad” (2), luego haga clic en “Alarma” (3). Conecte el dispositivo, luego presione el bo- tón de reinicio (CDDE) en la unidad principal por 5 segundos. -
Página 6: Añadir Accesorios A La Alarma Desde La App
Añadir accesorios a la alarma desde la App Control remoto: Vaya al menú “Accesorios” dentro de la App. Seleccione “Control remoto”. Haga clic en “Agregar” y presione cualquier botón del control remoto. Una vez añadido el control remoto, puede asignarle un nombre. - Página 7 Cambie la contraseña: Seleccione la opción “Configuración”. Haga clic en la opción “Contraseña” o “Virtual password setting”. La contraseña por defecto es 1234, personalice usando otra numeración. Para confirmar el cambio presione “Save”. Nota: La contraseña es necesaria para la configuración del sistema de alarma vía llamada, SMS y para desarmarla mediante comandos de voz a través del asistente de Google.
- Página 8 Ingrese los números telefónicos para SMS de emergencia: Seleccione la opción “Configuración”. Haga clic en la opción “Numero SMS”. Seleccione el primer espacio de arriba hacia abajo e ingrese el número telefónico (10 dígitos sin lada) al que desee enviar mensaje en primera instancia (puede ingresar hasta 3 números). Una vez que haya ingresado los números que desee, presione “Confirmar”.
-
Página 9: Interfaz De Control
Volumen: Seleccione la opción “Configuración”. Haga clic en “Sonido” mueva el interruptor para silenciar o activar el asistente de voz. Seleccione “Volumen de la sirena”. Elija el nivel de audio que desee y confirme. Interfaz de control Presione “SOS” para activar la alarma. Presione “Desarmado”... -
Página 10: Registro De Eventos
Registro de eventos Seleccione la opción “Registros”. Puede consultar el historial de eventos. Tipos de zona para los sensores Para reducir las falsas alarmas es posible configurar los sensores en alguno de los siguientes 5 tipos de zona: Normal: Los sensores configurados en este tipo de zona sólo ac- tivarán el sistema de alarma al ser detonados si éste se encuentra en los modos “Armado”... -
Página 11: Operación Gsm
Sensores: Presione 2 veces el botón de reinicio (CDDE) de la unidad principal, la luz de SOS se encenderá y el asistente de voz dirá “agregando 1 zona”. Active el sensor hasta escuchar el mensaje “agregado exitoso”. Presione una vez más el botón de reinicio (CDDE) para seguir añadiendo sensores. La alarma soporta hasta 24 sensores. -
Página 12: Instalación Del Sensor Magnético
Instalación del sensor magnético El espacio entre ambas unidades del sensor debe ser menor a 10 mm. Si la luz LED del sensor magnético se enciende cuando la puerta está abierta, significará que fue insta- lado correctamente. Si la luz LED del sensor parpadea cuando se activa, significa que la batería está baja, por favor cámbiela lo antes posible. -
Página 13: Mantenimiento
Mantenimiento El sistema necesita inspecciones periódicas para asegurar su estabilidad y buen desempeño. Sugerimos que se realice una inspección a la alarma cada tres meses y a los detectores cada mes. Unidad principal Verifique que la alarma se pueda armar y desarmar con normalidad. Verifique que la alarma pueda llamar a los números cuando sea activada. - Página 14 Descripción Ejemplo Comando Parámetro [1 para encender / 0 para Encender o apagar envío 121# de SMS de emergencia apagar] Encender o apagar envío [1 para encender / 0 para 151# de SMS del estado del apagar] Wi-Fi Modificar contraseña [Nueva contraseña (4 502222# dígitos)]...
-
Página 15: Tabla De Comandos Para Configuración Vía Sms
Tabla de comandos para configuración vía SMS Para configurar la alarma mediante mensajes SMS siga estos pasos: Envíe un mensaje SMS al número de la tarjeta SIM de la alarma con lo si- guiente: Ingrese [contraseña]+[comando]+[parámetro]+[#] Los siguientes ejemplos tienen la contraseña predeterminada: ‘1234’ Parámetro Descripción Ejemplo... - Página 16 Descripción Ejemplo Comando Parámetro Activar o desactivar envío [1 para encender / 0 para 1234590# de alerta de batería baja apagar] vía SMS Configurar tipo de zona [Zona (01-10)] + [Tipo de zona 1234600220# (1-5)] + [1 para encender / 0 para sensores para apagar] 1: Zona Normal.
-
Página 17: Cómo Conectar Con Alexa
Cómo conectar con Alexa Descargue e ingrese a la App “Amazon Alexa”, previamente configurada con su cuenta de correo electrónico y su asistente virtual. Haga clic en la opción “Skills y juegos”, luego, en la barra de búsqueda escriba Lloyds Smart. Cuan- do obtenga el ícono, haga clic en el mismo. - Página 18 Wireless Wi Fi and GSM Alarm System Brand: Lloyd´s Model: LA-543 Make your home smart with the help of Lloyd’s Take control from one single App, and transform your spaces into safe, efficient, comfortable and fun places. QUICK INSTALLATION GUIDE please read the following installation guide before operating your product “Operation is subject to the following two conditions: (1) This device may not cause harmful interference, and (2) this...
-
Página 19: Main Features
Introduction This wireless alarm system provides protection to your home 24 hours a day, all year round. It has an advan- ced digital security technology, which guarantees a low rate of false alarms. Its design is simple and highly durable. It includes anti-theft, anti-intrusion and SOS alarm functions. It can be used in homes, factories, schools, stores, residential villas, and other areas that need protection. -
Página 20: Electrical Characteristics
Electrical characteristics Parameter Name Static current < 25 mA Alarm current < 450 mA GSM frequency 850 / 900 / 1800 / 1900 MHz Wi-Fi 2.4Ghz Siren 85dB HUB receiving frequency (RF) 433MHz (±75MHz), PT2262/1.5-4.7MΩ; EV1527/300K HUB Transmission Frequency (RF) 433MHz (±75MHz), PT2262/1.5-4.7MΩ;... - Página 21 SIM card slot Current input (not included) On and Off Extern siren input Reset button (not included) (CDDE) Remote control diagram Disarm button Arm button Home button SOS button Alarm system setup Install a SIM card in the corresponding slot of the main unit. Connect the main unit to the power supply through the ca/cc adapter, a welcome message will be heard.
-
Página 22: Add Device
B. Registration and access Run the Lloyd’s Smart App. To register click on “Sign up” (1), to continue click on “Ok”, choose your country and enter an email address, then click on “Get verification code” (2). Enter the code sent to you by mail (see inbox or spam) (3), set a password and click on “Done”... - Página 23 Plug in the device, then press for 5 seconds the reset button (CDDE) on the main unit. Check that the STATUS light on the main unit is flashing quickly and confirm it in the App (4). Enter your Wi Fi network information and its password, click on “Next”...
-
Página 24: Remote Control
Add accessories to the alarm from the App Remote control Go to the “Accessories” menu within the App. Select “Remote control”. Press “Add” and press any remote-control button. Once the control is added you can name it. To delete the remote control just click on the trash icon. Sensors: Go to the “Accessories”... - Página 25 Change the password: Select the “Settings” option. Click on “Password” or “Virtual password setting”. The default password is 1234, customize using other numbers. Press “Save” to save the changes. Note: The password will be required to setup the alarm system via phone call, SMS and to disarm it via Google Assistant voice commands.
- Página 26 Enter emergency SMS numbers: Select “Settings” option. Click on “SMS number”. Select the first space from top to bottom and enter the phone number you want to send the message first (you can enter up to 3 numbers). Once you have entered the numbers chosen, press “Confirm”. Note: In case of emergency the main unit will send an SMS message to all the registered numbers.
-
Página 27: Control Interface
Volume: Select the “Settings” option. Click on “Sound”, move the switch to mute or activate the voice assistant. Select “Siren Volume”. Choose the desired audio level and confirm it. Control interface Press “SOS” to activate the alarm. Press “Disarm” to disarm the system. Press “Arm”... - Página 28 Events record Select the “Record” option. You can consult the events history. Zone types for sensors To reduce false alarms, it is possible to set the sensors in one of the following 5 zone types: Normal: The alarm will only work when it is in “Armed” and “Home”...
- Página 29 Sensors: Press the main unit’s reset button (CDDE) twice, the SOS light will turn on and the voice assistant will say “adding 1 zone”. Activate the sensor until you hear the message “added successfully”. Press the reset button (CDDE) once more to continue adding sensors. The alarm supports up to 24 sensors.
- Página 30 Magnetic sensor installation The distance between both sensor units must be less than 10mm. If the LED light on the magnetic sensor lights up when the door is open, it means that it was installed correctly. If the sensor LED flashes when activated, it means the battery is low and will need to be replaced. The transmission distance of the sensors is less than 100 meters in an open area, test the distance before installing it.
-
Página 31: Motion Sensor
Maintenance The system needs periodic inspections to ensure its stability and good performance. We suggest that an inspection of the alarm is made every three months and every month for the detectors. Main panel Verify that the alarm can be armed and disarmed normally. Verify that the alarm can call the numbers when activated. - Página 32 Description Example Command Parameter [1 to turn on / 0 to turn Turn emergency SMS 121# sending on or off off] [1 to turn on / 0 to turn Turn Wi-Fi status SMS 151# off] sending on or off Modify password [New Password (4 502222# digits)]...
- Página 33 Command table for SMS setup To set up the alarm through SMS messages, follow the steps below: Send an SMS message to the alarm’s SIM card number with the following: Enter [password]+[command]+[parameter]+ [#] The following examples have the default password: ‘1234’ Description Parameter Example...
- Página 34 Descripción Ejemplo Comando Parámetro Activate or deactivate [1 to turn on / 0 to turn 1234590# sending of low battery alert off] via SMS 1234600220# [Zone (01-10)] + [Zone Set up zone type for type (1-5)] + [1 to turn sensors on / 0 to turn off].
-
Página 35: Technical Specifications
How to connect to Amazon Alexa Download and install the “Amazon Alexa” App previously set up with your email account and your virtual assistant. Click on “Skills and Games”, then in the search bar type Lloyds Smart. When you get the icon, click on it. - Página 36 IMPORTADOR / IMPORTED BY: ZUTTO TECHNOLOGIES, S.A. DE C.V. R.F.C.: ZTE161017KT6 AV. EJÉRCITO NACIONAL No. 505 INTERIOR 1602 COLONIA GRANADA, C.P. 11520 MIGUEL HIDALGO, CIUDAD DE MÉXICO, MÉXICO. TELS / PHONE: 55 68447575 / 800 2345693...