Tabla de contenido
Publicidad
Idiomas disponibles
Idiomas disponibles
SELF MONITORING BLOOD GLUCOSE SYSTEM
Owner's
Booklet
Use only with TRUE METRIX
Self Monitoring Blood Glucose
Test Strips
Call for assistance
Monday - Friday, 8AM-8PM
Eastern Standard Time
English or Spanish
1-800-803-6025
www.trividiahealth.com
Manufactured by:
Fort Lauderdale, FL 33309 U.S.A.
© 2018 Trividia Health, Inc.
TRUE METRIX and the Trividia
Health logo are trademarks of
Trividia Health, Inc.
RE4TVH03 Rev. 52
®
Publicidad
Capítulos
Tabla de contenido
Solución de problemas

Manuales relacionados para Trividia Health TRUE METRIX


Resumen de contenidos para Trividia Health TRUE METRIX
- Página 1 SELF MONITORING BLOOD GLUCOSE SYSTEM Owner’s Booklet Use only with TRUE METRIX ® Self Monitoring Blood Glucose Test Strips Call for assistance Monday - Friday, 8AM-8PM Eastern Standard Time English or Spanish 1-800-803-6025 www.trividiahealth.com Manufactured by: Fort Lauderdale, FL 33309 U.S.A.
- Página 2 SELF MONITORING BLOOD GLUCOSE SYSTEM Fast Test Guide 2 simple steps INSERT APPLY TEST STRIP BLOOD SAMPLE For quick reference only, not intended as a substitute for complete instructions. Please read entire Owner’s Booklet and product Instructions for Use before testing. Expected Results for people without diabetes: Plasma Blood Glucose Result Before eating...
- Página 3 INTRODUCTION: TRUE METRIX® Self Monitoring Blood Glucose System TRUE METRIX is a simple, accurate way to test your whole blood glucose (sugar) level, anytime, anywhere. Our goal is to provide quality healthcare products and dedicated customer service. For questions about TRUE METRIX products, visit our web site at: www.trividiahealth.com.
- Página 4 The TRUE METRIX Self Monitoring Test Strips are for use with the TRUE METRIX Self Monitoring Meter to quantitatively measure glucose (sugar) in fresh capillary whole blood samples drawn from the fingertip or forearm. The TRUE METRIX Self Monitoring Meter...
- Página 5 IMPORTANT INFORMATION: For the most accurate results using TRUE METRIX Self Monitoring Blood Glucose System: • Read all product instructions for use before testing. • Use of TRUE METRIX Self Monitoring Blood Glucose System in a manner not specified in this Owner’s Booklet is not recommended and may affect ability to determine true blood glucose levels.
- Página 6 Control Solution are available for Control Tests. Call 1-800-803-6025, Monday - Friday, 8AM-8PM EST, for assistance in obtaining control solution. • The TRUE METRIX Self Monitoring Blood Glucose System is for one person use ONLY. DO NOT share your meter or lancing device with anyone, including family members.
- Página 7 Ensure the test strip vial cap is securely closed. If the product is damaged or the vial cap is not closed, DO NOT use the test strips for testing; product may give inaccurate results. Contact Trividia Health Customer Care at 1-800-803-6025 for replacement and assistance.
-
Página 8: Tabla De Contenido
How to Test Control Solution ..........17 Testing Blood Obtaining a Blood Sample............21 How to Test Blood ..............25 TRUE METRIX System and Laboratory Testing ....29 System Out of Range Warning Messages .......30 Meter Set Up Set Time / Date ................31 Set Event Tags, Ketone Test Alert and Test Reminders ..33 Meter Memory View Averages (7-, 14-, and 30-day) ........36... -
Página 9: Know Your System Meter
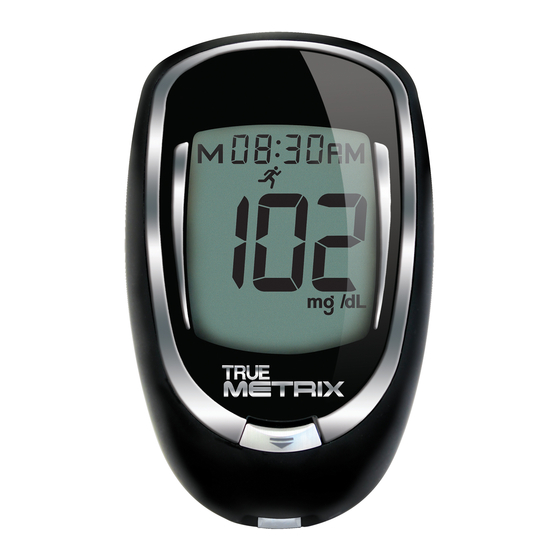
Know Your System Meter Top of Meter ① “ ◀ ” Button Decrease numbers in Meter Set Up; remove ALT Sym- bol; move backward by date/time when viewing results and Averages in Memory; scroll through Event Tags to mark results (if feature on). ②... - Página 10 Front of Meter Back of Meter ① Display Screen Shows results, messages, user prompts, information. ② Test Port Insert TRUE METRIX Test Strip here, contact blocks facing up. ③ Strip Release Button Releases test strip after testing for disposal. ④ Battery Door Use one non-rechargeable 3V lithium battery (#CR2032), positive (“+”) side up...
- Página 11 Full Display Screen 10 11 12 1. Result is from Memory 2. Time, Date 3. Time is AM/PM 4. Event Tag Symbols 5. Result is from 7, 14, or 30 day Average 6. Test Result 7. Control Symbol 8. Battery Symbol 9.
-
Página 12: Test Strip
Test Strip Top of Test Strip ① Contact End - Insert into Test Port with contact blocks facing up. ② Sample Tip - Bring Tip of test strip to top of sam- ple drop (blood or control solution) after Drop Symbol appears in the Display. - Página 13 Test Strip Vial Label May 30, 2018 ① Lot Number (LOT) - Used for identification when calling for assistance. ② Expiration Dates (EXP) - Write date first opened on vial label. Discard vial and unused test strips if either the open vial expiration date or the date printed next to EXP on vial label has passed, whichever comes first.
-
Página 14: Control Solution
Control Solution (Control) Control Solution Bottle Label ① Lot Number (LOT) - Used for identification when calling for assistance. ② Expiration Dates (EXP) - Write date first opened on bottle label. Discard bottle if either 3 months after first opening or date printed next to EXP on bottle label has passed, whichever comes first. -
Página 15: Getting Started
Getting Started Meter comes with pre-set time and date. The Event Tag feature, Ketone Test Alert, and all Test Reminders are off. Before using the meter for the first time or after a battery change, check the time, date, Event Tags, Alert and Reminders, and update as needed (see Meter Set Up). - Página 16 Getting Started (cont.) Event Tags allow you to tag your blood glucose results to link to the following events: Before meal – test was taken just before a meal, After meal – test was taken 2 hours after the start of a meal, Exercise –...
-
Página 17: Quality Control Testing
Quality Control Testing To assure you are getting accurate and reliable results, TRUE METRIX offers two kinds of quality Control Tests. These tests let you know that Contact Blocks your System is working properly Face Up and your testing technique is good. -
Página 18: Control Test
Note: It is important to perform Control Tests with more than one level of control solution. Three levels of TRUE METRIX Control Solution are available for Control Tests. Call 1-800-803-6025, Monday - Friday, 8AM-8PM EST, for assistance in obtaining different levels of control solution. -
Página 19: How To Test Control Solution
How to Test Control Solution Use ONLY TRUE METRIX Control Solution with the TRUE METRIX Self Monitoring Meter and Test Strips. 1. Check dates on control solution label and test strip vial label. Do not use control solution or test strips if expiration dates have passed. - Página 20 5. Insert test strip into Test Port. Meter turns on. Note: If test strip has been out of the vial too long before testing, an error message appears upon insertion of the test strip into the meter. Contact Blocks Face Up Release and discard old test strip.
- Página 21 9. With test strip still in meter, touch Sample Tip of test strip to top of drop of control solution. Allow drop to be drawn into test strip. Remove test strip from drop when meter beeps. 10. Dashes appear across the Display to show meter is testing.
- Página 22 Caution! If Control Test result is outside range, test again. If result is still outside range, system should not be used for testing blood. Call 1-800-803-6025, Monday - Friday, 8AM-8PM EST. 12. After result is shown, Strip Release Button flashes. Hold meter with test strip pointing down.
-
Página 23: Testing Blood
Testing Blood Obtaining a Blood Sample WARNING! • The TRUE METRIX Self Monitoring Blood Glucose System is for one person use ONLY. DO NOT share your meter or lancing device with anyone, including family members. Do not use on multiple patients!! •... -
Página 24: Obtaining A Blood Sample
Obtaining a Blood Sample (cont.) Refer to lancing device Instructions for Use for detailed instructions. • Never share lancets or lancing device. Lancets are for single use only. Do not re-use. • Do not use venous blood for testing. • To help prevent false high results, wash hands before using the system to test blood, especially after fruit has been handled. - Página 25 From Forearm Important Notes Regarding Forearm Testing • Check with your Doctor or Healthcare Professional to see if forearm testing is right for you. • Results from forearm are not always the same as results from fingertip. • Use fingertip instead of forearm for more accurate results: ~ Within 2 hours of eating, exercise, or taking insulin, ~ If your blood sugar may be rising or falling rapidly or...
- Página 26 4. Recap and remove lancet from lancing device. Caution! The used lancet may be biohazardous. Please discard it carefully according to your Doctor or Healthcare Professional's instructions.
-
Página 27: How To Test Blood
How to Test Blood 1. Check dates on test strip vial being used. Do not use if either the open vial expiration date (see test strip Instructions for Use) or the date printed next to EXP on vial label has passed, whichever comes first. - Página 28 5. Lance fingertip or forearm. Allow drop to form (see Obtaining a Blood Sample). 6. With test strip still in meter, touch Sample Tip of test strip to top of blood drop and allow blood to be drawn into test strip. Remove test strip from blood drop immediately after the meter beeps and dashes appear across the Display.
- Página 29 7. After the test is finished, result is displayed. The Strip Release Button flashes. To mark the result with an Event Tag, make sure that Event Tags are turned on Test Result (see Set Event Tags, Ketone Alert and Test Reminders).
- Página 30 8. Hold meter with test strip pointing down. Press test strip Release Button to discard test strip in the appropriate container. Meter turns off. Result is stored in Memory with date and time. Note: Removing test strip before result displays cancels the test.
- Página 31 System blood tests should be performed within 30 minutes of a laboratory test. If you have recently eaten, fingerstick results from the TRUE METRIX Self Monitoring Blood Glucose System can be up to 70 mg/ dL higher than venous laboratory results.
-
Página 32: System Out Of Range Warning Messages
System Out of Range Warning Messages WARNING! Meter reads blood glucose levels from 20-600 mg/dL. If test result is less than 20 mg/dL, “Lo” appears in Display. If test result is greater than 600 mg/dL, “Hi” appears in Display. ALWAYS repeat blood tests to confirm Low (“Lo”) and High (“Hi”) results. -
Página 33: Meter Set Up
Meter Set Up Note: If the meter turns off at any time during Set Up, go back to Step #1 under Meter Set Up and begin again. 1. With meter off, press and hold “ • ” Button until the full Display is shown and a series of beeps sound (after about 10 seconds). - Página 34 4. The month (number) flashes. To change, press “ ▶ ” or “ ◀ ” Button to select the month. Press “ • ” Button to set. 5. The day (number) flashes. To change, press “ ▶ ” or “ ◀ ” Button to select the day.
-
Página 35: Set Event Tags, Ketone Test Alert And Test Reminders
Set Event Tags, Ketone Alert and Test Reminders Meter comes with Event Tags, Ketone Test Alert and all Test Reminders off. Note: If the meter turns off at any time during Set Up, go back to Step #1 under Meter Set Up and begin again. Event Tags Event Tags are used to mark a test result that was taken during a specific event. - Página 36 Test Reminder Up to four Test Reminders per day may be set. Reminder sounds at set time for 10 seconds. Meter comes with all Test Reminders off. To set the Test Reminders: 1. After pressing “ • ” Button to set Ketone Test Alert, Display shows first Reminder setting (A-1).
- Página 37 4. Turn Reminders on and repeat setting the time for next 3 Reminders (if needed). Exit Set-Up Press and hold “ • ” Button until meter turns off. Meter also turns off after 2 minutes of non-use. Set-Up choices are saved. Note: If Test Reminders are set, the Alert Symbol appears in all Displays.
-
Página 38: Meter Memory View Averages (7-, 14-, And 30-Day)
Meter Memory View Averages (7-, 14-, and 30-day) The Averages feature allows you to view the average of all your blood glucose results within a 7-, 14-, or 30-day period. Control Test results are not included in the Averages. You can review the average of your glucose 7-Day results from the last 7-, 14-, or 30-days. -
Página 39: View Memory
View Memory Meter Memory stores 500 results. When Memory is full, the oldest result is replaced with the newest result. 1. Press and release “ • ” Button. Memory Symbol Meter displays 7-, 14- and 30-day Averages. Press and release “ • ” Button again to view most recent Control Test result in Memory. -
Página 40: Care, Cleaning/Disinfecting And Troubleshooting
Care, Cleaning/Disinfecting and Troubleshooting • Store System (meter, control solution, test strips) in Carrying Case to protect from liquids, dust and dirt. • Store in a dry place at room temperature (40°F-86°F) at 10%-80% relative humidity. DO NOT FREEZE. • Do not share your meter with anyone, including family members. - Página 41 To Clean and Disinfect the Meter: 1. Wash hands thoroughly with soap and water. 2. To Clean: Make sure meter is off and a test strip is not inserted. With ONLY Super Sani-Cloth® Wipes (EPA* reg. no. 9480-4), rub the entire outside of the meter using 3 circular wiping motions with moderate pressure on the front, back,...
- Página 42 5. Wash hands thoroughly again after handling meter. 6. Verify that the System is working properly by performing an Automatic Self-Test (see Getting Started). Stop using the meter and call Customer Care for assistance at 1-800-803-6025, Monday - Friday, 8AM-8PM EST, if: •...
-
Página 43: Lancing Device Cleaning And Disinfecting
Lancing Device Cleaning and Disinfecting Cleaning removes blood and soil from the lancing device. Disinfecting removes most, but not all possible infectious agents (bacteria or virus) from the lancing device, including blood-borne pathogens. • Clean and disinfect immediately after getting any blood on the lancing device or if lancing device is dirty. - Página 44 3. To Disinfect: Using fresh wipes, make sure that all outside surfaces of the lancing device remain wet for 2 minutes. Super Sani-Cloths may be purchased at the following places: • Amazon.com, • Officedepot.com or visit your local store, • Walmart.com 4.
- Página 45 • Store at temperatures between 36°F-86°F. DO NOT FREEZE. TRUE METRIX Self Monitoring Test Strip Care • Store test strips in original vial only. Do not transfer test strips to new vial or store test strips outside of vial.
-
Página 46: Changing Battery
Changing Battery A low battery displays Battery Symbol while continuing to function. A dead battery displays Battery Symbol, beeps, and then turns off. To replace battery: 1. Lift tab on Battery Door. 2. Turn meter over, tap gently on the palm of your other hand to loosen and remove battery. -
Página 47: Troubleshooting
Troubleshooting After inserting test strip, meter does not turn on. Reason Action Test strip inserted upside Remove test strip. down or backwards Re-insert correctly. Test strip not fully Remove test strip. Re-insert inserted test strip fully into meter. Test strip error Repeat with new test strip. -
Página 48: Messages
Messages Display Reason Action Repeat with new test strip, using capillary whole blood from the Invalid finger or forearm. If error persists, Hematocrit call 1-800-803-6025, Monday - Friday, 8AM-8PM EST. Move meter and test Temperature strips to area between Error 41°F-104°F;... - Página 49 Display Reason Action Retest with new test strip. If error persists, call 1-800-803-6025, Monday Test Strip - Friday, 8AM-8PM EST. If Error, or very you have symptoms such high blood as fatigue, excess urination, glucose result thirst, or blurry vision (higher than follow your Doctor or 600 mg/dL)
- Página 50 Display Reason Action Do not use meter for testing. Broken Call 1-800-803-6025, Display Monday - Friday, 8AM- 8PM EST. WARNING!! WARNING!! Out of Range Retest with new test - High Results strip. If result is still > 600 mg/dL “Hi” (High) or “Lo” (Low) contact Doctor - Low Results or Healthcare Profes-...
-
Página 51: System Specifications/Chemical Composition
Altitude: Up to and including 10,200 feet Note: Use within specified environmental conditions only. Chemical Composition TRUE METRIX Test Strips: Glucose dehydrogenase-FAD (Aspergillus species), mediators, buffers and stabilizers. TRUE METRIX Control Solution: Water, d-glucose, buffers, viscosity enhancing agent, salts, dye and... - Página 52 Trividia Health, Inc. provides the following Warranty to the original purchaser of the TRUE METRIX Self Monitoring Blood Glucose Meter: Trividia Health Inc. warrants this meter to be free of defects in materials and workmanship at the time of purchase. If the meter is ever inoperative, Trividia Health, Inc.
-
Página 53: References
References American Diabetes Association. Diagnosis and Classification of Diabetes Mellitus. Diabetes Care, Volume 37, Supplement 1, January 2014. FDA Public Health Notification: Use of Fingerstick Devices on More than One Person Poses Risk for Transmitting Blood Borne Pathogens: Initial Communication (2010) http://www.fda.gov/ MedicalDevices/Safety/AlertsandNotices/ucm224025.htm. -
Página 54: Notes
Notes: RE4TVH03 Rev. 52 EN... -
Página 55: Sistema De Automonitoreo De Glucosa En La Sangre
Llame para recibir ayuda Lunes- Viernes, 8AM-8PM EST Inglés o español 1-800-803-6025 www.trividiahealth.com Fabricado por: Fort Lauderdale, FL 33309 U.S.A. © 2018 Trividia Health, Inc. TRUE METRIX y el logotipo de Trividia Health son marcas comerciales de Trividia Health, Inc. RE4TVH03 Rev. 52... -
Página 56: Guía De Prueba Rápida
SISTEMA DE AUTOMONITOREO DE GLUCOSA EN LA SANGRE Guía de prueba rápida 2 pasos simples INSERTE APLIQUE LA LA TIRA MUESTRA DE PRUEBA DE SANGRE Solo para referencia rápida; no se pretende que sea un sustituto del instructivo completo. Lea todo el Manual del propietario y las Instrucciones de uso del producto antes de realizar pruebas. -
Página 57: Introducción
INTRODUCCIÓN: Sistema de automonitoreo de glucosa en la sangre TRUE METRIX® TRUE METRIX es una manera simple y exacta de realizar pruebas del nivel de glucosa (azúcar) en la sangre total, en cualquier momento y en cualquier lugar. Nuestro objetivo es proporcionarle productos para la atención de la salud de alta... - Página 58 La solución de control TRUE METRIX se utiliza con el medidor para automonitoreo y las tiras de prueba TRUE METRIX para verificar que el medidor y las tiras de prueba funcionen de forma adecuada juntos y que la prueba se realice correctamente.
- Página 59 • Use únicamente las tiras de prueba de automonitoreo de glucosa en la sangre TRUE METRIX y la solución de control TRUE METRIX con el medidor de automonitoreo de glucosa en la sangreTRUE METRIX.
- Página 60 INFORMACIÓN IMPORTANTE (continuación): • Realice pruebas de control con más de un nivel de solución de control. La solución de control TRUE METRIX ofrece tres niveles para las pruebas de control. Si necesita asistencia para obtener la solución de control, llame al 1-800-803-6025, Lunes - Viernes 8AM-8PM EST.
- Página 61 Si el producto está dañado o la tapa del frasco no está cerrada, NO use las tiras reactivas para la prueba; el producto puede dar resultados inexactos. Comuníquese con el departamento de atención al cliente de Trividia Health al 1-800-803-6025 para obtener reemplazo y asistencia.
- Página 62 Pruebas de sangre Cómo obtener una muestra de sangre ........21 Cómo analizar la sangre ............25 El sistema TRUE METRIX y las pruebas de laboratorio ..29 Mensajes de advertencia del sistema fuera de la escala ..30 Configuración del medidor Configuración de la fecha y la hora ........31 Configuración etiquetas de evento, alerta de la...
-
Página 63: Conozca El Sistema Medidor
Conozca el sistema Medidor Parte superior del medidor ① Botón “ ◀ ” Disminuye los números de la configuración del medidor, quita el símbolo ALT, retrocede por fecha y hora cuando se visualizan los resultados y los promedios guardados en la memoria;... - Página 64 Muestra resultados, mensajes, instrucciones para el usuario e información. ② Puerto de prueba Inserte la tira de prueba TRUE METRIX aquí, con los bloques de contacto hacia arriba. ③ Botón de liberación de la tira Libera la tira después de la prueba para su eliminación.
- Página 65 Pantalla del visor completo 10 11 12 1. El resultado está en la memoria 2. Fecha y hora 3. La hora indica AM/PM 4. Símbolos de etiqueta de evento 5. El resultado es un promedio a los 7, 14 o 30 días 6.
-
Página 66: Tira De Prueba
Tira de prueba Parte superior de la tira de prueba ① Extremo de contacto: introdúzcalo en el puerto de prueba con los bloques de contacto hacia arriba. ② Punta para la muestra: lleve la punta de la tira de prueba hacia la parte superior de la gota de muestra (sangre o solución de control) después de que aparezca el símbolo de gota en la pantalla. - Página 67 Etiqueta del envase de las tiras de prueba 30 de mayo de 2018 ① Número de lote (LOT): se usa como identificación cuando llama para obtener ayuda. ② Fechas de vencimiento (EXP): anote en la etiqueta del envase la fecha en que lo abrió por primera vez. Deseche el envase y las tiras de prueba sin usar después de la fecha de vencimiento del envase abierto o de la fecha impresa junto a EXP en la etiqueta del envase, lo que suceda primero.
-
Página 68: Solución De Control
Solución de control (control) Etiqueta del frasco de solución de control ① Número de lote (LOT): se usa como identificación cuando llama para obtener ayuda. ② Fechas de vencimiento (EXP): anote en la etiqueta del frasco la fecha en que lo abrió por primera vez. Deseche el frasco si transcurrieron 3 meses después de abierto o de la fecha impresa junto a EXP en la etiqueta, lo que suceda primero. -
Página 69: Cómo Empezar
Cómo empezar El medidor viene con la fecha y la hora preestablecidas. La característica de etiqueta de evento, el alerta de la prueba de cetona y los recordatorios de la prueba están desactivados. Antes de usar el medidor por primera vez o después de cambiar la pila, verifique la fecha, la hora, las etiquetas de evento, los alertas y los recordatorios, y actualícelos según sea necesario (consulte la sección Configuración del medidor). - Página 70 Cómo empezar (continuación) Las etiquetas de evento le permiten etiquetar los resultados de la glucosa en la sangre para vincularlos con los siguientes eventos: Antes de comer: la prueba se realizó justo antes de una comida. Después de comer: la prueba se realizó 2 horas después de una comida.
-
Página 71: Prueba De Control De Calidad
Prueba de control de calidad Para asegurarse de que obtendrá resultados exactos y confiables, TRUE METRIX le ofrece dos clases de pruebas de control de calidad. Estas pruebas le permiten garantizar que el Bloques de sistema funcione correctamente y que contacto la técnica de prueba sea satisfactoria. -
Página 72: Prueba De Control
Prueba de control Recomendamos hacer algunas pruebas de control de práctica antes de usar el medidor por primera vez para realizar una prueba de sangre. Se deberán realizar pruebas de control: • A modo de práctica, para asegurarse de que domina la técnica de pruebas correctamente •... -
Página 73: Cómo Evaluar La Solución De Control
Cómo evaluar la solución de control Use ÚNICAMENTE la solución de control TRUE METRIX con el medidor de automonitoreo TRUE METRIX y las tiras de prueba. Verifique las fechas en la etiqueta de la solución de control y la del envase de las tiras de prueba. - Página 74 Introduzca la tira en el puerto de prueba. El medidor se activará. Nota: Si se dejó una tira fuera del envase por mucho tiempo antes de realizar la prueba, aparece un mensaje de error cuando se la introduce en el medidor. Saque la tira vieja y deséchela.
- Página 75 Con la tira de prueba todavía en el medidor, toque la punta para la muestra de la tira de control en la parte superior de la gota de solución de control. Deje que la gota penetre en la tira de prueba. Separe la tira de prueba de la gota cuando el medidor emita un pitido.
- Página 76 ¡Precaución! Si el resultado de la prueba de control está fuera de la escala, vuelva a realizar la prueba. Si sigue estando fuera de la escala, no se deberá utilizar el sistema para realizar la prueba de sangre. Llame al 1-800-803-6025, Lunes - Viernes 8AM- 8PM EST.
-
Página 77: Pruebas De Sangre
Pruebas de sangre Cómo obtener una muestra de sangre ¡ADVERTENCIA! • El sistema de monitoreo de glucosa en la sangre TRUE METRIX es para el uso de una persona SOLAMENTE. NO comparta su medidor ni su dispositivo de punción, ni siquiera con miembros de su familia. No lo use para varios pacientes. - Página 78 Cómo obtener una muestra de sangre (continuación) Consulte las “Instrucciones de uso” del dispositivo de punción para obtener instrucciones detalladas. • Nunca comparta la lanceta o el dispositivo de punción. Las lancetas son para un solo uso. No vuelva a utilizarlas. • No use sangre venosa para las pruebas. •...
- Página 79 Del antebrazo Notas importantes sobre las pruebas en el antebrazo • Consulte al médico o al profesional de la salud para saber si en su caso puede usar sangre del antebrazo. • Los resultados con esta sangre no siempre son los mismos que con sangre de la yema del dedo.
- Página 80 Vuelva a colocar la tapa y retire la lanceta del dispositivo de punción. ¡Precaución! La lanceta usada puede ser un material con riesgo biológico. Deséchela cuidadosamente según las instrucciones del proveedor de atención médica.
-
Página 81: Cómo Analizar La Sangre
Cómo analizar la sangre Controle las fechas en el envase de las tiras de prueba que está utilizando. No utilizar si el frasco abierto fecha de caducidad (consulte las Instrucciones de uso de las tiras de prueba) o de la fecha impresa junto a EXP en la etiqueta, lo que suceda primero. - Página 82 Realice la punción en la yema del dedo o el antebrazo. Deje que se forme una gota (consulte Cómo obtener una muestra de sangre). Con la tira de prueba todavía en el medidor, toque la punta para la muestra de la tira de prueba con la parte superior de la gota de sangre, para permitir que la sangre penetre en la tira de prueba.
- Página 83 Cuando la prueba ha finalizado, se muestra el resultado. El botón de liberación de la tira parpadea. Para marcar el resultado con una etiqueta de evento, asegúrese de que las etiquetas de evento estén activadas (ver Etiquetas de evento, Alerta de Resultado de la prueba cetona y Recordatorios de la prueba).
- Página 84 Sujete el medidor con la tira de prueba orientada hacia abajo. Presione el botón de liberación de la tira de prueba para desecharla en el recipiente apropiado. El medidor se apaga. El resultado se almacena en la memoria con la fecha y la hora.
- Página 85 Sistema de automonitoreo de glucosa en la sangre TRUE METRIX y prueba de laboratorio Al comparar los resultados del sistema de automonitoreo de glucosa en la sangre TRUE METRIX y un sistema de laboratorio, las pruebas de sangre con el sistema TRUE METRIX deben realizarse dentro de los 30 minutos posteriores a un análisis de sangre de laboratorio.
-
Página 86: Mensajes De Advertencia Del Sistema Fuera De La Escala
Mensajes de advertencia del sistema fuera de la escala ¡ADVERTENCIA! El medidor lee niveles de glucosa en la sangre de 20 a 600 mg/dl. Si el resultado de la prueba es menor que 20 mg/dl, la pantalla del medidor indicará “Lo”. Si el resultado de la prueba es mayor que 600 mg/dl, la pantalla del medidor indicará... -
Página 87: Configuración Del Medidor
Configuración del medidor Nota: Si el medidor se apaga en cualquier momento durante la configuración, vuelva al paso 1 de la sección Configuración del medidor y comience otra vez. Con el medidor desactivado, mantenga presionado el botón “ • ” hasta que aparezca la pantalla completa y se escuche una serie de pitidos (después de aproximadamente 10 segundos). - Página 88 El mes (número) parpadea. Para cambiarlo, presione los botones “ ▶ ” o “ ◀ ” para seleccionar el mes. Presione el botón “ • ” para confirmar. El día (número) parpadea. Para cambiarlo, presione los botones “ ▶ ” o “ ◀ ” para seleccionar el día. Presione el botón “...
-
Página 89: Configuración Etiquetas De Evento, Alerta De La
Configuración etiquetas de evento, alerta de cetonas y recordatorios de la prueba El medidor viene con las etiquetas de evento, el alerta de la prueba de cetona y los recordatorios de la prueba desactivados. Nota: Si el medidor se apaga en cualquier momento durante la configuración, vuelva al paso 1 de la sección Configuración del medidor y comience otra vez. - Página 90 Recordatorio de la prueba Se pueden configurar hasta cuatro recordatorios de la prueba por día. El recordatorio suena a una hora establecida durante 10 segundos. El medidor viene con todos los recordatorios de la prueba desactivados. Para configurar los recordatorios de la prueba: Después de presionar el botón “...
- Página 91 Active los recordatorios y repita la configuración de la hora para los 3 alertas siguientes (si es necesario). Cómo salir de la configuración Mantenga presionado el botón “ • ” hasta que se apague el medidor. El medidor se apaga después de 2 minutos de inactividad.
-
Página 92: Memoria Del Medidor
Memoria del medidor Ver los promedios (a los 7, 14 y 30 días) La función de promedios le permite ver el promedio de todos los resultados de las pruebas de glucosa en la sangre en un período de 7, 14 o 30 días. Los resultados de la prueba de control no se incluyen en los promedios. - Página 93 Cómo ver la memoria La memoria del medidor guarda 500 resultados. Cuando la memoria está llena, los resultados más antiguos se reemplazan por los nuevos. Presione y libere el botón “ • ”. Símbolo de memoria El medidor muestra los promedios de 7, 14 y 30 días.
-
Página 94: Cuidado, Limpieza Y Desinfección Del Medidor
Cuidado, limpieza/desinfección y resolución de problemas • Guarde el sistema (medidor, control de glucosa, tiras de prueba) en el estuche, para protegerlo de los líquidos, el polvo y la suciedad. • Guarde el sistema en un lugar seco a temperaturas ambiente (40 °F y 86 °F) a una humedad relativa entre 10 % y 80 %. NO CONGELAR. - Página 95 Para limpiar y desinfectar el medidor: Lávese las manos cuidadosamente con agua y jabón. Limpieza: asegúrese de que el medidor esté apagado y que no haya tiras de prueba insertadas. Use SOLAMENTE toallitas Super Sani-Cloth® (N.º de registro 9480-4 de la EPA*); frote la parte externa completa del medidor aplicando 3 movimientos de limpieza circulares con presión moderada en...
- Página 96 Lávese las manos cuidadosamente de nuevo después de manipular el medidor. Verifique que el sistema funcione adecuadamente mediante una prueba de verificación automática (ver Cómo empezar). Deje de utilizar el medidor y llame al Departamento de Atención al Cliente al 1-800-803-6025, Lunes - Viernes 8AM-8PM EST, para obtener asistencia si: •...
- Página 97 Limpieza y desinfección del dispositivo de punción La limpieza elimina la sangre y la suciedad del dispositivo de punción. La desinfección elimina la mayoría de los agentes infecciosos (bacterias y virus) del dispositivo de punción, incluso los patógenos contenidos en la sangre, pero no todos. •...
- Página 98 Desinfección: con toallitas nuevas, asegúrese de que todas las superficies externas del medidor permanezcan húmedas durante 2 minutos. Las toallitas Super Sani-Cloth se pueden comprar en los siguientes lugares: • Amazon.com; • Officedepot.com o visite su tienda local, • Walmart.com. Deje secar bien el instrumento de punción al aire antes de usarlo para las pruebas.
- Página 99 Cuidado de la solución de control TRUE METRIX • Anote la fecha de apertura del envase de solución de control en la etiqueta. Deséchelo 3 meses de abierto o después de la fecha impresa junto a EXP en la etiqueta del frasco, lo que suceda primero.
-
Página 100: Cambio De Pila
Cambio de pila Cuando la pila tiene poca carga, aparece el símbolo de pila, aunque seguirá funcionando. Cuando la pila se agota, aparece el símbolo de pila, emite un pitido y luego se apaga el medidor. Para cambiar la pila: Levante la traba del compartimento Baja para la pila. -
Página 101: Resolución De Problemas
Resolución de problemas Al introducir la tira de prueba, el medidor no se activa. Razón Acción La tira de prueba se insertó al Saque la tira. revés, o de atrás para adelante Vuelva a insertarla correctamente. La tira no se introdujo Retire la tira de prueba. -
Página 102: Mensajes
Mensajes Visor Razón Acción Repita con una tira de prueba nueva usando la sangre total Hematocrito capilar del dedo o el antebrazo. no válido Si el error persiste, llame al 1-800-803-6025, Lunes - Viernes 8AM-8PM EST. Antes de realizar la prueba, Error de mueva el medidor y las tiras temperatura... - Página 103 Visor Razón Acción Repita la prueba con una tira de prueba nueva. Si el error persiste, Error de la tira de llame al 1-800-803-6025, Lunes - prueba o resultado Viernes 8AM-8PM EST. Si tiene de la glucosa en síntomas como fatiga, micción sangre muy alto excesiva, sed o visión borrosa, siga (superior a...
- Página 104 Visor Razón Acción No utilice el medidor para realizar pruebas. Visor Llame al 1-800-803-6025, roto Lunes - Viernes 8AM-8PM EST. ¡ADVERTENCIA! ¡ADVERTENCIA! Resultados Repita la prueba con una fuera de la tira de prueba nueva. Si el escala resultado sigue siendo - Resultados “Hi”...
-
Página 105: Especificaciones Del Sistema/Composición Química
Hematocrito: 20 % a 70 % Altitud: hasta 10 200 pies inclusive Nota: Usar únicamente en las condiciones ambientales especificadas. Composición química Tiras de prueba TRUE METRIX: glucosa deshidrogenasa- FAD (especies de Aspergillus), mediadores, excipientes y estabilizadores. Solución de control TRUE METRIX: agua, d-glucosa, excipientes, agente que mejora la viscosidad, sales, anilina y conservantes. - Página 106 Garantía limitada para toda la vida del sistema de automonitoreo TRUE METRIX Trividia Health, Inc. ofrece la siguiente garantía al comprador original del medidor de glucosa en la sangre de automonitoreo TRUE METRIX: Trividia Health, Inc. garantiza que este medidor no posee defectos de materiales o de fabricación en el momento...
-
Página 107: Referencias
Referencias American Diabetes Association. Diagnosis and Classification of Diabetes Mellitus. Diabetes Care, volumen 37, suplemento 1, enero de 2014. FDA Public Health Notification: Use of Fingerstick Devices on More than One Person Poses Risk for Transmitting Blood Borne Pathogens: Initial Communication (2010) http://www.fda.gov/MedicalDevices/Safety/ AlertsandNotices/ucm224025.htm. -
Página 108: Notas
Notas: RE4TVH03 Rev. 52 SP...