Velocity Exercise CHR-301 Manual Del Usuario
Remadora
Tabla de contenido
Idiomas disponibles
Idiomas disponibles
Enlaces rápidos
Series / Serie / Série
_________________
Write the serial number in the space above for future reference
Escriba el número de serie en el espacio de arriba para referencia futura
Écrivez le numéro de série dans l'espace ci-dessus pour référence future
Series
Serie
Série
r
QUESTIONS?
¿PREGUNTAS?
1-877-227-0955
Call:
Monday – Friday from 9 – 5 PM (CST)
Email: customerservice@capbarbell.com
Website: www.capbarbell.com;
CAP Barbell
10820 Westpark Dr.
Houston, TX 77042
WARNING!
SERIOUS INJURY OR
DEATH CAN OCCUR IF CAUTION IS NOT
USED. To reduce the risk of serious injury, read
all important precautions and instructions in this
manual and all warnings on your product before
using it. FOR HOME USE ONLY
¡CUIDADO!
HERIDAS GRAVES O
MUERTE PUEDEN OCURRIR SI NO USA
PRECAUCIÓN. Para reducir el riesgo de
lesiones graves, lea todas las precauciones e
instrucciones importantes de este manual y todas
las advertencias sobre el producto antes de
usarlo. PARA USO EN EL HOGAR SOLAMENTE
ATTENTION !
UNE MAUVAISE
UTILISATION DE CETTE MACHINE PEUT
CAUSER DES BLESSURES GRAVES OU LA
MORT. Pour réduire le risque de blessure grave,
lisez toutes les précautions importantes et des
instructions dans ce manuel et tous les
avertissements sur le produit avant utilisation.
POUR L'USAGE DOMESTIQUE SEULEMENT
ROWER / REMADORA / RAMEUR
Model Number:
CHR-301
Número de Modelo:
Numéro de modèle :
1
OWNER'S MANUAL
MANUAL DEL USUARIO
MANUEL DE MONTAGE
275 lb
Maximum weight capacity:
Peso máximo:
124 kg
Charge maximale:
Tabla de contenido

Manuales relacionados para Velocity Exercise CHR-301


Resumen de contenidos para Velocity Exercise CHR-301
- Página 1 MORT. Pour réduire le risque de blessure grave, lisez toutes les précautions importantes et des Model Number: instructions dans ce manuel et tous les CHR-301 Número de Modelo: avertissements sur le produit avant utilisation. Numéro de modèle : POUR L’USAGE DOMESTIQUE SEULEMENT...
-
Página 2: Tabla De Contenido
TABLE OF CONTENTS - INDICE - LE CONTENU Section: 1 ......................................WARNINGS ADVERTENCIAS AVERTISSEMENTS 2 ..............................WARNING DECAL PLACEMENT ETIQUETAS DE ADVERTENCIA VIGNETTES D’AVERTISSEMENT 3 ......................................MAIN PARTS PARTES PRINCIPALES PIÈCES PRINCIPALES 4 .......................................HARDWARE FERRETERIA MATÉRIEL 5 .......................................PARTS LIST LISTA DE PARTES LA LISTE DU PIÉCES 6 ..................................EXPLODED DRAWING DIBUJO DE DESPIECE VUE ÉCLATÉE... -
Página 4: Advertencias
1. ¡ADVERTENCIAS! ADVERTENCIA: HERIDAS GRAVES O MUERTE PUEDEN OCURRIR SI NO USA PRECAUCIÓN. Para reducir el riesgo de lesiones graves, lea todas las precauciones e instrucciones importantes de este manual y todas las advertencias sobre el producto antes de usarlo. El nivel de seguridad del equipo se puede mantener sólo si se examina regularmente para detectar daños y desgaste. -
Página 6: Warning Decal Placement
Note: The decal(s) may not be calcomanía en el lugar indicado. Nota: Appliquez la décalcomanie au bon Puede que las calcomanía(s) no sea mostrada endroit. Remarque: l'étiquette (s) n'est pas shown at actual size. en su tamaño real. montré à la taille réelle. CHR-301... -
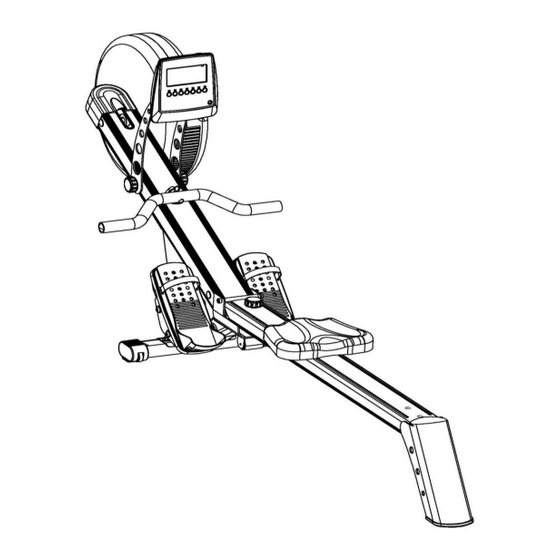
Página 7: Main Parts Partes Principales Pièces Principales
3. MAIN PARTS PARTES PRINCIPALES PIÈCES PRINCIPALES If you have any questions after reading this manual, please see the front cover of this manual. To help us assist you, note the product model number before contacting us. Before reading further, please familiarize yourself with the parts that are labeled in the drawing below. -
Página 8: Hardware
HARDWARE / FERRETERIA / MATÉRIEL Below are the hardware and main parts that are included with your product. If a part is not in the hardware kit, please check to see if it has been preassembled. Ver abajo las piezas pequeñas y partes principales incluidas con el producto. Si una parte no está en el juego de accesorios, comprobar para ver si ha sido pre-ensamblado. -
Página 9: Parts List
PARTS LIST / LISTA DE PARTES / LA LISTE DU PIÉCES... - Página 14 EXPLODED VIEW / DIBUJO DE DESPIECE / VUE ÉCLATÉE...
-
Página 16: Assembly
ASSEMBLY / ENSAMBLAJE / ASSEMBLER... -
Página 20: Exercise Guidelines
EXERCISE GUIDELINES Before beginning any exercise program, consult your physician. This is especially important for persons over age 35 or persons with pre-existing health problems. For models with heart rate monitors: The pulse sensor is not a medical device. Various factors, including the user’s movement, may affect the accuracy of heart rate readings. The pulse sensor is intended only as an exercise aid in determining heart rate trends in general. -
Página 23: Instrucciones De Uso
9. INSTRUCCIONES DE USO ALMACENAMIENTO Y CONSERVACIÓN Mantenga el equipo en un lugar seco con la menor variación de temperatura posible. Trate de proteger el equipo del polvo y desenchufe siempre cuando no esté en uso (si aplica). LIMPIEZA Utilice un paño caliente, húmedo para limpiar las superficies. Un detergente suave se puede utilizar si es necesario. NUNCA QUITE LA CARCASA PROTECTORA. -
Página 34: Instrucciones De Uso Del Monitor
10. INSTRUCCIONES DE USO DEL MONITOR SM5806-64 MANUAL DE INSTRUCCIONES Para un ejercicio simple, no siempre es necesario seleccionar un programa de entrenamiento ni ajustar la hora, la distancia o cualquier otro valor. Usted puede simplemente comenzar a remar. Tan pronto como el monitor esté conectado a la fuente de alimentación, una señal acústica suena y todas las pantallas se iluminan con LCD durante 2 segundos (Dibujo 1). -
Página 35: Visualizacion
Si no se pulsa ningún botón y los pedales no se mueven por unos 4 minutos, la pantalla LCD de monitor se apagará. El sistema se detiene y se guardará todos los ajustes del ejercicio y datos. Cuando el remero está encendido la próxima vez, se continuará con el último cálculo. PANTALLA Y FUNCIONES DE LOS BOTONES VISUALIZACION ARTICULO... - Página 36 Los siguientes ejercicios están disponibles: • Entrenamiento Manual (entrenamiento sin programas) • Entrenamiento con programas (hay 12 programas preestablecidos, P01 ~ P12) • Entrenamiento con el programa de ritmo cardíaco (H.R.C) • Entrenamiento con el programa de competencia (RACE) • Entrenamiento con su propio programa (programa de usuario) Empezar hacer ejercicio inmediatamente (MANUAL) Cuando el remero está...
- Página 37 Tan pronto como el valor de TIEMPO cuente regresivamente a 0:00, la computadora se detendrá junto y habrá un sonido de alarma durante 8 segundos. Pulse cualquier botón para detener la alarma. -Usted Puede ajustar el nivel de resistencia de 1~16 en las paletas mientras rema pulsando la tecla UP/DOWN.
- Página 38 -Con el programa TARGET, se mostrara el valor preseleccionado 100 (Dibujo 8). Presione UP & DOWN para ajustar un valor entre 30 ~ 230 y confirmar con ENTER. El programa se ha guardado. -Establecer el tiempo TIME de la sesión deseada con UP & DOWN (Dibujo 9) y pulse el botón ENTER para confirmar.
- Página 39 -Pulse START/STOP para iniciar. La computadora mostrará USER y PC. La columna de PC muestra la distancia de PC y la columna de USER muestra la distancia remada. (Dibujo 12). -Pulse UP/DOWN para ajustar el nivel de resistencia. Cuando el PC o el USUARIO terminen la distancia establecida de remo en primer lugar, la computadora se detendrá...
- Página 40 Fase de recuperación Se recomienda finalizar una sesión de remo intensivo con una fase de recuperación. Durante esta fase usted debería ser capaz de relajarse y remar sin una fuerte resistencia hasta que su pulso se desacelere cerca de su ritmo normal. Pulse RECOVERY (RECUPERACIÓN) y use la correa del pecho.
-
Página 41: Transmisor De Frecuencia Cardiaca
TRANSMISOR DE FRECUENCIA CARDIACA ACCESORIOS Y UNIONES Transmisor de Frecuencia Cardiaca Banda elástica Batería de Litio CR2032 3V Cojinete de Goma de Batería Tapa de la Batería COLOCACIÓN DEL TRANSMISOR DE FRECUENCIA CARDIACA Instale una batería CR2032 en la parte posterior según se ilustra, coloque el transmisor de frecuencia cardiaca y ajuste la banda elástica de modo que se adapte a la región del tórax cómodamente según se ilustra. - Página 42 El cojinete de goma (Anillo en O) asegura una protección impermeable del compartimiento de la batería. Cerrar Abrir Punto de control PUNTOS IMPORTANTES Cierre la tapa de la batería firmemente tal como se ilustra a continuación a fin de evitar que el sudor y la humedad perjudiquen la composición de la misma.
-
Página 53: Maintenance
MAINTENANCE IMPORTANT: The safety and integrity designed into this machine can only be maintained when the equipment is regularly examined for damage and repaired. It is the sole responsibility of the user/owner to ensure that regular maintenance is performed. Worn or damaged components shall be replaced immediately and stop using the equipment until the repair is made. -
Página 54: Instrucciones De Reemplazo De La Batería
BATTERY REPLACEMENT INSTRUCTIONS Open the battery compartment cover (Diagram 1). Remove battery by pulling the battery in direction of spring and lift opposite end upwards (Diagram 2). Insert 4 AA batteries ensuring you match the polarity markings (+ and -) on the batteries with the indicators in the battery compartment. -
Página 55: Ordering Replacement Parts
12. LIMITED WARRANTY GARANTÍA LIMITADA GARANTIE LIMITÉE ORDERING REPLACEMENT PARTS To order replacement parts, please see the front cover of this manual. To help us assist you, be prepared to provide the model number, name of the product and the part number or description of the replacement part. PEDIDO DE PIEZAS DE REPUESTO Para pedir piezas de repuesto, por favor vea la portada de este manual.